OAuth Clients
Register and manage OAuth clients for the applications and services that need to call Coralogix APIs on a user's behalf. Each client represents a specific integration, gets its own credentials, and inherits the permissions of the user who authorizes it.
Early access
OAuth Clients is available to early-access customers. To request access, contact us via our in-app chat or by emailing [email protected].
Viewing OAuth clients requires the OAuth Clients: Read (OAUTH_CLIENT_READ) permission; creating, editing, rotating, or deleting them requires OAuth Clients: Manage (OAUTH_CLIENT_MANAGE). If you don't see OAuth Clients under Settings, ask your administrator.
This article walks through registering a client, reviewing the clients in your account, and revoking access. For the protocol-level details, see OAuth 2.1.
Ready to get started?
Add your first client: Add an OAuth client.
Why use OAuth Clients
An OAuth client is a safer, more manageable way to give an application programmatic access than a long-lived API key or a shared username and password. Typical consumers are CLI tools, internal integrations, MCP applications and AI agents, automation workflows, embedded Coralogix views inside your own application, and read-only displays such as a dashboard on a wall-mounted screen — anything that acts on a user's behalf without a browser session.
Each client gives you:
- Least-privilege, short-lived access. A client issues short-lived access tokens scoped to what the integration needs — no all-powerful key sitting in a script or config file. Each token inherits the authorizing user's permissions, narrowed further by a read-only or full-access preset and an optional team restriction, so the client can never do more than the user, and a leaked token is limited in both reach and lifetime.
- Per-client control and clear attribution. Disable, delete, or rotate the secret for one client without touching any other integration or rotating a shared key — revocation takes effect immediately. Coralogix logs every action under the authorizing user and tags it with the client ID, so you can tell third-party integration activity apart from web UI activity.
- Standards-based. Clients use standard OAuth 2.1 flows — including PKCE for public clients and refresh tokens for long-lived integrations — so they work with the OAuth libraries and tooling you already have.
Each client maps to a single user's identity, much like a personal API key. Service-to-service clients — which map to a team identity, like a shared team key — are coming soon.
How OAuth Clients work
Coralogix issues tokens against a user delegation model: an access token inherits the permissions of the user who authorized the client. Any change to that user's role, team membership, or status applies to the token immediately. Two things follow from this:
- Pick the authorizing user carefully. A client can never do more than that user can.
- Treat access tokens as short-lived credentials. Don't store them long term — refresh them through the token endpoint instead.
A client uses one of two authentication methods:
- Confidential — stores a client secret on the server and sends it when exchanging the authorization code. Use this for backend services that can keep a secret.
- Public — can't store a secret (mobile apps, browser tools, CLI tools), so it secures the exchange with Proof Key for Code Exchange (PKCE).
Add an OAuth client
To register a client, open Settings and select OAuth Clients, then select Create OAuth client to open the Create a new OAuth client drawer. Enter a name, select a client type, configure the sections that apply to that type, then create the client.
Client name
Enter a Client name (for example, backend-service). Coralogix shows the name to users at consent time and on the clients list.
Client type
Directly below the name, select how the application accesses Coralogix:
- User-authorized app — a user-facing OAuth 2.1 flow where the user authorizes the app at consent time. This is the default, and the sections that follow describe it.
- Embedded — embeds Coralogix views in your own application using iframe token authentication. See Embedded client type below. (Early access — see the note in that section.)
- Service to service — machine-to-machine access with no user interaction. The card is labeled
Coming soonand is not yet selectable.
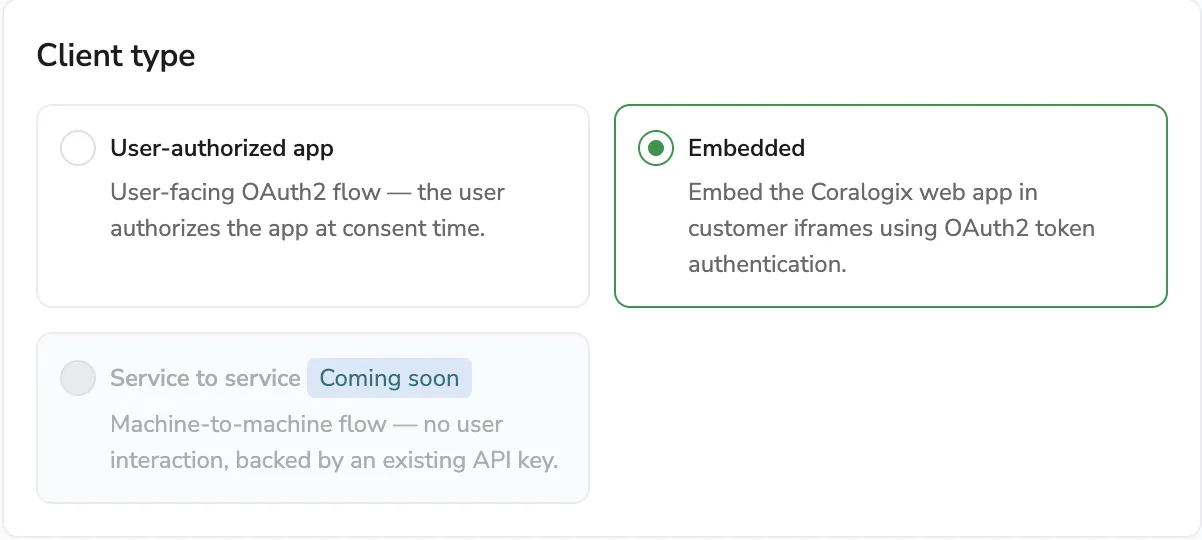
Selecting a client type shows only the sections that apply to it. Choosing Embedded, for example, hides the Require client secret, Team access, Access permissions, and refresh-token sections that don't apply.
The remaining sections below apply to a User-authorized app client.
Require client secret
Leave Require client secret on for a confidential client that runs on a server and can store a secret. Turn it off for a public client that authenticates with PKCE — Coralogix skips secret generation and the integration must include a code_verifier on token exchange. Use a public client without a secret only for trusted client-side or local applications.
Team access
Configure two sub-blocks:
- Team selection — set how many teams the user picks at consent:
- Single team — the user picks exactly one team.
- Multiple teams — the user can pick any team they belong to.
- Team restrictions — optionally restrict which teams or organizations the client can act on. Leave the picker empty to allow every team in your organization (the row shows an All teams badge on the list page as a reminder). Selecting an organization covers every team under it, including teams added later.
Access permissions
Pick a preset:
- Read-only access (the safer default) — the client can read data on the user's behalf but cannot modify or delete.
- Full access — the client acts as the authorizing user, with the full weight of their permissions.
Note
Full access lets the application modify and delete data on the user's behalf, not just read it. Grant it only when the integration needs to write.
Token settings
Configure each token type in its own sub-block:
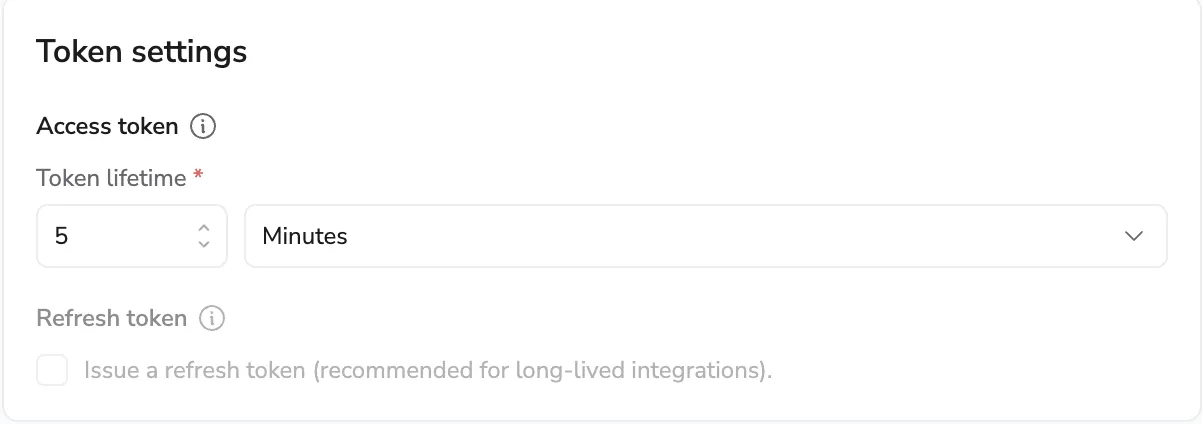
- Access token — the short-lived token an integration uses to call Coralogix APIs on behalf of the user. Once it expires, the integration must use a refresh token or re-authenticate.
- Token lifetime — how long an issued access token stays valid. Default
1 Hour. Use shorter lifetimes to limit exposure if a token leaks, or longer ones to reduce how often the integration refreshes.
- Token lifetime — how long an issued access token stays valid. Default
- Refresh token — a long-lived token that automatically obtains new access tokens without asking the user to log in again. Recommended for integrations and automation.
- Issue a refresh token is off by default. Turn it on for long-lived integrations that need to renew access without user interaction; leave it off for short-lived flows where re-authentication is acceptable.
- Token lifetime (refresh) — how long a refresh token can mint new access tokens. Visible only when refresh tokens are enabled. Default
7 Days. Higher values trigger an inline warning that scales with the lifetime — see Long-lived refresh token warnings below.
Allowed redirect URIs
For User-authorized app clients, add one or more callback URLs. A redirect URI is where Coralogix sends the user after they complete login and consent; register more than one when the same application runs across different environments or platforms.
- Coralogix requires HTTPS. The only exception is
http://localhostorhttp://127.0.0.1for CLI and native clients (the loopback exception in RFC 8252). - Wildcards are not allowed — register each callback URL explicitly.
- The drawer shows inline format examples for common patterns:
- Local development (
http://localhost) - Production application (
https://myapp.company.com) - Desktop/CLI callback flows
- Staging environments
- Local development (
Embedded client type
Early access
The Embedded client type is rolling out to selected accounts. If you don't see Embedded in the Client type selector, contact us via our in-app chat or by emailing [email protected].
Select Embedded to display a fully authenticated Coralogix dashboard inside an <iframe> in your own application — a customer portal, an internal dashboard, or an unattended display such as a NOC wall or a kiosk monitor — with no interactive login. A trusted server-side process in your environment establishes the session on the dashboard's behalf, so the view appears and stays authenticated without anyone signing in.
An embedded client reuses the Client name and an access-token lifetime from a standard client, and hides the sections that don't apply: Require client secret, Team access, Access permissions, and the refresh token. It adds the user-mode and allowed-origins sections described below.
How embedded sessions work
The embedded flow keeps your integration credentials off the browser entirely:
- Your page loads a Coralogix dashboard in an iframe.
- Your server requests a short-lived, single-use challenge code from Coralogix, authenticating with your client ID and secret — credentials that never leave your server.
- Your server delivers the challenge code to the iframe, which exchanges it with Coralogix for a session.
- The dashboard renders. Before the session expires, the iframe signals your application that it needs a new code; your server mints a fresh single-use code and passes it back, so the session renews in the background and the dashboard never reloads or goes blank.
A challenge code is single-use and short-lived, so an intercepted code is useless, and the browser never holds a long-lived credential. Coralogix accepts a session only from the website origins you register (see Allowed origins). Each embedded session is scoped to the single team it was configured for and acts with its configured user's permissions, and disabling the client takes effect immediately — any outstanding codes stop working.
Delegated access
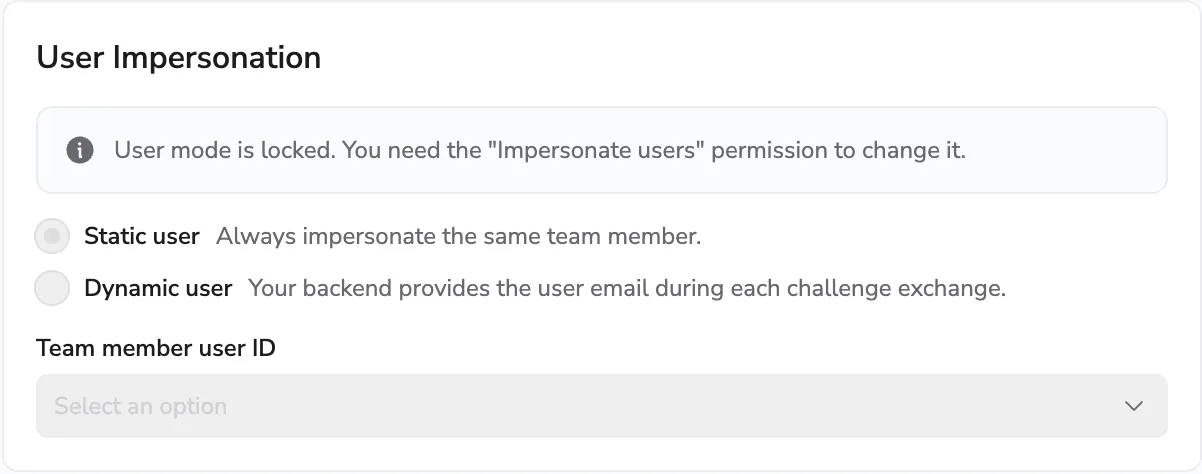
The Delegated access section controls which user an embedded session acts as. The session acts on behalf of the selected user and inherits that user's permissions, so an embedded session can be read-only or full access depending on the account you configure it with. Pick a user mode:
- Static user — the session always acts as one selected team member. Recommended for unattended displays such as a NOC wall or a TV dashboard, and for simple integrations and testing. Enter the Team member user ID to pin the account.
- Dynamic user — the session acts as the user your application authenticates. Recommended for multi-user portals. Your backend must supply the user's email with each challenge exchange, so your application must already authenticate its users. Don't use dynamic mode for unattended or anonymous displays — use a static user instead.
Note
For a static user, create a dedicated team member with the minimum permissions the integration needs — read-only is usually enough — rather than using a personal account. This limits the access and makes it easier to revoke independently.
Pinning a different team member in static mode, or using dynamic mode, requires the Impersonate users permission, granted through role management — ask your administrator if you need it. Without it, the session is issued for your own user and the user mode is locked.
Allowed origins
Register the website origins allowed to exchange a challenge code for a session — only requests from these origins can establish an embedded session, even if a code is intercepted. Enter an origin only: scheme and host with no path or query, for example https://app.example.com. HTTPS is required, with the same localhost / 127.0.0.1 loopback exception as redirect URIs, and wildcards are not allowed.

Embedded access token lifetime
An embedded client issues short-lived access tokens only — there's no refresh token. Set the access-token lifetime between 1 and 10 minutes (the default is 5 Minutes).
The embedded session renews silently: before the current token expires, your application supplies a new single-use challenge code (minted by your server) and the session renews, so the user is never prompted to sign in again. Because your application drives renewal in the background, the lifetime controls how long a leaked token stays valid rather than how often anyone has to act — keep it short.
Reference implementation
To build an integration, contact Coralogix support and request the embedded integration brief and reference implementation. The brief covers the protocol, endpoints, and token structure; the reference implementation demonstrates the full flow end to end and lets you test against your own Coralogix account.
Create the client
Select Create OAuth client.
High-risk configurations need confirmation
If you combine Full access with a long access-token TTL (over 24 hours) or a long-lived refresh token (over 30 days), Coralogix prompts you to confirm before creating the client. Long-lived high-privilege tokens are a higher-risk credential — keep them short-lived unless your use case requires otherwise.
Long-lived refresh token warnings
The drawer's warning escalates with the lifetime you set: no warning below 7 days, informational from 7 to 30 days, a security warning from 30 to 90 days, and a high-severity warning beyond 90 days. Keep lifetimes short — or rotate credentials on a schedule — for anything beyond a trusted, long-running integration.
Copy the secret immediately
Once you confirm creation, Coralogix shows the Client ID and Client Secret a single time. Copy both and store them in your secret manager before closing the dialog — Coralogix does not show the secret again. If you lose it, rotate the secret to issue a new one.
Manage your OAuth Configurations
The OAuth Clients page lists every client registered in your account along with its credentials, scopes, token lifetimes, and recent activity. A Type column distinguishes user-authorized app clients from embedded configurations, where the embedded client type is enabled. The page opens to an empty-state card the first time you visit it; once you create a client, it's replaced by the table.
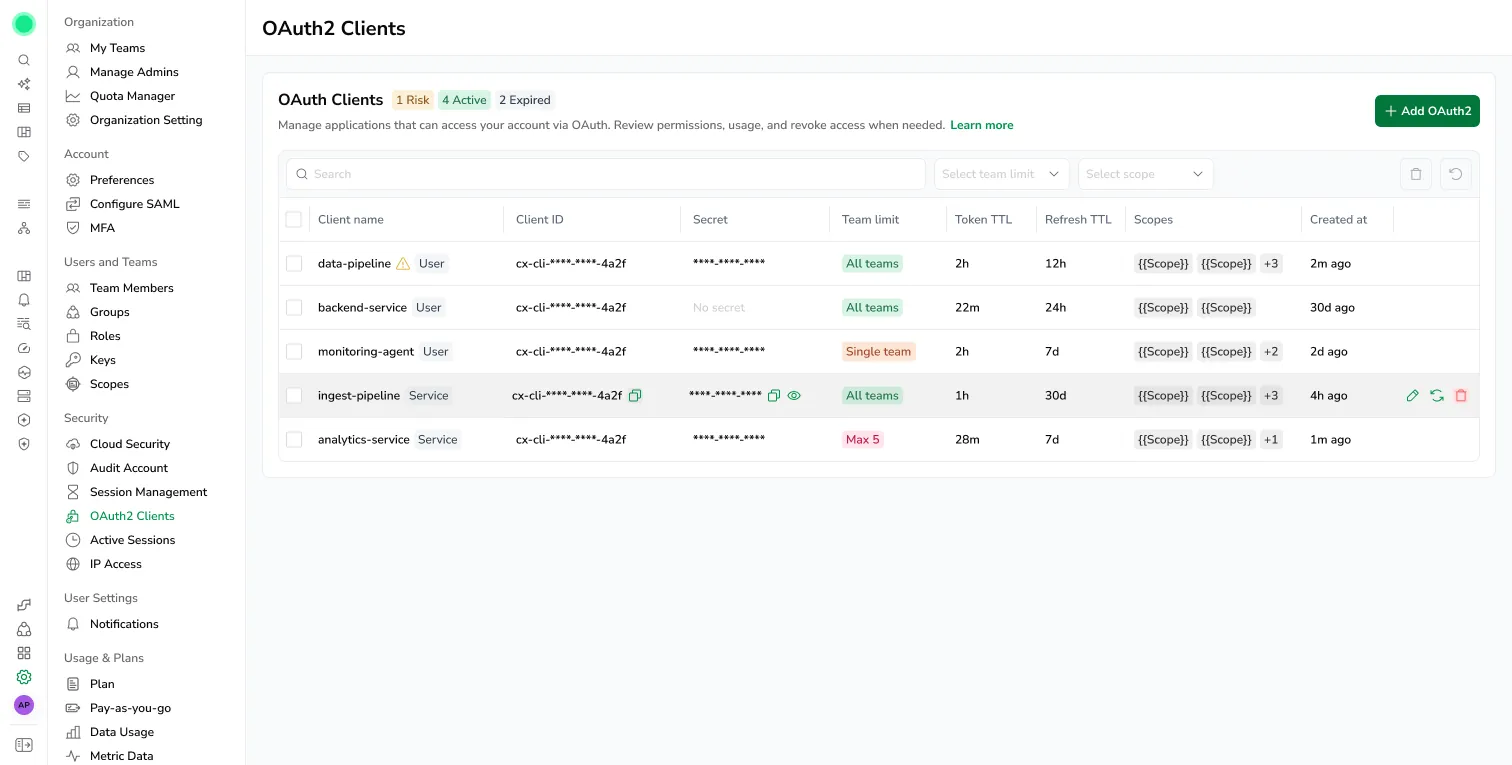
Select any row to open the Edit OAuth client drawer with that client's settings prefilled. Hover over any client to edit the configuration, rotate the secret, or delete.
Use the filter bar above the table to narrow by team limit (Team limit) or scope (Scope).
Rotate a client secret
Rotate the secret if you suspect exposure, after a contributor with access leaves, or as part of a scheduled rotation policy. To confirm, type the client name exactly as prompted. Coralogix generates a new secret on rotation and shows it once — copy it and update every integration that uses the client before the previous secret stops working.
Pause and resume a client
Switch the Status toggle to Disabled to stop a client from issuing new tokens; Coralogix invalidates the client's existing tokens immediately. The client and its history stay on the list, so you can switch the toggle back on later without registering it again. Use this for short-lived investigations or to temporarily revoke access without losing the audit trail.
Delete a client
Deleting a client invalidates its credentials and revokes any tokens it issued. Integrations that hold a token from a deleted client fail the next time they call Coralogix and must reconnect against a new client. Deletion is permanent — to confirm, type the client name exactly as prompted.
To remove several clients at once, select their checkboxes and use Delete selected in the toolbar (up to 500 per bulk delete). Bulk deletion is atomic: if any selected client is already gone, Coralogix rejects the whole request and deletes nothing.
Active sessions
Use Security, then Active Sessions to see what currently has access to your account, in 2 groups:
- Connected apps — issued OAuth tokens, grouped by the client that issued them. Each row shows the App name, Token ID, Token type (access or refresh token), Expires, and Scopes. Revoke a single token from its row, or revoke every token for a client from the group header.
- UI sessions — browser logins. Each row shows the Session, Client (device and browser), Location, Status, IP address, Last active, and Expires.

Hover a row to reveal the revoke action. Revoking a token forces the integration to reconnect through the OAuth flow on its next call.
OAuth2 endpoints
Integrations use these endpoints against your regional Coralogix domain.
| Endpoint | Purpose |
|---|---|
POST <domain>/oauth2/token | Exchange an authorization code for an access token, or use a refresh token to obtain a new one. Grant types: authorization_code, refresh_token. Public clients must include a code_verifier. |
POST <domain>/oauth2/revoke | Invalidate a specific access or refresh token. Requires the token plus the client's client_id and client_secret. |
POST <domain>/oauth2/introspect | Check whether a token is active and read its scope, exp, and client_id. |
GET <domain>/oauth2/userinfo | Return claims about the authenticated user (identifier, email), plus the teams the user authorized and the teams the user belongs to. |
Auditing
Actions performed using an OAuth token appear in audit logs under the user who authorized the client. Coralogix enriches each entry with the OAuth Client ID so auditors can distinguish web UI activity from third-party integration activity attributed to the same user.
Limitations
- Service-to-service clients (machine-to-machine, no user interaction) are not yet available — you can create User-authorized app clients, plus Embedded clients on accounts where early access is enabled.
- Embedded sessions are scoped to a single team and act with their configured user's permissions (read-only or full access). Embedded clients issue short-lived access tokens only (1–10 minutes) with no refresh token, and use an allowed-origins list (scheme and host) rather than redirect URIs.
- Dynamic Client Registration (DCR) is not supported.
- Per-endpoint permissions and custom scope builders are not available — select between Read-only and Full access presets at creation time.
- Coralogix shows the client secret only once at creation or rotation and cannot recover a lost secret.
- Allowed redirect URIs must be exact HTTPS URLs. Wildcards are not allowed; the only HTTP exception is
localhost/127.0.0.1loopback per RFC 8252.