SCIM
Coralogix supports the SCIM specification (System for Cross-Domain Identity Management), an open standard that allows you to automate user and group provisioning using a REST API.
SCIM lets you create users and groups in Coralogix and give them the proper level of access, as well as to remove access for users (de-provisioning) should they leave your organization or no longer need it.
Note
If you have already added users to your Coralogix account, delete them before beginning this integration. If necessary, you may leave one admin user.
Upon completion of the SCIM integration, recreate all users through SCIM.
Integrating Okta with Coralogix
Supported features
Create users: New or existing users in Okta will be pushed to Coralogix as new users.
Update user attributes: Updates to user profiles in Okta (firstname, lastname, username) will be updated in Coralogix.
Deactivate users: Users deactivated in Okta will be deactivated in Coralogix. They won’t be able to log in using their team in Coralogix. If a user is reactivated, they will regain access to Coralogix and keep all previously specified access controls.
Sync Okta groups to Coralogix: An Okta group can be synced to Coralogix with all it users, moving a user between groups in Okta that are configured in Coralogix will move the user to another team.
SCIM server authentication: To ensure that accounts can't be created by unauthorized users, Coralogix uses a Bearer Token authentication.
Useful links
Instructions
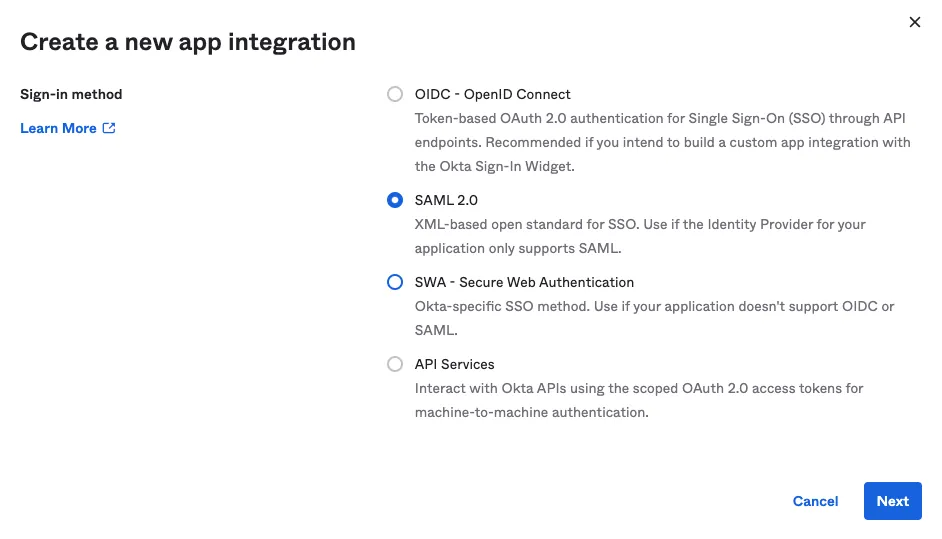
Create a new SAML 2.0 app integration in Okta
Under the Applications section In Okta, press on Create App Integration and choose SAML 2.0.
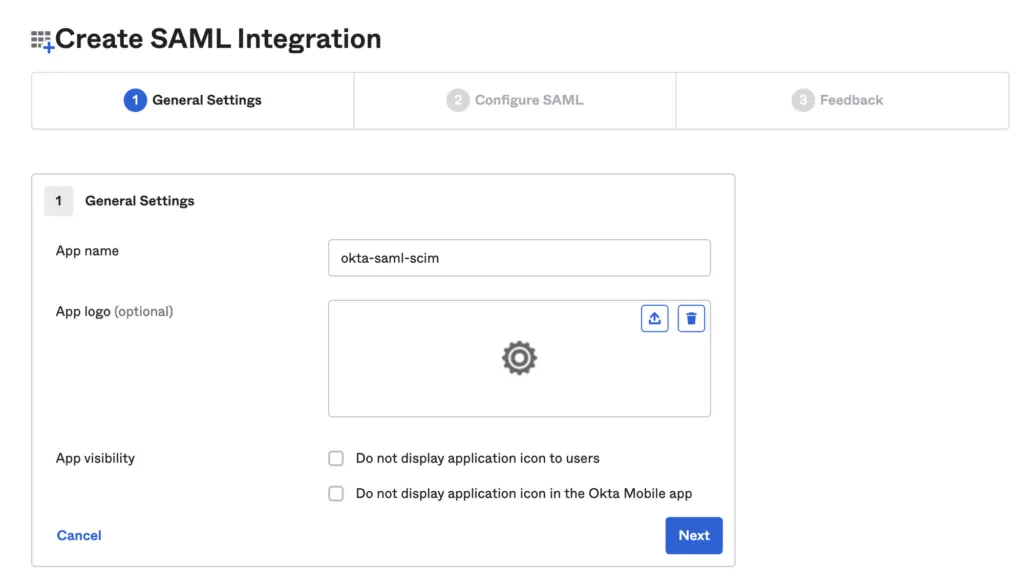
In General Settings, the App name will be used by Okta as the application name displayed to users. You can choose any name you like.
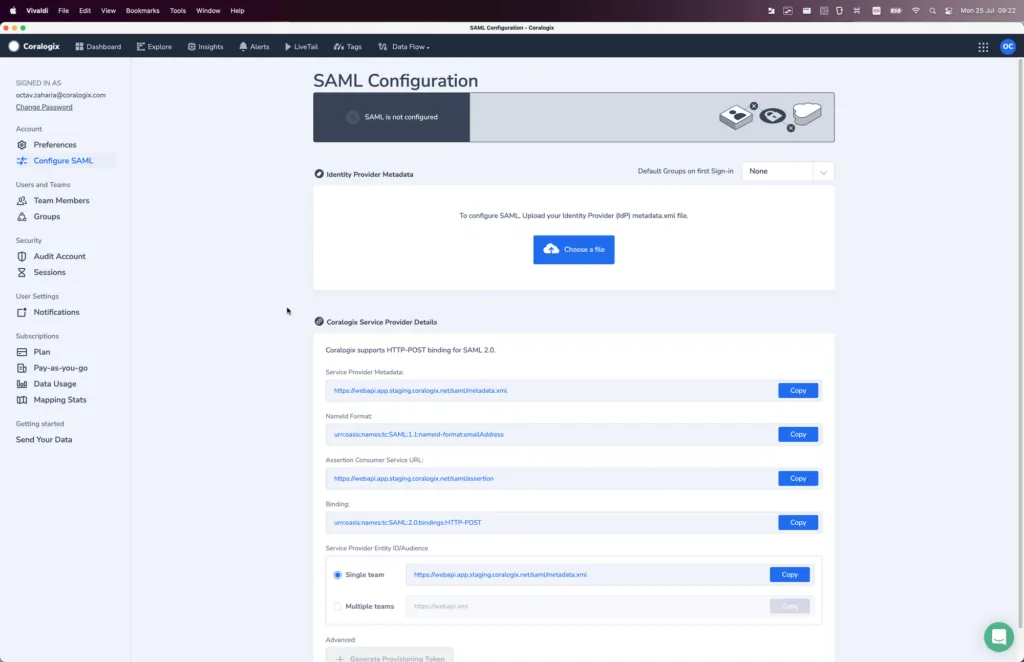
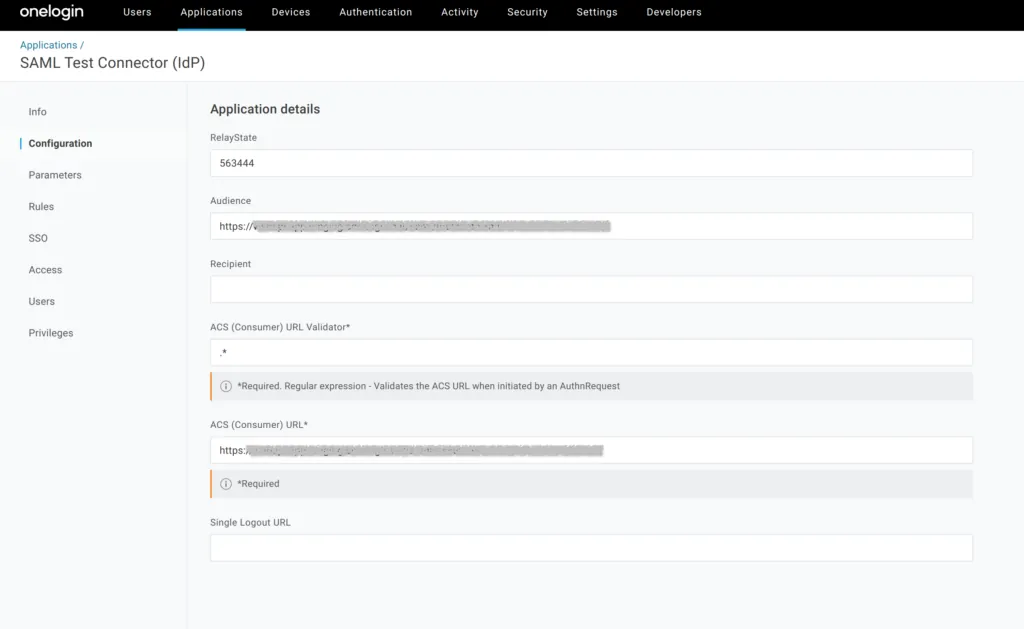
In the next stage you will need to fill information the exists in Coralogix under Settings → Configure SAML.
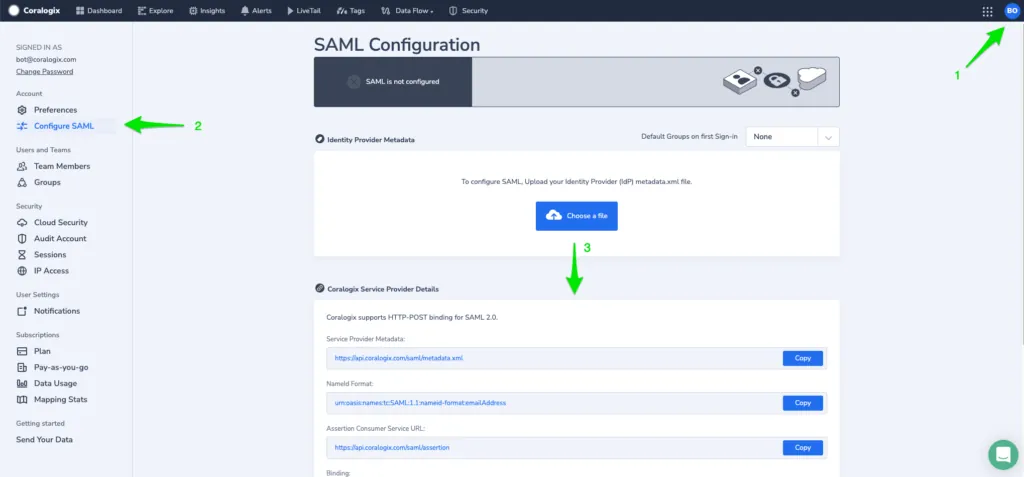

- Single sign on URL → Assertion Consumer Service URL
- Audience URI (SP Entity ID) → Service Provider Entity ID/Audience
- Default RelayState →
<Name of your Coralogix team> - Name ID Format should be set to EmailAddress
Once done, press Next and then Finish in the last stage.
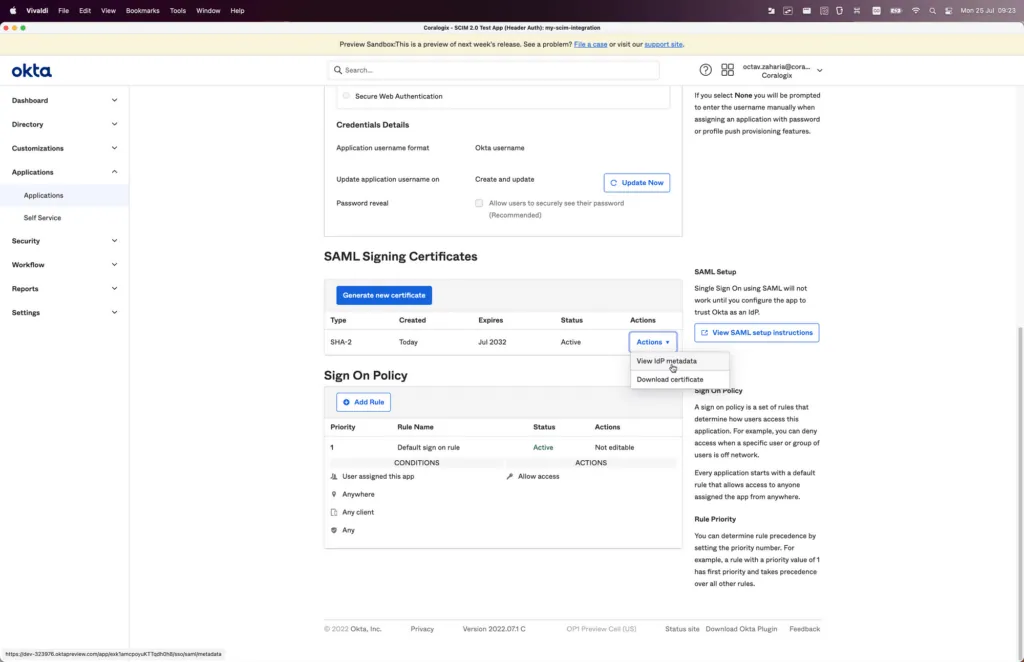
After clicking Finish, scroll down to SAML Signing Certificate, press on actions and choose View IdP metadata in the dropdown. Copy the metadata into a text file and save it as an .xml.
Return to the Coralogix SAML configuration. Upload the file you just created by clicking Choose File and selecting it from its saved location.
Enable SCIM 2.0 integration in Okta
After successfully uploading the configuration file, navigate to Settings > Keys > Team Keys to create a Team API key with the following permissions:
| Action | Description |
|---|---|
| team-members:ReadConfig | View Team Membership |
| team-members:Manage | Manage Team Membership |
| team-groups:ReadConfig | View Team-Level Groups |
| team-groups:Manage | Manage Team-Level Groups |

Go back to Okta and enable SCIM integration in the General tab. Once enabled, the page will refresh with a new tab - Provisioning.
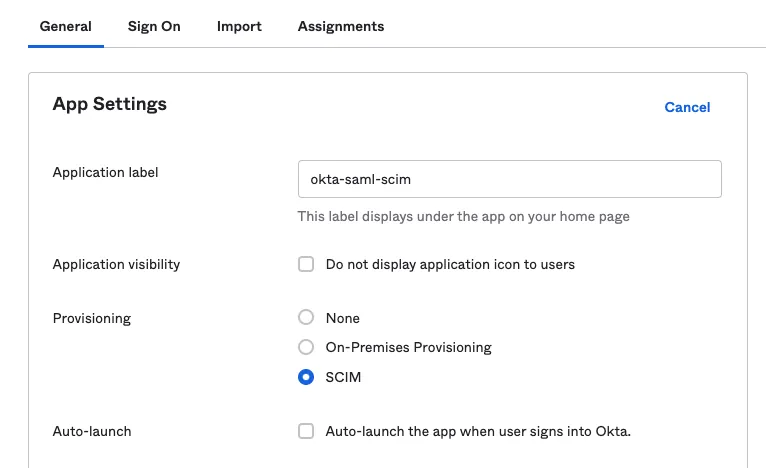
Go to the newly added Provisioning tab and click Edit to configure SCIM integration.
Choose the https://api./scim endpoint that corresponds to your Coralogix domain using the domain selector at the top of the page.
Select Supported provisioning actions as displayed on the screenshot below
In Authentication Mode select HTTP Header and paste the Provisioning Token that was generated in Coralogix under HTTP Header - Authorization
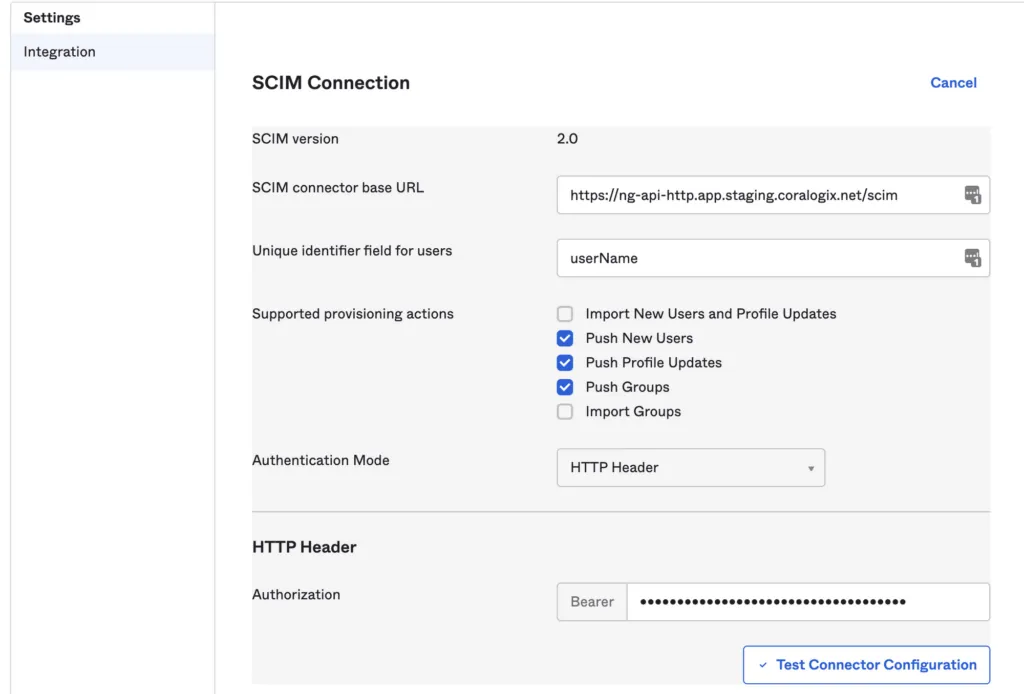
The connection is now set up.
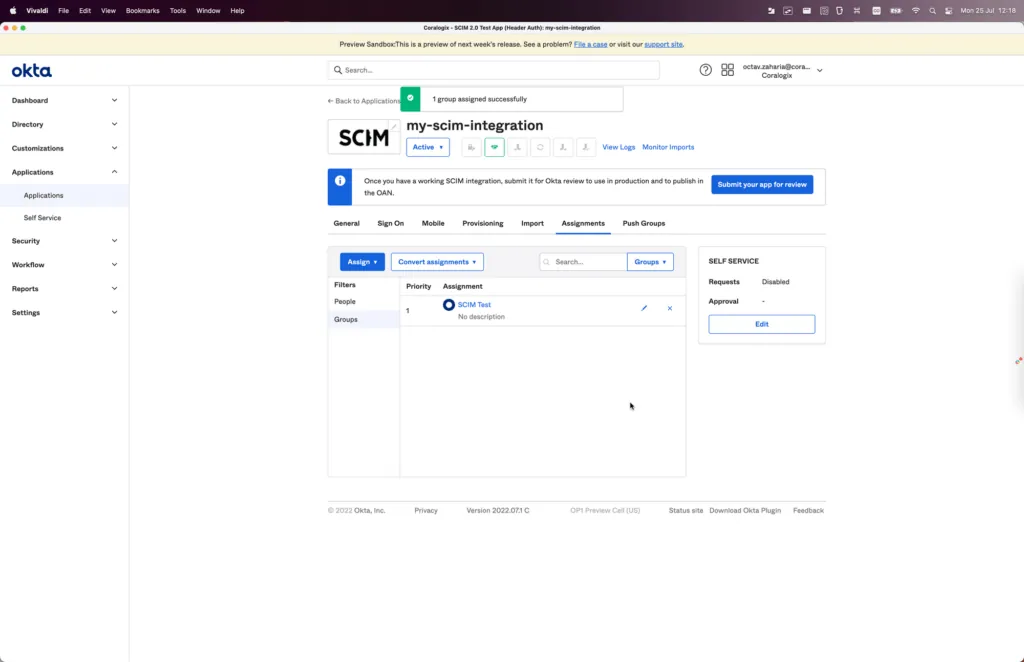
Assign users or groups to the Coralogix in Okta
- To sync a group to Coralogix, you must add the group under Assignments tab by clicking Assign to Group.
Note
Group names must contain only supported characters, such as letters, numbers, underscores (_), or hyphens (-). Avoid using other special characters, such as periods (.).
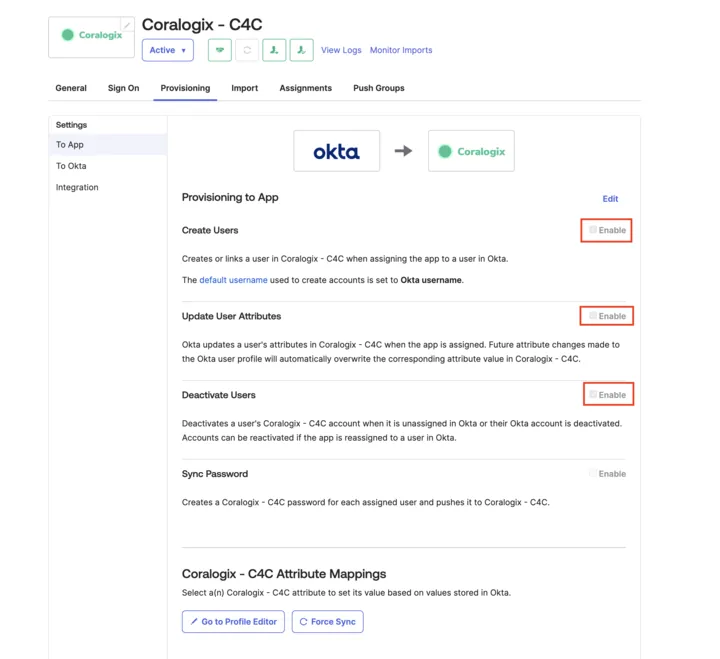
- In the Provisioning section, you must enable the following permissions: Create Users, Update User Attributes, and Deactivate Users.
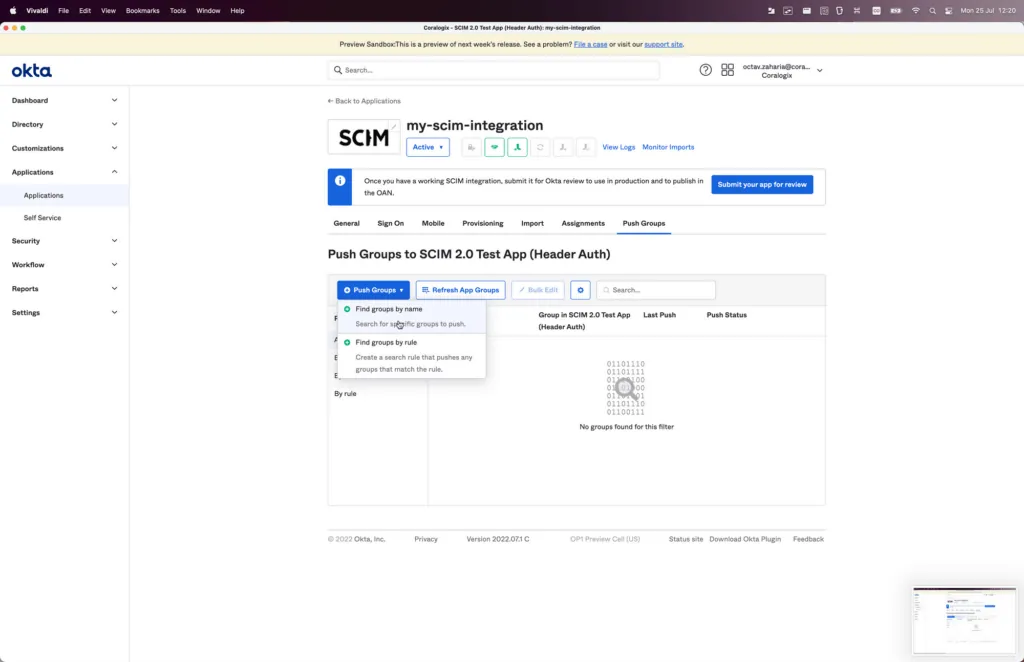
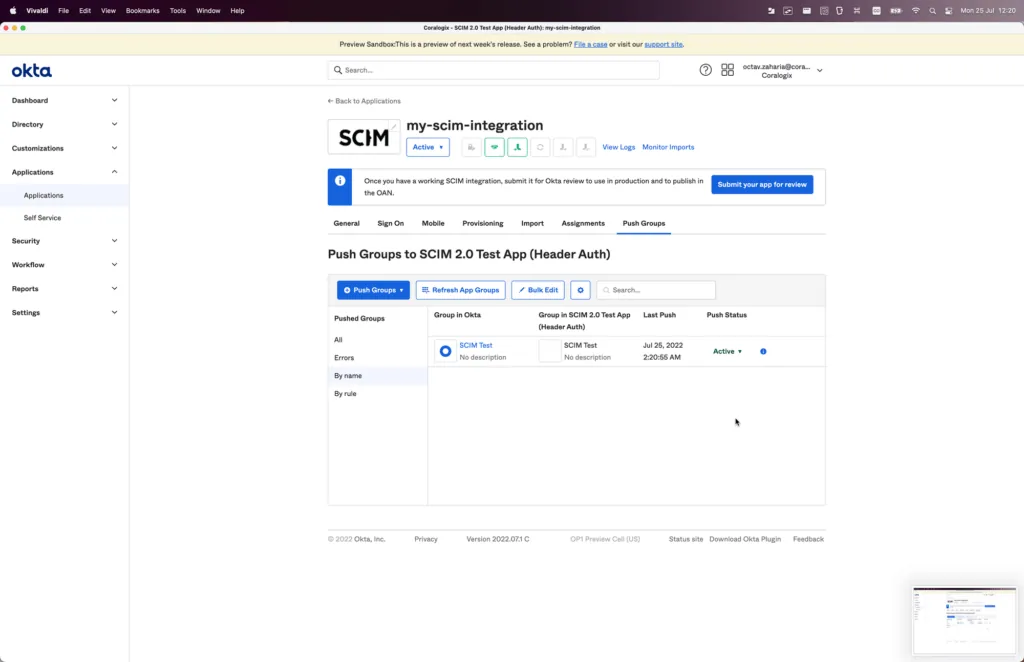
- After assigning a group to the app, the group should be pushed to Coralogix by going to Push Groups tab and searching the group. After successfully pushing the group, it will appear with a green color as active.
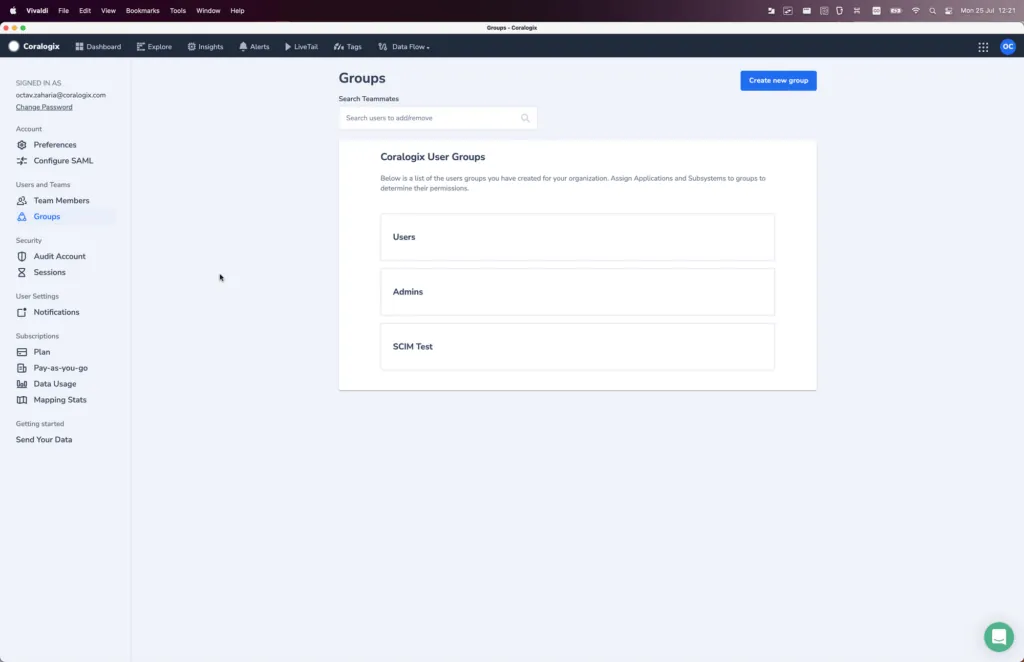
- Checking the Groups in Coralogix, the new group (SCIM Test) should be visible in the list together with the existing groups.
Roles & scope
Roles and Scope should be edited in Coralogix side under Groups per the relevant Okta group.
Sync using Okta cannot be supported as a custom attributes on groups sync via Push process is not implemented on Okta's side.
For more information on how to assign Roles and Scope visit our Team usage guidelines.
Integrating OneLogin with Coralogix
Supported Features
Create Users: New or existing users in OneLogin will be created as new users in Coralogix.
Update User Attributes: Updates to user profiles in OneLogin (firstname, lastname, username) will be updated in Coralogix.
Deactivate Users: Users deactivated in OneLogin will be deactivated in Coralogix. They won’t be able to log in using their team in Coralogix. If a user is reactivated, they will regain access to Coralogix and keep all previously specified access controls.
Useful links
One Login SCIM Developer documentation
Create an application.

- Use
SCIM Provisioner with SAML (SCIM v2 Core)from Find Applications.
Input the relevant Application and API Connection details.
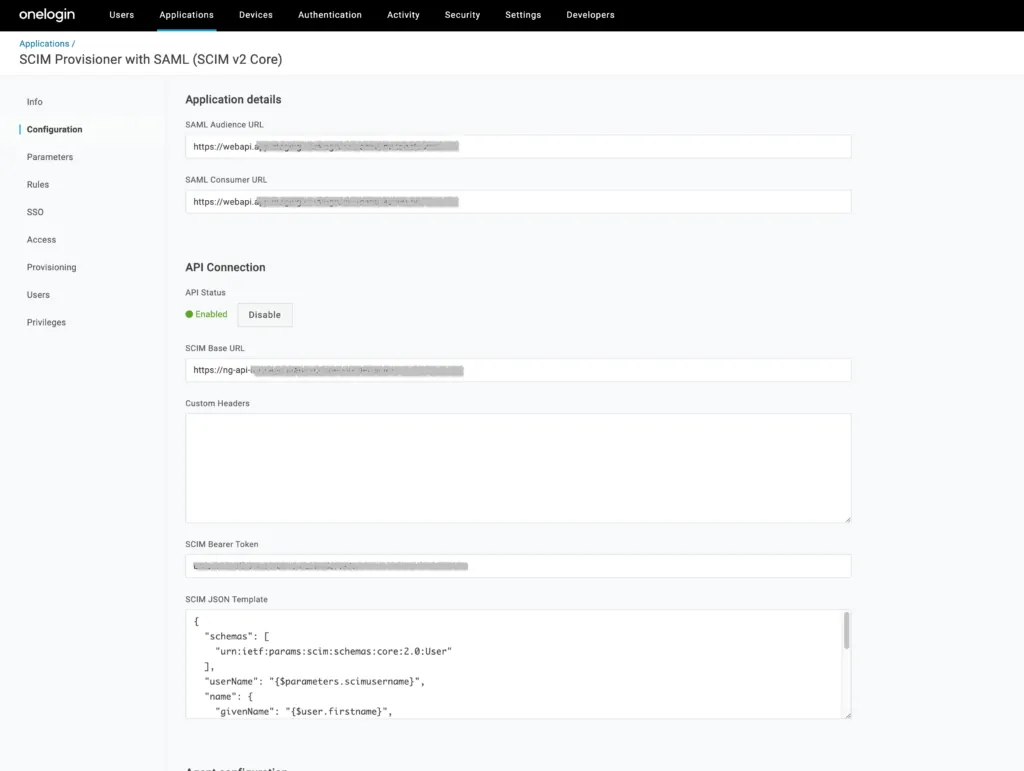
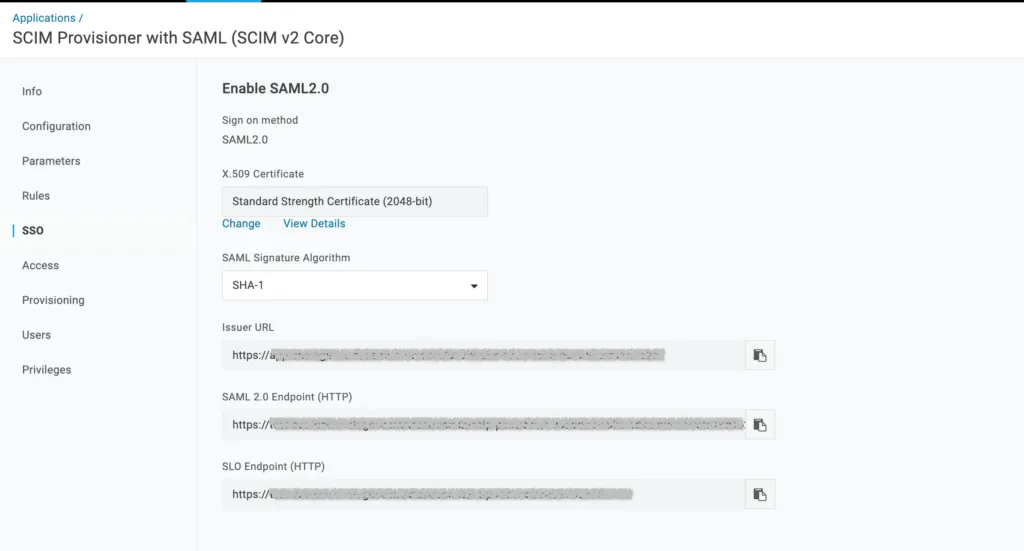
Identify the Identity Provider Metadata by navigating to SSO > Issuer URL.
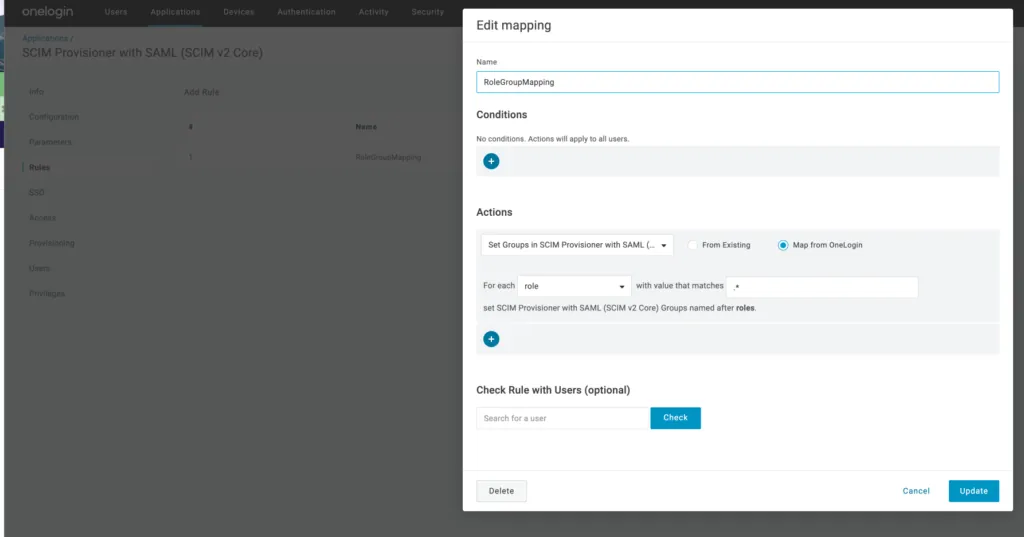
To use OneLogin roles as a group, add a rule to the app.
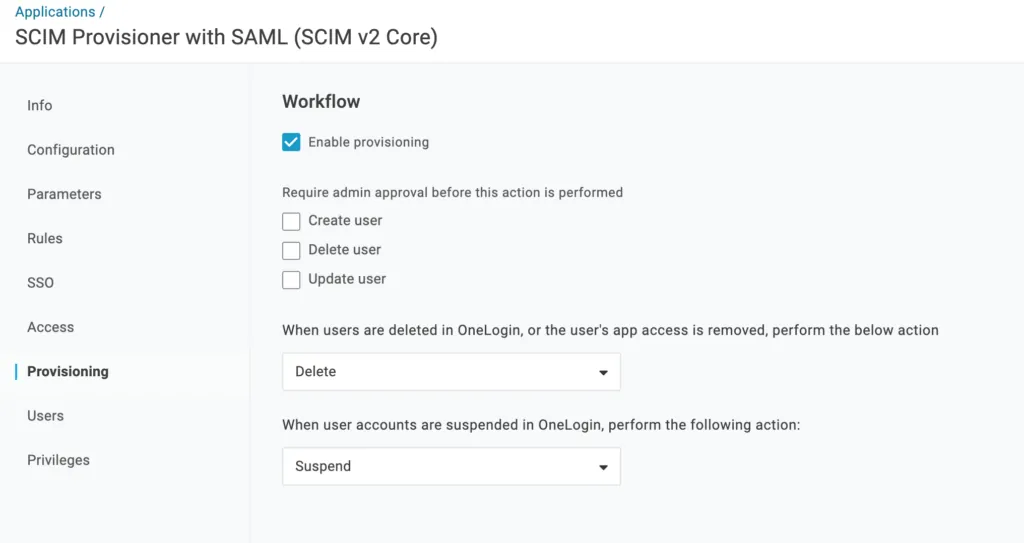
Enable automatic provisioning.
Validate configuration for testing your SAML SSO login. Choose the https://api./scim endpoint that corresponds to your Coralogix domain using the domain selector at the top of the page.
Integrating Azure Active Directory with Coralogix
This integration will push Azure Active Directory Users and Groups to Coralogix every 40 minutes. A Coralogix admin user needs to assign roles to the Groups using Coralogix UI. Another option is to assign roles to a Group using the integration.
Supported features:
Create Groups (supported attributes are: displayName, objectId, members)
Create Users (supported attributes are: userPrincipalName, givenName, surname)
Role - Assign a system role to a group: Platform Admin, Data Admin, Observability Lead, Standard User, Read-Only User, and Security User
Update Groups
Scope - Set group scope with "Exact" filter type
Delete users and Groups
Generate a Coralogix API token
Navigate to Settings > Keys > Team Keys to create a Team API key with the following permissions:
| Action | Description |
|---|---|
| team-members:ReadConfig | View Team Membership |
| team-members:Manage | Manage Team Membership |
| team-groups:ReadConfig | View Team-Level Groups |
| team-groups:Manage | Manage Team-Level Groups |
Copy the API key for use in the Enterprise Application configuration in Azure Active Directory.
Create an Enterprise Application in Azure Active Directory
- Log in to Azure.
- Navigate to Azure Active Directory > Enterprise Applications > New Application.
- Select ‘Create your own application’. Enter the application name, select Integrate any other application you don't find in the gallery, and click ‘Create’.

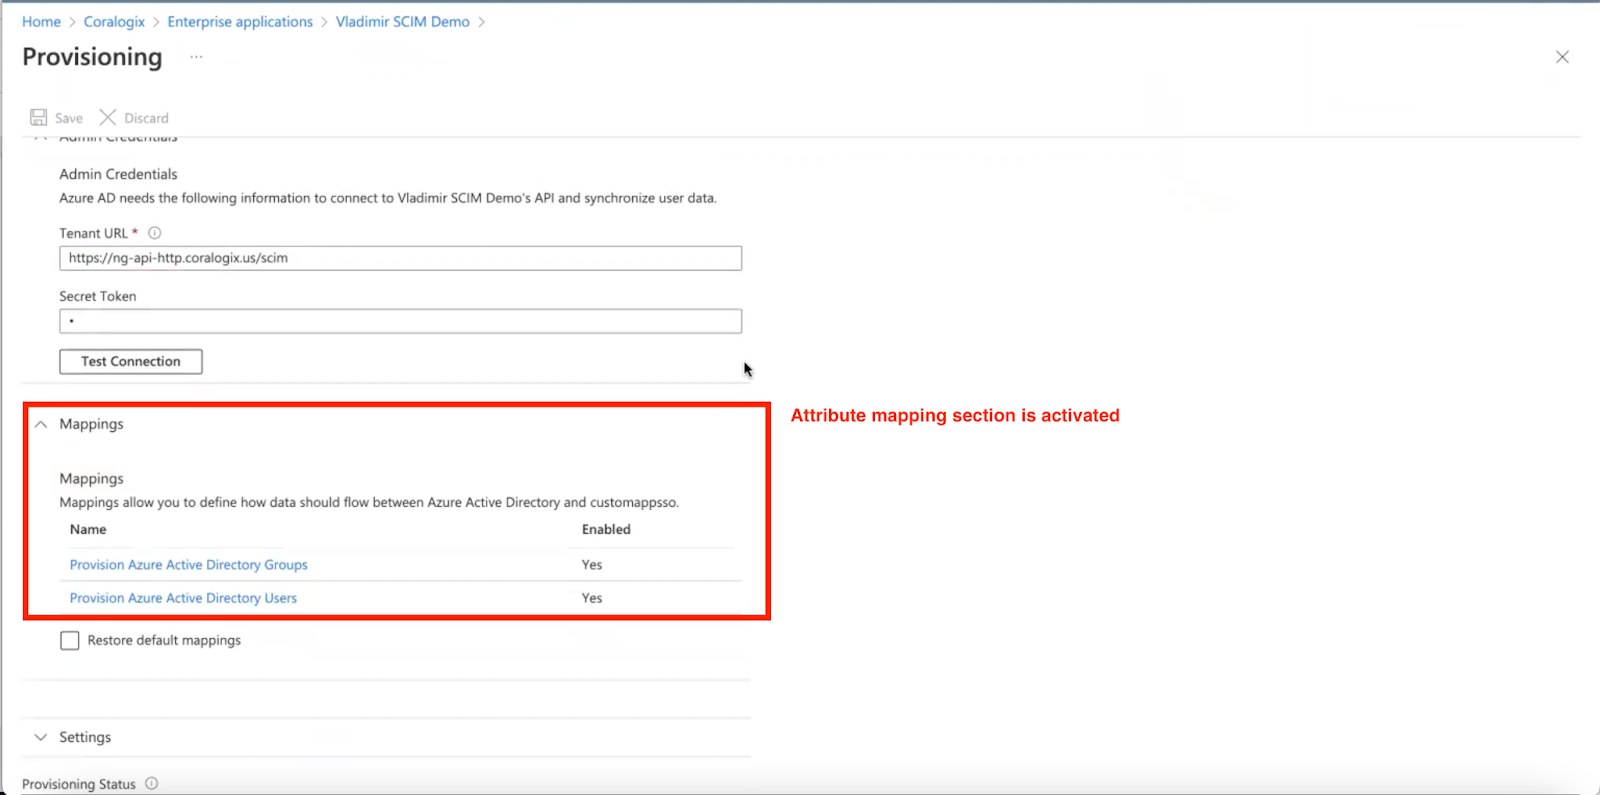
- Once the Enterprise Application has been added successfully, click ‘Provisioning’.

- Configure Provisioning mode, Tenant URL and Secret token (the Coralogix Team API key). Choose the https://api./scim endpoint that corresponds to your Coralogix domain using the domain selector at the top of the page. Test the connection to verify successful integration.

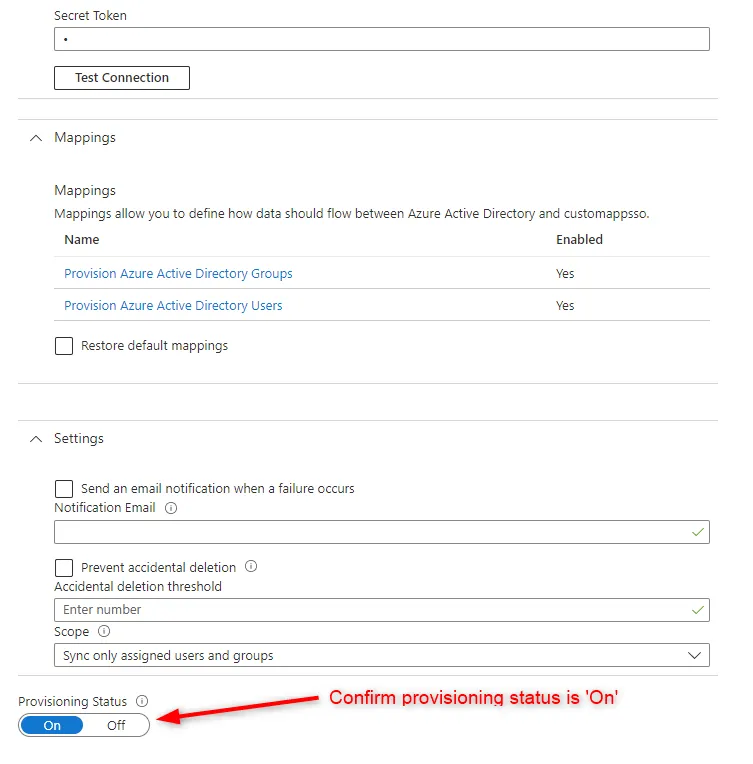
- The Attribute Mapping section is activated after a successful connection is established.
- Attribute mapping configuration (Group). The default Attribute Mappings and Target Object Actions are sufficient.

- Attribute mapping configuration (User). The default Attribute Mappings are sufficient.

- Ensure provisioning is ‘On’
Additional resources
| Coralogix Endpoints | Coralogix Endpoints |