Archive retention policy
In addition to the TCO Optimizer, Coralogix provides an extra layer of granularity for data retention. Use Archive Retention to control and modify the length of time your logs are archived.
Overview
When creating a new policy in the TCO Quota Optimizer, you can define a lifecycle policy — the length of archive retention for a specific group of logs, defined by application, subsystem, and severity.
Choose between four default retention periods: default, short, intermediate, or long. The names and values for the latter three are determined by the tag names you set in your S3 bucket configuration. For example, one user might define a "short" retention period as three days, while another defines it as 15 days, or renames it to "minimum."

- Only newly archived files are affected by these settings.
- Files created before the new lifecycle policy have no retention tag and are not changed retroactively. The data retention policy that applied to them before the new lifecycle policy — default or defined — continues to apply even after the new settings are in place.
Configuration
Configure GetObjectTagging and PutObjectTagging permissions.
- Search S3 in the AWS search bar and select the service.
- Select the bucket you want to use for storing the archive.
- Select the Permissions tab, then select Edit in the Bucket policy section.
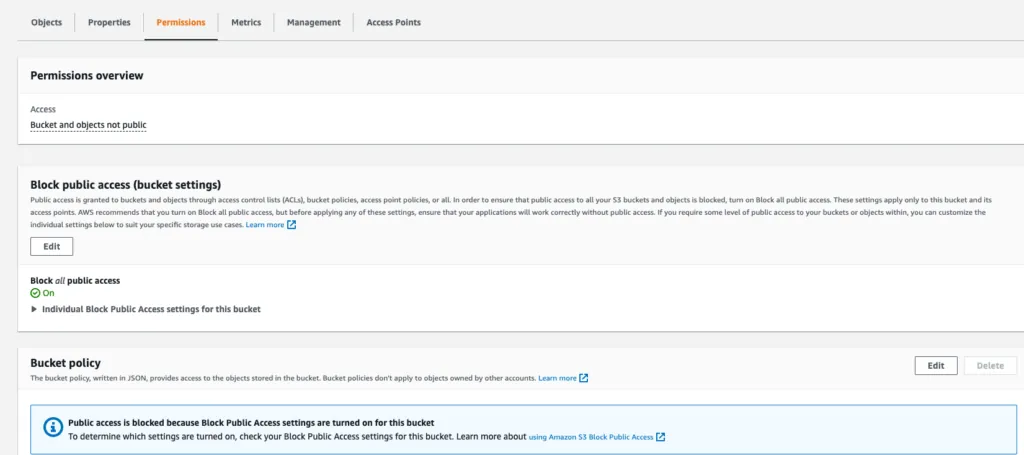
- Paste the following policy and update the bucket name:
{
    "Version": "2012-10-17",
    "Id": "MyPolicyID",
    "Statement": [
        {
            "Sid": "MyStatementSid",
            "Effect": "Allow",
            "Principal": {
                "AWS": "arn:aws:iam::625240141681:root"
            },
            "Action": [
                "s3:GetObject",
                "s3:ListBucket",
                "s3:PutObject",
                "s3:PutObjectTagging",
                "s3:GetObjectTagging"
            ],
            "Resource": [
                "arn:aws:s3:::<bucket name>",
                "arn:aws:s3:::<bucket name>/*"
            ]
        }
    ]
}
- Select Save.
Set up a lifecycle configuration.
- Navigate to Lifecycle configuration.
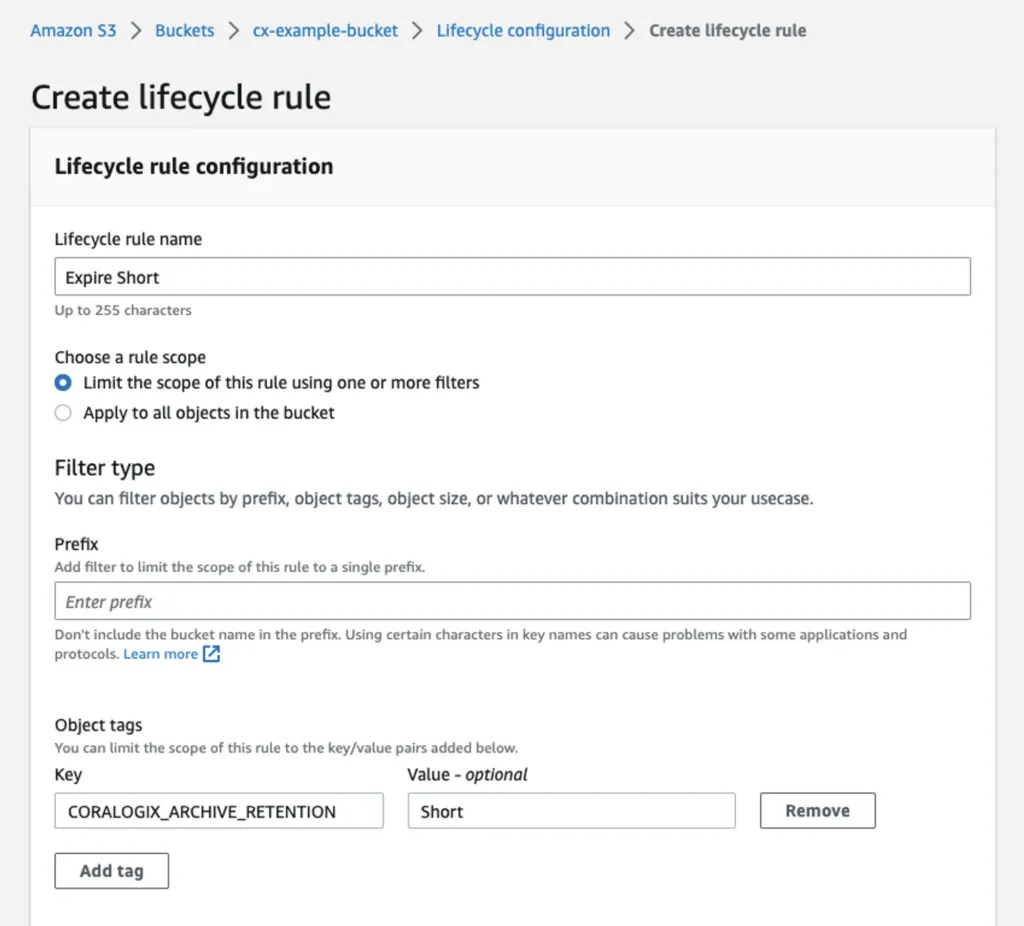
- Define a Lifecycle rule name and at least one Lifecycle rule action.
- Select Limit the scope of this rule using one or more filters.
- Add Object tags by defining a Key/Value pair.
- Select Save.
The value of your object tag must be identical in content and form (case-sensitivity) to the archive retention name in your Coralogix Archive Retention settings.
Create a lifecycle policy
The following steps demonstrate one method of creating a lifecycle policy using AWS CLI. The example sets a policy to remove archive files with the retention "short" after 15 days.
Define a policy in a local lifecycle.json file.
{
    "Rules": [
        {
            "Filter": {
                "Tag": {
                  "Key": "CORALOGIX_ARCHIVE_RETENTION",
                  "Value": "Short"
                }
            },
            "Status": "Enabled",
            "Expiration": {
                "Days": 15
            },
            "ID": "ExampleRuleShort"
        },
        {
            "Filter": {
                "Tag": {
                  "Key": "CORALOGIX_ARCHIVE_RETENTION",
                  "Value": "Intermediate"
                }
            },
            "Status": "Enabled",
            "Expiration": {
                "Days": 150
            },
            "ID": "ExampleRuleIntermediate"
        },
        {
            "Filter": {
                "Tag": {
                  "Key": "CORALOGIX_ARCHIVE_RETENTION",
                  "Value": "Long"
                }
            },
            "Status": "Enabled",
            "Expiration": {
                "Days": 365
            },
            "ID": "ExampleRuleLong"
        }
    ]
}
Apply the policy.
aws s3api put-bucket-lifecycle-configuration --bucket <bucket-name> --lifecycle-configuration file://lifecycle.json
- This command completely overrides the current policy of the bucket, if one exists.
- To append to an existing policy, retrieve it first with the command below, then update
lifecycle.jsonaccordingly before re-applying.
aws s3api get-bucket-lifecycle-configuration --bucket <bucket-name>
Verify that the policy has been applied.
aws s3api get-bucket-lifecycle-configuration --bucket <bucket-name>
Define archive retention settings
Once you configure your S3 bucket, set your Archive Retention settings in Coralogix.
In the Coralogix navigation bar, select Data Flow, then Setup Archive.
In the Archive Retention section, name Retention Periods 2, 3, and 4. You can use names such as "Short," "Intermediate," and "Long," or choose your own. The duration for each period is managed by the S3 storage lifecycle in your AWS account.
Select ACTIVATE. A confirmation message confirms the archive retention policy was added to your bucket.
- Archive retention settings only appear in the TCO Quota Optimizer after you activate them.
- When modifying existing settings, ACTIVATE is replaced with SAVE.
Select Data Flow, then TCO Quota Optimizer to view your changes.
TCO override
Configuring a TCO override replaces the TCO policy for the specified application-subsystem-severity combination, including any associated Archive Retention tags. The Archive Retention tag is overridden and reverts to the default tag.
Impact
This behavior directly impacts S3 lifecycle policies that depend on retention tags. If the tag reverts to default, lifecycle policies associated with specific tags — such as revenue — may not apply as intended, potentially resulting in unintended data deletion.
Prevention
If you manage S3 lifecycle policies based on Archive Retention tags, review and adjust overrides to prevent unintended data deletion.
Example:
- TCO override not in use: Retention tag =
revenue, lifecycle policy transitions data to Glacier after 30 days and deletes it after one year. - TCO override in use: Retention tag =
default, lifecycle policy expires data after 60 days.
Create a new policy
Once you create your Archive Retention settings, create a new data retention policy.
In the Coralogix navigation bar, select Data Flow, then TCO Quota Optimizer.
Select +ADD NEW POLICY.

Enter a POLICY NAME.
Define APPLICATIONS, SUBSYSTEMS, and SEVERITY level.
Define PRIORITY.
- Blocked data is not archived.
- Only data marked as priority High, Medium, or Low is archived and eligible for archive retention settings.
Define ARCHIVE RETENTION settings.
- Logs matching the criteria (application, subsystem, and severity) are retained for the duration associated with the policy.
- Logs without a specified retention policy are retained for the default period.

Previously archived files
Files created before the new lifecycle policy have no retention tag and are not changed retroactively. The data retention policy that applied to them before — default or defined — continues to apply after the new settings are in place.