Configure an Amazon S3 bucket
This tutorial demonstrates configuring an Amazon S3 bucket to send your telemetry data to Coralogix. For GCP environments, see Connect a GCS archive bucket.
Overview
Use your archive buckets to store all of your data as long as you need, on your own S3 bucket, for infinite retention. Your logs & traces archive bucket can be stored in CX data format. Metrics archive bucket stores Prometheus index blocks.
There are three configuration options:
-
CloudFormation
-
Terraform module
-
Manual
Make sure to match your bucket region with the region associated with your Coralogix account.
S3 bucket usage across teams
Coralogix supports configuring a shared S3 bucket for multiple teams to store logs or metrics, with internal mechanisms to ensure data partitioning.
Metrics
- Multiple teams can upload metrics to the same S3 bucket.
- Data is partitioned by
companyId, ensuring isolation. - The
companyIdis specified in the metadata (meta.json) file accompanying each folder.
Logs & traces
- Logs from multiple teams can also be stored in the same S3 bucket.
- Each team writes to a separate directory path within the bucket, ensuring data separation.
A directory path is built as follows:
s3://BUCKET_NAME/PREFIX/OBJECT.suffix
Team "0" example:
s3://my-bucket-name/cx/parquet/v1/team_id=0/dt=2025-06-29/hr=07/my-object-name.parquet
Team "1" example:
s3://my-bucket-name/cx/parquet/v1/team_id=1/dt=2025-06-29/hr=07/my-object-name.parquet
Configuration with CloudFormation
Create a new stack with new resources.
- In the Amazon S3 URL field, input the following URL: https://cgx-cloudformation-templates.s3.eu-central-1.amazonaws.com/coralogix-s3-archive/template.yaml. This will create the required bucket with the necessary policies.
- Run the stack in the same region in which the bucket is created.
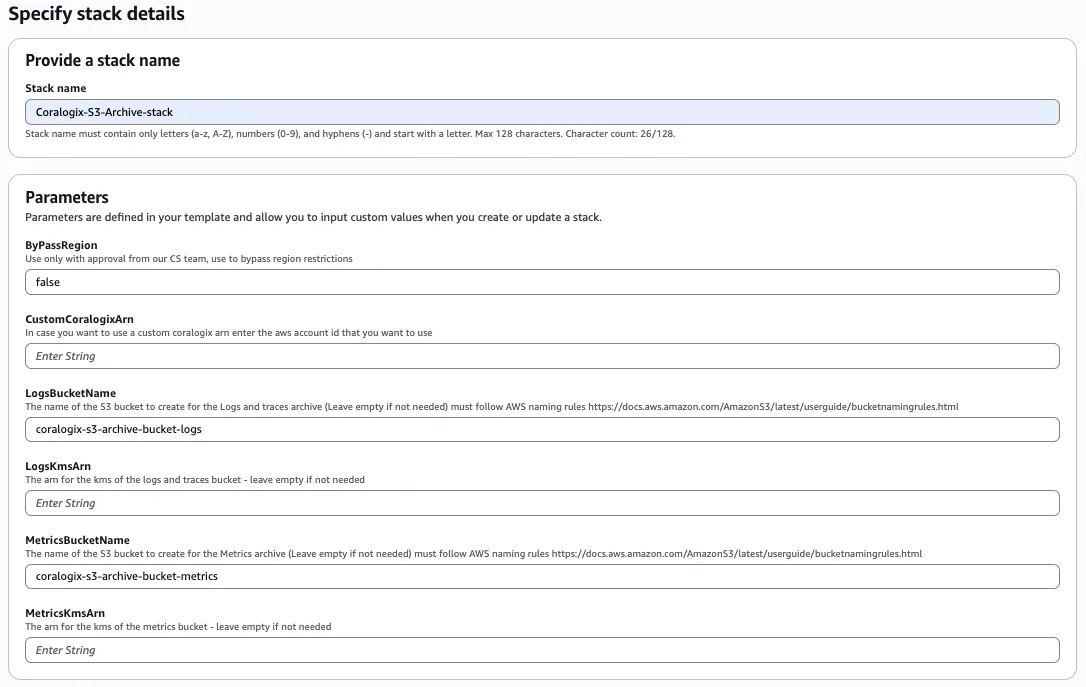
Specify your stack details.
- Input a unique LogsBucketName and/or MetricsBucketName.
- If your bucket needs to be encrypted and you are using KMS, ensure that the KMS is in the same region as your bucket.
- Parameters that you don’t need may be left empty.
- Follow AWS bucket naming rules. Every S3 bucket name must be globally unique.
Run the template to create the S3 archives.
Terraform
Access the S3-archive module in the Coralogix Terraform Registry.
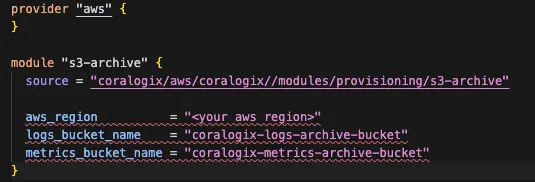
Create the Terraform file with the following variables.
| Variable | Description |
|---|---|
| aws_region | The AWS region where you want to create the S3 bucket must be the same as the region where your Coralogix account is set. |
| logs_bucket_name | The name of the S3 bucket to create for the logs archive (Leave empty if not needed) |
| metrics_bucket_name | The name of the S3 bucket to create for the metrics archive (Leave empty if not needed) |
Notes:
- Bucket names must follow AWS AWS bucket naming rules.
- View more configuration options here.
[Optional] Add KMS keys to the buckets with logs_kms_arn and metrics_kms_arn variables.
Create the archive buckets by saving the file and running the following commands:
terraform init

terraform apply
Manual configuration
Create an S3 bucket for configuration with default parameters.
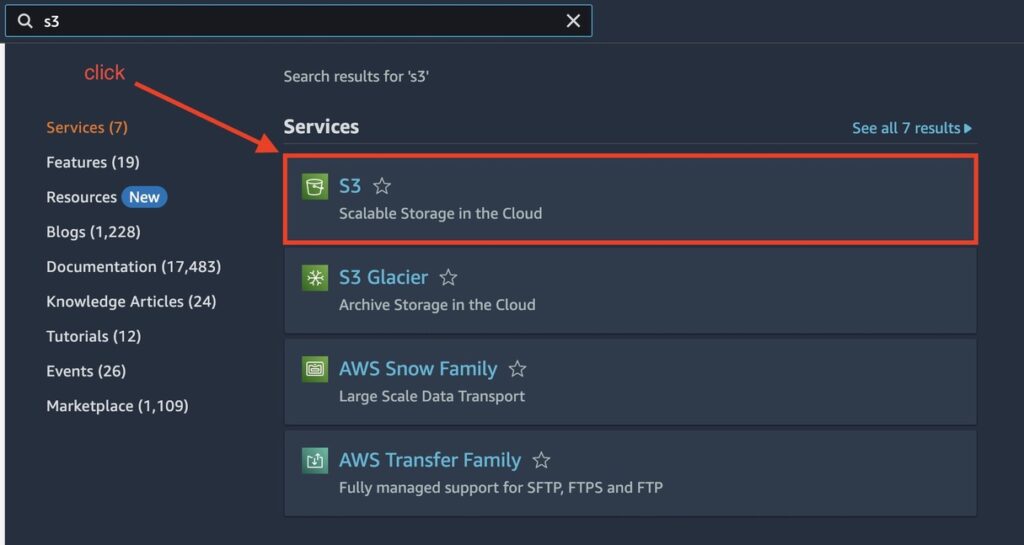
Search S3 in your AWS search bar and select this service.
Locate and select the bucket of choice for storing the archive.
Navigate to the Permissions tab. Edit the Bucket policy.
Paste the following code and update the name of your bucket. The following provides both a logs and metrics archive bucket configuration snippet.
Notes:
- For all configured snippets, you must input the ACCOUNT_ID associated with your Coralogix domain (e.g. "us1.coralogix.com") and region (e.g. us1).
| DOMAIN | REGION | ACCOUNT_ID |
|---|---|---|
| us1.coralogix.com | us1 (Ohio) | 625240141681 |
| us2.coralogix.com | us2 (Oregon) | 739076534691 |
| eu1.coralogix.com | eu1 (Ireland) | 625240141681 |
| eu2.coralogix.com | eu2 (Stockholm) | 625240141681 |
| ap1.coralogix.com | ap1 (Mumbai) | 625240141681 |
| ap2.coralogix.com | ap2 (Singapore) | 625240141681 |
| ap3.coralogix.com | ap3 (Jakarta) | 025066248247 |
Archive bucket configuration snippet
{
    "Version": "2012-10-17",
    "Id": "MyPolicyID",
    "Statement": [
        {
            "Sid": "MyStatementSid",
            "Effect": "Allow",
            "Principal": {
                "AWS": "arn:aws:iam::<ACCOUNT_ID>:role/coralogix-archive-<REGION>"
            },
            "Action": [
                "s3:GetObject",
                "s3:ListBucket",
                "s3:PutObject",
                "s3:PutObjectTagging",
                "s3:GetObjectTagging",
                "s3:DeleteObject",
                "s3:DeleteObjectVersion",
                "s3:DeleteObjectTagging",
                "s3:DeleteObjectVersionTagging"
            ],
            "Resource": [
                "arn:aws:s3:::<bucket name>",
                "arn:aws:s3:::<bucket name>/*"
            ]
        }
    ]
}
Click Save changes.
Copy and save the name of the archive for your Coralogix platform setup.
KMS encrypted bucket (optional)
If your bucket needs to be encrypted and you are using KMS, you will need to grant Coralogix permission to use the specific key to encrypt and decrypt the data when we store it on your bucket. Only those keys that are ‘Customer Managed’ may have their policy modified.
Access KMS and choose the key used for encryption. Note: The key must be in the same region as your archive bucket.
Edit the Key Policy and add the highlighted section below to your KMS key policy or copy the code to give your root user full access.
{
    "Version": "2012-10-17",
    "Id": "key-consolepolicy-3",
    "Statement": [
        {
            "Sid": "Enable Coralogix Permissions",
            "Effect": "Allow",
            "Principal": {
                "AWS": "arn:aws:iam::<ACCOUNT_ID>:role/coralogix-archive-<REGION>"
            },
            "Action": [
                "kms:Encrypt",
                "kms:Decrypt",
                "kms:ReEncrypt*",
                "kms:GenerateDataKey*",
                "kms:DescribeKey"
            ],
            "Resource": "*"
        },
        {
            "Sid": "Enable root Permissions",
            "Effect": "Allow",
            "Principal": {
                "AWS": "arn:aws:iam::<your-user>:root"
            },
            "Action": "kms:*",
            "Resource": "*"
        }
     ]
}
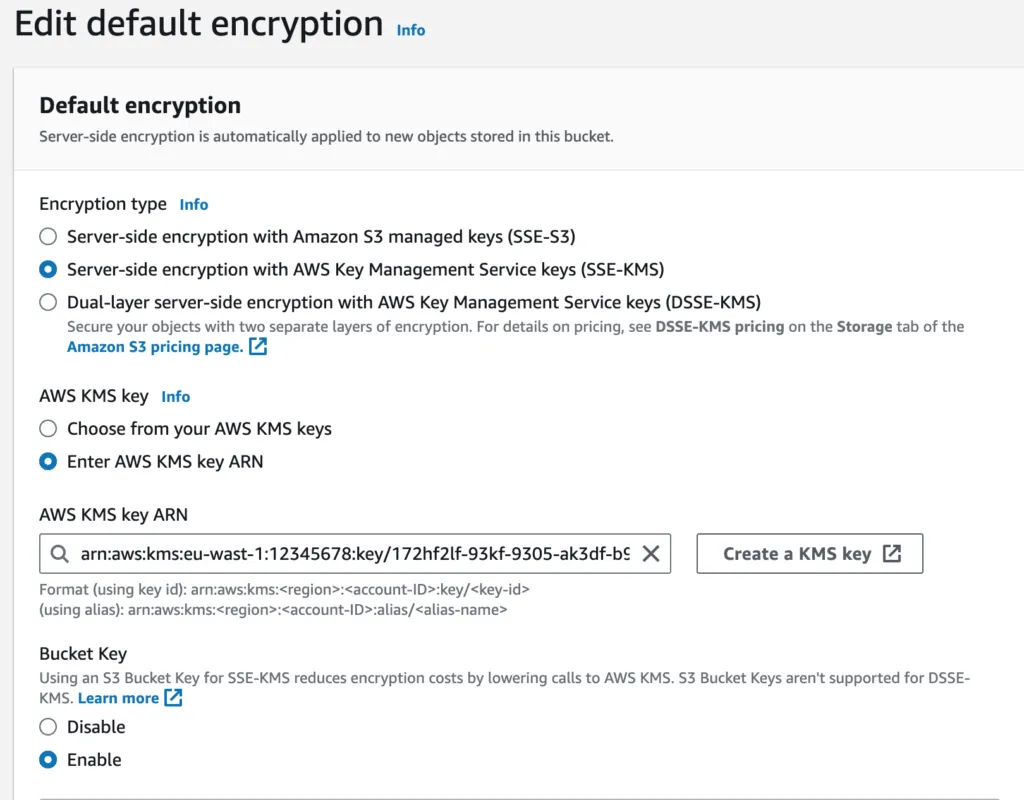
Add the key to the S3 bucket. Navigate go to your archive bucket. Under Properties, edit the Default encryption.

Select Server-side encryption with AWS Key Management Service keys (SSE-KMS) and insert your KMS ARN. Enable the Bucket Key. Click Save changes.
Notes:
- For key policy, an asterisk "*" on the resource field refers to the specific KMS key and not all resources.
Coralogix platform setup
Select the Data Flow tab and click on Setup Archive.
Choose from two bucket options: one for logs & traces (CX data) and one for metrics. You cannot use the same bucket for metrics and logs together.
Query your Metrics S3 bucket through our hosted Grafana metric index or use our plugin and input metrics_index.
Changing your S3 bucket destination
To update your S3 bucket destination, modify the bucket name in your platform setup.
When you update the S3 bucket destination used for storing your data, there is no disruption to data availability or query functionality. The system automatically tracks the change and ensures continuity:
-
Historical data remains accessible even after the bucket switch.
-
New data is written to the new bucket, starting from the moment of the change.
-
When querying across a time range that spans both buckets, the system automatically pulls data from both sources as needed—transparently. It has no effect on the query you write.
Understand and avoid excessive S3 costs
Avoid excess S3 costs when using Coralogix direct S3 queries.
Billing of S3 API calls
S3 API calls are billed to your AWS account based on the file tier and AWS pricing.
Overview of Amazon S3 infrequent access storage class
Amazon S3 Infrequent Access storage class is ideally suited for data that isn’t accessed frequently but requires quick accessibility when needed. This storage class offers a cost-effective solution for storing such data. Coralogix customers must understand the specific cost implications of accessing data within this tier.
Cost considerations for Coralogix and Amazon S3 infrequent access
For applications utilizing Coralogix in conjunction with Amazon S3's Infrequent Access storage, it’s critical to be aware that accessing data stored in this tier might lead to additional costs, especially for querying the data from the Coralogix UI. This is due to the unique pricing structure Amazon S3 applies to data in the infrequent access category.
Ensure optimal data storage management
To ensure optimal data storage management and avoid unexpected costs, we advise all of our customers to review AWS S3 pricing and familiarize themselves with the details of AWS S3 pricing, especially the sections on the Infrequent Access storage class. Using any tier other than S3 Standard may incur additional AWS costs.