Send logs using Amazon Data Firehose
Amazon Data Firehose delivers real-time streaming data to destinations like Amazon Simple Storage Service (Amazon S3), Amazon Redshift, or Amazon OpenSearch Service (successor to Amazon Elasticsearch Service), and now supports delivering streaming data to Coralogix. There is no limit on the number of delivery streams to be used for retrieving data from multiple AWS services.
Coralogix is an AWS Partner Network (APN) Advanced Technology Partner with AWS Competencies in DevOps. The platform enables you to easily explore and analyze logs to gain deeper insights into the state of your applications and AWS infrastructure. Analyze all of your AWS service logs while storing only those you need. Generate metrics from aggregated logs to uncover and alert on trends in your AWS services.
Setup options
-
Automated Integration Package (Recommended). Streamline ingesting and analyzing logs from your AWS resources using our automated integration packages.
-
Manual Integration. Alternatively, use our manual integration below.
-
Terraform. Install and manage the Firehose Logs integration with AWS services as modules in your infrastructure code.
-
CloudFormation. Install our Amazon Data Firehose Logs with CloudFormation Template and incorporate the configurations and settings via CloudFormation to automate your Firehose logs collection setup and management.
Automated integration packages
Streamline your setup process using our automated integration depending on the integration type (e.g. CloudWatch, WAF). The selected package lets you preconfigure and deploy a template, replicating the manual setup
Integration options
Select one of the integration types based on the format of the logs that are being sent:
-
AWS CloudWatch (JSON) - CloudWatch logs store records of events and data generated by various AWS resources, applications, and services. These logs provide insights into system behavior, errors, and operational performance.
-
AWS CloudTrail (CloudWatch) - CloudTrail provides comprehensive records of actions performed within your Amazon Web Services (AWS) account. This includes API calls, configuration changes, and user activities.
-
Web Application Firewall (WAF) - WAF logs are detailed records of web traffic and security events generated by AWS Web Application Firewall. These logs contain critical information about incoming requests, such as IP addresses, request types, response codes, and potential security threats or attacks.
-
Amazon Elastic Kubernetes Service (EKS) Fargate - EKS Fargate logs are the records of events, activities, and information generated by containers running within the EKS Fargate environment. These logs provide essential insights into the operation and performance of your containerized applications.
-
Generic Logs - This integration provides a wider array of data sources, including
DefaultandRawTexttypes. Its generic nature allows you to select the source of your logs flexibly. You can also define the application and subsystem names as dynamic extractions during the setup, accommodating various AWS resources and services.
Configuration
STEP 1. From your Coralogix toolbar, navigate to Data Flow > Integrations.
STEP 2. In the Integrations section, search "Firehose" and select one of the following:
-
AWS CloudWatch Logs via Firehose
-
AWS CloudTrail Logs via Firehose
-
AWS EKS Fargate Logs via Firehose
-
AWS WAF Logs via Firehose
-
AWS Generic Logs via Firehose
STEP 3. Select ADD NEW.
STEP 4. Input your integration details.
-
Integration Name. Enter a name for your integration. This will be used as a stack name in CloudFormation.
-
API Key. Enter your Send-Your-Data API key or select CREATE A NEW KEY to create a new API key for the integration.
-
Application Name. Enter an application name. The default name is AWS.
-
Subsystem Name. Enter a subsystem name. The default name
-
Kineses Stream ARN. [Optional] Enter the ARN of the Kinesis stream if using Amazon Data Streams as a source for logs.
-
Input Source [for Generic Logs Integration]. The data source in Amazon Data Firehose determines the
integrationTypeparameter value. For extracting theapplicationNameandsubsystemNamevalues dynamically, an explanation is in the Manual Setup: Step 4 and a reference table in the Dynamic Values Table section of this document. -
AWS Region. Select your AWS region from the dropdown menu.
STEP 5. Select NEXT.
STEP 6. Review the instructions for your integration. Select CREATE CLOUDFORMATION.
STEP 7. You will be rerouted to the AWS website. Verify that all of the auto pre-populated values are correct. Select Create Stack.
STEP 8. Return to the Coralogix application, where you will find instructions on configuring the log delivery from the selected input source to AWS Firehose (if relevant).
Notes:
If you provide a Kinesis Stream ARN, Coralogix assumes that the data is in the stream and does not provide any additional instructions. It is the user’s responsibility to deliver data to the stream. In place of the instructions, you will see a message that prompts the user to confirm the integration.
STEP 9. Select COMPLETE to close the module.
STEP 10. [Optional] Deploy the extension package of your choice to complement your integration needs. We offer the following extensions for data originating from CloudTrail and WAF:
-
AWS CloudTrail
-
AWS WAF
STEP 11. View the logs by navigating to Explore > Logs in your Coralogix toolbar. Find out more here.
Manual setup
Configuration
STEP 1. Navigate to the Amazon Data Firehose console and select ‘Create delivery stream’.
STEP 2. Under ‘Select source and destination’:
-
Source: Select Direct PUT
-
Destination: Select Coralogix
-
Delivery stream name: Fill in the desired stream name.
STEP 3. Scroll down to ‘Destination settings’:
-
HTTP endpoint URL: Select a URL based on your Coralogix domain and region.
-
Private key: Enter your Coralogix Send Your Data – API key.
-
Content encoding: Select GZIP.
-
Retry duration: Select 300 seconds.
STEP 4. Scroll down to ‘Parameters’. This section allows you to add and configure additional parameters surrounding the Coralogix platform.
The following parameters are available:
| Parameter | Description |
|---|---|
| applicationName | A comma-separated list of application name sources |
| subsystemName | A comma-separated list of subsystem name sources |
| integrationType | Data structure: - CloudWatch_JSON: Data from CloudWatch log groups - WAF: CloudWatch_CloudTrail - EksFargate - Default - RawText: Use for VPC flow logs |
A name source can be a literal string (something), a quoted string ("something"), or a field reference (e.g. ${logGroup}). Sources in a list are evaluated in order, variables without a value are skipped. For example, ${applicationName}, MyApp for a Default integration will use applicationName field if available, otherwise it will default to MyApp.
The Dynamic Values Table section in this document serves as a reference for setting the applicationName and subsystemName dynamically.
Notes:
-
By default, your delivery stream name will be used as ‘applicationName’ and ARN as ‘subsystemName’.
-
To override the associated ‘applicationName’ or ‘subsystemName’, add a new parameter with the desired value.
-
Key: ‘applicationName’ , value – ‘new-app-name’
-
Key: ‘subsystemName’ , value – ‘new-subsystem-name’
-
-
The source of the data in Firehose determines the ‘integrationType’ parameter value:
-
For CloudWatch logs, use
CloudWatch_JSON. -
For CloudTrail logs in CloudWatch, use
CloudWatch_CloudTrail. -
For logs coming from EKS Fargate using our guide, use
EksFargate. -
For data sources matching the Coralogix log ingestion format, use
Default. -
For other data sources, use
RawText. This moves all the text totextfield of log, adds severity ofInfo, and generates a current timestamp. All further parsing of these logs should be done using parsing rules. -
For logs coming from AWS WAF, use
WAF. This requires configuration on WAF as follows:
-


-
Without adding the ‘integrationType’ parameter, the
Defaultintegration type is selected. -
For integration of type
Default, the logs should be structured according to our REST API rules.
STEP 5. Set up a recovery bucket (recommended). Enabling source data backup ensures the data can be recovered if the record processing transformation does not produce the desired results.
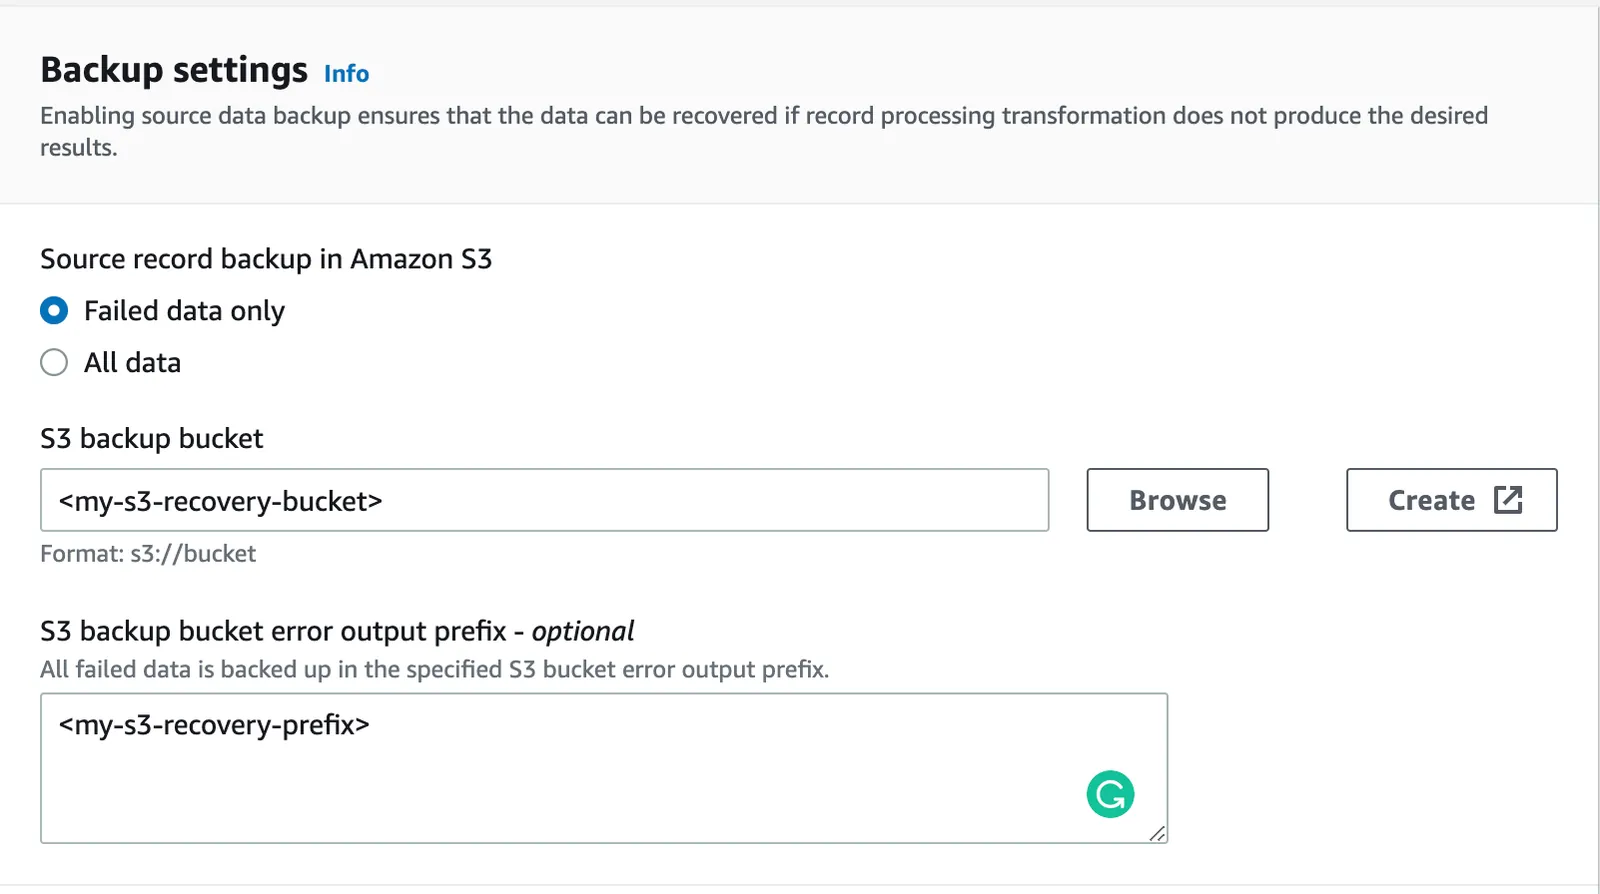
STEP 6. Scroll down to ‘Backup settings’:
-
Source record backup in Amazon S3: We suggest selecting Failed data only.
-
S3 backup bucket: Select an existing bucket or create a new one.
-
Retry Duration: 300 seconds.
-
Buffer hints: Set Buffer Size to 1 MiB.
-
Compression, encryption: Leave these fields as is.
STEP 7. Review your settings and select Create delivery stream.
Logs subscribed to your delivery stream will be immediately sent and available for analysis within Coralogix.
Data source configuration
Below are a couple of ways to connect your data source to Firehose.
CloudWatch logs
To send your logs to Coralogix, create a subscription filter inside your CloudWatch log group.
First, create a new role in IAM for your Cloudwatch log group to allow sending data to Firehose.
Go to the IAM console and select ‘Roles’ under ‘Access management’.
Select ‘Create role’ on the right.
Under ‘Trusted entity type’ select ‘Custom trust policy’ and insert this policy.
{
    "Version": "2012-10-17",
    "Statement": [
        {
            "Effect": "Allow",
            "Principal": {
                "Service": "logs.<region_code>.amazonaws.com"
            },
            "Action": "sts:AssumeRole"
        }
    ]
}
Change <region_code> into your AWS region. e.g us-east-1
In ‘Add permissions’, select ‘Create policy’.
On the opened window, select the ‘JSON’ tab and insert this policy:
{
    "Version": "2012-10-17",
    "Statement": [
        {
            "Effect": "Allow",
            "Action": [
                "firehose:PutRecord",
                "firehose:PutRecordBatch"
            ],
            "Resource": [
                "<firehose_ARN>"
            ]
        }
    ]
}
Change <firehose_ARN> to your Firehose Amazon Resource Name (ARN).
After creating the policy, go back to the role creation page and select the refresh button.
Pick the newly created policy.
Give your role a name and create it.
After creating the role, go to the Cloudwatch console and select ‘Logs groups’ under the ‘Logs’ side menu.
Create a new subscription filter for the relevant log group – <Your_log_group> -> ‘Subscription filters’ -> ‘Create Firehose subscription filter’.
Under ‘Select destination’:
-
For ‘Destination account’ select ‘Current account’
-
For ‘Firehose delivery stream’ select the created firehose delivery stream
Scroll down to ‘Grant permission’:
- For ‘Select an existing role’ select the role created above
Scroll down and select ‘Start streaming’.
Logs coming to your Cloudwatch log group will also be directed to Firehose.
Note: Use the correct integration type inside your Firehose configuration.
Kinesis data stream
To start sending your Kinesis data stream logs to Coralogix, connect the Data stream to Firehose.
Go to the Kinesis Data Stream console and select ‘Create data stream’.
Under ‘Data stream configuration’:
- Data stream name: Enter the name of the data stream
Scroll down to ‘Data stream capacity’:
- Capacity mode: Select ‘On-demand’
After that scroll down and select ‘Create data stream’.
Note: to connect a kinesis data stream to a firehose delivery stream the delivery stream must use Amazon kinesis data streams as its source instead of Direct PUT .
Terraform module setup
Using Coralogix Terraform modules, you can easily install and manage Coralogix integrations with AWS services as modules in your infrastructure code. Our open-source modules are available on our GitHub and in the Terraform Registry. Visit our full Amazon Data Firehose Terraform Module — Logs documentation for more info.
For logs, install Amazon Data Firehose by adding this declaration to your Terraform project:
module "cloudwatch_firehose_coralogix_logs" {
  source                         = "coralogix/aws/coralogix//modules/firehose-logs"
  private_key                    = "XXXXXXXX-XXXX-XXXX-XXXX-XXXXXXX"
  firehose_stream                = "coralogix-firehose-logs"
  coralogix_region               = "Europe"
  integration_type_logs          = "Default"
  source_type_logs               = "DirectPut"
}
Dynamic values table
For application name and/or subsystem name to be set dynamically in relation to their integrationType's resource fields (e.g. CloudWatch_JSON's loggroup name, EksFargate's k8s namespace). The source's variable can be mapped as a string literal with pre-defined values:
| Field | Source Var | Expected Parameter | Integration Type | Notes |
|---|---|---|---|---|
| applicationName field in logs | applicationName | ${applicationName} | Default | Needs to be supplied in the log to be used |
| subsystemName field in logs | subsystemName | ${subsystemName} | Default | Needs to be supplied in the log to be used |
| CloudWatch LogGroup name | logGroup | ${logGroup} | CloudWatch_JSONCloudWatch_CloudTrail | Supplied by AWS |
kubernetes.namespace_name field | kubernetesNamespaceName | ${kubernetesNamespaceName} | EksFargate | Supplied by the default configuration |
kubernetes.container_name field | kubernetesContainerName | ${kubernetesContainerName} | EksFargate | Supplied by the default configuration |
| name part of the log.webaclId field | webAclName | ${webAclName} | WAF | Supplied by AWS |
The expected parameter for the field must be exact with no extra characters. Characters may, however, be exchanged - for instance, subsystemName parameter with value ${applicationName} or )
Note: RawText integrationType does not support dynamic values.
Private Link
Amazon Kinesis Data Firehose is currently unable to connect to Coralogix via AWS PrivateLink primarily because Kinesis Data Firehose does not support delivering data to custom HTTP endpoints over AWS PrivateLink or VPC endpoints.