Custom enrichment
Enhance log data with additional business, operational, or security context to improve log analysis and usability.
Overview
Custom Enrichment allows you to enhance your logs by adding critical contextual data that may not be available at runtime. This enrichment is done by appending fields to your JSON logs based on specific matches using a custom data source you define.
Here are some use cases illustrating how Custom Enrichment can benefit you:
Monitoring
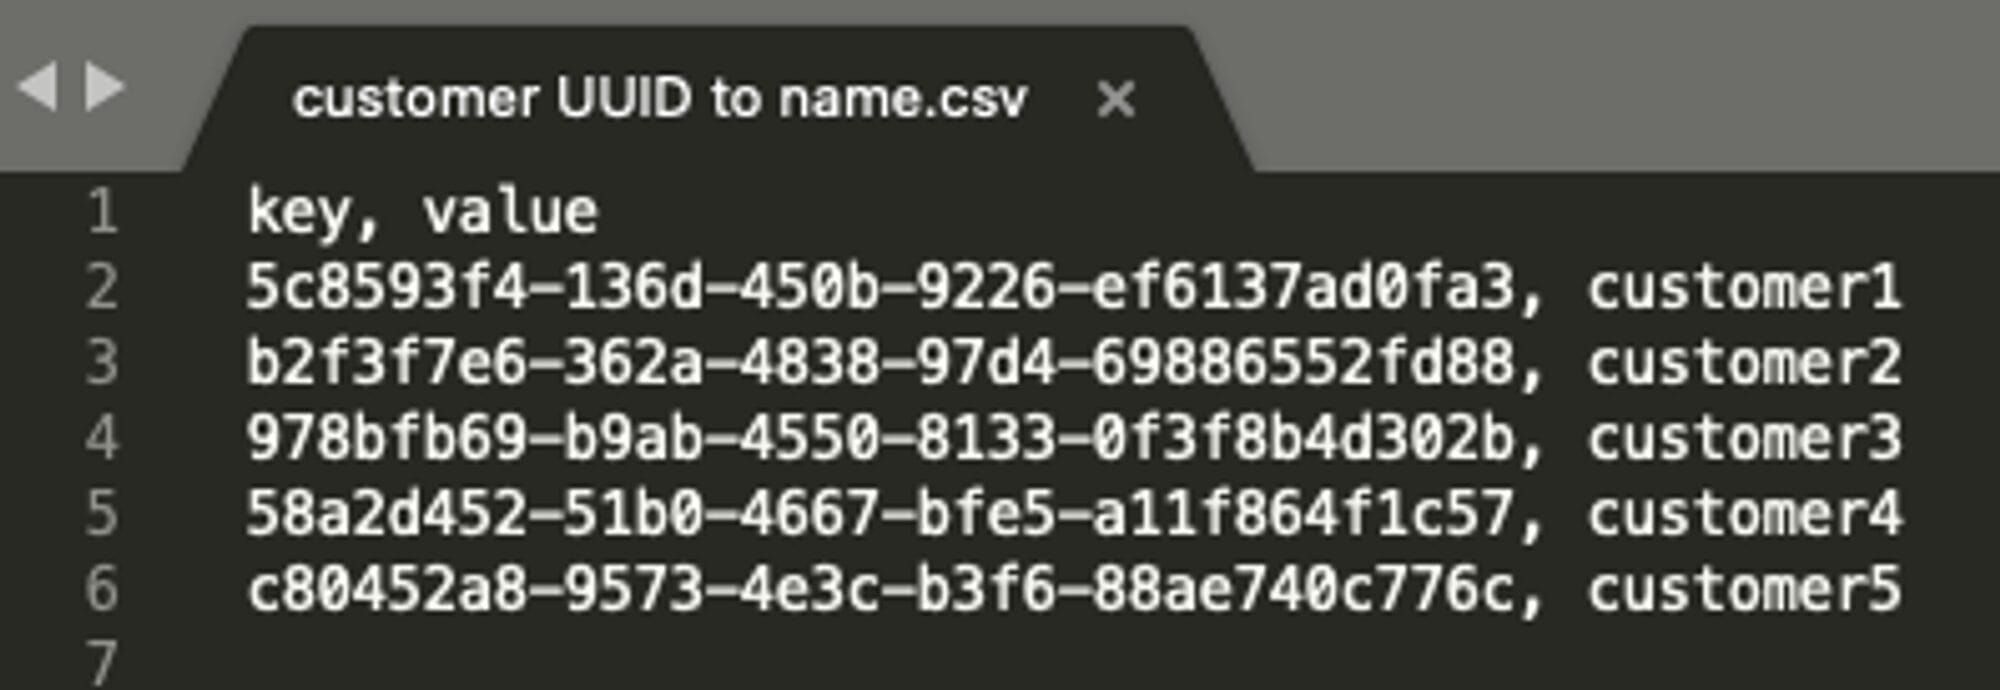
Gain visibility into customer names based on customer IDs.
Suppose you have a log with a UUID representing a customer but no field containing the customer's name. By including a field with the customer's name, you can visualize and search logs based on this information. With Custom Enrichment, set up a CSV file mapping each UUID to a customer name, enriching the logs automatically as they are ingested.
Security
Receive alerts when users browse domains outside of your allow list.
Consider a log field with a domain name representing where the user is browsing. You want to create an alert for any attempts to access your application from unauthorized domains. By setting up a CSV file with a list of allowed domains, you can enrich logs with a field containing the word "allowed" for each allowed domain. Then, create an alert for logs not containing this field, using a query such as NOT domain_enriched:allowed.
Example
Enriching logs with user details provides immediate context about actions performed, enabling better security monitoring and incident response. This example demonstrates how a log is transformed with string-to-string or string-to-JSON mapping.
Original log
{
  "action": "DeleteFile",
  "user_id": "1234"
}
Enriched log with string-to-string mapping
{
  "action": "DeleteFile",
  "user_id": "1234",
  "user_id_enriched": "John White"
}
Enriched log with string-to-JSON mapping
{
  "action": "DeleteFile",
  "user_id": "1234",
  "user_id_enriched": {
    "name": "John White",
    "role": "DevOps Engineer",
    "department": "IT"
  }
}
Log enrichment methods
Custom Enrichment supports two methods:
- Automatic enrichment during ingestion
- Dynamic enrichment using DataPrime syntax
Automatic enrichment
Automatic enrichment appends additional data to logs as they are ingested. This ensures enriched logs are consistently available for queries across the Coralogix platform, including in Alerts and Custom Dashboards.
DataPrime query enrichment
DataPrime’s enrich command allows dynamic enrichment at query time without increasing stored log size. This approach enables retroactive enrichment of previously ingested logs.
Prepare a CSV file
To define your custom data source, create a CSV file with either string-to-string or string-to-JSON mappings. CSV files must contain a minimum of two columns, all of which must have titles. Users may select any column from the file that maps to the log field and the columns from which to enrich the logs.
String-to-string mapping
For simple key-value mapping, use a CSV file with two columns.
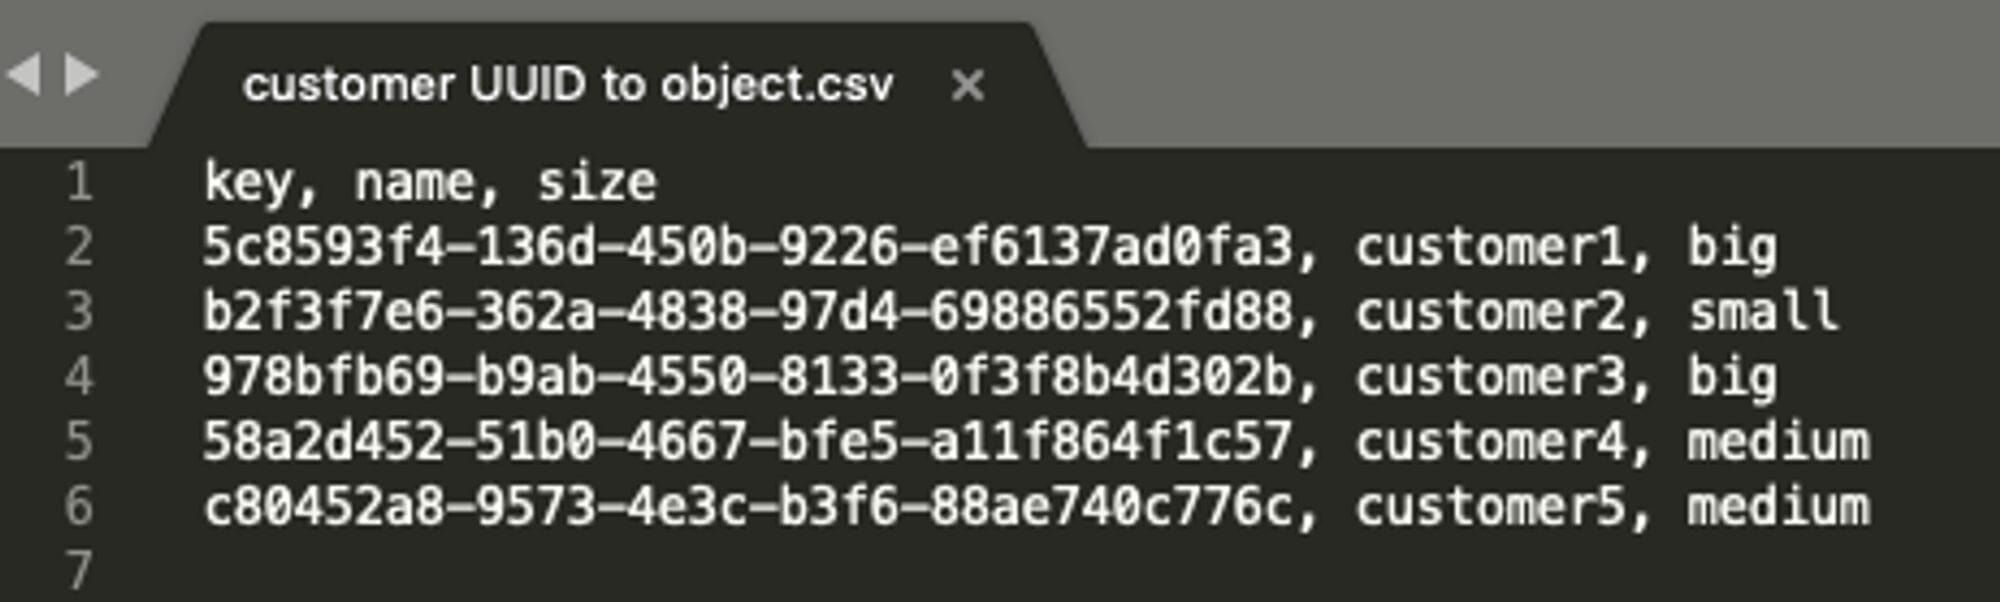
String-to-JSON mapping
For richer context, include multiple columns in a CSV file. There is no limitation on the number of columns that may be included.
Downloadable CSV files
Below is a curated collection of CSV enrichment files that you may download and leverage to build your own custom enrichments:
| Custom Data Enrichment (CSV) | Description |
|---|---|
| area-code-to-state.csv | Maps US area codes to their corresponding state code(s). |
| us-state-or-terrirory-code-to-state-or-country-name.csv | Maps US state/territory codes to their corresponding names. |
| cisco-cipm-return-codes-to-description.csv | Maps Cisco IP Manager return codes to their corresponding descriptions. |
| country-phone-code-to-country-name.csv | Maps country calling codes to country names. |
| country-territory-to-currency-symbol-code-unit.csv | Maps countries to their currency names, symbols, and ISO codes. |
| country-to-currency-name-code-number-and-minor-unit.csv | Maps countries to currency names and alphabetic/numeric codes. |
| cve-code-to-cve-description.csv | Maps CVE identifiers to their descriptions. |
| date-to-day-of-the-week.csv | Maps dates to days of the week (Jul 30 2021 → Feb 07 2033). |
| gmt-offset-to-civilian-code-during-standard-time.csv | Maps GMT offsets (e.g., +0000) to civilian time‑zone codes (e.g., GMT). |
| iana-network-protocol-number-to-protocol-name.csv | Maps IANA protocol numbers to protocol names. |
| iana-network-protocol-number-to-protocol-keyword-to-protocol-name.csv | Maps IANA protocol numbers to protocol keywords and names. |
| iso-country-code-to-country-name.csv | Maps country names to short and long ISO codes. |
| naics-industry-codes-to-description.csv | Maps NAICS industry codes to their official titles (2017). |
| cloudfront-locations.csv | Maps IATA airport codes to AWS CloudFront CDN edge locations. |
Configuration
- Navigate to Data Flow, then Data Enrichment.
- Select Enrich custom data to open the editor.
- Provide a name and description, then upload your CSV file.
- To enable automatic enrichment, define how logs should be enriched during ingestion:
- Field: Select one or more fields for enrichment.
- Enriched Field Name: Customize the enriched field name.
- Lookup Column: Choose the CSV column that maps to the log field.
- Columns for Enrichment: Select additional CSV columns to enrich the logs.
- Select Save to create the enrichment.
Download a CSV
In the enrichments table, open the more actions menu for the enrichment, then select Download CSV to retrieve the full CSV file.
View and query in Explore
In the enrichments table, open the more actions menu for the enrichment, then select View in Explore screen to preview the uploaded CSV as a dataset in Explore, where you can filter, transform, and aggregate the data using DataPrime.
The Explore UI displays up to 2,000 rows, but queries apply to the entire dataset.
Limitations
- CSV files are limited to 150,000 rows.
- Files exceeding 10,000 rows can only be used for DataPrime query enrichment, not automatic ingestion enrichment.
Required permissions
Depending on which actions you would like to take with Custom Enrichments, the following permissions are necessary.
| Resource | Action | Description |
|---|---|---|
enrichments:team-custom-enrichment | ReadConfig | View enrichment configuration |
enrichments:team-custom-enrichment | ReadData | View enrichment data |
enrichments:team-custom-enrichment | UpdateConfig | Manage enrichment configuration |
enrichments:team-custom-enrichment | UpdateData | Manage enrichment data |
API support
Refer to our Custom Enrichment API documentation to create and manage enrichments programmatically.
Additional resources
Next steps
Use lookup tables to enrich and filter logs with additional context at query time in Lookup tables.