GCP logs
Google Cloud Platform offers integrated monitoring and observability tools that enable users to gather and analyze logs from their GCP resources. Send these GCP logs to Coralogix to search, analyze, and visualize your data. Gain insights into application behavior, identify errors, and troubleshoot problems effectively.
Overview
Google Cloud Platform (GCP) logs encompass all types of log entries generated across various Google Cloud Platform services and resources. These logs capture a wide range of information, including activities, events, and system operations related to your entire GCP environment. This can include logs from compute instances, databases, networking, security, access, and more.
The integration collects logs that are published to a GCP Pub/Sub topic to which one has a subscription, referenced by a subscription name.
Benefits
By integrating Coralogix seamlessly with your GCP environment, you can gain a comprehensive understanding of your system’s performance, user experiences, and security. This enables you to proactively detect issues, troubleshoot effectively, and optimize your resources, ultimately improving the reliability and efficiency of your applications.
Prerequisites
To begin, you must have an existing project within your Google Workspace.
Route GCP logs to the Pub/Sub topic
STEP 1. Log in to the GCP console.
STEP 2. Go to Pub/Sub / Topics and create a Topic. Uncheck the ‘Add a default subscription’ checkbox.
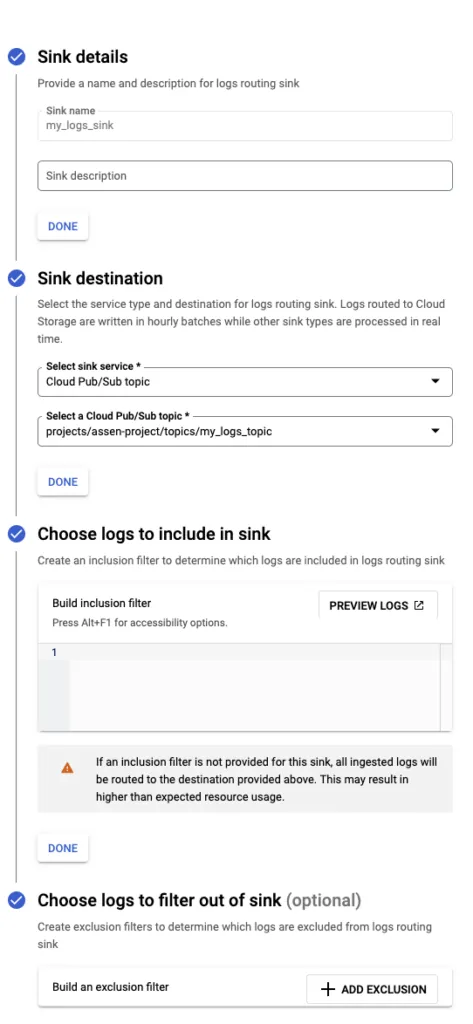
STEP 3. Go to Logging / Logs Router and create a Sink.
-
Select sink service: Cloud Pub/Sub topic
-
Select the Cloud Pub/Sub topic created in the previous step
-
Choose logs to include in Sink: Leave blank. Do not denote logs that should be included or excluded.
Create a pull subscription
Use "Google Cloud Pub/Sub Topic created in STEP 2 [above] within your Google Cloud project. The following property settings are mandatory:
-
Delivery type: Pull
-
Exactly once delivery: Disabled
All other property settings below are recommended but not mandatory.
Setup
1. Configure a Service Account to facilitate automated intermediation.
2. From your Coralogix toolbar, navigate to Data Flow > Integrations.
3. From the Integrations section, select GCP Logs.
4. Click + ADD NEW.
5. Pick the ACCOUNT KEY/IMPERSONATION authentication flow and click NEXT (available for version 0.2.0 and later).
6. (For key-based authentication only) If you haven’t already done so, click GO TO GCP ACCOUNT and create a key file. Then, click NEXT.
7. (For key-based authentication only) Click SELECT FILE and upload the key file you previously created. A confirmation will appear when the file is uploaded successfully. Click NEXT.
8. Fill in the settings:
-
Integration Name: Name your integration. This field is automatically populated, but can be changed if you want.
-
Specific configuration for version 0.0.1
- Application Name: Naming conventions for production, development and/or staging environments.
- Subsystem Name: Naming conventions for production, development and/or staging environments.
-
Specific configuration for version 0.1.0 and later
-
Application Name templates: Templates from which the application name is derived.
-
Subsystem Name templates: Templates from which the subsystem name is derived.
Working with templates
Template syntax, e.g.
${variable}, supports the following variables:projectIdorganizationIdbillingAccountIdfolderIdlogIdresourceType
Most of the variable values are extracted from the
logNamefield of the LogEntry. The only outlier isresourceType, which is taken from theresource.typefield of the log entry. The first template with all variables existing will be used.
In addition, the special template values
applicationNameandsubsystemName(case-insensitive) can be used to extract values directly from the log message JSON payload. The lookup order is:jsonPayload.applicationName/jsonPayload.subsystemName(GCP LogEntry structured payload)- Top-level
applicationName/subsystemName(custom logs) metadata.applicationName/metadata.subsystemName
When using these special values without a constant fallback template,
defaultis automatically used as a fallback.
Example 1 — Variable templates
Application/Subsystem Name configuration using templates: [
gcp/${projectId},gcp/prod]The resulting value will be:
gcp/my-project-123for a log entry withlogNameset toprojects/my-project-123/logs/my-loggcp/prodfor a log entry withlogNameset toorganization/my-org-123/logs/my-log
Example 2 — Extraction from JSON payload
Application Name configuration using templates: [
applicationName]For a log entry with
jsonPayload: {"applicationName": "my-app"}, the resulting application name will bemy-app. If the field is missing, the fallback valuedefaultis used.NoteBoth Application Name and Subsystem Name must contain either a constant value for fallback in case of a missing field, or use
applicationName/subsystemNamewhich provide an automaticdefaultfallback.
-
-
Subscription Name: This is the subscription name you previously created in Prerequisites.
-
GCP Project ID: ID of a GCP project that you perform the setup for (for impersonation-based authentication only).
-
GCP Billing Project Id: A caller-specified project for quota and billing purposes. The caller must have
serviceusage.services.usepermission on the project. -
Service Account Email: Email of the service account you configured at the beginning (for impersonation-based authentication only).
Step 9. (For impersonation-based authentication only)
-
Click NEXT
-
Copy the email of the Coralogix principal
-
Click GO TO GCP ACCOUNT
-
Select the service account you created earlier, go to the PERMISSIONS tab, click GRANT ACCESS, paste the copied email into the NEW PRINCIPAL field, assign the
Service Account Token Creatorrole and click SAVE -
Navigate back to the Coralogix portal
It may take a few minutes for the GCP IAM role change to take effect.
Step 10. Click COMPLETE and finish setup.
Wait a few minutes for the integration to take effect and your data will be available on the platform.