JumpCloud
Note
We strongly recommend using our JumpCloud integration for a simplified setup, as it enables direct integration without the need for a middleware server.
JumpCloud’s open directory platform allows the user to unify technology stack across identity, access, and device management, in a manner that doesn’t sacrifice security or functionality.
JumpCloud can be integrated to Coralogix using a designated script
Prerequisites
A virtual machine used as an intermediate - It is recommended to use at least 2 vCPU and 2GB of RAM
Access to JumpCloud platform as Administrator for the API Key
It is recommended to create a read-only administrator account for the API key used in the integration
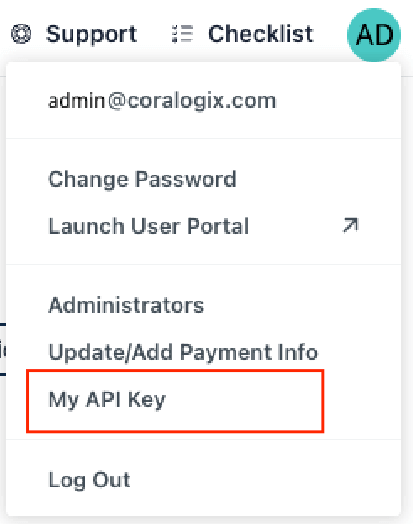
The API key can be found by clicking your initials on the top right of the JumpCloud platform and then clicking "My API Key"
STEP 1. Creating the relevant files in the virtual machine
Login to the Instance that will be used for shipping the JumpCloud logs
Optional - Create a directory called "JumpCloud" to host all the integration files
Copy the script content and paste it in a file called
script.ps1on the instance in a location of your choosingCopy the configuration file content and paste it in a file called
configurations.jsonon the instance in a location of your choosingEdit the configuration file in the following manner
jumpcloud.api_key - Your JumpCloud admin private key.
siem.headers.private_key - Your Coralogix private key. can be found in your Coralogix account under Settings > Send Your Data. Learn more about your Send-Your-Data API key.
siem.url - https://ingress./logs/datastream
- Coralogix domain - the region-specific endpoint associated with your Coralogix Account. You can find your Domain here.
custom_log_fields.reqHost - Application name
custom_log_fields.customField - Subsystem name
STEP 2. Installing PowerShell (Non Windows)
In non-Windows operation systems, install PowerShell on the instance by copying and running the following script
# Update the list of packages
sudo apt-get update
# Install pre-requisite packages.
sudo apt-get install -y wget apt-transport-https software-properties-common
# Download the Microsoft repository GPG keys
wget -q "https://packages.microsoft.com/config/ubuntu/$(lsb_release -rs)/packages-microsoft-prod.deb"
# Register the Microsoft repository GPG keys
sudo dpkg -i packages-microsoft-prod.deb
# Update the list of packages after we added packages.microsoft.com
sudo apt-get update
# Install PowerShell
sudo apt-get install -y powershell
# Start PowerShell
pwsh
Note: After the PowerShell installation was successful, create a file called powershell.config.json in the correct path (the example uses PowerShell 7)
For MacOS - /usr/local/microsoft/powershell/7
For Linux - /opt/microsoft/powershell/7
with the following content
For more information, visit Microsoft documentation
STEP 3. Install the JumpCloud module
STEP 4. Creating the Crontab
- In the virtual machine instance, create a cronjob with the following command (edit according to the files paths you saved on step 1)
- Inside the crontab document, paste the following line
- Save & quit the crontab
After successfully completing the provided steps, logs will start to ingest to the provided Coralogix account
Log example
{
  "jumpcloud": {
    "initiated_by": {
      "id": "637212c33f396457d287dad6",
      "type": "admin",
      "email": "admin@coralogix.com"
    },
    "geoip": {
      "country_code": "IL",
      "timezone": "Asia/Jerusalem",
      "latitude": 32.0803,
      "continent_code": "AS",
      "region_name": "Tel Aviv",
      "longitude": 34.7805,
      "region_code": "TA"
    },
    "useragent": {
      "minor": "0",
      "os": "Mac OS X",
      "os_minor": "15",
      "os_major": "10",
      "os_version": "10.15.7",
      "version": "108.0.0.0",
      "os_patch": "7",
      "patch": "0",
      "os_full": "Mac OS X 10.15.7",
      "major": "108",
      "name": "Chrome",
      "os_name": "Mac OS X",
      "device": "Mac"
    },
    "mfa": false,
    "event_type": "admin_login_attempt",
    "success": true,
    "service": "directory",
    "organization": "637212c33f396",
    "@version": "1",
    "client_ip": "10.20.30.40",
    "id": "639f9ea9ac5d37",
    "jc_timestamp": "2022-12-18T14:57:03.801Z",
    "reqHost": "jumpcloud",
    "customField": "jumpcloud",
    "severity": "info"
  }
}
