Salesforce
Overview
Salesforce is a cloud-based CRM platform that empowers businesses to manage their sales operations, enhance customer engagement, and drive sales growth.
Integrate Salesforce with Coralogix to gain enhanced visibility and real-time monitoring of system events and logs. Salesforce generates detailed logs encompassing system activities, user interactions, and data changes, thereby offering valuable insights into the platform's operations. By leveraging this integration, you can actively monitor your Salesforce environment, optimize its performance, and ensure adherence to security and compliance standards.
Users can choose which types of logs to monitor from a comprehensive list of options, including Platform Event logs and Event Log File logs. This customization empowers organizations to tailor their monitoring strategy according to their specific requirements, ensuring that critical events are promptly detected and addressed.
Integration versions
The integration comes in two versions that differ only in how Coralogix authenticates to Salesforce. The events collected and the data received are identical.
- Version 2.0.0: Client Credentials Flow (recommended for new integrations). Coralogix authenticates with the OAuth 2.0 Client Credentials Flow. There is no browser authorization step: Coralogix uses its own Salesforce app and collects as an integration user that you nominate. Because there is no per-integration token, Coralogix rotating its app credentials never interrupts collection. Follow Set up version 2.0.0.
- Version 1.0.0: Browser authorization (existing integrations). An administrator authorizes the integration in a browser. This version is still supported for integrations already using it; see Set up version 1.0.0. To move an existing integration to 2.0.0, see Upgrade an existing integration to version 2.0.0.
Prerequisites
These apply to both versions.
-
To proceed with the integration, you must have Salesforce administrator permissions.
-
Either a Salesforce Shield subscription or a Salesforce Event Monitoring add-on is required.
-
For Platform Event logs, the following permissions are required:
-
View Real-Time Event Monitoring Events
-
View Threat Detection Events
-
API Enabled
-
-
For EventLogFile logs, the following permissions are required:
-
View Event Log Files
-
API Enabled
-
Coralogix permissions
To configure this integration, users must have all of the following permissions:
| Resource | Action | Description | Explanation |
|---|---|---|---|
| integrations | ReadConfig | View Deployed Integrations | View deployed integration packages. |
| integrations | Manage | Manage Integrations | Deploy, undeploy, and update integrations. |
Find out more about roles and permissions here.
Set up version 2.0.0
Version 2.0.0 uses the OAuth 2.0 Client Credentials Flow, which has no browser authorization step.
Coralogix authenticates with its own Salesforce app and its own consumer key and secret. You never see them, and you never send Coralogix a key, secret, password, or certificate.
Your part is three things: install (approve) that app in your org, choose the user it runs as, and tell Coralogix your My Domain.
The setup has two stages: prepare Salesforce and configure the integration in Coralogix. You can prepare Salesforce on your own first, but the easiest path is to start in Coralogix: as soon as you enter your My Domain, the configuration screen offers ready-made links to the exact Salesforce Setup pages each step needs, so you don't have to build them yourself. Either way, Coralogix will not create the integration until it can reach your org: on the configuration screen you click Test connection, and the Create button stays disabled until that test passes. If you test before Salesforce is ready, the test shows an install link and what to fix. Keep the page open and finish preparing Salesforce; Coralogix keeps re-checking automatically, and the test passes on its own once your org is ready.
You don't need to build any of these links yourself: once you enter your My Domain, the integration's configuration screen shows ready-made links to each of these pages. The table is here for reference, for example for an administrator working in Salesforce without the Coralogix screen open.
Every Setup page referenced below opens directly at https://YOUR_DOMAIN.lightning.force.com/lightning/setup/<page>/home. Replace YOUR_DOMAIN with your My Domain host, the acme in https://acme.my.salesforce.com (a Developer Edition org looks like acme.develop):
| Setup page | Direct link |
|---|---|
| App Manager | https://YOUR_DOMAIN.lightning.force.com/lightning/setup/NavigationMenus/home |
| Manage Connected Apps | https://YOUR_DOMAIN.lightning.force.com/lightning/setup/ConnectedApplication/home |
| Connected Apps OAuth Usage | https://YOUR_DOMAIN.lightning.force.com/lightning/setup/ConnectedAppsUsage/home |
| Users | https://YOUR_DOMAIN.lightning.force.com/lightning/setup/ManageUsers/home |
| My Domain | https://YOUR_DOMAIN.lightning.force.com/lightning/setup/OrgDomain/home |
The one link that can't be listed here is the install/approval link for the Coralogix app. Coralogix generates it for your specific org (see step 2) and shows it in the integration's Install Coralogix app step.
Prepare Salesforce
1. Choose the integration user (the "Run As" user)
Version 2.0.0 collects as a specific Salesforce user that you nominate, the "Run As" user. This is the integration's identity in Salesforce.
The logs Coralogix receives are exactly the logs this user is permitted to see, and nothing more. Choose the user deliberately, and make sure it has the rights below.
The Run As user must:
- Be active.
- Have API Enabled, on a license that permits API access (Chatter Free and some community licenses do not).
- Have the event-viewing permissions listed under Prerequisites, assigned through its profile or a permission set. If the user cannot see an event type, Coralogix cannot collect it.
Recommended:
- Use a dedicated user rather than a person's account, so the integration keeps working when people change roles or leave.
- Give it the API Only User permission, which stops the account being used to log in interactively.
You will need this user's Username, not its email address. The two often look alike but differ: a Salesforce username is unique across all orgs, so it frequently carries a suffix. Find the exact value in Setup under Users, in the Username column.
2. Install the Coralogix app in your org
The Coralogix app must be approved (installed) in your org before it can collect. The easiest way is the install link Coralogix gives you:
- Create the integration in Coralogix (you can do this before finishing Salesforce). When the app isn't in your org yet, the integration waits in an Install Coralogix app step showing an install link.
- Open that link, or send it to a Salesforce administrator. It opens Salesforce's standard approval page for the Coralogix app. Click Allow to add the app to your org.
- If, after approving, the app appears under Setup > Connected Apps OAuth Usage but not yet under Manage Connected Apps, click Install next to it on the OAuth Usage page.
The link opens Salesforce's standard approval page for the Coralogix app. Approving requires a Salesforce administrator. If that isn't you, copy the link and send it to one.
The app enters an org the first time it is approved there, so if you already run a Salesforce integration it is likely present. Check Setup > App Manager (and Connected Apps OAuth Usage) before using the install link.
3. Assign the Run As user to the app
This is the step that actually activates the integration: after the app is installed, you tell Salesforce which user it runs as.
First find the app's type. In Setup, open App Manager and look at the App Type column for the Coralogix Events Collector app:
Both work identically with Coralogix; only the Salesforce screens differ.
3a. Connected app
- In App Manager, open the Coralogix app's action dropdown and select Manage, then click Edit Policies. (The same page is reachable in Setup under Manage Connected Apps.)
- Scroll to the Client Credentials Flow section near the bottom of the page. Next to Run As, click the search icon and pick your integration user from the lookup results. Typing the name straight into the field is rejected as an invalid user. Then save.
:::caution There are two "Run As" fields, so use the right one The Edit Policies page has a second Run As field, under Custom Connected App Handler. Leave that one empty: it configures an Apex plugin, not this integration. Only the Run As inside the Client Credentials Flow section activates collection. :::
The Enable Client Credentials Flow switch on the app itself belongs to Coralogix and is already enabled, so you only nominate the Run As user. If Edit Policies shows no Client Credentials Flow section, contact Coralogix support.
See Configure a Connected App for the OAuth 2.0 Client Credentials Flow.
3b. External Client App
- In Setup, in the Quick Find box, enter
External Clientand select External Client App Manager. - Open the Coralogix app, select the Policies tab, expand OAuth Policies, and click Edit.
- Under OAuth Flows and External Client App Enhancements, select Enable Client Credentials Flow and enter the integration user's Username in Run As (Username).
- Save.
See Configure a Client Credentials Flow.
Salesforce validates both at once. Enabling the flow without a username, or with a username it cannot resolve, is rejected with "Enter a valid execution user for the OAuth client credentials flow." If you see that message, check the value against the Username column in Setup > Users.
A separate setting with a confusingly similar name. It belongs to Headless Identity, applies only to external customer and partner users, and should be left off. It is unrelated to the Client Credentials Flow.
After you save the Run As user, Salesforce takes a few minutes to apply it. Until it does, the connection test in Coralogix keeps failing, which is expected. After such a failure Coralogix re-checks automatically ("keep this page open, we're checking…"), so leave the integration page open. The test passes on its own once Salesforce has applied the change.
4. Note your My Domain URL
You enter this in Coralogix. Find it in Setup under Company Settings then My Domain, as the value of Current My Domain URL, entered with an https:// prefix. It looks like https://yourcompany.my.salesforce.com. Use exactly this value: the lightning.force.com address in your browser's URL bar is the UI domain and is not accepted. Developer Edition orgs use domains like https://yourcompany.develop.my.salesforce.com.
Your My Domain identifies the org, so there is no separate sandbox option. A sandbox domain looks like https://yourcompany--sandbox.sandbox.my.salesforce.com. Whichever domain you enter is the org Coralogix collects from, so to monitor both a sandbox and production, create two integrations.
Configure the integration in Coralogix
-
In the Coralogix UI, go to Data Flow > Integrations.
-
Select Salesforce, then click Connect.
-
Click Add New.
-
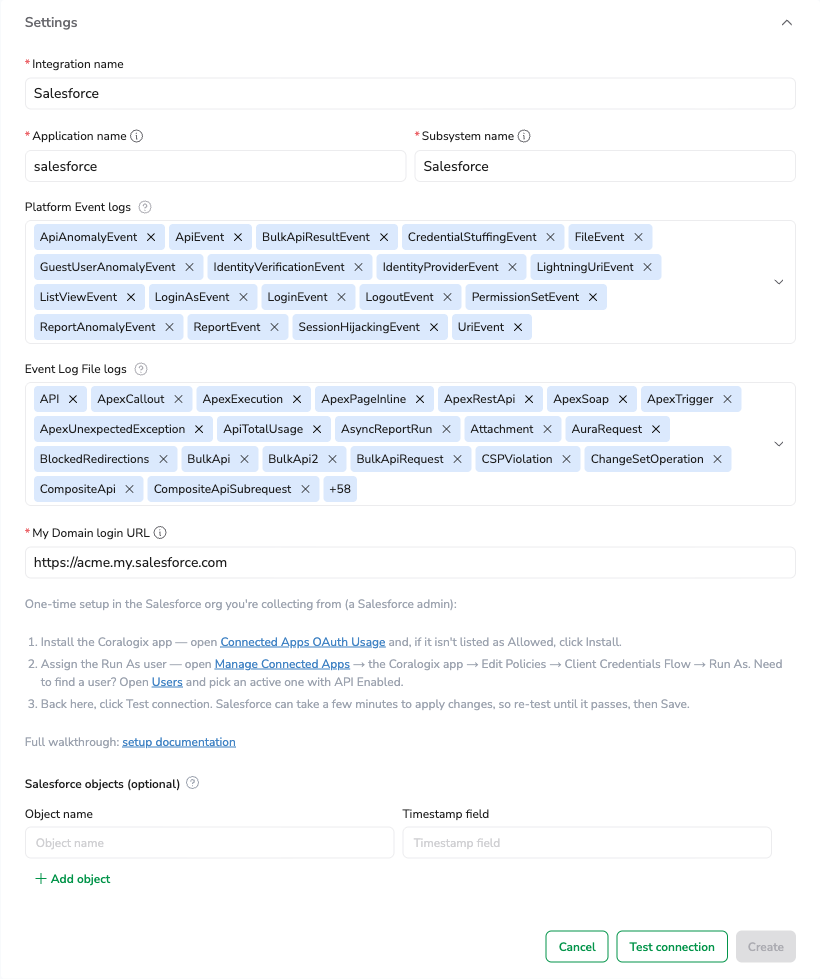
Enter configuration parameters according to your application requirements:
- Integration name – Meaningful name of the Salesforce integration.
- Application name – The Coralogix application name.
- Subsystem name – The Coralogix subsystem name.
- My Domain login URL – Your Salesforce My Domain URL, for example
https://yourcompany.my.salesforce.com. Coralogix requests tokens from this domain, so it must be the org you want to collect from. - Platform Event logs and Event Log File logs – Logs to be collected. By default, all logs for Platform Events and Event Log Files are selected to be sent to Coralogix. Remove any events you do not wish to monitor to prevent unnecessary costs.
- Salesforce objects (optional) – Salesforce objects (Standard Objects or Custom Objects) to be read into Coralogix as logs. Specify the object name and the field that contains the timestamp.
-
Click Test connection. Coralogix verifies the credentials against your org without creating anything yet. One of three things happens:
- Salesforce accepts: the test passes and the Create button is enabled.
- Salesforce refuses: the test reports Salesforce's response and offers an Install Coralogix app link. The app is not installed yet, the Client Credentials Flow is off, or the Run As user is not set or has not propagated. Complete Prepare Salesforce. Salesforce can take a few minutes to apply a change, and after this kind of failure Coralogix re-checks automatically ("keep this page open, we're checking…"), so keep the page open until the test passes, since nothing is created until it does. Editing any field stops the automatic re-check; after a change, test again manually.
- The My Domain URL is invalid: the test fails immediately. Correct the URL and test again.
-
When the test passes, click Create. The integration goes Live and starts collecting straight away. There is no browser authorization step and no waiting for background activation.
Upgrade an existing integration to version 2.0.0
Integrations created on version 1.0.0 authenticate with a token issued when someone authorized the integration in a browser. They keep working, but Salesforce revokes those tokens whenever Coralogix rotates its app credentials, and collection then stops until each integration is authorized again. Upgrading removes that dependency.
Your integration name, selected events, and Salesforce objects are preserved.
-
Complete Prepare Salesforce. The Coralogix app is already in your org from the original authorization, so you are enabling a setting on it and nominating a Run As user rather than adding anything new.
-
In the Coralogix UI, open the integration and click Edit.
-
Change the version to 2.0.0.
-
Enter your My Domain login URL. The Use Sandbox Environment option disappears, because My Domain replaces it.
-
Click Test connection to verify the new credentials, then Save. Coralogix applies the upgrade only after the test passes; if Salesforce is not ready yet, keep the page open. After a setup-pending failure Coralogix re-checks automatically, so nothing changes until it succeeds.
If Salesforce refuses the credentials, the upgrade is abandoned and your existing integration keeps running on its current version, still authorized. Correct the Salesforce configuration and try again. You cannot lock yourself out by attempting this.
Version 2.0.0 runs as the integration user you nominated, not as the person who originally authorized the integration. If that user has narrower access, Coralogix receives fewer logs.
After upgrading, confirm you are still receiving the events you expect. If something is missing, widen the integration user's permissions rather than reverting: the event is being filtered by Salesforce, not dropped by Coralogix.
Set up version 1.0.0
Version 1.0.0 authorizes the integration in a browser. Use this section only for integrations already on version 1.0.0; new integrations should use version 2.0.0.
Configure a Salesforce integration
-
In the Coralogix UI, go to Data Flow > Integrations.
-
Select Salesforce, then click Connect.
-
Click Add New.
-
Enter configuration parameters according to your application requirements:
- Integration name - Meaningful name of the Salesforce integration.
- Application name - The Coralogix application name.
- Subsystem name - The Coralogix subsystem name.
- Use Sandbox Environment - If this option is selected, the Salesforce Sandbox/Test environment will be used instead of the production environment. By default, this option is disabled and the integration connects to the production Salesforce environment.
- Platform Event logs and Event Log File logs – Logs to be collected. By default, all logs for Platform Events and Event Log Files are selected to be sent to Coralogix. Remove any events you do not wish to monitor to prevent unnecessary costs.
- Salesforce objects (optional) – Salesforce objects (Standard Objects or Custom Objects) to be read into Coralogix as logs. Specify the object name and the field that contains the timestamp.
-
Click Authorize. You will be redirected to the Salesforce portal, where you should save the settings and authorize the integration. Make sure to have the required Salesforce administrator permissions defined in the Prerequisites.
-
Revert back to the integration. Click Complete & Authorize.
Salesforce API v66.0 changes
Version 1.0.0 updates the integration to Salesforce API v66.0 with the following changes.
Renamed Event Log File types
The following event types have been renamed to match API v66.0 names. If you have existing alerts, dashboard queries, or parsing rules that reference the previous event type names, update them to use the new names after upgrading to v1.0.0.
| Previous name | New name |
|---|---|
| AsynchronousReportRun | AsyncReportRun |
| ContinuationCalloutSummary | ContinuationCallout |
| DocumentAttachmentDownoads | DocumentAttachmentDownloads |
| MultiblockReport | MultiBlockReport |
| UITelemetryNavigationTiming | UiTelemetryNavigationTiming |
| UITelemetryResourceTiming | UiTelemetryResourceTiming |
New Event Log File types
14 new event types are now available:
- ApexPageInline
- Attachment
- BlockedRedirections
- BulkApiRequest
- CSPViolation
- CompositeApi
- CompositeApiSubrequest
- DatabaseSave
- InvocableAction
- PermissionUpdate
- Pricing
- SalesforceLoginAs
- UITracking
- UniqueQuery
Usage
Explore Salesforce activities by a specific user
Track all activities that a specific user performed in Salesforce to check for unexpected activity based on the user’s role.
In the Explore screen, follow these steps to explore all Salesforce activities done by a specific user:
-
Filter the logs by Subsystem = "Salesforce".
-
Apply the query: Username:"[email protected]"
Set alerts to detect suspicious activity
Set alerts and be notified of potential suspicious activity in Salesforce, which may violate the organization’s policy.
When setting up an alert, define the criteria for triggering it based on your organization's Salesforce policy. For instance, assume that, on average, a salesperson is assigned to 5 customer accounts. Set an alert if one user accesses more than 20 different customer accounts in Salesforce within 1 day.

Limitations
-
Refresh times for platform and log file events are 5 minutes and 60 minutes, respectively.
-
Logs older than 24 hours from their original event time are dropped and not processed.