Log parsing rules
What is log parsing?
Parsing Rules converts unstructured log data into structured key-value pairs based on user-defined rules. Log parsing enhances data usability, making it ideal for querying, analysis, and generating insights. Additionally, it can optimize costs—for example, by parsing an unnecessary complex JSON document as a simple string.
In Coralogix, log parsing is performed automatically using predefined parsing rules in Extension Packages, but it can also be customized and applied by the user to meet specific needs.
For detailed behavior, required fields, and examples for each rule type, see Rule Types.
In this guide, you'll learn the mechanics of log parsing and how to create your own custom rules. It covers:
- How log parsing works
- What a rule group is
- What a rule is and the logical AND/OR relationship between rules
- Why rule group and rule order matter
- Steps to take before getting started with Parsing Rules
- Creating and managing rule groups and rules
- Parsing Rules optimization
- Parsing Rules limits
How log parsing works
Parsing Rules in Coralogix uses rules to process, transform, and organize log data for effective monitoring and analysis. These rules enable you to:
- Extract critical information from raw logs
- Convert unstructured text into structured formats
- Filter out irrelevant content
- Mask sensitive fields for compliance
- Fix formatting issues
- Block logs with unwanted content
Ingested logs flow through a pipeline system, where rule groups are applied sequentially as logs move through the pipeline.
Scope
Rules are applied to all logs regardless of their TCO priority — High (Frequent Search), Medium (Monitoring), Low (Compliance), and Blocked. To learn more about how logs flow through the system, see TCO Optimizer.
Timing
Rules only impact ingested logs after the rule has been created.
Parsing example
This is a standard Heroku L/H type error log sent from Heroku, which contains unstructured text. In its unparsed form, you'd need to perform a full-text search to answer most questions. While it’s useful for searching, it doesn’t offer much structure for deeper analysis.
sock=client at=warning code=H27 desc="Client Request Interrupted" method=POST path="/submit/" host=myapp.herokuapp.com fwd=17.17.17.17 dyno=web.1 connect=1ms service=0ms status=499 bytes=0
RegEx:
^(sock=)?(?P<sock>(\\\\S*))\\\\s*at=(?P<severity>\\\\S*)\\\\s*code=(?P<error_code>\\\\S*)\\\\s*desc="(?P<desc>[^"]*)"\\\\s*method=(?P<method>\\\\S*)\\\\s*path="(?P<path>[^"]*)" host=(?P<host>\\\\S*)\\\\s* (request_id=)?(?P<request_id>\\\\S*)\\\\s*fwd="?(?P<fwd>[^"\\\\s]*)"?\\\\s*dyno=(?P<dyno>\\\\S*)\\\\s*connect=(?P<connect>\\\\d*)(ms)?\\\\s*service=(?P<service>\\\\d*)(ms)?\\\\s*status=(?P<status>\\\\d*)\\\\s* bytes=(?P<bytes>\\\\S*)\\\\s*(protocol=)?(?P<protocol>[^"\\\\s]*)$
After parsing a Regular Expression (RegEx), the resulting log is converted to JSON and organized into attributes, like severity and error_code:
{
  "sock": "client",
  "severity": "warning",
  "error_code": "H27",
  "desc": "Client Request Interrupted",
  "method": "POST",
  "path": "/submit/",
  "host": "myapp.herokuapp.com",
  "request_id": "",
  "fwd": "17.17.17.17",
  "dyno": "web.1",
  "connect": "1",
  "service": "0",
  "status": "499",
  "bytes": "0",
  "protocol": ""
}
The value of this parsing process is that it transforms unstructured log data into a machine-readable format, enabling more efficient querying, reporting, and automation.
Rule groups
Rule groups group parsing rules into collections designed for specific log types, enabling sequential transformations. They include the following rule types:
- BLOCK: Prevent specific logs from being processed further. Optionally, mark them as low-priority for S3 archive queries, with no downstream parsing applied.
- EXTRACT: Pull specific details from log content.
- JSON EXTRACT: Extract fields from JSON-formatted logs.
- PARSE: Parse fields using RegEx and replace the data in the log with the extracted fields.
- PARSE JSON FIELD: Parse inner JSON strings into fields.
- REMOVE FIELDS: Delete unwanted fields from logs.
- REPLACE: Replace parts of the log content.
- STRINGIFY JSON FIELD: Convert JSON fields into strings.
- TIMESTAMP EXTRACT: Extract or modify log timestamps.
For a comprehensive explanation of each rule type, including detailed examples and use cases, see Rule Types.
Order of rule group execution
Logs are processed in ascending order of rule groups (from top to bottom), following the sequence in which they were created. Users can adjust this order by dragging and dropping rule groups within the list, allowing for customized log processing flow.
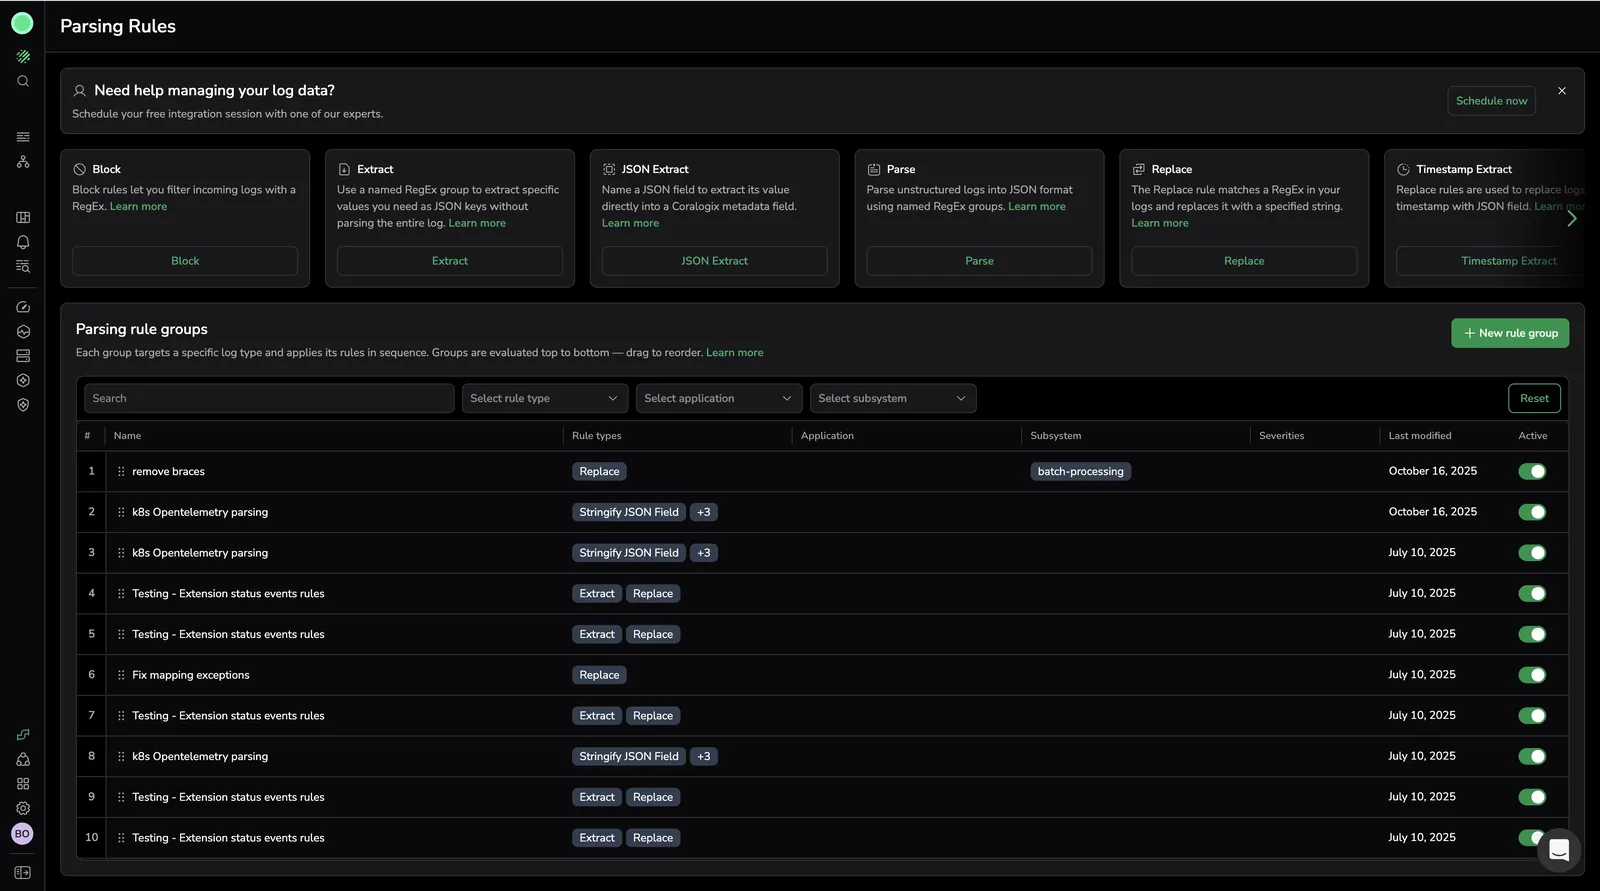
The Parsing Rules page shows available rule types as cards at the top and all rule groups in evaluation order below. Use the filters to narrow the list and drag rows to reorder.
Rule group components
Each rule group contains the following components.
| Section | Description |
|---|---|
| Details | A name and optional description for the rule group. |
| Rule Matcher | [Optional] Fields that filter logs based on application, subsystem, and severity. Only logs matching the defined conditions will be processed, improving performance. |
| Rules | A sequence of rules that apply transformations to the logs. |
Rules
Rules are defined instructions that allow you to process, transform, and categorize log data in a structured way by using Regular Expressions (RegEx) to match specific patterns in the log text. Each rule operates within a rule group and can be connected with other rules using logical AND/OR relationships. Rules can be used to extract, modify, or classify log data to make it more useful for monitoring, filtering, and analysis.
PARSE example
This example demonstrates the configuration of a PARSE rule. The PARSE rule converts unstructured log text into structured data, typically in JSON format.
- Source Field:
- The rule will examine a specific field from the incoming log (e.g.,
log.message). This is where the unstructured data resides before parsing. The rule will only be applied if the source field is present in the log data.
- The rule will examine a specific field from the incoming log (e.g.,
- RegEx:
- The RegEx pattern is applied to the content of the source field. It is used to match specific parts of the log text. In this case, the RegEx will extract important details like
method,status,path, and more. This enables you to parse the log and structure it into a more usable format.
- The RegEx pattern is applied to the content of the source field. It is used to match specific parts of the log text. In this case, the RegEx will extract important details like
- Destination Field:
- After applying the RegEx, the parsed data is stored in a destination field. This ensures that the parsed information is separated from the original log text and can be used for further analysis.
By applying this PARSE rule, unstructured logs are transformed into structured data, making it easier to perform specific queries or analysis tasks. For instance, the parsed JSON data could include fields like status, method, host, and bytes, which allow for more precise querying and filtering.
REPLACE example
This example demonstrates how to use a REPLACE rule to standardize the classification of log severity by replacing specific log messages with a standardized severity level, without altering the original source field.
- Source Field:
- The rule is applied to a specific field in the log data (e.g.,
log.message). The rule checks the content of this field to decide if a replacement is needed.
- The rule is applied to a specific field in the log data (e.g.,
- Regular Expression (RegEx):
- A RegEx pattern is used to identify parts of the log message. In this case, the pattern is designed to match any content, effectively applying the rule universally to all log messages.
- Replacement String:
- Once the RegEx finds a match, it replaces the content of the source field with the specified replacement string (
ERROR). This ensures that all matched log entries will display the standardized severity level.
- Once the RegEx finds a match, it replaces the content of the source field with the specified replacement string (
- Destination Field:
- The new, standardized severity value (
ERROR) is stored in a destination field, such asseverity. The original field (log.message) remains unchanged, preserving the original log message. - Important Note: If the source field and destination field were the same, the original message would be overwritten with the replacement value. By using a different destination field, the source field’s content remains intact while the severity is tagged.
- The new, standardized severity value (
This REPLACE rule enables you to enforce consistent log classification by standardizing severity levels across various logs, making it easier to track and filter logs based on severity.
How a log passes through a rule sequence
Logs matching the Rule Matcher proceed through the group’s rules based on their AND/OR relationships:
AND: Logs pass through all connected rules sequentially.OR: Logs are processed by the first matching rule, skipping subsequent rules.
In complex sequences, a log passes through the rules in sequence. The log passes through every rule that connects to another rule with AND and only passes through the first applicable rule of multiple rules connected by OR.
For example, in this rule group containing rules EXTRACT, REPLACE, and JSON:
- RED subgroup: Rules (
Rule-1throughRule-5) are connected byOR. Logs pass through only the first applicable rule. - YELLOW subgroup: Connected to RED by
AND. Logs pass through YELLOW rules sequentially, but only the first matching rule applies (since YELLOW’s rules useOR).
A subgroup of rules separated by OR number the rules in ascending order. The following rule attached with an AND causes the numbering to restart.
Why rule order matters
The order of rules in a rule group is crucial because each rule processes and transforms the log as it moves through the pipeline. When one rule modifies a log, the next rule applies to the transformed version of the log, not the original input. This sequential transformation can significantly impact the final result.
As the log progresses through the pipeline:
- Each rule applies to the latest version of the log.
- Rules rely on the transformations applied by earlier rules.
This means that placing rules in the wrong order can cause some transformations to fail, resulting in incomplete or incorrect logs.
Example:
-
Rule-1-
Log Input:
{"message": "test-message", "key2": "98a35"} -
Action: Use RegEx to substitute the
"message"field with"message_str". -
RegEx: Replace
"message"with"message_str".^message$ -
Log Output:
{"message_str": "test", "key2": "98a35"}
-
-
Rule-2-
Log Input (from Rule-1's output):
{"message_str": "test", "key2": "98a35"} -
Action: Add a new field based on whether
"message_str"exists. -
RegEx: If
"message_str"exists, add a new field:"mess_str_exists": "true"."message_str":\\s*".+" -
Log Output:
{"message_str": "test", "key2": "98a35", "mess_str_exists": "true"}
-
If the rules are out of order, for example, if Rule-2 runs before Rule-1, the transformation will fail because "message_str" wouldn’t exist in the log when Rule-2 is executed. The result will look like this:
-
Rule-2runs first (and does nothing):{"message": "test-message", "key2": "98a35"} -
Rule-1runs afterward:{"message_str": "test", "key2": "98a35"}
Since Rule-2 was executed without the "message_str" field, the "mess_str_exists": "true" field is never added.
Special care should be taken when ordering BLOCK rules, as they stop the processing of any log that matches the set conditions. To learn more about BLOCK rules, see Rule Types
Supported RegEx options
When defining rules, you can utilize various RegEx options to help you define patterns and extract specific data from logs. Below is a list of the supported RegEx options that you can use to tailor your rules to your needs.
| Option | Description |
|---|---|
. (dot) | Matches any single character except for line breaks. Useful for matching various characters within a string. |
^ | Anchors the match to the start of a string. Can be used to ensure the pattern starts at the beginning of the log line. |
$ | Anchors the match to the end of a string. Useful when you want to match the end of a log line. |
[] | Matches any one of the characters inside the brackets. For example, [a-z] matches any lowercase letter. |
[^] | Matches any character except the ones inside the brackets. For example, [^0-9] matches any non-digit character. |
* | Matches zero or more of the preceding element. For example, a* matches any number of 'a' characters, including none. |
+ | Matches one or more of the preceding element. For example, a+ matches one or more 'a' characters. |
? | Matches zero or one of the preceding element. For example, a? matches an optional 'a'. |
{n} | Matches exactly n occurrences of the preceding element. For example, a{3} matches exactly three 'a' characters. |
{n,} | Matches n or more occurrences of the preceding element |
You may create your RegEx patterns in tools like REGEX101, which will help you efficiently parse logs based on actual data samples.
Rule types
Parsing Rules offers a variety of rule types, each designed to perform specific actions when processing log data. For a comprehensive explanation of each rule type, including detailed examples and use cases, see Rule Types.
What you need
Before using Parsing Rules, you should be able to identify the distinct patterns within your logs that require parsing. This groundwork will allow you to confidently apply rules for each identified pattern, ensuring that logs are parsed effectively and consistently.
Set a query time frame
Start by dedicating time in Explore to explore your logs so that you can grasp their structure and content effectively. The goal is to capture enough data to understand the log structure before parsing.
To collect a representative sample of logs, set a fixed query time frame that represents the entire dataset sent to Coralogix.
- If the account has a high log volume: 1H or 2H timeframe.
- If low log volume: 24H timeframe.
Log exploration
The first step is to explore a representative set of logs and determine which fields contain the actual log message. Log messages may appear in fields such as log, message, or msg. In some cases, especially with OpenTelemetry integrations, the message might be nested in a field like logRecord.body.
To identify these fields efficiently:
- Use the filters on the left side of the exploration screen to locate field names like
log,message,msg, or similar. - Run a query like
_*exists*_:logto identify how many logs in your selected timeframe contain thelogfield. - Add the identified field (e.g.,
log) as a column in the grid view to quickly focus on the log messages. - Avoid querying based on combinations of applications and subsystems. Many logs in environments like Kubernetes clusters share common patterns, regardless of the specific application or subsystem.
By the end of your exploration, you should be able to identify the distinct patterns within logs that require parsing rules.
This groundwork allows you to confidently create REPLACE rules for each identified pattern, ensuring that logs are parsed effectively and consistently.
Text logs without JSON formatting will require PARSE rules instead.
Handling multiline logs
Multiline issues are common and require special attention. The query _*exists*_:log retrieves all logs with the log field, including single-line valid logs and individual lines from multiline logs. To differentiate:
- A valid log (or the first line of a multiline log) typically includes a timestamp with a year, like
2024. - Use the query
_*exists*_:log NOT log:2024to filter out logs without timestamps and identify potential multiline issues.
If multiline issues are detected:
- Determine which subsystems are affected and resolve them with the customer to ensure proper data integration.
- Be aware that valid logs without timestamps are rare but possible. Always review the results of this query to account for exceptions.
Creating a rule group
To create a rule group in the Coralogix UI:
- In the navbar, hover over Data Flow, and select Parsing Rules.
- Open the New rule group drawer by either selecting
 or a specific rule type.
 - Define the rule group.
Details
Write a name and description [optional] for the rule group.
Rule matcher
Create a query to filter logs for this group [optional]. Only logs that match the defined query will be processed, enhancing performance by focusing only on relevant logs. The query includes optional selections for applications, subsystems, and severities. Leaving fields blank or not setting a RegEx means that the rule group will apply to all logs.
To save Coralogix computation resources:
- Filter out irrelevant logs from entering the rules logic, especially for high-volume services.
- For applications or subsystems with a large number of logs that follow specific patterns, create dedicated rule groups to keep them separate from general parsing rules and ensure efficient processing.
Rules
Define a sequence of one or more rules in the rule group.
Defining rules in a rule group
After creating a rule group, you define one or more rules that determine how matching logs are processed. Each rule represents a single parsing action—such as parsing, extracting, replacing, or blocking—and is evaluated in sequence within the rule group.
For details on how rule groups scope and order log processing, see Rule groups.
To define rules as part of your rule group setup:
-
Select a rule type.
-
Define the rule fields for the rule. Refer to the following table for field descriptions:
Field Description Name Specify a unique name for the rule to identify it in your rule set. Description Provide an optional description of the rule’s purpose or function. This helps others understand what the rule is designed to do. Source Field The log field or data source that the rule will analyze. For a PARSE rule, this is typically a raw, unstructured log entry that the rule will convert into structured data using regular expressions. Destination Field The field where the parsed data will be stored. This enables you to store the processed, structured data in a field that is easier to query and analyze. RegEx The regular expression (RegEx) used to match and extract data from the source field. This is critical for defining how the unstructured log data will be parsed. -
Insert a log sample that lets you preview how the rule will process actual log entries. This is useful for testing the rule to ensure it works as expected before applying it to the full log data.
NoteThe log sample must be a raw log. To view a log in its raw form, select Logs in the navbar to open Explore, select the log’s more actions menu, and then select View Raw Log.
-
To add additional rules to the rule group, select Add Rule. Toggle between AND/OR to select the logical relationship between the previous rule and the additional rule.
-
Select Save when you finish adding all the rules necessary for the rule group.
The new rule group will appear in your Parsing Rules Management Screen.
Managing rule groups
Adding a rule to an existing rule group
To add rules to a group:
- Select a rule type from the ADD RULE dropdown.
- Set the logical relationship (AND/OR) between rules.
Searching for rule groups
Use the search function to find Rule Groups quickly. You can search by rule or group names.
Editing rules and groups
To edit a rule group or its rules:
- Select the rule group.
- Make changes.
- Select Save changes.
View as code
View as code is currently in Beta.
The Code preview panel displays the Terraform or Kubernetes YAML representation of a saved rule group. Use it to copy or download a rule group's configuration directly into your infrastructure-as-code workflow.
Open the panel
In the rule list, open the more actions menu for a rule and select View as Code.

Use the panel
The panel opens with two tabs:
- Terraform (default) — Terraform configuration for the rule group
- K8s — Kubernetes YAML manifest for the rule group
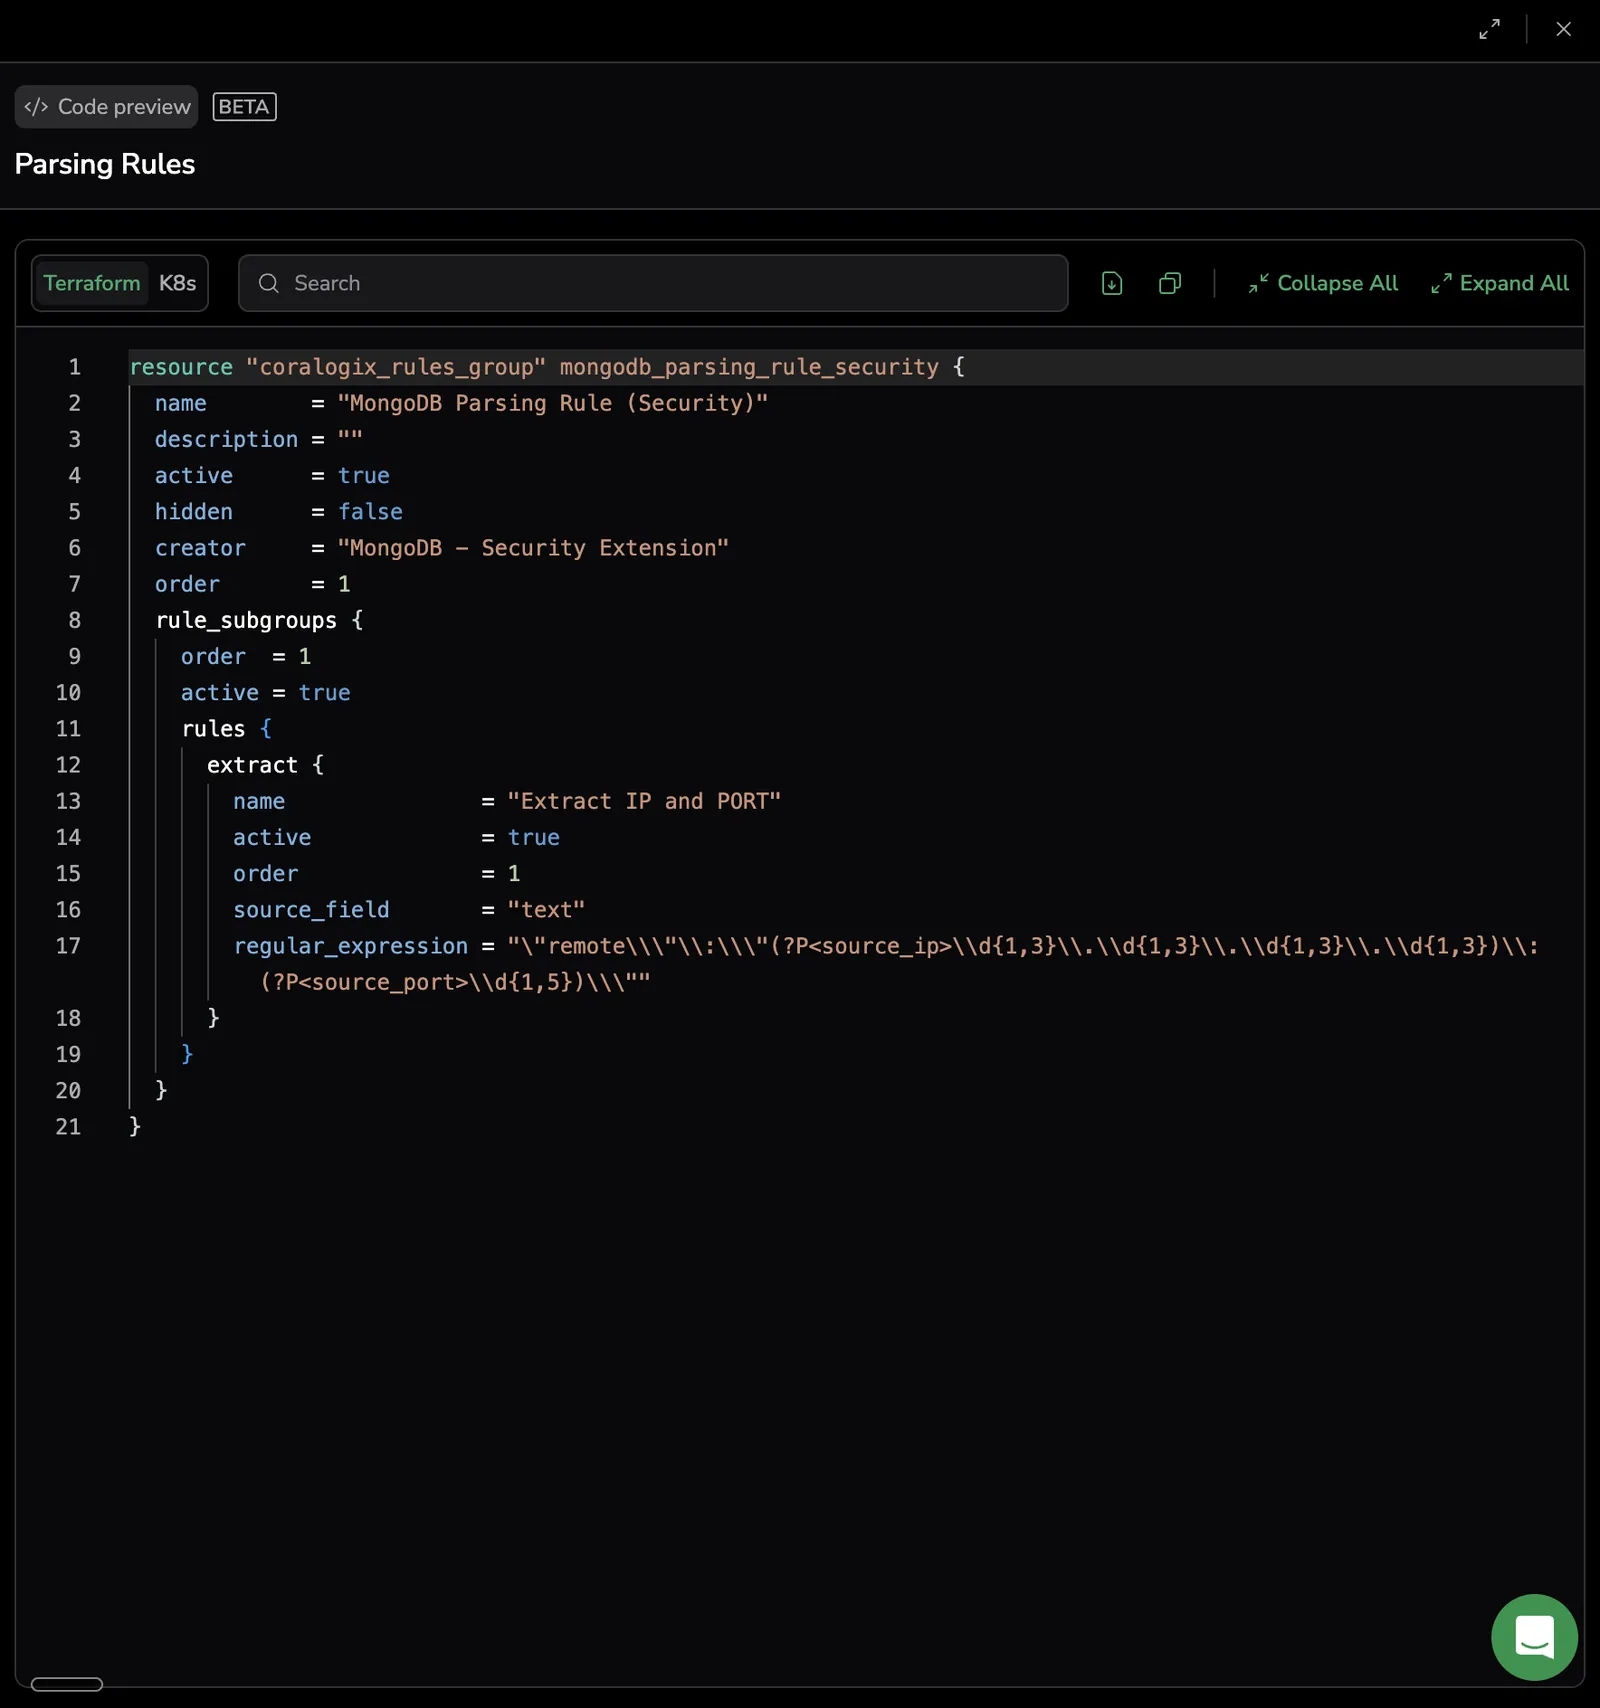
Use the toolbar to:
- Search — find text in the displayed code
- Download — download the code as a file
- Copy — copy the displayed code to your clipboard
- Collapse All / Expand All — fold or unfold all code blocks
The panel is read-only — you cannot save changes from within it. Select the fullscreen icon to expand the panel, and the close icon to dismiss it.
View as code is available for saved rule groups only. The code reflects the rule group's last saved configuration.
Optimizing parsing rules
To ensure efficient parsing and optimize the processing of logs, it's important to follow best practices when creating and arranging your parsing rules. Below are some key tips for improving the speed and effectiveness of your parsing setup.
Order your rules for efficiency
When creating RegEx rules for different types of logs, the order in which they are applied is crucial. Follow these guidelines to optimize rule execution:
- Place more specific and strict RegEx rules at the top: These rules should capture logs with more defined structures, as they tend to be faster to parse and more accurate. These rules should be designed to capture the largest possible number of logs.
- Place more generic rules towards the bottom: These rules typically match broader patterns, which means they might require more computation to apply and could end up parsing logs that are already processed by the more specific rules above.
This arrangement ensures that logs that should be parsed by stricter rules are processed first, saving computation time and reducing the chances of a log being wrongly matched by a more general rule.
Avoid parsing nested objects
In this example, the log is sent via the OpenTelemetry integration, which includes a nested structure. The actual log message is located under the field logRecord.body, which is deeply nested within the JSON object.
{
	"resource": {
		"attributes": {
			"cx_application_name": "kubernetes",
			"cx_subsystem_name": "edge-device",
			"k8s_container_name": "edge-device",
		},
		"droppedAttributesCount": 0
	},
	"scope": {
		"name": "",
		"version": ""
	},
	"logRecord": {
		"timeUnixNano": 1675263581389385880,
		"observedTimeUnixNano": 1675263581389828092,
		"body": "2023-02-01 14:59:41.389 ERROR [CamelJettyServer(0x3bec2275)-481] [EdgeComponent.java:130] 0e387b70-a241-11ed-af17-f941f150d303:null:_do_ route failed with [EdgeServiceException=Device not found], [headers={CamelHttpResponseCode=404, X-Request-ID=0e387b70-a241-11ed-af17-f941f150d303, X-Original-Forwarded-For=52.144.56.254, X-Runtime=0.036989, X-RateLimit-Details=, X-Connection=X-value, X-Route-Redirect=main, X-Scheme=https}]\\n",
		"severityNumber": 0,
		"attributes": {
			"log_file_path": "/var/log/pods/default_edge-device-8447547587-wqs6z_dd5e4d9b-3052-4959-bc8a-995edcfc1c82/edge-device/0.log",
			"log_iostream": "stdout",
			"time": "2023-02-01T14:59:41.38938588Z"
		}
	}
}
In this case, the message itself, which needs parsing, is nested within logRecord.body. While it is technically possible to parse nested fields, it’s generally best practice to avoid parsing deeply nested objects. This is because such nested structures can complicate parsing and lead to inefficient rule execution.
Ideally, unparsed messages should reside at the root level. Consider using a stringified JSON field for the raw log message, which can then be processed more easily by PARSE JSON FIELD rules. This ensures the log message is accessible at a higher level, simplifying parsing and improving performance.
Swiftly create RegEx patterns
To speed up the process of creating RegEx patterns, use the Explore screen to gather log samples. Here's an efficient approach for working with a large batch of logs:
-
Instead of manually picking log examples from the RAW log view, export a JSON file containing logs from the first 5-10 pages (roughly 500-1000 logs). This provides a broader and more representative sample.
-
Convert the exported JSON to raw, unformatted logs using the following
jqcommand to flatten the JSON structure into a.logfile:cat file.json | jq -r '.[]' | while read -r repo; do echo "$repo"; done | jq -r '.text' | jq -r tostring > file.log -
You can then use these flattened raw logs to create your RegEx patterns in tools like REGEX101, which will help you efficiently parse logs based on actual data samples.
Create a message field for your logs
Create a message field for all of your logs, regardless of whether the original message was in a nested object or in a field possessing the log message. Once your logs are parsed, you should have a new field called message that holds the new parsed messages. This allows the user to enjoy Coralogix’s Loggregation feature and generate meaningful templates in the user account.
nginx/access type of logs naturally after parsing won’t have the field message since there are no textual message for such logs.
Extract additional values from newly parsed logs
After parsing logs and generating the new, structured messages, consider going the extra step and extracting additional valuable data from the newly created fields. This will allow you to enrich your logs for deeper analysis and more comprehensive monitoring. Here's how you can do it:
- Explore the new message field: Revisit the newly parsed message fields and look for patterns or valuable pieces of information that you can extract.
- Use Loggregation: With structured log messages, you can leverage Loggregation to find common templates and parameters across your logs. This will help you identify trends or insights that could be useful for setting up alerts or creating dashboards.
By going through this process, you can further optimize your log parsing setup and deliver more actionable insights to your users.
Parse key metadata
Parse key elements such as timestamp, severity level, thread, and other metadata.
Timestamp extraction
- When parsing timestamps, consider extracting timestamps as a separate field to make it easier to filter and analyze logs by time. You can use RegEx groups to extract timestamp information from the log entries.
- This is not mandatory, but extracting and storing the timestamp in a structured field can significantly improve the ability to query logs over time.
Severity rules group
- After parsing your logs, create severity classification rules to tag logs based on their severity (e.g., ERROR, INFO, WARN). Ensure that you include a default rule at the end to capture any logs that were not matched by the more specific severity rules.
- Based on the parsing process you've already completed, apply JSON extraction rules before the severity rules. This ensures that logs are appropriately parsed and structured before applying severity labels.
These structured fields will make it easier to filter and prioritize logs based on their severity.
Validation
Validate your parsed logs in Pipeline Analyzer.
Limits
Users may create up to 35 parsing rules per rule group.
Permissions
To work with parsing rules, users need the appropriate permissions.
| Permission | Description |
|---|---|
PARSING-RULES:READCONFIG | View parsing rules. |
PARSING-RULES:UPDATECONFIG | Create, modify, or delete parsing rules. |
For more on roles and permissions, see Permissions list.
API
To learn about programmatic access to parsing rules, see the Parsing Rules API documentation.