Install OpenTelemetry on an EC2 instance
This tutorial demonstrates how to set up OpenTelemetry Collector Contrib on a Linux EC2 instance. There are some optional sections in the example configuration that can be enabled as needed.
Setup
Installation
STEP 1 If you don't already have one, create an EC2 instance.
STEP 2 Download and install OpenTelemetry.
On this page, find and copy the otelcol-contrib download link for your OS and CPU architecture in the list of Assets.
For example:
For Debian based Linux on AMD64 CPU architecture:

otelcol-contrib_0.115.1_linux_amd64.deb

Link:

https://github.com/open-telemetry/opentelemetry-collector-releases/releases/download/v0.115.1/otelcol-contrib_0.115.1_linux_amd64.deb
Download and install the desired package onto the EC2 host:
Example using the CLI:

wget https://github.com/open-telemetry/opentelemetry-collector-releases/releases/download/v0.115.1/otelcol-contrib_0.115.1_linux_amd64.deb
sudo dpkg -i otelcol-contrib_0.115.1_linux_amd64.deb
STEP 3 Configure
Review and replace the default /etc/otelcol-contrib/config.yaml with this example configuration. Adjust as necessary:
receivers:
  otlp:
    protocols:
      grpc: { endpoint: 0.0.0.0:4317 }
      http: { endpoint: 0.0.0.0:4318 }
  filelog:
    force_flush_period: 0
    include:
    - /var/log/syslog
    - /var/log/more/examples/*/*.log
    include_file_name: true
    include_file_path: false
    retry_on_failure:
      enabled: true
    start_at: beginning
    storage: file_storage
  hostmetrics:
    root_path: /
    collection_interval: 10s
    scrapers:
      cpu: { metrics: { system.cpu.utilization: { enabled: true } } }
      filesystem:
        exclude_fs_types: { fs_types: [autofs, binfmt_misc, bpf, cgroup2, configfs, debugfs, devpts, devtmpfs, fusectl, hugetlbfs, iso9660, mqueue, nsfs, overlay, proc, procfs, pstore, rpc_pipefs, securityfs, selinuxfs, squashfs, sysfs, tracefs], match_type: strict }
        exclude_mount_points: { match_type: regexp, mount_points: [/dev/*, /proc/*, /sys/*, /run/k3s/containerd/*, /run/containerd/runc/*, /var/lib/docker/*, /var/lib/kubelet/*, /snap/*] }
      memory: { metrics: { system.memory.utilization: { enabled: true } } }
      network:
      process:
        metrics:
          process.cpu.utilization: { enabled: true }
          process.memory.utilization: { enabled: true }
          process.threads: { enabled: true }
        mute_process_exe_error: true
        mute_process_user_error: true

processors:
  batch: { send_batch_max_size: 2048, send_batch_size: 1024, timeout: 1s }
  resourcedetection:
    detectors: [system, env, ec2]
    override: false
    timeout: 2s
  resource/metadata:
    attributes:
      - action: upsert
        key: cx.otel_integration.name
        value: coralogix-integration-OTEL-EC2-service
  resourcedetection/entity:
    detectors: [system, env, ec2, ecs]
    override: false
    timeout: 2s
    system:
      resource_attributes:
        host.id: { enabled: false }
        host.cpu.cache.l2.size: { enabled: true }
        host.cpu.stepping: { enabled: true }
        host.cpu.model.name: { enabled: true }
        host.cpu.model.id: { enabled: true }
        host.cpu.family: { enabled: true }
        host.cpu.vendor.id: { enabled: true }
        host.mac: { enabled: true }
        host.ip: { enabled: true }
        os.description: { enabled: true }
  transform/entity-event:
    error_mode: silent
    log_statements:
      - context: log
        statements:
          - set(attributes["otel.entity.id"]["host.id"], resource.attributes["host.id"])
          - merge_maps(attributes, resource.attributes, "insert")
      - context: resource
        statements:
          - keep_keys(attributes, [""])

exporters:
  coralogix:
    domain: "coralogix.com"
    private_key: "cxtp_ExampleSndYourDataAPIKey"
    application_name: "DefaultApplicationName"
    subsystem_name: "DefaultSubsystemName"
    # These configuration values can be used to dynamically set the application_name and subsystem_name
    # application_name_attributes:
    # - host.id
    # subsystem_name_attributes:
    # - host.name
    timeout: 30s
  coralogix/resource_catalog:
    application_name: resource
    domain: "coralogix.com"
    private_key: "cxtp_ExampleSndYourDataAPIKey"
    logs:
      headers:
        X-Coralogix-Distribution: ec2-local-integration/0.0.1
        x-coralogix-ingress: metadata-as-otlp-logs/v1
    subsystem_name: catalog
    timeout: 30s

extensions:
  file_storage: { directory: /var/log/otelcol }

service:
  extensions:
  - file_storage
  pipelines:
    logs:
      receivers: [ filelog ]
      processors: [ resourcedetection, batch ]
      exporters: [ coralogix ]
    metrics:
      receivers: [ hostmetrics, otlp ]
      processors: [ resourcedetection, batch ]
      exporters: [ coralogix ]
    traces:
      receivers: [ otlp ]
      processors: [ resourcedetection, batch ]
      exporters: [ coralogix ]
    logs/resource_catalog:
      exporters:
        - coralogix/resource_catalog
      processors:
        - resource/metadata
        - resourcedetection/entity
        - transform/entity-event
      receivers:
        - hostmetrics
Notes:
-
Ensure the file_storage extension path is writable by your otelcol-contrib service.
-
Coralogix recommends the default otel-integration chart settings for batch processors in all collectors. Learn more here.
-
Learn more about receivers and exporters, the
filelogreceiver, and thehostmetricsreceiver. -
Due to Linux permissions, you'll likely get errors in the otelcol-contrib service logs. There are options in the
hostmetricsreciever process config to mute these errors. We've enabled the mute_process_exe_error and mute_process_user_error in our example configuration.
STEP 4 Reload service
To consume the new configuration, you'll need to restart the service. Depending on which package you installed, the process will be different.
Example:
Systems with systemctl:

sudo systemctl restart otelcol-contrib
Check service logs to ensure proper function.
Custom configurations
file_storage extension
The file_storage extension is used to provide the OTEL Collector space on the local filesystem to store checkpoints or other files. As Linux permissions are user based, and OTEL Collector service runs as otelcol-contrib, you'll need to designate an approprite folder with appropriate write permissions for that user.
Dynamic application and subsystem names
The Coralogix Exporter supports dynamic application and subsystem names through the use of application_name_attributes and subsystem_name_attributes configuration options. You can use any resource attribute from your enriched payloads as the keys. The first key that is non-null will be used. If all options are null, it will fall back to the value set in application_name and subsystem_name.
Resource Catalog
The Resource Catalog configuration will submit EC2 metadata to Coralogix for inclusion in your Resource Catalog. You'll be able to review your EC2 metrics and relavent details alongside the rest of your various hosts.
The resource catalog is composed of three components:
- resourcedetection/entity processor
- transform/entity-event processor
- coralogix/resource_catalog exporter
Collect EC2 Tags
To add EC2 tags, add a role to your instance.

Create a New Policy
STEP 1. Navigate to IAM > Policies. Click Create policy.
STEP 2. Select the following options.
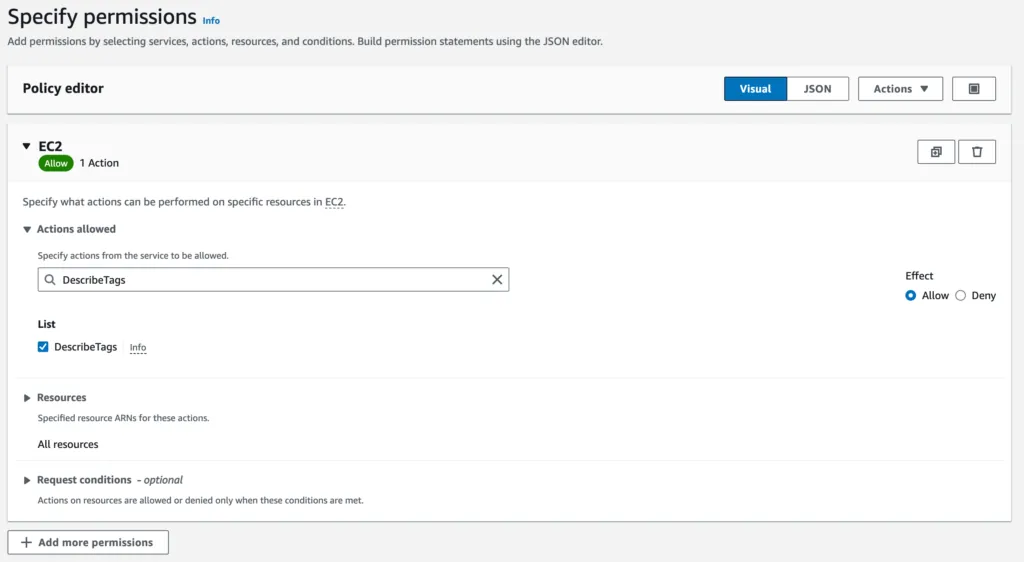
STEP 3. Enter a policy name. Click Save.
Create a New Role
STEP 1. Navigate to IAM > Roles. Click Create role.
STEP 2. Select the following options.
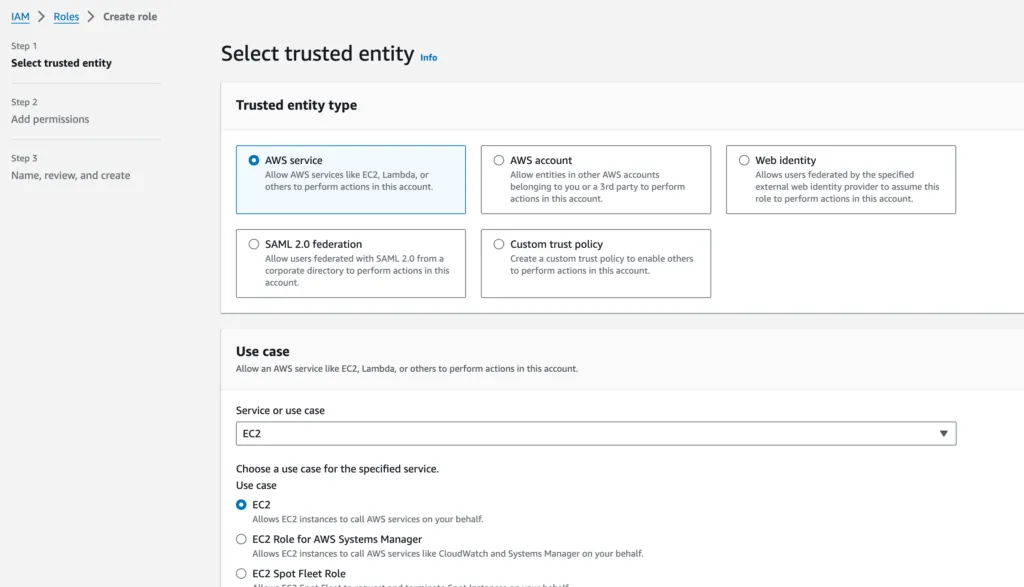
STEP 3. Click Next.
STEP 4. Click on the checkbox next to the rule you just created.
STEP 5. Enter a rule name. Click Create rule.
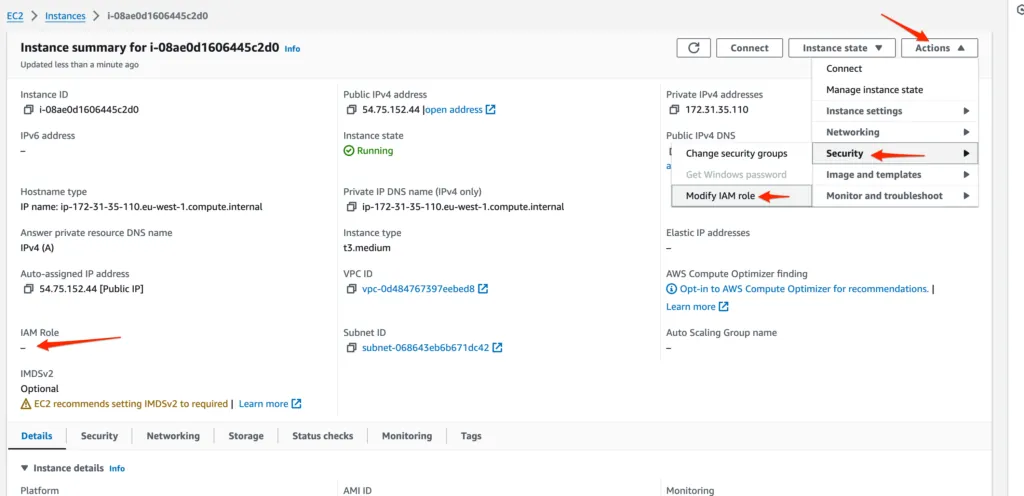
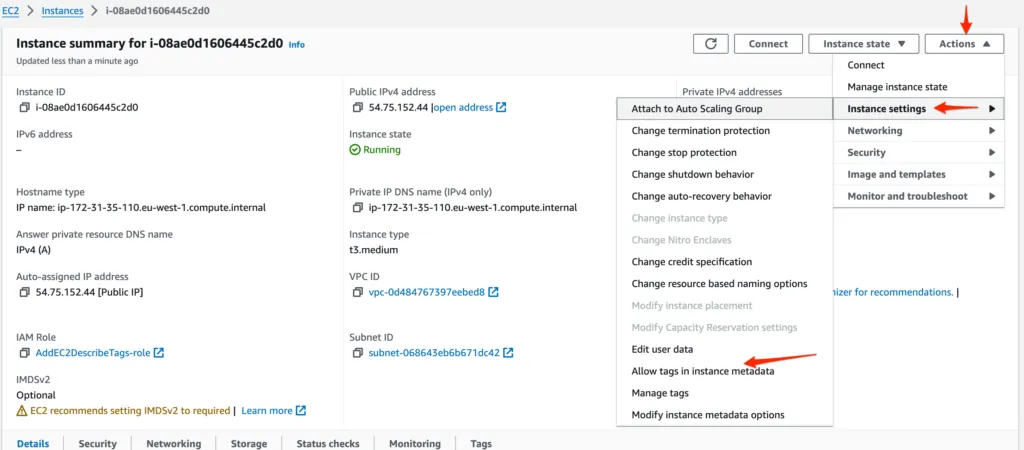
Add IAM Role to Your Instance
STEP 1. Open your instance from the EC2 instance screen.
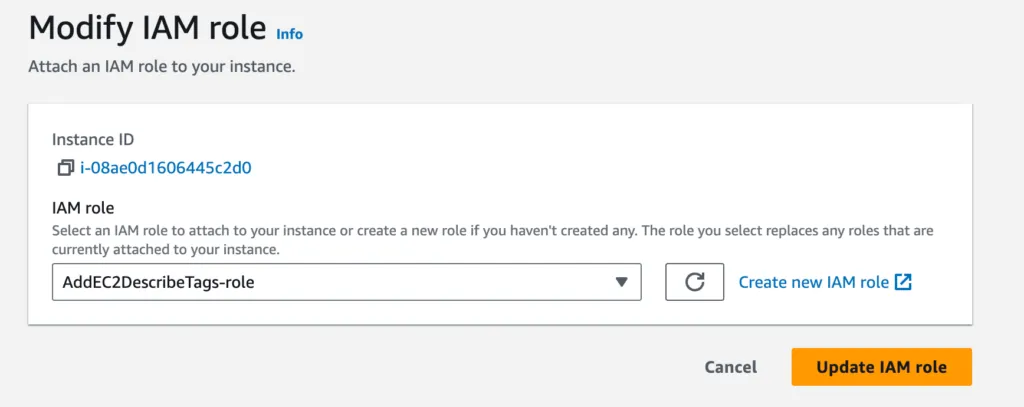
STEP 2. Add the IAM role to the empty IAM.
STEP 3. Select the IAM role. Click Update IAM role.
STEP 4. Allow tags in the metadata instance.
STEP 5. Update the resourcedetection processor at the processors.
resourcedetection:
    # ecs & docker detectors not required when using ecslogresourcedetection for logs
    detectors: [env, ec2, system]
    ec2:
      tags:
        - ^TagName$
    timeout: 2s
    override: false
Notes:
-
It is mandatory to specify the tags parameter, as it is not added by default.
-
Set any Regex to limit the number of tags or use
^.*$to get all tags.
Validation
Start Otel to validate your setup, using this example from Ubuntu Linux.
/usr/bin/otelcol-contrib --config=file:/etc/otelcol-contrib/config.yaml