Synthetic monitoring with Checkly
This tutorial demonstrates how to add synthetic capabilities to your Coralogix dashboard with Checkly, allowing you to view and query the results of your Checkly synthetic testing.
Prerequisites
- Checkly account
Setup
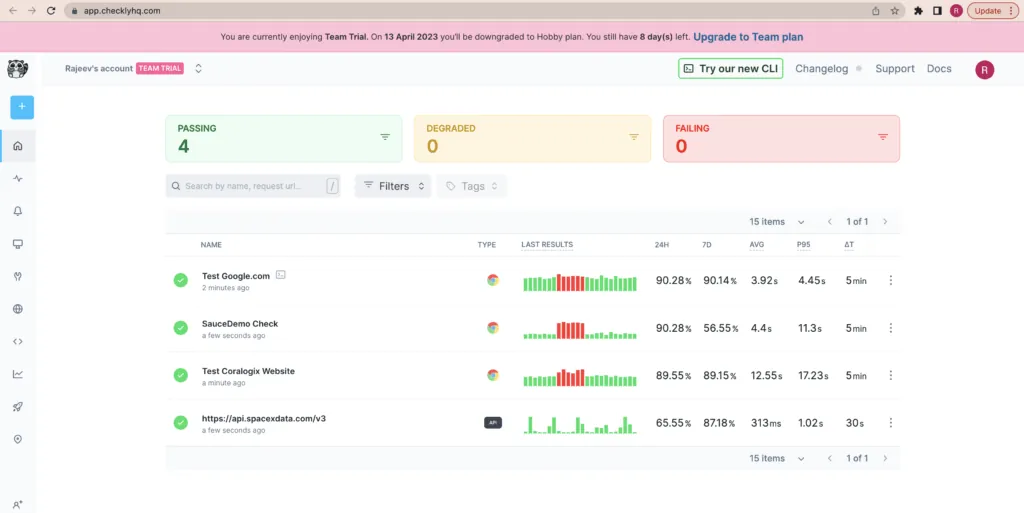
In your Checkly account, create API and / or browser checks in your dashboard.
Configuration
To integrate with Coralogix, define a webhook. In your Checkly navigation pane, select Alerts and define a new channel using the Coralogix Rest API /singles using the endpoint associated with your Coralogix domain.
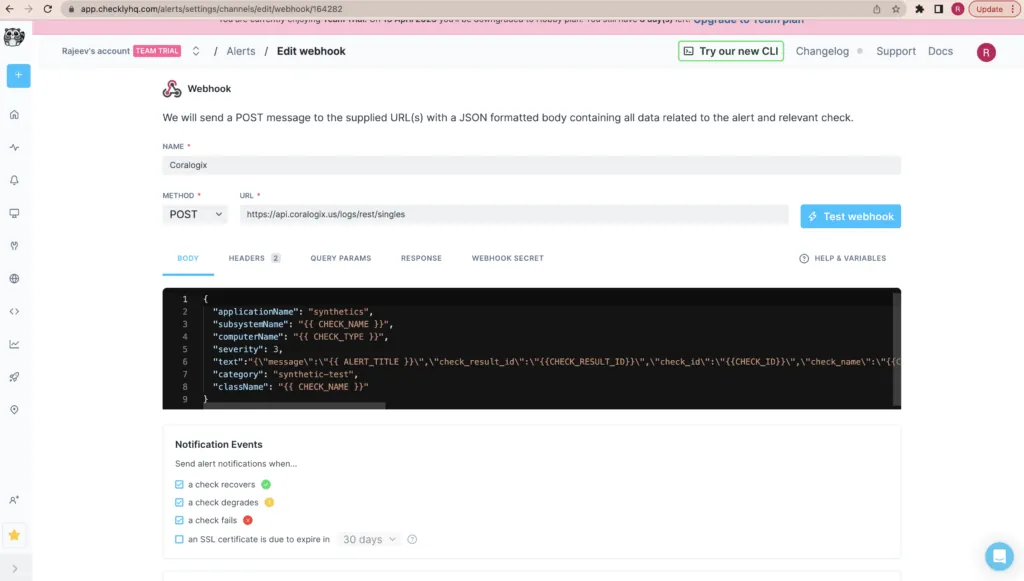
The example above consists of the following JSON body. Note the importance of inputting application and subsystem names.
{
  "applicationName": "synthetics",
  "subsystemName": "{{ CHECK_NAME }}",
  "computerName": "{{ CHECK_TYPE }}",
  "severity": 3,
  "text":"{\"message\":\"{{ ALERT_TITLE }}\",\"check_result_id\":\"{{CHECK_RESULT_ID}}\",\"check_id\":\"{{CHECK_ID}}\",\"check_name\":\"{{CHECK_NAME}}\",\"check_type\":\"{{CHECK_TYPE}}\",\"alert_type\":\"{{ALERT_TYPE}}\",\"response_time\":\"{{RESPONSE_TIME}}\",\"response_code\":\"{{API_CHECK_RESPONSE_STATUS_CODE}}\",\"response_text\":\"{{API_CHECK_RESPONSE_STATUS_TEXT}}\",\"run_location\":\"{{RUN_LOCATION}}\",\"result_link\":\"{{RESULT_LINK}}\",\"started_at\":\"{{STARTED_AT}}\",\"group_name\":\"{{GROUP_NAME}}\"}",
  "category": "synthetic-test",
  "className": "{{ CHECK_NAME }}"
}
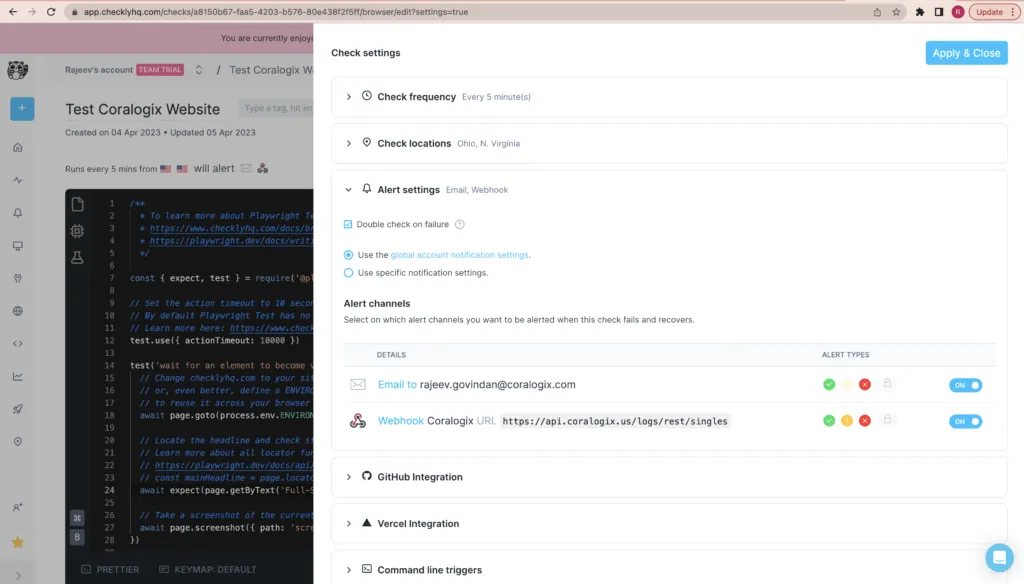
Connect your webhook to your checks by adding the webhook as an alert channel for each.
Terraform
You have the option of deploying your Coralogix-Checkly integration as a code using Terraform. Follow these steps:
Set up your Terraform Checkly provider.
Create the following terraform resource to deploy a Coralogix webhook within Checkly.
# A Coralogix alert channel webhook for Checkly

resource "checkly_alert_channel" "coralogix_ac" {
  webhook {
    name         = "coralogix_alert_channel"
    method       = "post"
    template     = <<EOT
{
  "applicationName": "synthetics",
  "subsystemName": "{{ CHECK_NAME }}",
  "computerName": "{{ CHECK_TYPE }}",
  "severity": 3,
  "text":"{\"message\":\"{{ ALERT_TITLE }}\",\"check_result_id\":\"{{CHECK_RESULT_ID}}\",\"check_id\":\"{{CHECK_ID}}\",\"check_name\":\"{{CHECK_NAME}}\",\"check_type\":\"{{CHECK_TYPE}}\",\"alert_type\":\"{{ALERT_TYPE}}\",\"response_time\":\"{{RESPONSE_TIME}}\",\"response_code\":\"{{API_CHECK_RESPONSE_STATUS_CODE}}\",\"response_text\":\"{{API_CHECK_RESPONSE_STATUS_TEXT}}\",\"run_location\":\"{{RUN_LOCATION}}\",\"result_link\":\"{{RESULT_LINK}}\",\"started_at\":\"{{STARTED_AT}}\",\"group_name\":\"{{GROUP_NAME}}\"}",
  "category": "synthetic-test",
  "className": "{{ CHECK_NAME }}"
},
    EOT
    url          = "<cx_rest_api_singles>"
  }
}

# A Checkly check to do a test on api.spacexdata.com. And connecting this check to the above Coralogix
# alert channel.

resource "checkly_check" "spacexdata_check" {
  name                      = "SpacexData V2 Check"
  type                      = "API"
  activated                 = true
  should_fail               = false
  frequency                 = 1
  double_check              = true
  use_global_alert_settings = true

  locations = [
    "us-west-1"
  ]

  request {
    url              = "<https://api.spacexdata.com/v2>"
    follow_redirects = true
    skip_ssl         = false
    assertion {
      source     = "STATUS_CODE"
      comparison = "EQUALS"
      target     = "200"
    }
  }

  alert_channel_subscription {
    channel_id = checkly_alert_channel.coralogix_ac.id
    activated  = true
  }
}
Notes:
Once applied, view the Coralogix alert channel created within your Checkly account. Apply the above to view the Coralogix alert channel created within Checkly.
Validation
Depending on the frequency with which your checks are being executed and are changing states, you should be able to view the checks in your Coralogix dashboard.
Notes:
-
Checkly only invokes a webhook when the state of a check changes, either from pass to fail or fail to pass.
-
A webhook will not be invoked for every browser check, meaning that you will not receive a message within your Coralogix dashboard for every check.
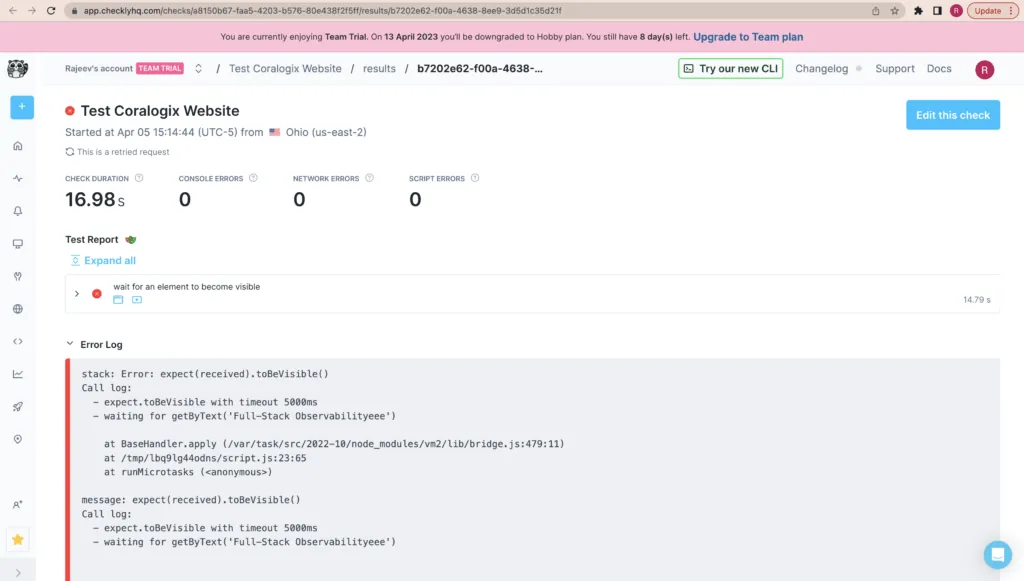
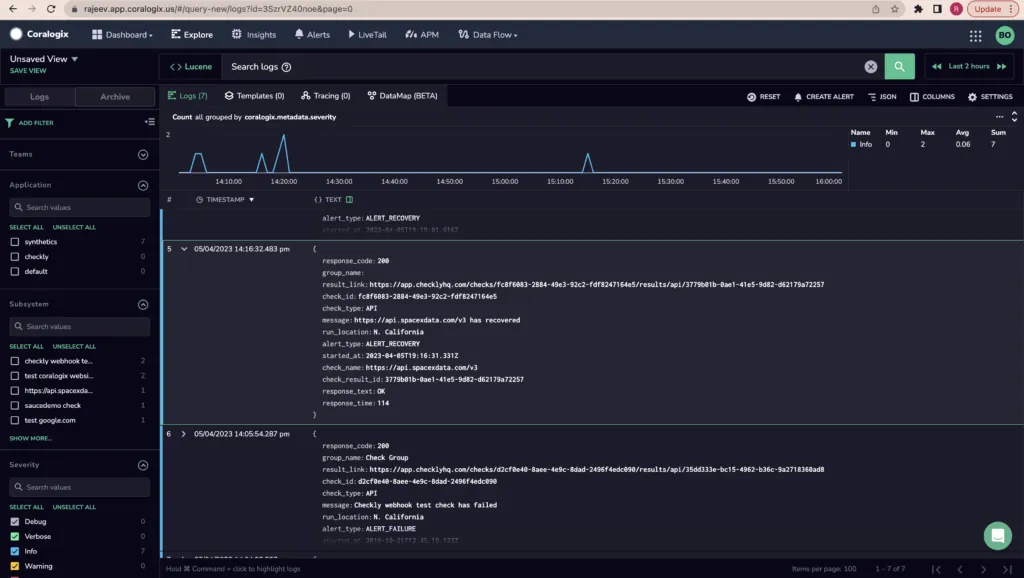
Check
A check in your Coralogix dashboard should appear as follows:
/**
  * To learn more about Playwright Test visit:
  * <https://www.checklyhq.com/docs/browser-checks/playwright-test/>
  * <https://playwright.dev/docs/writing-tests>
  */

const { expect, test } = require('@playwright/test')

// Set the action timeout to 10 seconds to quickly identify failing actions.
// By default Playwright Test has no timeout for actions (e.g. clicking an element).
// Learn more here: <https://www.checklyhq.com/docs/browser-checks/timeouts/>
test.use({ actionTimeout: 10000 })

test('wait for an element to become visible', async ({ page }) => {
  // Change checklyhq.com to your site's URL,
  // or, even better, define a ENVIRONMENT_URL environment variable
  // to reuse it across your browser checks
  await page.goto(process.env.ENVIRONMENT_URL ||

  // Locate the headline and check if it's visible
  // Learn more about all locator functions in the Playwright docs
  // <https://playwright.dev/docs/api/class-locator>
  // const mainHeadline = page.locator('title')
  await expect(page.getByText('Full-Stack Observability')).toBeVisible();

  // Take a screenshot of the current page
  await page.screenshot({ path: 'screenshot.jpg' })
})
Test
A multi-step synthetic test, which logs in to a website, should appear as follows:
/**
 * To learn more about Playwright Test visit:
 * <https://www.checklyhq.com/docs/browser-checks/playwright-test/>
 * <https://playwright.dev/docs/writing-tests>
 */
const { expect, test, selectors } = require("@playwright/test")

// Set the action timeout to 10 seconds to quickly identify failing actions.
// By default Playwright Test has no timeout for actions (e.g. clicking an element).
// Learn more here: <https://www.checklyhq.com/docs/browser-checks/timeouts/>
test.use({ actionTimeout: 10000 })

test("Login into Github", async ({ page }) => {
  // Go to login page
  page.goto('<https://www.saucedemo.com>')

  // Fill in credentials
  await page.getByPlaceholder('Username').type('standard_user')
  await page.getByPlaceholder('Password').type('secret_sauce')
  await page.click('input[value="Login"]')

  // Verify successful login
  // await selectors.setTestIdAttribute("  c sccsßtitle")
  // await expect(page.getByTestId("Products"))
  await expect(page.locator('.title')).toBeVisible();
  // await page.click('input[value="add-to-cart-sauce-labs-backpack"]')
})
If you simulate the test to change its state, the message should appear in your Coralogix dashboard as follows:
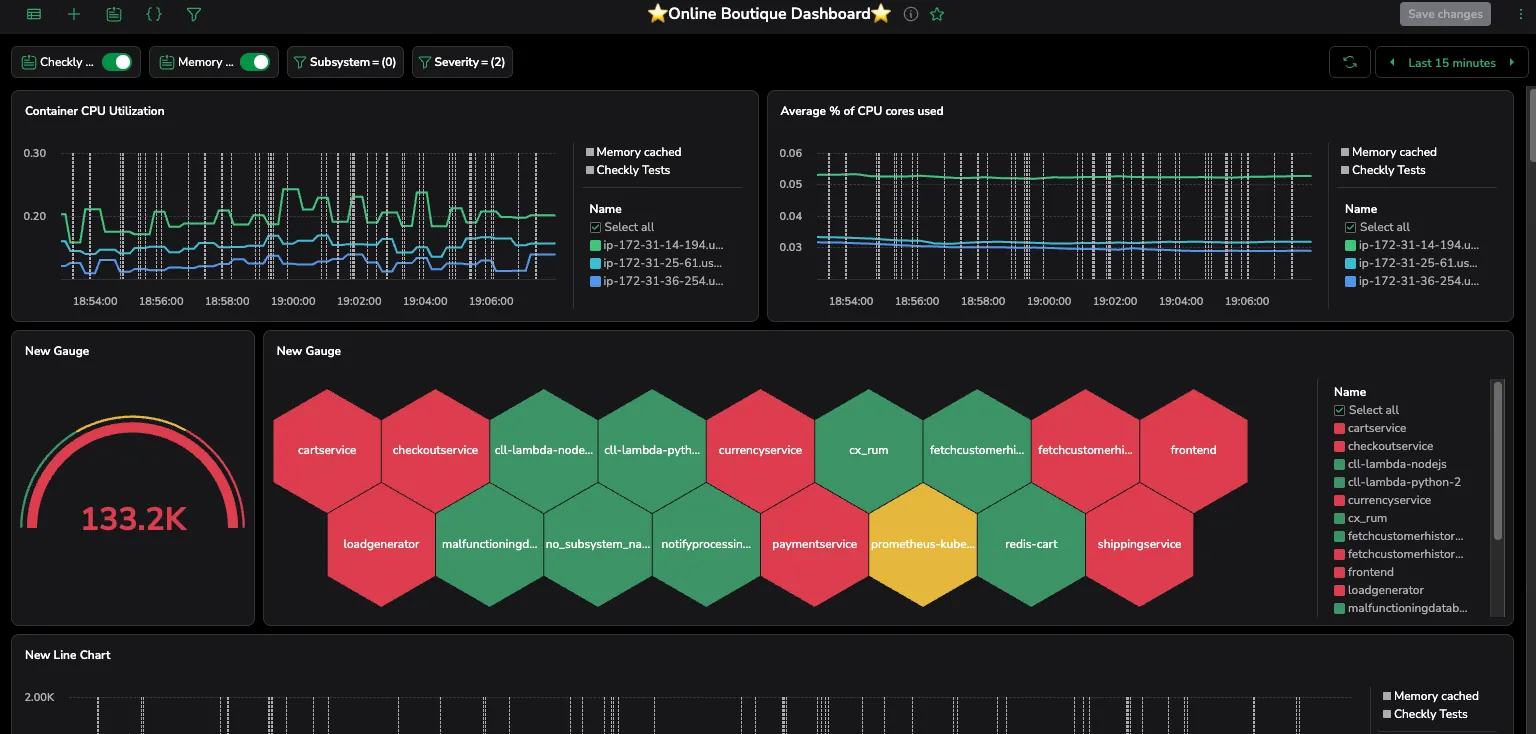
Coralogix dashboard
Custom dashboard
Below is a sample custom dashboard built with synthetic test data. Filter the view using your synthetic test.
Coralogix actions
Define a Coralogix custom action, allowing you to navigate from the synthetic test message in your Coralogix dashboard to the status of that specific test within your Checkly account.