Access policies
Policy-based access control gives you precise control over who can view, manage, or perform other supported actions on specific resources in Coralogix. It adds resource-level policies on top of your existing role-based permissions, so you can set rules per resource and per action instead of granting broad access to everyone who can access that resource type.
By combining access policies with groups, you can keep sensitive content private, create team-level silos, reduce dashboard and alert noise, personalize views, and make sure each team sees only what's relevant.
Use access policies to:
- Secure resource-level access for dashboards, datasets, alerts, Team API keys, and more.
- Streamline workflows by showing users only the resources they need.
- Reduce risk by limiting exposure to sensitive content using group-based rules.
- Enable secure collaboration across teams, managed service providers, or customers.
How permissions and policies work together
- Role-based permissions determine whether a user can access a type of resource at all (for example, dashboards).
- Access policies fine-tune access for each individual resource (for example, a specific dashboard), including what actions a user or group can perform.
Why use access policies
| Team | How access policies help |
|---|---|
| Admins and org owners | Reduce data exposure, enforce least privilege, and support isolated team models for MSP and multi-team environments. |
| Security teams | Protect sensitive content and enforce separation between teams or domains. |
| DevOps and SRE | Cut dashboard and alert noise by limiting visibility to owned resources. |
| Developers | Work privately until ready to share, without changing role-based permissions. |
| Data and observability admins | Restrict access to specific datasets and other high-impact resources. |
Understand policy-based access control
Role-based permissions define global access by resource type, and policies refine access for specific resources.
For example:
- Global permissions can grant a user read access to Custom Dashboards, but a policy that denies access to a specific dashboard overrides this.
- Global permissions can grant a user read and manage access to datasets, but a policy for a specific dataset can restrict or extend this further.
When you configure a policy on a resource for the first time, the default general access reflects existing system behavior.
Access modes
Every access policy starts with a top-level mode selector — Who can access this <resource> — that controls how much of the editor is exposed:
- Private — only you can view and edit the resource. No other configuration is needed; this is the default for newly created resources.
- Public — anyone in the team with role-based access to this resource type can view and edit it. No other configuration is needed.
- Advanced — opens the full policy editor, with target group rules and general access. Use Advanced when you need to share a resource with specific groups or set broad team-wide access. Advanced mode also supports Policy permissions, which let you delegate policy administration to other groups.
Supported features
Policies are currently available for the following Coralogix features:
What you need to get started
To create or edit a policy for a resource, you must first have all required permissions, including role-based permissions that grant you eligibility to the resource type.
Create a policy
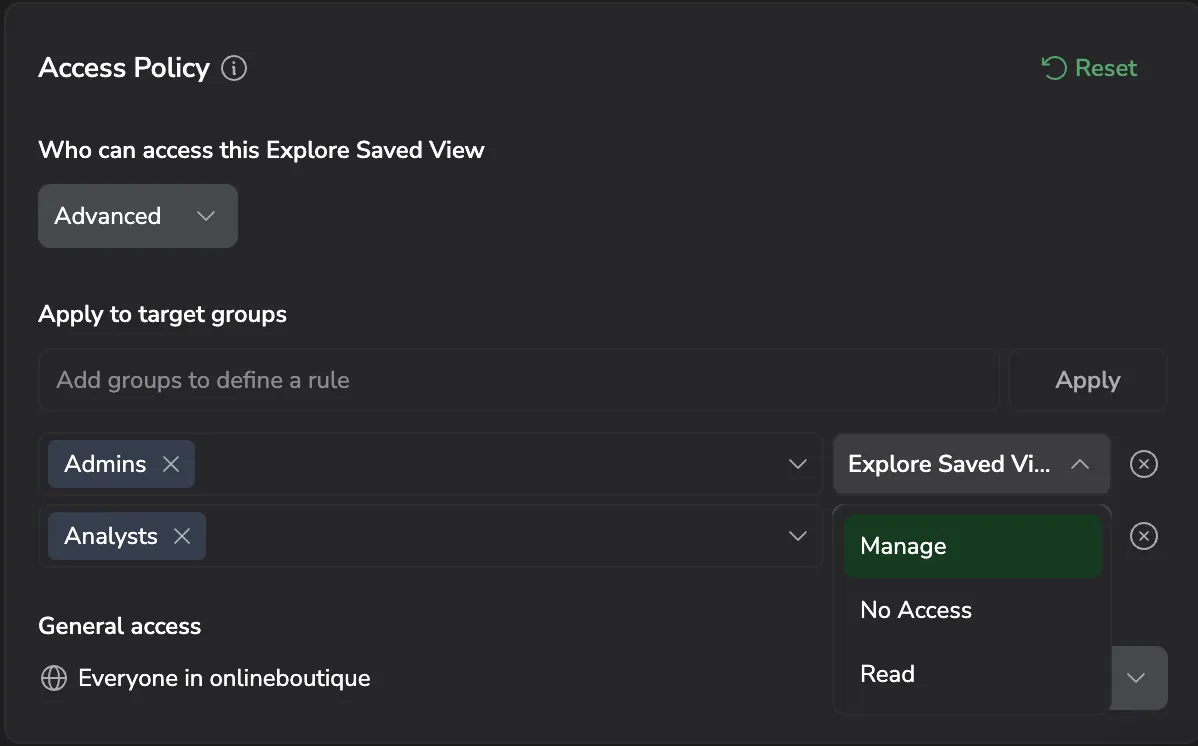
The screenshot below shows the Access Policy panel in Advanced mode on an Explore saved view, with two target-group rules (Admins → Manage, Analysts → with the access-level dropdown open) and General access set to everyone in the team.
Policy permissions
By default, only the policy creator can view or edit a policy's configuration. Policy permissions let you delegate that administration to other groups.
Policy permissions are available only for certain resource types, such as Custom Dashboards.
To delegate this access, turn on the Policy permissions toggle in the top-right of the Access Policy panel. This adds a Policy access level to each target group rule and to the General access row, alongside the resource access level. The resource access level is labeled with the resource type as a prefix — for dashboards, Dashboard: Manage or Dashboard: Read. For the access level labels used by other resource types, see the documentation for that resource: Custom Dashboards, API Keys, Datasets, and Explore.
The Policy access level has three options:
- Edit — the group can view and change the policy, including adding, editing, and removing rules. This shares policy ownership with them.
- View — the group can view the policy configuration but can't save any changes to it.
- No Access — the group can neither view nor change the policy. This is the behavior when Policy permissions is off.
For Custom Dashboards, read-only viewers (Dashboard: Read) can also be restricted to changing only the time range — see Read-only dashboards.
To restore the default configuration, select Reset (this removes all custom rules and returns the policy to its default state).
Restricted group behavior
If the policy creator belongs to one or more restricted groups, the system:
- Converts the general access setting into per-restricted-group rules.
- Sets general access to the restricted-group default (typically no access).
This makes content created by restricted-group members private-first by default.
Configuration examples
Level names in the steps that follow — Read, Manage, No Access — match the saved-views UI. The names differ by resource type (for example, datasets expose readData, overwriteData, appendData, readAccessPolicy, and updateAccessPolicy). The configuration pattern is the same in every case.
Only me (Private)
- Goal: No one else can view, manage, or take any other action.
- Steps:
- Set the mode to Private.
- Result: Only the policy owner has access.
Team-only
- Goal: Only the
App A Devsgroup can read (and optionally manage). - Steps:
- Set the mode to Advanced.
- Set General access to No Access.
- In Apply to target groups, add a rule: target
App A Devs→ Read (or Manage if needed). Select Apply.
- Result: Users in
App A Devscan read or manage; others are denied.
Everyone, except group X
- Goal: Broad read access for all, except block the
Londongroup. - Steps:
- Set the mode to Advanced.
- Set General access to Read.
- In Apply to target groups, add a rule: target
London→ No Access. Select Apply.
- Result: All users can read, except the
Londongroup.
Read-only for all; Product-Managers can manage
- Goal: Everyone can read;
Product-Managerscan also manage. - Steps:
- Set the mode to Advanced.
- Set General access to Read.
- In Apply to target groups, add a rule: target
Product-Managers→ Manage. Select Apply.
- Result: All users can read;
Product-Managerscan manage.
For Custom Dashboards, you can further restrict read-only viewers to changing only the time range by turning on Allow only time filters on the rule. See Read-only dashboards.
Sensitive dashboard visible only to SOC-Analysts
- Goal: Keep it private to
SOC-Analysts. - Steps:
- Set the mode to Advanced.
- Set General access to No Access.
- In Apply to target groups, add a rule: target
SOC-Analysts→ Read (and Manage if needed). Select Apply.
- Result: Only
SOC-Analystshave access.
Allow everyone to read; Developers can manage
- Goal: Broad visibility, controlled changes.
- Steps:
- Set the mode to Advanced.
- Set General access to Read.
- In Apply to target groups, add a rule: target
Developers→ Manage. Select Apply.
- Result: All users can read;
Developerscan manage.
Read-only dashboard with policy managed by an admin group
- Goal: A dashboard that a
Viewersgroup can only read, while aDashboard-Adminsgroup can administer the policy itself. - Steps:
- Set the mode to Advanced.
- Set General access to No Access.
- In Apply to target groups, add a rule: target
Viewers→ Dashboard: Read. Optionally turn on Allow only time filters to restrict them to changing the time range. Select Apply. - Turn on the Policy permissions toggle.
- On the
Dashboard-Adminsrule (add one if needed), set the Policy access level to Edit.
- Result:
Viewerscan read the dashboard only;Dashboard-Adminscan manage who has access without being able to edit the dashboard's contents.
Permissions
To create or edit a policy for a resource, the following requirements must be met cumulatively.
Global resource permissions
You must have global permissions that grant you visibility and management of the resource itself: <resource_type>:Read and <resource_type>:Manage.
Policy owner permissions
As a policy creator, you automatically get permissions to view and update a resource's policy: <resource_type>:ReadAccessPolicy and <resource_type>:UpdateAccessPolicy.
As long as your policy is active, users with access-policies:UpdateAll and access-policies:ReadAll can override resource-specific policy permissions and disable your policy, effectively becoming the new policy owners.
The resource's creator does not need to be the policy owner. One user can create a resource, and another user can create and own its policy.
Target group permissions
To select and view target groups when building a policy, you need the following:
team-groups:ReadSummaryteam-groups:ReadConfig
Overriding access policies
Where appropriate, grant wide policy maintenance permissions so designated users can find and fix stale policies:
access-policies:ReadAllaccess-policies:UpdateAll
These powerful permissions are not included in any out-of-the-box system roles.
What happened to Scopes?
Scopes are a legacy access mechanism still used by some resource types (for example, default /logs and /spans datasets). They continue to work alongside policies in the legacy API.
For legacy scopes, membership is also additive — the user's visible data is the union of all group scopes they belong to.
FAQs
Q: I can't see the Access policy section. Why?
You don't have permission to create or edit policies for this resource.
Ask your admin to check your <resource_type>:ReadAccessPolicy and <resource_type>:UpdateAccessPolicy permissions for this resource type.
Q: I can't see groups when adding a rule. Why?
You may be missing the team-groups:ReadSummary permission.
Ask your admin to enable it.
Q: I can see some groups, but not all of them. Why?
Even if you have team-groups:ReadSummary, visibility still depends on the group type.
You can see:
- Open groups
- Private or restricted groups you are a member of
You can't see:
- Private or restricted groups you are not part of
Q: I lost access to a policy I created. How can that happen?
Common reasons:
- You lost the global permissions required to view or manage policies.
- An admin or user with
access-policies:ReadAllandaccess-policies:UpdateAllpermissions replaced or removed your policy.
Q: I lost access to a resource. How can that happen?
Possible causes:
- You were removed from a private/restricted group included in the policy.
- The group used by the policy was deleted.
- Another user with permissions updated the policy and changed who is allowed.