Saved views in Alerts
Save and reuse filtered Alert Management views to stay focused on the work that matters. A saved view in Alerts preserves the current configuration so you can return to common monitoring workflows without reapplying filters each time.
Alerts saved views are part of the Saved Views shared component used across Coralogix products. The core experience is the same in each product; the options that get saved differ.
What a saved view captures in Alerts
| Option | Description |
|---|---|
| Query | The current search query and dataset. |
| Filters | The applied filters. |
| Table settings | The column layout and formatting. |
| Set as default view | Makes this the default landing view in Alert Management. |
The Time range, Fields, and Widget state options, available in other products, do not apply in Alerts. Alert Management is time-range-insensitive: the table lists alert definitions and current status, not time-bound events.
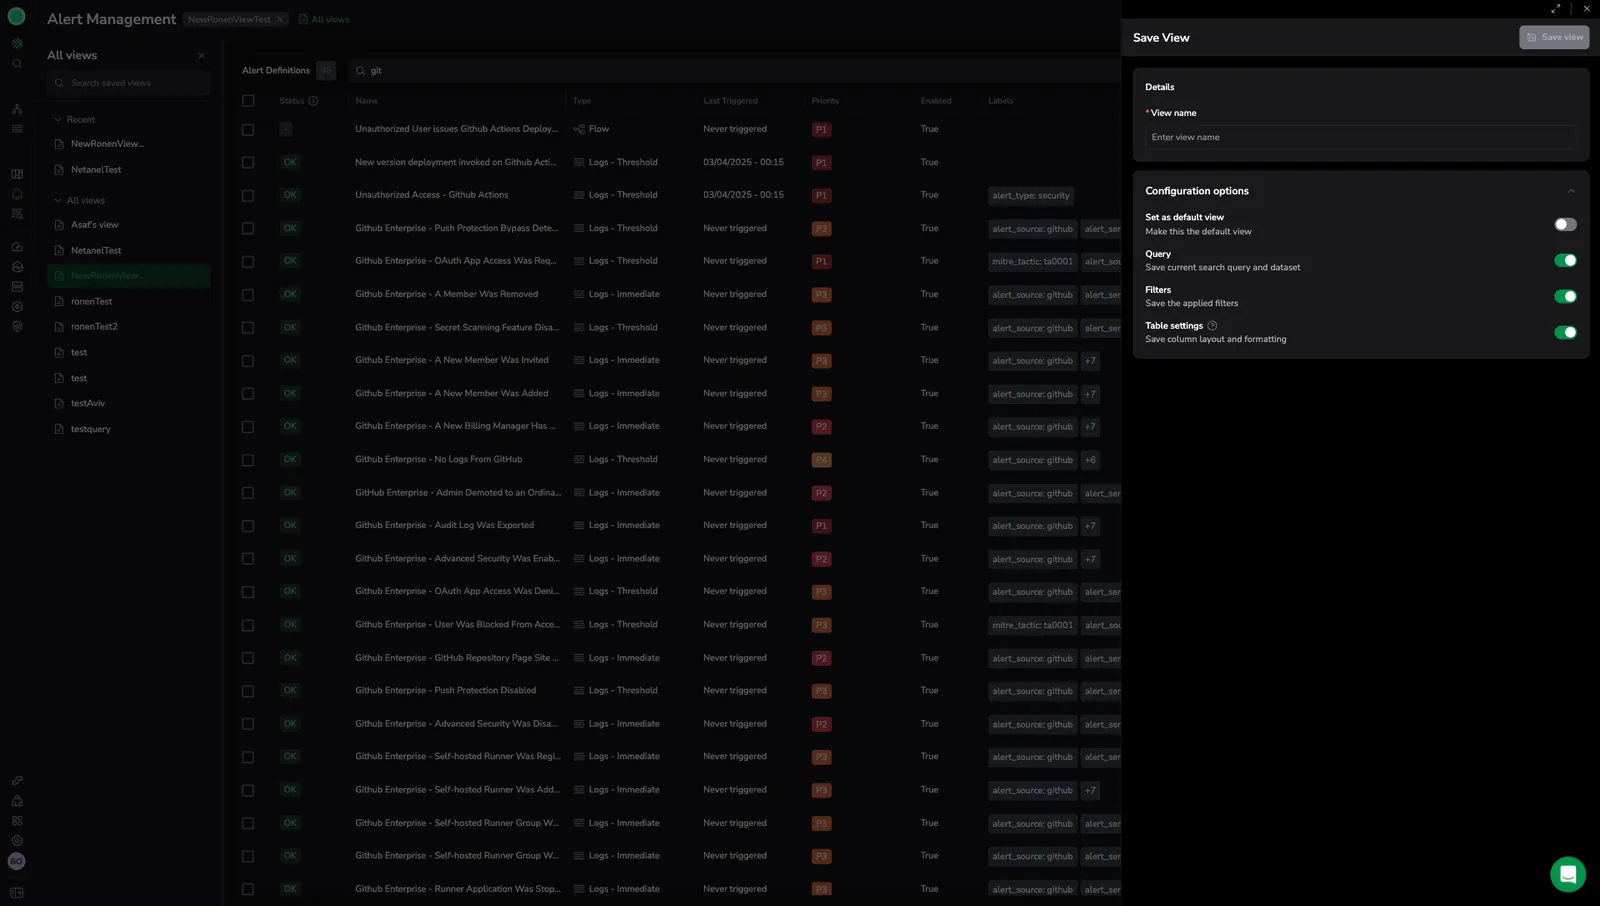
Create a saved view
- Configure the Alert Management page using search, filters, and table settings.
- Select Save view.
- In View name, enter a descriptive name.
- Under Configuration options, toggle which settings to save:
- Query: Save the current search query and dataset.
- Filters: Save the applied filters.
- Table settings: Save the column layout and formatting.
- (Optional) Enable Set as default view to make this the landing view in Alert Management.
- Select Save view.
Use saved views
- Saved views appear as tabs across the top of the Alert Management page, next to the page title.
- Open the All views panel from the left sidebar to browse all saved views.
- Find views under Recent or All views.
- Use Search saved views to locate a view by name.
- Select a saved view to apply it.
Update or save as a new view
When a loaded view has unsaved changes, the save menu provides two options:
- Update current view: Save the changes to the loaded view.
- Save as new view: Save the changes as a new view, leaving the original unchanged.
Edit, clone, or delete a saved view
Manage existing saved views from the more actions menu:
- Open All views.
- Locate the view.
- Open the more actions menu next to the view.
- Select one action:
- Edit: Update the view name or saved configuration.
- Clone: Create a copy you can modify without changing the original.
- Delete: Permanently remove the view.
Share a saved view
To share a saved view with a teammate, copy the page URL after the saved view is loaded. Opening the URL applies the same query, filters, and table settings.
Product-specific notes
- Alerts saved views do not include Time range, Fields, or Widget state.
- Saved views appear as tabs across the top of the Alert Management page, with the active view name shown next to the page title.
- The save menu uses Update current view / Save as new view, the standard pattern shared with Cases and Infrastructure Explorer.
Set the team default view
Admins can set a team-level default view so every team member lands on the same Alert Management configuration by default. Individual users can still override the team default for themselves.
To set the team default:
- Open Settings and navigate to the Alerts section.
- Under Team default view, select an existing saved view from the dropdown.
- Select Save.
To override the team default for your own account, load any saved view and enable Set as default view when saving: your personal default takes precedence over the team default.
This feature requires the ALERTS-TEAM-DEFAULT-VIEWS:MANAGE permission, included only in the Platform Admin system role by default.
Access policy
By default, a new saved view is Private (only you can see it). To share it with everyone on your team, switch the mode to Public. To configure per-group access rules, switch to Advanced: the access levels available in Advanced mode are:
- No Access: team members cannot see the view unless they have an explicit group rule.
- Read: everyone on your team can see and load the view.
- Manage: everyone on your team can see, load, and modify the view.
For the cross-product model, examples, and FAQs, see the access policies overview.
Permissions
The following permissions govern saved views in Alerts.
| Resource | Required for |
|---|---|
ALERTS-SAVED-VIEWS:READ | Loading shared saved views in Alert Management. |
ALERTS-SAVED-VIEWS:MANAGE | Creating, editing, and deleting shared saved views. |
ALERTS-SAVED-VIEWS:READACCESSPOLICY | Viewing the access policy on a saved view. |
ALERTS-SAVED-VIEWS:UPDATEACCESSPOLICY | Creating, editing, or deleting access policies on saved views. |
ALERTS-TEAM-DEFAULT-VIEWS:READ | Seeing the configured team default view in settings. |
ALERTS-TEAM-DEFAULT-VIEWS:MANAGE | Setting the team default view in settings. |
Building a policy also requires TEAM-GROUPS:READSUMMARY and TEAM-GROUPS:READCONFIG to select target groups. See the permissions list for the role assignments per key.
Next steps
Learn how to silence noisy or expected alerts: Suppression Rules.