Overview tab
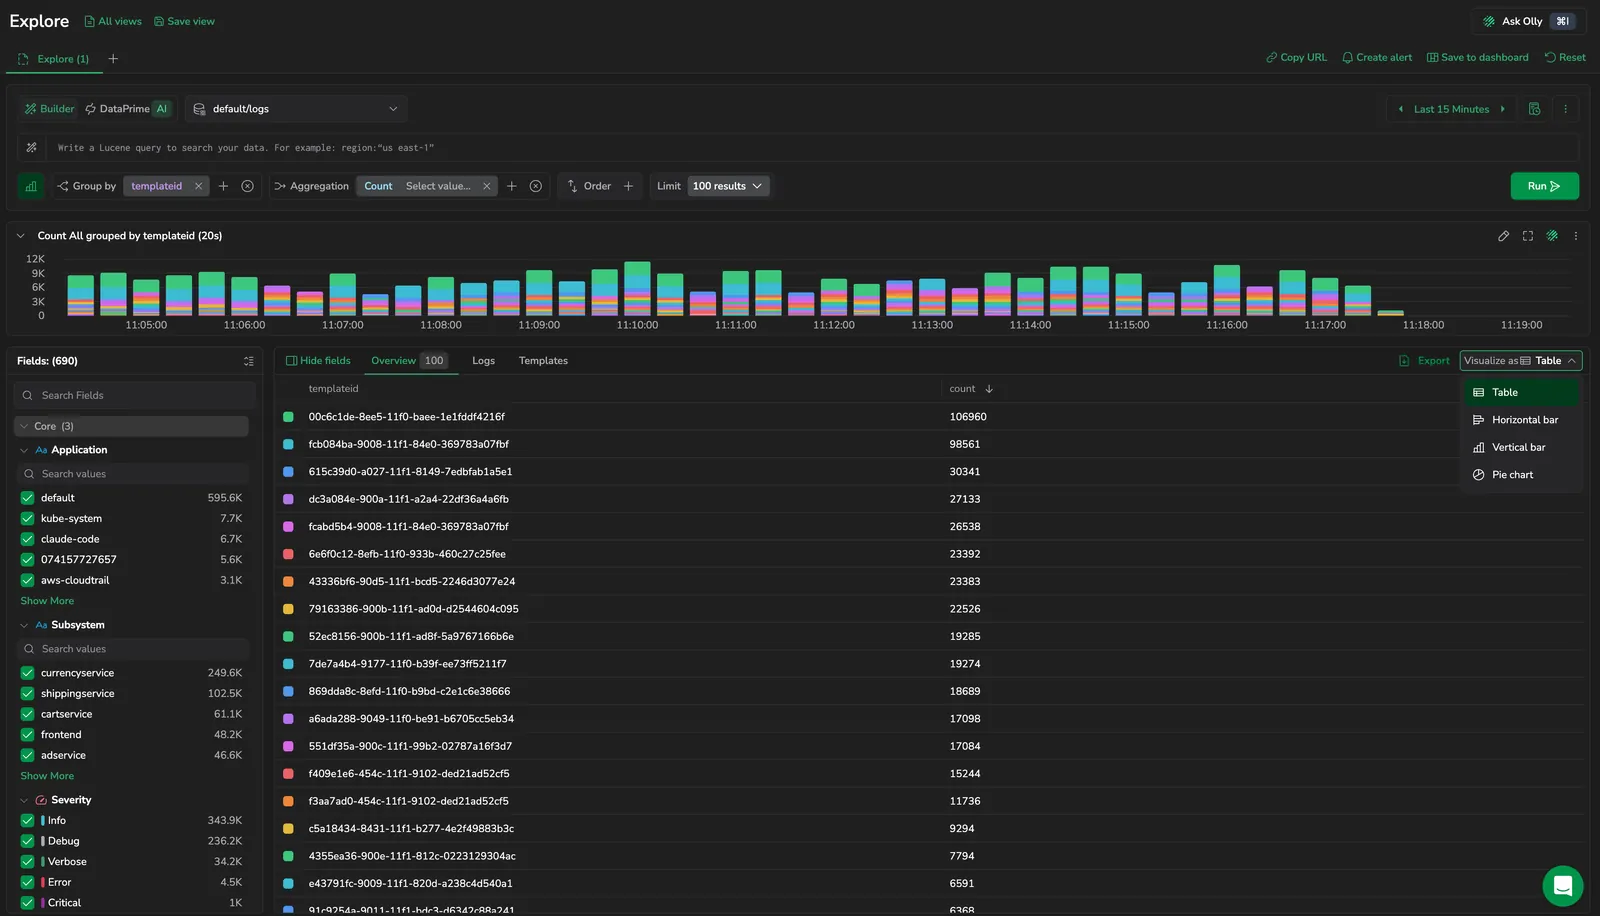
The Overview tab in Explore turns the results of your query into a sortable, aggregated view (top contributors, distributions, and bar or pie visualizations) so you can see where the load is concentrated without rebuilding the query as a chart.
It works the same way on every dataset. On the logs dataset it sits alongside the Logs and Templates tabs; on the spans dataset it sits alongside the Spans, Traces, Flows, Highlights, and Signals tabs; on a custom dataset it sits alongside that dataset's row-level tab. In every case, the Overview tab shares the exact same query, filters, and time range as the tabs beside it, switching tabs changes only how the result is presented.
When to use the Overview tab
Use the Overview tab when you want the shape of your data, not the individual events:
- Find the heaviest contributors. Rank applications by error count, services by request volume, subsystems by log volume, or hosts by severity mix.
- Find the low end of the distribution. Order ascending with a small limit to surface low-volume groups that may have stopped reporting.
- See the distribution at a glance. A pie or bar visualization makes it easy to tell which service, severity, or status code dominates.
- Compare values across groups. Put several groups side by side in a single view, for example, sum of duration by service versus by operation.
For row-level inspection of a specific event, span, or trace, use the dataset's row-level tabs.
How the Overview tab populates
The Overview tab is driven by the same Group by and Aggregation clauses you set in Query builder:
- In Builder mode, apply a Group by or an Aggregation clause and Explore moves you to the Overview tab automatically. The aggregated shape is what you came for, so it leads.
- Clear the Group by and Aggregation clauses, and the row-level tab (Logs, Spans, and so on) takes the lead again.
- Before you add an aggregation, the Overview tab shows a single-row summary with the total count for the active query, so you always see something useful when you land there.
Group by and Aggregation stay enabled whenever the Overview tab is active. In the row-level tabs, Group by behaves differently. It adds a column to the results table rather than reshaping them. To add or remove columns in a row-level tab, use Columns.
Order by and Limit
The Order and Limit chips in the query builder only affect the Overview tab. They never reshape the row-level tabs.
- Order descending to surface the busiest groups. Top error counts, top request volume, top severity mix.
- Order ascending with a small limit to find the quiet outliers. For example, group by
coralogix.metadata.applicationName, aggregatecount(), set order to ascending, and set the limit to 10. The lowest-volume applications surface at the top of the table. - The default limit is 100. Lower it to focus on the leaders; raise it when you need the full distribution.
Choose good Group by fields
Grouping by a high-cardinality field produces too many groups to render meaningfully. Avoid fields that are unique per row, for example span.id (every span is unique) or trace.id (one group per trace; use the Traces tab instead). Prefer lower-cardinality fields such as service.name, operation, http.status_code, http.method, coralogix.metadata.applicationName, coralogix.metadata.severity, or resource attributes like cloud.region and k8s.namespace.name.
Visualizations
The Overview tab renders non-time-bucketed groupings. A count grouped by severity, a p95 duration by service, and so on. Time-bucketed series stay in the time-series chart above the result panel, which trends the same query over time.
Use the Visualize as dropdown in the Overview tab's result toolbar to switch between Table, Horizontal bar, Vertical bar, and Pie chart. The dropdown is disabled until you submit a query with a Group by clause. The tooltip on the disabled control reads Use Group By in the Builder to unlock additional visualizations. When the query no longer supports charts (for example, after clearing Group by), the visualization falls back to Table. Switching the chart type does not re-run the query. The same result set is re-rendered in the new shape.
Choose a visualization type
The Visualize as dropdown toggles between four chart types. The default view is Table.
Table
Displays grouped query results as rows and columns. Use the table to:
- Sort, scan, and compare values across groups.
- Drill into a specific group to view its underlying events or spans.
- Read aggregated values precisely, without inferring them from a chart.
Horizontal bar
Displays values as horizontal bars, with categories on the vertical axis. Use horizontal bars to:
- Rank categories by value (for example, top services by error count).
- Compare named groups where labels are long or numerous.
- Present leaderboard-style views of aggregated data.
Vertical bar
Displays values as vertical bars along a categorical axis. Use vertical bars to:
- Compare discrete values across groups (for example, error count by application).
- Spot peaks at a glance.
- View stacked or grouped breakdowns when multiple groupings are applied.
Pie chart
Displays values as wedges of a circle, proportional to their share of the total. Use a pie chart to:
- See the distribution of a small set of groups at a glance.
- Communicate share-of-total at a quick scan.
- Compare two or three dominant groups against the rest.
Interact with the chart
All chart visualizations in the Overview tab are interactive. Use them to drill down, refine your query, or pivot your investigation.
Drill down into a data point
Select any bar, slice, or row to open a context menu. Select Drilldown to view the underlying events or spans that contributed to the selected value, useful for investigating the data behind a spike or outlier.
Filter values from a chart
Select a chart element to open a context menu with field-level actions:
- Filter row: narrow results to those in the selected row.
- Include in query: add the value as a filter on the current query.
- Exclude from query: add the value as an exclusion filter on the current query.
- Copy value, Copy key, Copy query: copy the data point value, field key, or the full query to the clipboard.
Refine your investigation directly from the visualization without manually editing the query.
Query warnings
When a query returns warnings (for example, when results are truncated to the row limit or a field in the query can't be found) a warning icon appears in the chart toolbar. Hover the icon to read the warning messages. The icon appears only when the current query produces warnings.
Common use cases
The examples below apply to any dataset, swap in the fields that fit your data.
Top contributors by count
Rank groups by their share of the result to see where the load (or the failures) concentrate.
- Group by:
service.name(spans) orcoralogix.metadata.applicationName(logs) - Aggregation:
count - Filter: toggle Errors in the query builder to rank by error volume
- Order: descending
- Visualize as: horizontal bar or table
Slowest operations
Find the operations carrying the worst tail latency.
- Group by:
operation(orspan.name) - Aggregation:
p95(duration)ormax(duration) - Order: descending
- Visualize as: horizontal bar or table
Status code distribution
See the share of 2xx, 4xx, and 5xx responses at a glance.
- Group by:
http.status_code - Aggregation:
count - Visualize as: pie chart
Quiet groups
Surface groups that may have stopped reporting, useful for catching silent regressions.
- Group by:
service.name,coralogix.metadata.subsystemName, or another grouping field - Aggregation:
count - Order: ascending
- Limit: 10
The result panel and Fields
The result panel toolbar holds, from left to right: the Hide fields / Show fields toggle, the result tabs (with a count on the Overview tab), Export, and the Visualize as dropdown.
Select Hide fields to collapse the Fields panel on the left and give the aggregated result more room; select Show fields to bring it back. The Fields panel behaves the same on the Overview tab as on the row-level tabs, search fields, expand a field to see its value distribution, and filter values in or out. Its selections stay in sync with the query bar across every tab.
DataPrime queries
When you switch the builder to DataPrime, the Overview tab renders the query result whenever the query expresses grouping and aggregation. Behavior matches the builder's Overview tab. For complex queries the visualization layer can't interpret, the chart is disabled and only the row-level result is populated. The over-time chart above the result panel remains visible.
The DataPrime view exposes the same left-side Fields panel as the builder, with the same field actions. Filter in / Filter out, Search values, Show more, and Sort.
Move from an aggregated row to the underlying data
Aggregated rows tell you where to look, not what happened. To inspect the underlying records:
- Note the value driving the row, for example, the service or application in the top row.
- Switch to a row-level tab (Logs, Spans, and so on). The query, filters, and time range carry over.
- Add a filter on the value from step 1, or select the value from the row's context menu to filter in place.
- Open a specific record for full context, the log details panel on logs, or the span drilldown on spans.
For spans, switch to the Traces tab for a request-level handoff or Flows for a topology view. The query carries over to all of them.
Related resources
- Explore overview
- Query builder
- Time-series chart
- Filter with fields
- Templates. Group high-volume logs by shared message structure.
- Explore spans
Next steps
Group high-volume logs by shared message patterns with Templates.