Connect AWS DevOps Agent to Coralogix
Connect Coralogix to AWS DevOps Agent so the agent can use your logs, metrics, and traces during incident investigations and, when you configure it, start investigations automatically when a Coralogix alert fires. Responders begin an investigation with context already in hand.
This is a built-in integration, so you do not install or operate a local connector. AWS DevOps Agent reaches Coralogix through the Coralogix hosted Model Context Protocol (MCP) server, and Coralogix reaches AWS DevOps Agent through a webhook. For telemetry introspection the agent needs read-only access, so grant only read permissions.
How it works
The integration has two independent paths. Configure the first on its own if you start investigations manually, or configure both to also trigger investigations automatically.
- Telemetry introspection: during an investigation, AWS DevOps Agent queries Coralogix telemetry through the MCP server. This path answers requests and cannot start an investigation on its own.
- Automated triggering: when a selected alert fires, Coralogix sends an event to the Agent Space webhook, which opens an investigation. This path uses the Coralogix Notification Center or a legacy outbound webhook.
Coralogix alert
    -> Coralogix Notification Center / outbound webhook (or AWS EventBridge)
    -> AWS DevOps Agent webhook
    -> New investigation

AWS DevOps Agent investigation
    -> Coralogix hosted MCP server
    -> Read logs, metrics, traces, RUM, alerts, and incidents
What you need
- An active Coralogix account.
- Access to AWS DevOps Agent with permission to register account-level capability providers, and at least one Agent Space.
- Your Coralogix domain or region value, such as
eu1. The MCP endpoint uses the API hostapi.<domain>.coralogix.com, which can differ from the hostname you see in the Coralogix UI. - A dedicated personal Coralogix API key for the MCP server. AWS DevOps Agent cannot authenticate to the Coralogix MCP server with OAuth. See Authenticate with an API key.
- Read permissions for each telemetry type the agent queries. Scope the credential to read-only, and do not grant write, delete, or administrative access. Create a dedicated personal API key rather than reusing a broadly privileged key, because the MCP server inherits the permissions of the key owner.
At minimum, grant these read permissions when you create the key:
| Telemetry | Coralogix permission |
|---|---|
| Logs | Query logs (ReadData on log data) |
| Metrics | Query metrics (ReadData on metric data) |
| Spans and traces | Query spans (ReadData on span data) |
For the full list, see MCP server permissions.
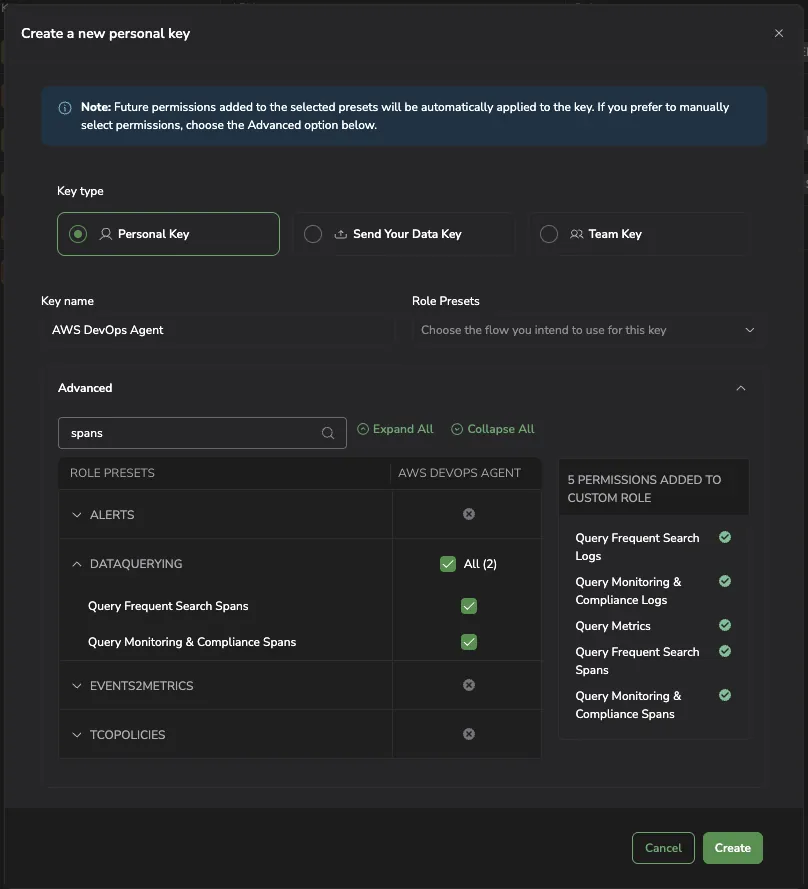
The Coralogix MCP endpoint format is https://api.<domain>.coralogix.com/mgmt/api/v1/mcp. EU1 (Ireland) is a naming exception: its canonical API host is the bare api.coralogix.com. The regional alias api.eu1.coralogix.com also resolves but can return 403 for EU1 credentials. If one host fails authentication, try the other. Every other region carries its label, for example https://api.eu2.coralogix.com/mgmt/api/v1/mcp for EU2.
Authenticate with an API key
Authenticate the connection with a dedicated personal Coralogix API key. This is the only authentication method the integration supports.
The OAuth option that AWS DevOps Agent offers is not compatible with the Coralogix OAuth server:
- AWS DevOps Agent registers an OAuth client manually, by supplying a client ID and client secret that you create in advance. The Coralogix OAuth server issues client credentials only through dynamic client registration, so there is no client ID and secret to enter.
- Coralogix refresh tokens are single use. Every refresh returns a new refresh token and invalidates the previous one, and a client that does not store the replacement cannot refresh again.
An OAuth connection therefore drops as soon as the access token expires, and the refresh fails with invalid_grant and refresh token does not exist. Re-authorizing restores the connection only until the next expiry.
Register Coralogix as a capability provider
Register the Coralogix MCP server once at the AWS account level. After registration, it is available to every Agent Space in the account.
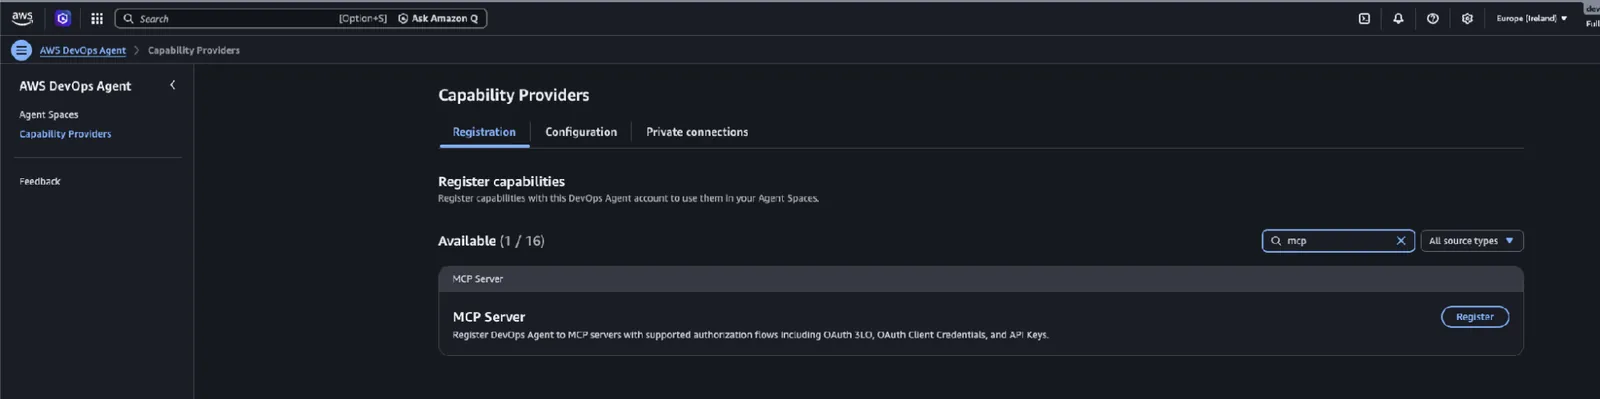
Register in the console
- Sign in to the AWS Management Console and open AWS DevOps Agent.
- Open the account-level Capability Providers page.
- Find MCP Server in the Available section and select Register.
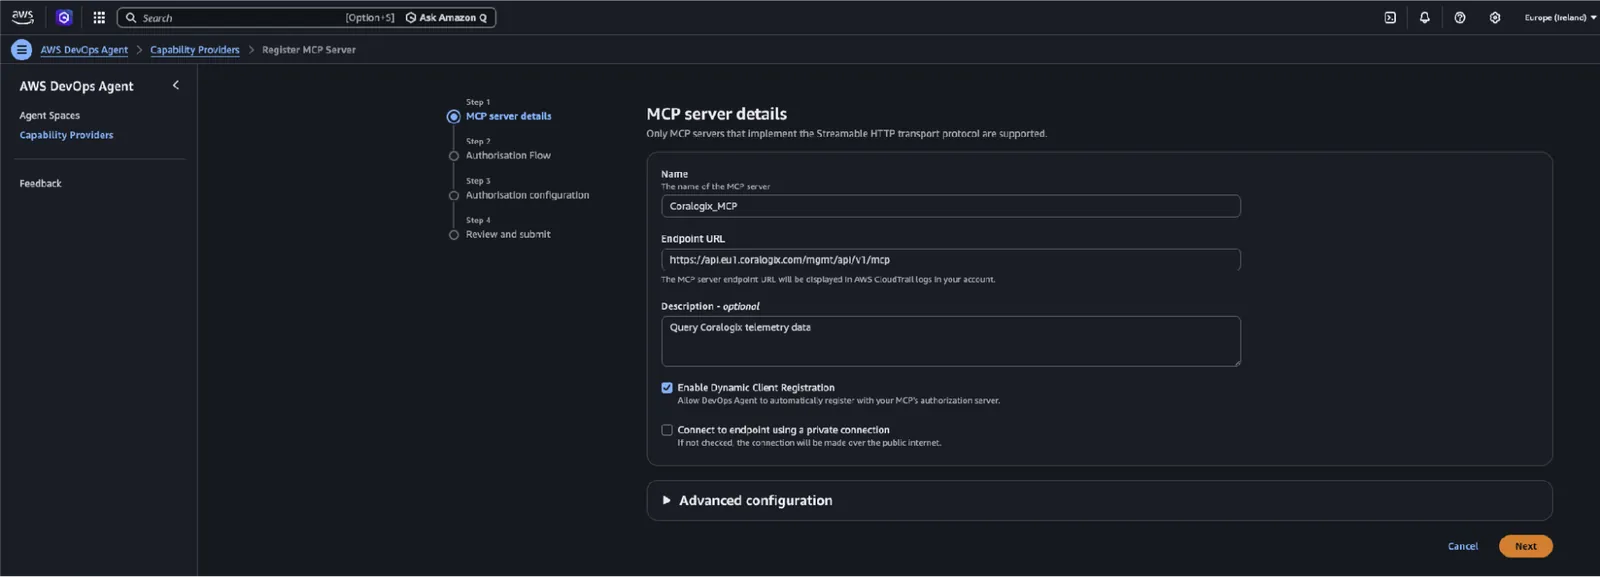
- On the MCP server details page, enter:
- Name: a descriptive name, for example
Coralogix_MCP. - Endpoint URL: your region's MCP endpoint, for example
https://api.coralogix.com/mgmt/api/v1/mcpfor EU1. - Description (optional): for example, query Coralogix telemetry data.
- Enable Dynamic Client Registration: clear this check box. Selecting it starts an OAuth flow, which Coralogix cannot complete.
- Connect to endpoint using a private connection: leave cleared. The MCP server is a public SaaS endpoint.
- Name: a descriptive name, for example
- Select Next.
- On the Authorization flow page, select API Key. Do not select OAuth 3LO.
- Select Next.
- On the Authorization configuration page, set Header name to
Authorizationand API key value toBearer <YOUR-CORALOGIX-PERSONAL-API-KEY>, including theBearerprefix. - Select Next, review on Review and submit, and select Submit. AWS validates the connection. On success, Coralogix appears in the Currently registered section.
Coralogix recommends the mcp-version: v2 header. Of the registration auth methods, only AWS SigV4 exposes a custom-headers field in the console. If your method cannot attach a custom header, rely on the server default and confirm the active version during validation.
Register with the AWS CLI
Replace the endpoint with your region's endpoint and supply your personal API key with the Bearer prefix:
aws devops-agent register-service \
    --service mcpserver \
    --service-details '{
        "mcpserver": {
            "name": "coralogix",
            "endpoint": "https://api.coralogix.com/mgmt/api/v1/mcp",
            "authorizationConfig": {
                "apiKey": {
                    "apiKeyName": "coralogix-api-key",
                    "apiKeyValue": "Bearer <YOUR-CORALOGIX-PERSONAL-API-KEY>",
                    "apiKeyHeader": "Authorization"
                }
            }
        }
    }' \
    --region us-east-1
Confirm the current field shape with aws devops-agent register-service help, because the service API can change.
Create and enable an Agent Space
An Agent Space is where investigations run. Account-level registration makes Coralogix available, but each Agent Space must add it and select which tools it can call. This is also where you keep access least-privilege.
Create an Agent Space
Skip this if you already have an Agent Space to use.
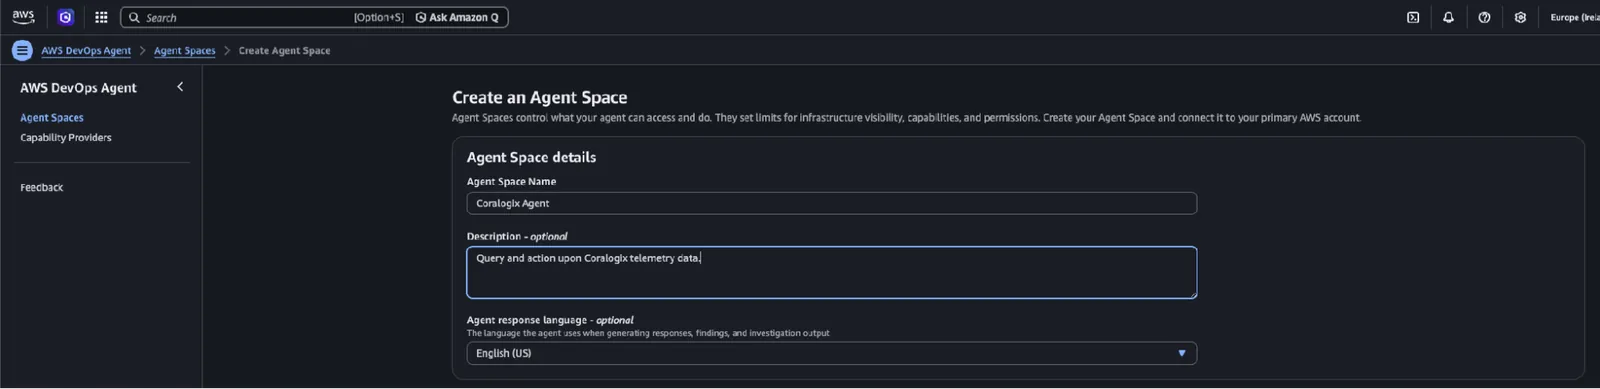
- In AWS DevOps Agent, select Create Agent Space.
- In Agent Space details, enter a Name. Optionally add a Description and an Agent response language.
- Under Give this Agent Space AWS resource access, select an IAM role method. Auto-create a new AWS DevOps Agent role is the safe default and needs permission to create IAM (Identity and Access Management) roles.
- Under Enable the Agent Space Web App, select a role method the same way. The Web App is where operators review and run investigations.
- Optionally add Tags, then select Create.
Enable Coralogix in the Agent Space
- Open the Agent Spaces page, select your Agent Space, and select View details.
- On the Capabilities tab, in the Telemetry (MCP server) section, select Add.
- Select the Coralogix MCP server you registered, by its name. Registering at the account level does not enable it here.
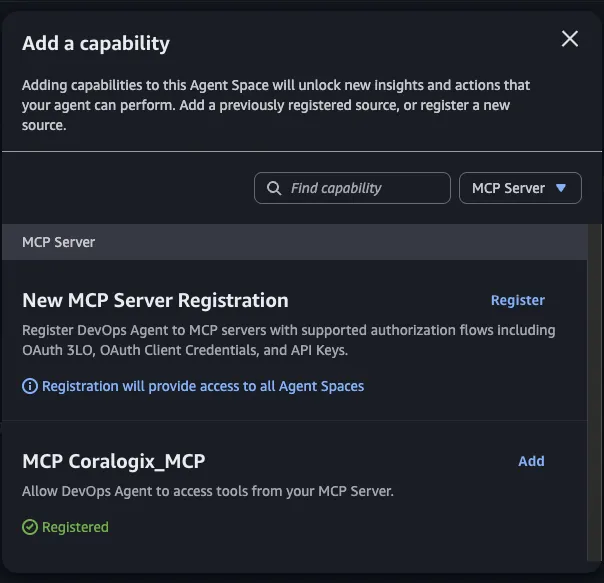
- Allowlist the query tools. In the MCP server tools list, search
queryand select the three query tools:query_dataprimefor logs and traces or spans, using DataPrime.query_promql_instantandquery_promql_rangefor metrics, using PromQL.- Optionally add a RUM query tool if you use Real User Monitoring.
- Select the webhook authentication type, needed only to trigger investigations automatically. Select API key so Coralogix can authenticate with a static
Authorizationheader. Coralogix cannot compute the per-request signature that HMAC requires. - Select Next, then Review, then Save.
- Copy the Webhook URL and the Webhook API Key from the set-up instructions, and store the key in a secrets manager. The key appears only once.
Coralogix exposes a single manage_alerts tool that performs both reads and writes, so you cannot allowlist only its read operations. If you add it for alert context, use a Coralogix key with read-only alert permissions so any write fails at the API. Otherwise, omit manage_alerts and rely on the DataPrime and PromQL query tools.
Trigger investigations from alerts
Configure this section to open an investigation automatically when a Coralogix alert fires. The telemetry path works on its own for manually started investigations.
Webhook request format
Send an HTTP POST to the Agent Space Webhook URL with a bearer token. Follow Version 2 of the AWS DevOps Agent webhook format:
POST <Agent-Space-Webhook-URL>
Content-Type: application/json
Authorization: Bearer <Webhook-API-Key>
x-amzn-event-timestamp: <ISO-8601 timestamp>
The body carries the incident fields:
{
  "eventType": "incident",
  "incidentId": "cx-alert-8842-2025-11-23T18:00:00Z",
  "action": "created",
  "priority": "HIGH",
  "title": "example-service 5xx rate above 5% for 5m",
  "description": "HTTP 5xx rate exceeded 5% on example-service (production).",
  "timestamp": "2025-11-23T18:00:00Z",
  "service": "example-service",
  "data": { "metadata": { "environment": "production", "source": "coralogix" } }
}
incidentId combined with timestamp must be unique per firing. Reused values are deduplicated and dropped.
Design the payload so the investigation is actionable. Carry the affected resource or Amazon Resource Name (ARN), the AWS account ID, the region, and a bounded time window inside data, plus the alert name and a deep link back to the alert. A title-only event produces an investigation that acknowledges the alert but has nothing to root-cause.
Select a delivery path
Coralogix delivers the alert to the webhook in one of three ways. Configure one. All three send the same Version 2 request and differ only in where you template the payload.
Path A: Coralogix Notification Center
The Coralogix Notification Center uses a Connector for where to send, a Preset for what to send, and Routing for which alerts use them.
-
Create a Generic HTTPS connector. Set the URL to the Agent Space Webhook URL and the method to
POST. Expand Advanced, then under Headers addContent-Type: application/jsonandAuthorization: Bearer <Webhook-API-Key>.
-
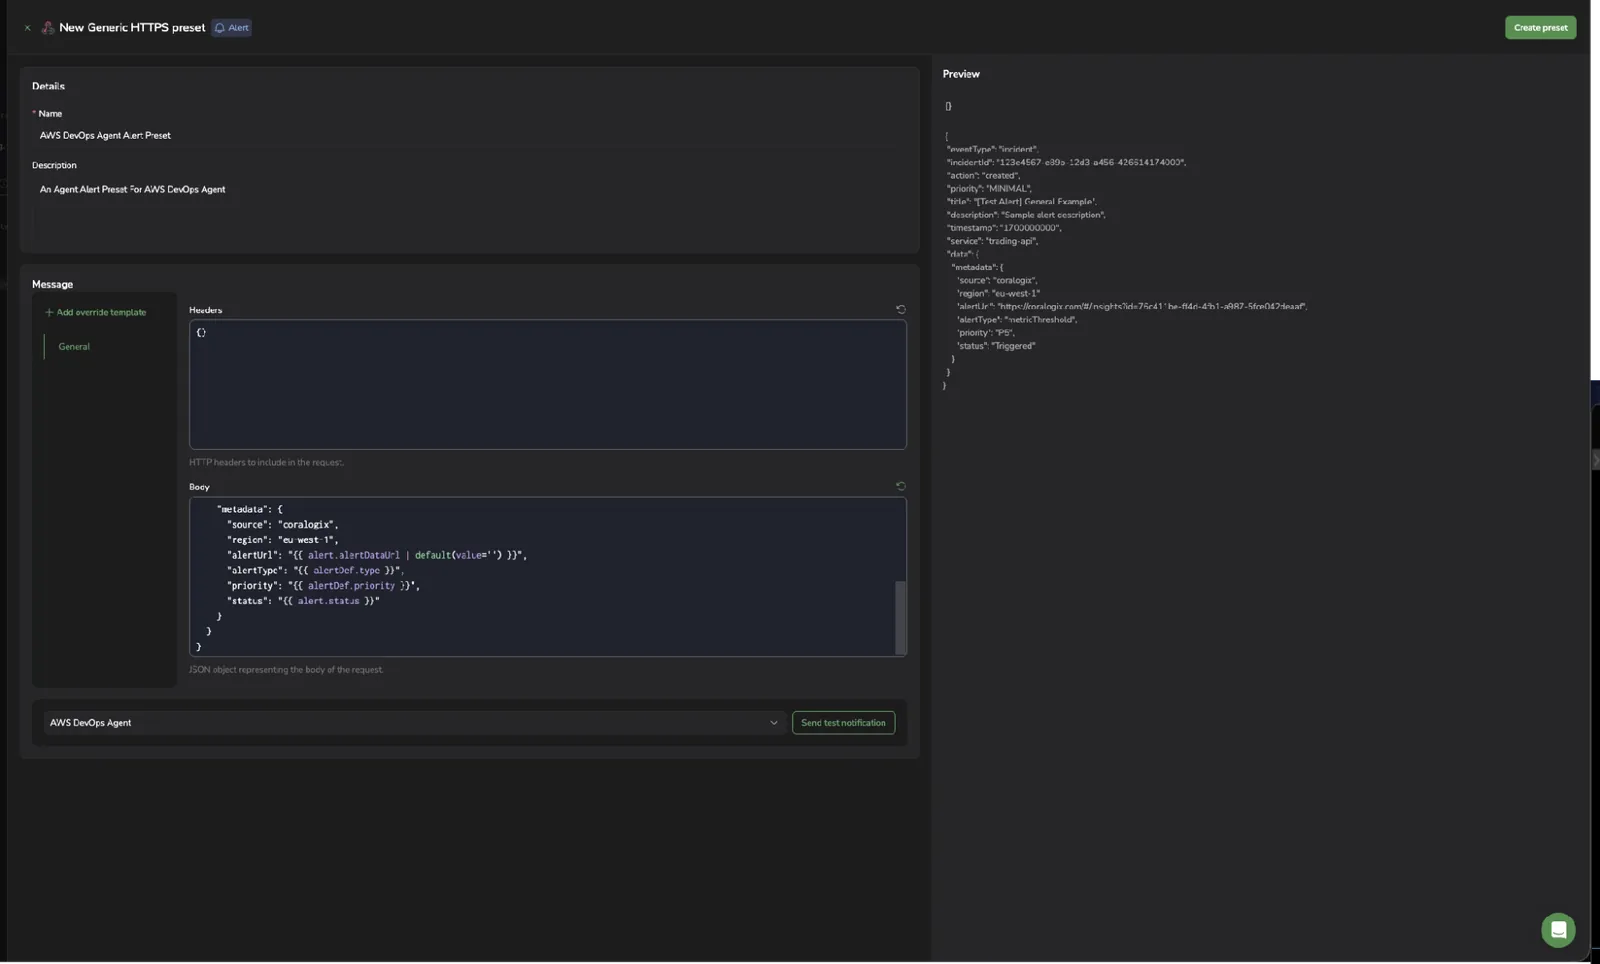
Create a custom preset on the Generic HTTPS schema. Select the Alert entity type, because the
alert.*andalertDef.*variables exist only for alert entities. Set the preset Headers template to{}and put the payload in the Body template:
{
  "eventType": "incident",
  "incidentId": "{{ alertDef.id }}",
  "action": "{% if alert.status == 'Resolved' %}resolved{% else %}created{% endif %}",
  "priority": "{% if alertDef.priority == 'P1' %}CRITICAL{% elif alertDef.priority == 'P2' %}HIGH{% elif alertDef.priority == 'P3' %}MEDIUM{% elif alertDef.priority == 'P4' %}LOW{% else %}MINIMAL{% endif %}",
  "title": {{ alertDef.name | json_encode }},
  "description": {{ alertDef.description | default(value='') | json_encode }},
  "timestamp": "{{ alert.timestamp }}",
  "service": "example-service",
  "data": {
    "metadata": {
      "source": "coralogix",
      "region": "us-east-1",
      "alertUrl": "{{ alert.alertDataUrl | default(value='') }}",
      "alertType": "{{ alertDef.type }}",
      "priority": "{{ alertDef.priority }}",
      "status": "{{ alert.status }}"
    }
  }
}
The json_encode filter emits a safely quoted string, so title and description need no surrounding quotes. The priority block maps Coralogix P1 through P5 to the AWS set, and action maps the alert status to created or resolved.
- In the preset editor, select the AWS DevOps Agent connector and select Send test notification. The editor renders the preset against sample data and posts to the webhook, so you can confirm an investigation opens before wiring a real alert.
- In the alert's Response step, set Notify on to Alerts. Then choose a notification method. For a targeted setup, open the Destinations tab and select + Add destination and choose the AWS DevOps Agent connector and its preset. To route dynamically instead, select Route via Labels and use a router whose
routingLabelsmatch the alert's labels (Team, Environment, Service).

Path B: legacy outbound webhook
Use this older mechanism if you are not yet on the Notification Center. Create a Generic outbound webhook, set the URL to the Agent Space Webhook URL and the method to POST, add the Authorization and Content-Type headers, and set the body to the Version 2 schema using the Coralogix dollar-style variables such as $ALERT_ID, $ALERT_NAME, and $EVENT_TIMESTAMP. Legacy webhooks substitute variables literally, with no conditional logic and no JSON encoding, so a quote or newline in an alert name can break the body. Prefer Path A when it is available.
Path C: AWS EventBridge
Use this option when your organization routes alerts through AWS EventBridge. Send the selected alert events to EventBridge, create a rule that matches them, add an API destination pointed at the Agent Space Webhook URL, configure its connection to send the Authorization bearer header, and use an input transformer to map the payload to the Version 2 schema.
Query Coralogix telemetry
After you authorize and enable the connection, AWS DevOps Agent calls the allowlisted MCP tools during an investigation. Coralogix groups the tools into logs and traces (DataPrime), metrics (PromQL), RUM, alerts, optional Olly tools, and management tools. For incident response, allowlist the read-only DataPrime and PromQL query tools first.
The agent uses these tools to root-cause an incident: it queries logs for the affected service and window, queries traces to find failing routes and dependencies, and queries metrics to compare against a healthy baseline.
Verify the integration
Run these checks after setup and after any change to credentials or endpoints.
- Confirm the provider appears on the Capability Providers page with your endpoint URL.
- Confirm Coralogix appears as an enabled capability on the Agent Space Capabilities tab, with the tools you allowlisted.
- Confirm the connection shows a connected or authorized status.
Test the read path with a tool-list handshake, which returns a JSON-RPC result listing the Coralogix tools:
curl -sS -X POST "https://api.coralogix.com/mgmt/api/v1/mcp" \
  -H "Authorization: Bearer <Coralogix-personal-API-key>" \
  -H "mcp-version: v2" \
  -H "Content-Type: application/json" \
  -d '{"jsonrpc":"2.0","id":1,"method":"tools/list"}'
Then send a test alert through each configured trigger path and confirm a new investigation opens in the target Agent Space. AWS labels the investigation Triggered by MCP Server, as expected, because AWS registers the provider webhook as an MCP-server webhook.
AWS DevOps Agent recognizes a title-only test event as a synthetic check and reports an integration-check acknowledgment. To exercise data gathering, send an event whose data carries a real test-account resource or ARN, the AWS account, the region, and a bounded time window.
Troubleshoot common issues
| Symptom | Resolution |
|---|---|
| Registration validation fails or times out. | Confirm the endpoint uses the format https://api.<domain>.coralogix.com/mgmt/api/v1/mcp. For EU1 use the bare host api.coralogix.com. The alias api.eu1.coralogix.com can return 403. Confirm outbound network access, and set HTTP_PROXY and HTTPS_PROXY if required. |
| Coralogix rejects MCP requests as an invalid version. | Send the mcp-version: v2 header and remove any use of v1. |
| API-key authorization fails. | Confirm the header name is Authorization and the value is Bearer <key>. Confirm the key is a personal API key, not an ingestion key, and has not expired. |
The connection works at first, then fails with invalid_grant or refresh token does not exist. | The provider is registered with OAuth or Dynamic Client Registration, which this integration does not support. Deregister it and register again with API Key. See Authenticate with an API key. |
| Authorization succeeds, but telemetry returns permission errors. | Grant the credential read access to the telemetry category that fails. |
| An alert fires, but no investigation starts. | Confirm you attached the alert to the connector or route, and that the target URL matches the Agent Space Webhook URL. Check the delivery log for responses other than 2xx. |
The webhook returns 200 but no investigation starts. | Confirm the body is valid JSON and matches the Version 2 schema, and that incidentId and timestamp are unique. |
| A new investigation lacks Coralogix context. | Confirm Coralogix appears in the same Agent Space, that you allowlisted the read-only tools, and that the authorization status shows connected. |
Security considerations
- Use a dedicated personal API key for this integration, so you can revoke it without affecting anything else.
- Grant only read-only access to the telemetry categories the agent needs.
- Treat the Webhook URL, Webhook API Key, and Coralogix API key as secrets, and store them in a secrets manager.
- Rotate the keys periodically and immediately after suspected exposure.
- Review the allowlisted tools regularly and remove any that are no longer needed.
Remove the integration
Remove Coralogix in the reverse order of setup. First, on each Agent Space Capabilities tab, remove or turn off the Coralogix provider. Then, on the account-level Capability Providers page, confirm the provider is no longer in use and select Deregister.
Permissions
Grant the person who registers the provider and the API-key owner the read permissions for the telemetry the agent queries. For the exact keys and the RUM, alerts, and management scopes, see MCP server permissions.