Saved views
Save and reuse Explore views to stay focused on the work that matters. A saved view preserves the current configuration so you can return to common investigation workflows without reapplying settings each time.
Saved views is available for both Logs tab and Spans. A view saved while you're querying logs reopens against logs; a view saved while you're querying spans reopens against spans. The saved configuration travels with the view regardless of which tab you started from.
Explore saved views are part of the Saved Views shared component used across Coralogix products. The core experience is the same in each product; the options that get saved differ.
What an Explore saved view captures
| Option | Description |
|---|---|
| Query | The current Lucene or DataPrime query and dataset (logs or spans) |
| Fields | The favorite fields shown in the sidebar |
| Table settings | The column layout and formatting, plus the Content column field selection (logs and spans) and the Resource column field selection (spans only) |
| Time range | The selected time range, with optional Lock time to fix the range |
| Folder | Optional folder used to organize the view in the All views panel |
| Set as default view | Makes this the default landing view in Explore |
In Explore, filter conditions are part of the query, so the Filters option that appears in Cases and Alerts is not surfaced separately here. The Widget state option, unique to Infrastructure Explorer, also does not apply.
Create a saved view
- Open the Logs or Spans view in Explore and configure your query, fields, and table settings.
- Select Save view.
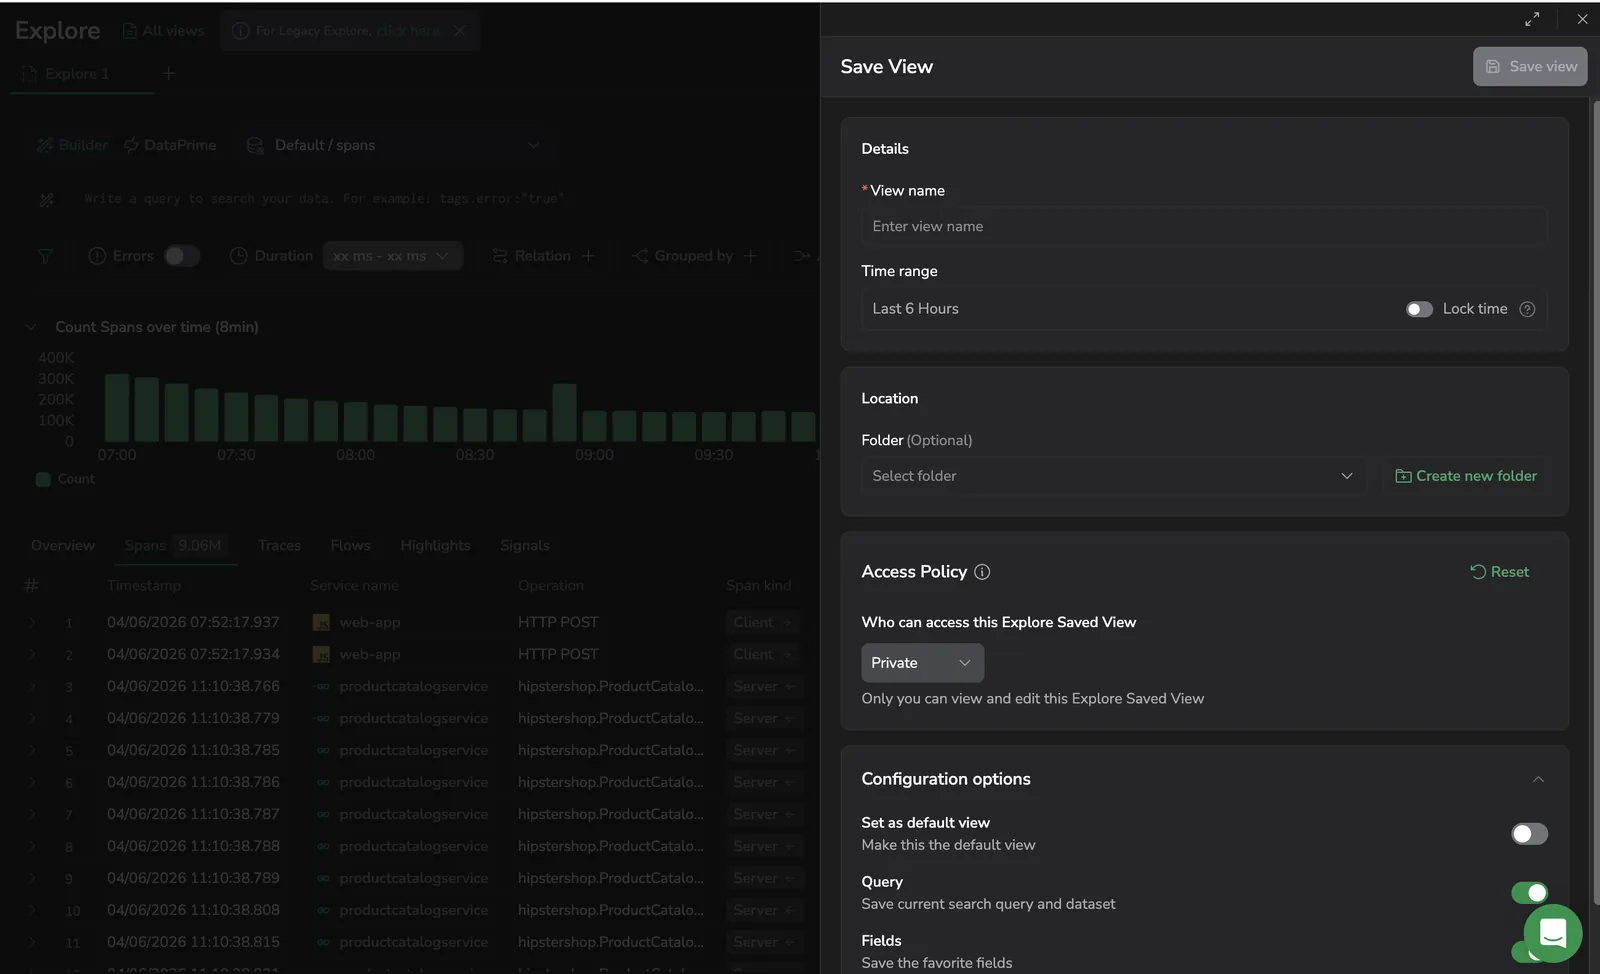
- Under Details, enter a descriptive View name.
- Set the Time range. Enable Lock time to fix the time range so it does not auto-update when the view is reopened.
- (Optional) Under Location, select an existing folder from the Folder dropdown to organize the view, or select Create new folder to add a new folder.
- Under Access Policy, select who can access the view. Keep the default Private to limit it to yourself, or open access for teammates (see Access policy).
- Under Configuration options, toggle which settings to save:
- Set as default view: Make this the default landing view in Explore.
- Query: Save the current search query and dataset (
logsorspans). - Fields: Save the favorite fields shown in the sidebar.
- Table settings: Save the column layout, formatting, the Content column field selection (logs and spans), and the Resource column field selection (spans only).
- Select Save view.
Organize views in folders
Use folders to group related saved views together in the All views panel.
- Add a view to an existing folder: While saving, expand the Folder dropdown under Location and select the folder.
- Create a new folder: While saving, select Create new folder next to the Folder dropdown, name the folder, and confirm. The new folder is available for future saved views as well.
- Skip the folder: Leave the Folder field empty to save the view at the root of the All views panel. The Folder field is optional.
Use saved views
- Select All views to open the saved views panel.
- Find views under Recent or All views.
- Use Search saved views to locate a view by name.
- Select a saved view to apply it.
The All views panel also has a New view button at the top to open a blank tab without browsing the list.
The active view appears as a tab at the top of the page. Tabs use the Explore (N) label format until they're saved — Explore (1), Explore (2), and so on. A tab opened from a saved view uses the view's name as the label.
You can open up to 5 tabs at once. When you hit the limit, the + button is disabled with a tooltip — close a tab or save it as a view to free a slot.
For the full list of per-tab actions (Save view, Save as, Edit, Rename, Duplicate, Copy view ID), see Tab actions menu.
Save changes to a loaded view
When a loaded view has unsaved changes, Explore shows a Save changes button at the top of the page. Select it to overwrite the loaded view with your current state.
To save your current state as a separate view instead, open the tab's menu and select Save as. The Save view panel opens with the current state pre-filled. Enter a different name and save. The original view stays unchanged.
You can also open the All views panel and select Save to reach the same panel.
Duplicate a tab
To work on a copy of the current tab without affecting the saved view it loaded from, open the tab's menu and select Duplicate. The duplicated tab opens with the same query, filters, and table settings. Coralogix appends (copy) to the duplicated tab's name and unlinks it from the saved view, so changes you make in it do not appear under Save changes.
Edit, clone, or delete a saved view
In Explore, each row in the All views panel also exposes three Explore-specific actions in its menu, alongside the shared Edit/Clone/Delete:
- Copy query: copy the saved view's Lucene query to the clipboard.
- Copy as DataPrime query: copy the saved view's query in DataPrime syntax.
- Copy view ID: copy the view's identifier for use in URLs or APIs.
Share a saved view
To share a saved view with a teammate, copy the page URL after the saved view is loaded. Opening the URL applies the same query, filters, table settings, and time range.
In Explore, you can also select Copy URL in the top-right action bar to share the current view.
Set the team default view
Admins can set a team-level default view so every team member lands on the same Explore configuration by default. Individual users can still override the team default for themselves.
To set the team default:
- Open Settings and navigate to the Explore section.
- Under Team default view, select an existing saved view from the dropdown.
- Select Save.
To override the team default for your own account, load any saved view and enable Set as default view in the Save view panel — your personal default takes precedence over the team default.
This feature requires the EXPLORE-TEAM-DEFAULT-VIEWS:MANAGE permission, included only in the Platform Admin system role by default. Team members need EXPLORE-TEAM-DEFAULT-VIEWS:READ to see the configured team default in their own settings page.
Access policy
By default, a new saved view is Private — only you can see it. To share it with everyone on your team, switch the mode to Public. To configure per-group access rules, switch to Advanced — the access levels available in Advanced mode are:
- No Access: team members cannot see the view unless they have an explicit group rule.
- Read: everyone on your team can see and load the view.
- Manage: everyone on your team can see, load, and modify the view.
For the cross-product model, examples, and FAQs, see the access policies overview.
Permissions
To create, view, or share saved views in Explore, your role needs the right combination of role-based permissions and policy permissions. The full list lives on the Explore permissions page; the essentials:
- View and manage shared views:
EXPLORE-SAVED-VIEWS:READ,EXPLORE-SAVED-VIEWS:MANAGE - Create and edit access policies on saved views:
EXPLORE-SAVED-VIEWS:READACCESSPOLICY,EXPLORE-SAVED-VIEWS:UPDATEACCESSPOLICY - Manage the team default view:
EXPLORE-TEAM-DEFAULT-VIEWS:READ,EXPLORE-TEAM-DEFAULT-VIEWS:MANAGE - Select target groups when building a policy:
TEAM-GROUPS:READSUMMARY,TEAM-GROUPS:READCONFIG
System-wide policy overrides (access-policies:UpdateAll and access-policies:ReadAll) are not included in any out-of-the-box system role.
Related resources
Next steps
Build shareable URLs that recreate your current view in Deep links and URL parameters.