Analytics Tool
The Coralogix Analytics Tool is a Chrome extension that lets you name what your analytics measure, without reading or writing code. Select any element on one of your pages to see the name Real User Monitoring reports for it, rename it to something your team recognizes, then export a report a developer or coding agent can apply to your source in one step.
Use it to turn an Unnamed element in a heatmap into a readable name, to confirm a name before you build a funnel around it, or to name every clickable element on a page in one pass.
What you need
- Google Chrome, with the Coralogix Analytics Tool installed.
- A page running the Browser Real User Monitoring SDK, version 3.23.2 or later, initialized. Earlier versions do not expose the name-resolution API the extension reads.
The extension resolves names locally, against the SDK already running on the page. It makes no network requests of its own, needs no Coralogix permission, and stores nothing between sessions.
Inspect an action name
-
Open the page you want to inspect.
-
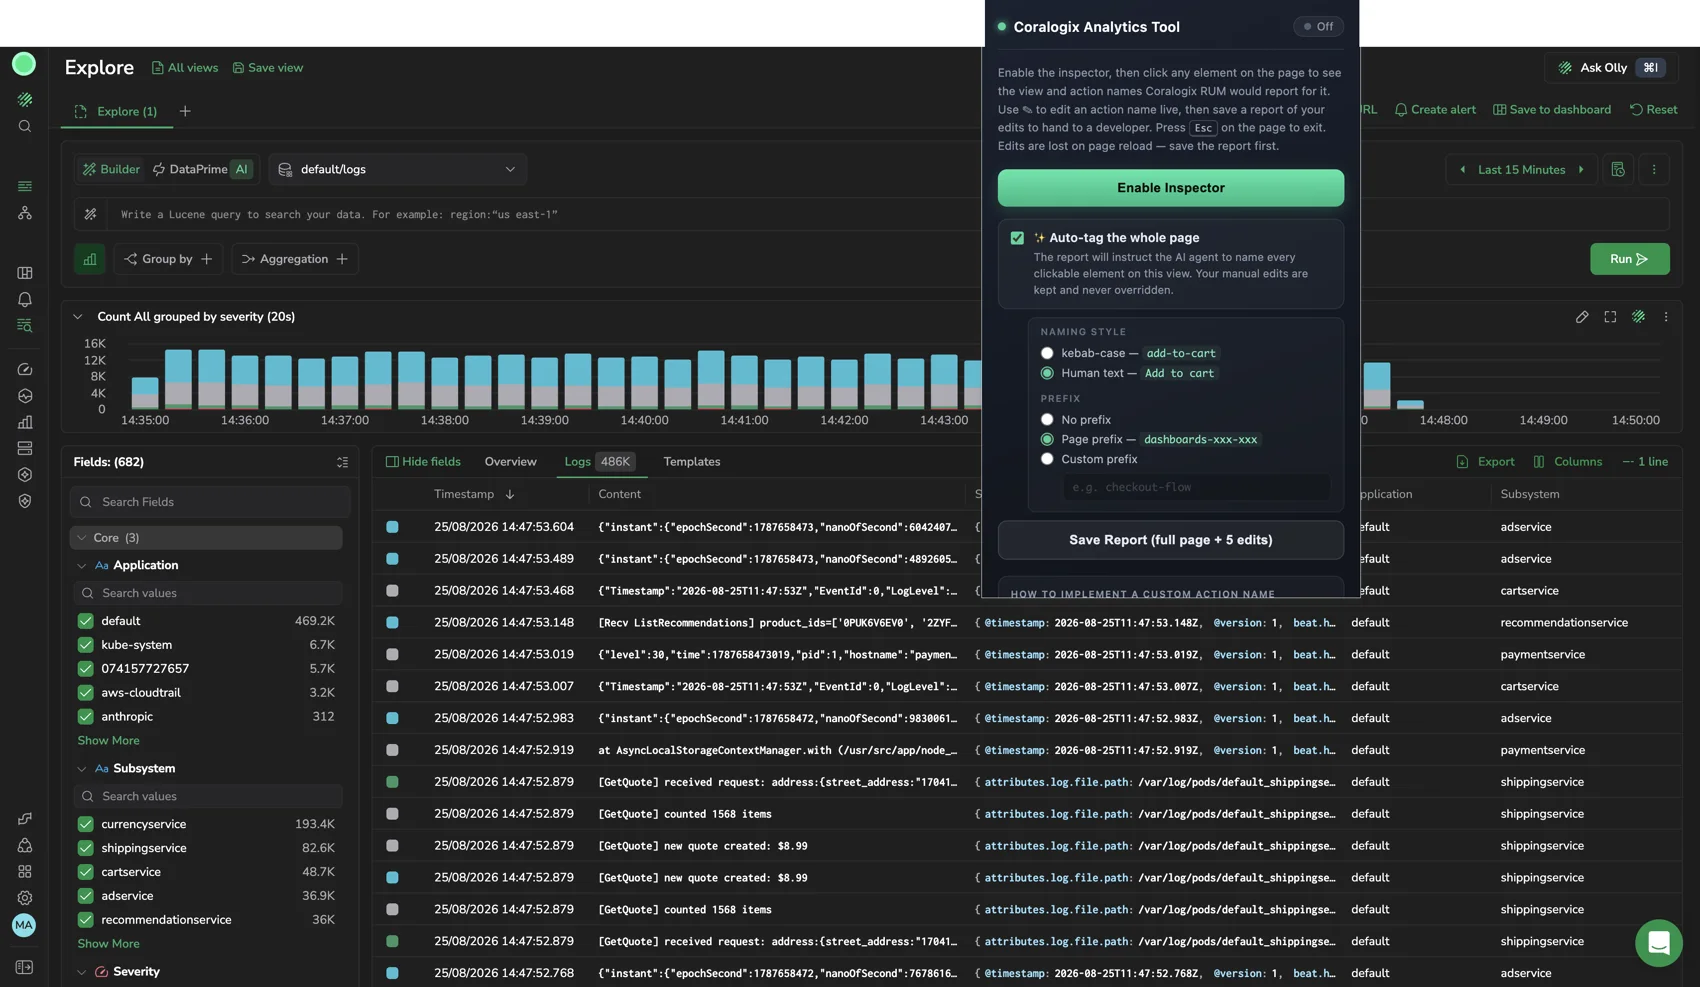
Select the extension icon in the Chrome toolbar, then select Enable Inspector.
-
Hover over the page to highlight elements, then select the one you want to check. A tooltip shows the SDK version, the View name the SDK reports for the page, and the Action name it would report for that element.
-
Press
Esc, or select Disable Inspector, when you are done.
While the inspector runs, it intercepts clicks. The page does not react to them and the SDK does not record them, so inspecting never pollutes your analytics data.
Dead clicks
Not every element on a page is clickable. When you select one that has no click affordance, such as a heading or a block of static text, the tooltip flags it as a dead click and reports no action name, because the SDK records no action for a click there.
Use this to check a control users are likely to try clicking. If the inspector calls it a dead click, the control looks interactive but isn't wired to anything, and those clicks show up later as a frustration signal in Heatmaps.
Rename an action
- With an element selected, select the pencil next to the action name.
- Enter the name you want, then press
Enterto apply it orEscto cancel.
Applying the name sets a data-cx-action-name attribute on the element in the live page, so the SDK resolves the new name immediately. The tooltip marks the action as edited and shows the scope it will be reported under, and a copy button puts the name on your clipboard.
Scope the name to one view or to all views
Many elements come from a component that several views reuse, such as a date picker or a search bar. The scope you set tells your developer where to put the attribute:
- This view only applies by default. The report asks the developer to put the attribute on a view-level parent instead of inside the shared component, so clicks inside it inherit the name on this view alone.
- All views applies when you select Shared component. Apply this name on all views. The report asks the developer to put the attribute on the component itself, so every view that uses it reports the same name.
Name a whole page at once
Renaming elements one at a time is slow when a page has dozens of controls. Select Auto-tag the whole page to have the report cover every clickable element on the page instead. Any name you set by hand stays as you entered it.
Two settings control how the generated names read:
- Naming style picks between kebab-case, such as
add-to-cart, and human text, such asAdd to cart. - Prefix puts every generated name in a namespace. Select No prefix, Page prefix to derive it from the current page, or Custom prefix to enter your own, such as
checkout-flow.
Pick a style and prefix once and keep them consistent across pages. Names that follow one convention are easier to search and group in funnels and heatmaps than a mix of styles.
Save and hand off the report
Your edits live only in the current page's DOM. Reloading or navigating away discards them, so save the report before you leave the page.
- Select Disable Inspector. Save Report stays locked while the inspector runs, so the report captures a finished set of edits.
- Select Save Report. The button shows what the report will include, such as the number of edits and whether full-page tagging is on.
The extension downloads coralogix-action-names-report.md. It opens with the page URL, the SDK version, the number of explicit edits, and whether you asked for full-page tagging. For each element you renamed, it records:
| Field | What it holds |
|---|---|
| Requested action name | The name you entered |
| Scope | Whether to name this view only, or every view that uses the component |
| Replaces resolved name | The name the SDK reports today |
| View name | The view the element was renamed on |
| Page URL | The page you inspected |
| CSS selector | A short selector that locates the element |
| Target markup | The element's opening tag and text |
The report also carries implementation instructions written for a coding agent, so you can hand the file to Claude or another agent and let it apply the attributes to your source.
When you asked for full-page tagging, those instructions add rules for the rest of the page:
- Name elements by user intent rather than by copying their visible text.
- Apply the prefix and naming style you selected.
- Leave names that already exist in the code untouched.
- Tag a repeated template, such as a table row or a card in a collection, once with a single collection-level name instead of once per row.
- Keep attributes out of shared design-system components. Put them on the page-level element that hosts the component, so only this page is affected.
How the SDK resolves a name
The SDK takes the first of these that produces a value:
- A
data-cx-action-nameattribute on the element, or on any ancestor up to<body>. - A masking placeholder, when your masking configuration covers the element.
- The element's label,
aria-label, placeholder, or inner text, climbing to parent elements when those are empty.
An explicit data-cx-action-name always wins, and unlike text-based names it survives copy changes and translations. To set one by hand, add the attribute to the element or to any ancestor:
<button data-cx-action-name="add-to-cart">
  Add to Cart
</button>
For the full attribute reference, see the Browser SDK configuration options.
Troubleshooting
| What you see | What to do |
|---|---|
| Enable Inspector is unavailable, and the popup warns that the SDK is missing | The page is not running the RUM SDK, or the SDK has not initialized. Confirm the SDK loads on this page. |
| The popup warns that the SDK does not support the tool | The page runs a Browser SDK earlier than 3.23.2. Upgrade the SDK. |
| The action name is empty, and the tooltip flags a dead click | The element has no clickable target, so the SDK reports no name for a click on it. Select the control itself rather than the area around it. If it is a control you expect to be clickable, it isn't wired to a handler. |
| The name shows as masked | Your masking configuration covers the element. A data-cx-action-name attribute is never masked, so set one to name the element. |
| Save Report is unavailable | Either you have made no edits yet, or the inspector is still running. Select Disable Inspector first. |
| Your edits are gone | Reloading or navigating away discards them. Save the report before leaving the page. |
Next steps
See where users click and scroll on a page: Heatmaps.