AWS Cloud Security Posture Management (CSPM)
Cloud Security Posture Management (CSPM) helps to mitigate and minimize cloud data security breaches and to assess the overall posture of the entire cloud environment against best practices and compliance standards to help remediate issues.
CSPM tools verify that cloud configurations follow security best practices and compliance standards such as CIS, Azure, and GCP benchmarks as well as PCI and HIPAA frameworks. As companies are increasingly moving to the cloud, CSPM is becoming a necessary aspect of security insights.
API keys
To use these tools you need to create the following API keys:
- Send-Your-Data API Key
(Optional) A personal or team API key. It’s recommended to use permission presets, as they are automatically updated with all relevant permissions. Alternatively, you can manually add individual permissions.
Preset Action Description Enrichments CLOUD-METADATA-ENRICHMENT:READCONFIG
CLOUD-METADATA-ENRICHMENT:UPDATECONFIG
GEO-ENRICHMENT:READCONFIG
GEO-ENRICHMENT:UPDATECONFIG
SECURITY-ENRICHMENT:READCONFIG
SECURITY-ENRICHMENT:UPDATECONFIG
TEAM-CUSTOM-ENRICHMENT:READCONFIG
TEAM-CUSTOM-ENRICHMENT:READDATA
TEAM-CUSTOM-ENRICHMENT:UPDATECONFIG
TEAM-CUSTOM-ENRICHMENT:UPDATEDATAView AWS Enrichment Configuration
Manage AWS Enrichment Configuration
View Geo Enrichment Configuration
Manage Geo Enrichment Configuration
View Unified Threat Intelligence Enrichment Configuration
Manage Unified Threat Intelligence Enrichment Configuration
View Custom Enrichment Configuration
View Custom Enrichment Data
Manage Custom Enrichment Configuration
Manage Data for Custom Enrichment Ingestion
Installation
The CSPM can be installed using the following methods:
Docker container
Kubernetes CronJob
For each installation method, we need to pass the following environment variables:
| Environment Variable | Description |
|---|---|
| API_KEY | Send-Your-Data API key |
| APPLICATION_NAME | Set the application name |
| SUBSYSTEM_NAME | Set the subsystem name |
| COMPANY_ID | The Company ID from the settings screen in your Coralogix account |
| CORALOGIX_ENDPOINT_HOST | Choose the api. endpoint that corresponds to your Coralogix domain using the domain selector at the top of the page |
| CLOUD_PROVIDER | The Cloud Provider that CSPM will be deployed to in lowercase (e.g. aws, gcp, etc) |
| TESTER_LIST | If specified, will run the tests on the specified service, otherwise, will run tests on all the AWS services. Leave empty to run all testers, otherwise, use comma separated tester names without spaces. |
| REGION_LIST | If specified, will check only the specified regions (for global services like AWS S3, IAM and Route53, make sure you add the "global" region). Otherwise, the tests will be conducted in all regions. Leave empty to run on all regions, otherwise, use comma separated region names without spaces. |
| AWS_DEFAULT_REGION | AWS default region for authentication |
| ROLE_ARN_LIST | An additional role(s) that can be assumed from other AWS accounts to scan. Leave empty to run on the current account. For additional accounts, add comma-separated role ARNs without spaces. Note: please follow the instructions below for multi-account configuration. |
| CORALOGIX_ALERT_API_KEY | (Optional parameter) When providing this variable, a custom enrichment for failed resources will be created in Coralogix's account at the end of each run if specified. |
Installing as a Docker container
Prerequisites
EC2 Instance
The minimum Instance Type should be "t3a.medium"
Internet connectivity (thorough Internet/NAT Gateway)
IAM Role with the following policy attached to the instance
Docker installed on the EC2 instance - refer to Docker documentation
Note that the instance type will affect the run time, so it's up to a personal preference and is affected by the environment size.
Deploying
After prerequisites are met, download the docker image using the following command (if the following command hasn't run, the image will still be downloaded automatically in the next step):
In order to automate the process, use Crontab in the following manner:
Create the crontab using your favorite editor
Inside the document, on the bottom, paste the following one-liner (note that the API_KEY and the CORALOGIX_ENDPOINT_HOST fields are mandatory)
*/10 * * * * docker rm snowbit-cspm ; docker rmi coralogixrepo/snowbit-cspm ; docker run --name snowbit-cspm -d -e PYTHONUNBUFFERED=1 -e CLOUD_PROVIDER="choose_the_cloud_provider - aws / gcp" -e AWS_DEFAULT_REGION="eu-west-1" -e CORALOGIX_ENDPOINT_HOST="api." -e APPLICATION_NAME="application_name" -e COMPANY_ID=<coralogix_company_ID> -e SUBSYSTEM_NAME="subsystem_name" -e TESTER_LIST="" -e API_KEY="<send_your_data_api_key>" -e REGION_LIST="" -e ROLE_ARN_LIST="" -e CORALOGIX_ALERT_API_KEY="" --network host -v ~/.aws:/root/.aws coralogixrepo/snowbit-cspm
The above command will try to run every 10* minutes, and consists of two commands:
docker rm snowbit-cspm - removes the last docker container if exists
docker rmi coralogixrepo/snowbit-cspm - will remove and redownload the docker images to ensure it have the latest images locally available.
docker run --name snowbit-cspm [Options...] - runs a new container sequence
** The actual scheduling is set in the Coralogix security tab - scroll to the "Configuring the scan settings" section for further details
Installing as a Kubernetes CronJob in EKS – via kubectl and eksctl
In order to deploy the image in a pod that follows the principle of least privileged, we should use a service account that assumes the needed role at the start of each job and doesn't inherit its permission from his host node.
Prerequisites
An existing Amazon EKS cluster
Version 2.7.21 or later or 1.25.46 or later of the AWS CLI installed and configured on your device or AWS CloudShell
The kubectl command line tool is installed on your device or AWS CloudShell
The eksctl command line tool is installed on your device or AWS CloudShell
An existing kubectl config file that contains your cluster configuration
IAM policy with the following permissions
Before deploying
Determine whether you have an existing IAM OIDC provider for your cluster:
- Retrieve your cluster's OIDC provider ID and store it in a variable:
oidc_id=$(aws eks describe-cluster --name my-cluster --query "cluster.identity.oidc.issuer" --output text | cut -d '/' -f 5)
- Determine whether an IAM OIDC provider with your cluster's ID is already in your account
Note: If the output is returned from the previous command, then you already have a provider for your cluster and you can skip the next step. If no output is returned, then you must create an IAM OIDC provider for your cluster
Deploying
If the output from the above test is blank, create an IAM OIDC identity provider for your cluster with the following command. Replace "my-cluster" with your own value
Configuring a Kubernetes service account to assume an IAM role (the policy ARN is the policy created in section 6 of the above prerequisites)
eksctl create iamserviceaccount --name my-service-account --namespace default --cluster my-cluster --role-name "my-role" --attach-policy-arn arn:aws:iam::111111111111:policy/my-policy --approve
Use the following CronJob configurations:
apiVersion: batch/v1
kind: CronJob
metadata:
  name: snowbit-cspm-cronjob
  namespace: <optional - when using the default, remove entire row>
spec:
  schedule: "*/10 * * * *"
  successfulJobsHistoryLimit: 1
  jobTemplate:
    spec:
      template:
        spec:
          serviceAccountName: <my-service-account>
          hostNetwork: true
          containers:
          - image: coralogixrepo/snowbit-cspm
            name: snowbit-cspm-cronjob
            command: ["python3"]
            args: ["lambda_function.py"]
            env:
              - name: API_KEY
                value: "send_your_data_api_key"
              - name: CORALOGIX_ENDPOINT_HOST
                value: "api."
              - name: CLOUD_PROVIDER
                value: "choose_the_cloud_provider - aws / gcp"
              - name: APPLICATION_NAME
                value: "application_name"
              - name: SUBSYSTEM_NAME
                value: "subsystem_name"
              - name: TESTER_LIST
                value: ""
              - name: REGION_LIST
                value: ""
              - name: ROLE_ARN_LIST
                value: ""
              - name: COMPANY_ID
                value: "<coralogix_company_ID>"
              - name: PYTHONUNBUFFERED
                value: "1"
              - name: AWS_DEFAULT_REGION
                value: "eu-west-1"
              - name: CORALOGIX_ALERT_API_KEY
                value: ""
          restartPolicy: OnFailure
Save the above content into a .yaml file and execute the following command:
Additional configurations and permissions
Several tests for AWS services necessitate specific permissions. If you are utilizing any of these services and would like them to be included in the testing, it is essential to adjust your settings to grant the required permissions. Below is a list of the necessary adjustments for each service. Please ensure these permissions are configured to enable comprehensive testing.
EKS (Elastic Kuberentes Service)
several of the tests are using additional tools that communicating with the clusters using kubectl. In order to process actions successfully, your clusters’ configmap aws-auth must include CSPM’s IAM role Under mapRoles in the following structure:
- rolearn: arn:aws:iam::<ACCOUNT_ID>:role/<ROLE_NAME>
  username: <ROLE_NAME>
  groups:
  - system:masters
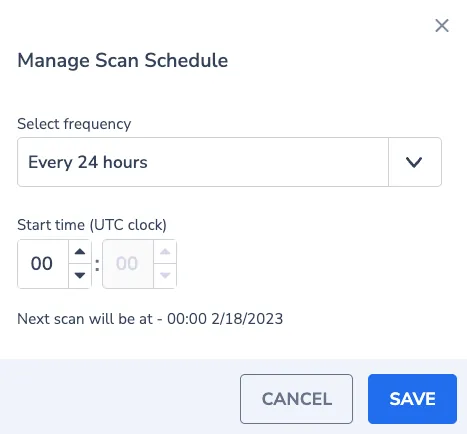
Configuring scan settings
Inside the security tab in your Coralogix account, you will find the SCAN SETTINGS button:
Scan Now will start the scan of the selected environment(s) in up to 10 minutes from pressing (according to the configured cronjob)
Scan Schedule allows choosing the frequency of the scans, and the start time of each scan. the default is every 24 hours
Multi-account configuration
Definitions
Primary Account - the account that the CSPM is initially was deployed at
Additional Account - an account that you wish to be scanned on top of the Primary Account
For each additional account
Go to IAM > Roles and click "Create role"
Choose "AWS account"
Below, choose "Another AWS account" and paste the account ID of the primary account
For permissions, create and add the following policy
Give the Role a name and Click "Create role"
Go to the role and copy his ARN
For primary account
Add the following policy to the existing CSPM Role (done in the initial deployment)
Fill the resource key according to the amount of roles to assume
Example for one additional account:
{
    "Version": "2012-10-17",
    "Statement": [
        {
            "Sid": "CSPMMultiAccountAccess",
            "Effect": "Allow",
            "Action": "sts:AssumeRole",
            "Resource": "arn:aws:iam::123456789012:role/cspm_additional_account_to_scan"
        }
    ]
}
Add the environmental variable to the Docker\Kubernetes command
use the ROLE_ARN_LIST environmental variable as listed above to point each run to use the role ARN in all the additional accounts.
when using more than one account, use comma-separated strings without spaces.
Limitations
CSPM does not support Scopes. To restrict user access to CSPM test results—such as those specific AWS accounts or resources—follow these steps:
Deactivate the user’s CSPM permissions in the
SNOWBITpreset:Description Action View CSPM Data SNOWBIT.CSPM:READView Snowbit Overview Data SNOWBIT.OVERVIEW:READView Snowbit Resource Explorer Data SNOWBIT.RESOURCE-EXPLORER:READView Snowbit SSPM Data SNOWBIT.SETUP:MANAGEView CSPM logs in Explore or Custom Dashboards, both supporting Scopes. Filter using
cspmas application and/or subsystem name.
Additional resources
| Coralogix Endpoints | Coralogix Endpoints |