GCP Security Posture Management (CSPM)
Security Posture Management (CSPM) helps to mitigate and minimize cloud data security breaches and to assess the overall posture of the entire cloud environment against best practices and compliance standards to help remediate issues.
CSPM tools verify that cloud configurations follow security best practices and compliance standards such as CIS, Azure, and GCP benchmarks as well as PCI and HIPAA frameworks. As companies are increasingly moving to the cloud, CSPM is becoming a necessary aspect of security insights.
API keys
To use these tools you need to create the following API keys:
- Send-Your-Data API Key
(Optional) A personal or team API key. It’s recommended to use permission presets, as they are automatically updated with all relevant permissions. Alternatively, you can manually add individual permissions.
Preset Action Description Enrichments CLOUD-METADATA-ENRICHMENT:READCONFIG
CLOUD-METADATA-ENRICHMENT:UPDATECONFIG
GEO-ENRICHMENT:READCONFIG
GEO-ENRICHMENT:UPDATECONFIG
SECURITY-ENRICHMENT:READCONFIG
SECURITY-ENRICHMENT:UPDATECONFIG
TEAM-CUSTOM-ENRICHMENT:READCONFIG
TEAM-CUSTOM-ENRICHMENT:READDATA
TEAM-CUSTOM-ENRICHMENT:UPDATECONFIG
TEAM-CUSTOM-ENRICHMENT:UPDATEDATAView AWS Enrichment Configuration
Manage AWS Enrichment Configuration
View Geo Enrichment Configuration
Manage Geo Enrichment Configuration
View Unified Threat Intelligence Enrichment Configuration
Manage Unified Threat Intelligence Enrichment Configuration
View Custom Enrichment Configuration
View Custom Enrichment Data
Manage Custom Enrichment Configuration
Manage Data for Custom Enrichment Ingestion
Installation
Choose the api. endpoint that corresponds to your Coralogix domain using the domain selector at the top of the page.
For each installation method, we need to pass the following environment variables:
| Environment Variable | Description |
|---|---|
| API_KEY | Send-Your-Data API key |
| APPLICATION_NAME | Set the application name |
| SUBSYSTEM_NAME | Set the subsystem name |
| COMPANY_ID | The Company ID from the settings screen in your Coralogix account |
| CORALOGIX_ENDPOINT_HOST | A Coralogix gRPC endpoint corresponding to your Coralogix domain - api. |
| CLOUD_PROVIDER | The Cloud Provider that CSPM will be deployed to in lowercase (e.g. aws, gcp, etc) |
| TESTER_LIST | If specified, will run the tests on the specified service, otherwise will run tests on all the GCP services. Leave empty to run all testers, otherwise, comma separated per tester name without spaces. |
| REGION_LIST | If specified, will check only the specified regions (for global services like IAM and DNS, make sure you add the "global" region). Otherwise, the tests will be conducted in all regions. Leave empty to run on all regions, otherwise, use comma separated region names without spaces. |
| GOOGLE_APPLICATION_CREDENTIALS | Path to the credentials file inside the container |
| CORALOGIX_ALERT_API_KEY | (Optional parameter) When providing this variable, a custom enrichment for failed resources will be created in Coralogix's account at the end of each run if specified. |
Installing as a Docker container
Prerequisites
Verify the following APIs are enabled on the project before running
Cloud Resource Manager API
API Keys API
Cloud SQL Admin API
Compute Engine API
Cloud Key Management Service (KMS) API
BigQuery API
Kubernetes Engine API
Create a Role with the following permissions (IAM & Admin > Roles)
If you have access to use gcloud command and wish to automate the role creation process, download the following file
Now run the command gcloud iam roles create test_coralogix_role1 --project --file=/path/to/yaml.yml
Create a service account and attach the previously created role (IAM & Admin > Service Accounts)
Create VM Instance
Attach the service account (3) to the instance
E2-small is sufficient
Internet connectivity
Docker installed on the VM instance - refer to Docker documentation
Note that the instance type will affect the run time, so it's up to a personal preference and is affected by the environment size.
Deploying
After prerequisites are met, download the docker image using the following command (if the following command hasn't run, the image will still be downloaded automatically in the next step):
In order to automate the process, use Crontab in the following manner:
Create the crontab using your favorite editor
Inside the document, on the bottom, paste the following one-liner (note that the API_KEY and the CORALOGIX_ENDPOINT_HOST fields are mandatory)
*/10 * * * * docker rm snowbit-cspm ; docker rmi coralogixrepo/snowbit-cspm:latest ; docker run --name snowbit-cspm -d -e PYTHONUNBUFFERED=1 -e CLOUD_PROVIDER="gcp" -e COMPANY_ID=<coralogix_company_ID> -e CORALOGIX_ENDPOINT_HOST="coralogix_grpc_endpoint" -e APPLICATION_NAME="application_name" -e SUBSYSTEM_NAME="subsystem_name" -e TESTER_LIST="" -e API_KEY="<send_your_data_api_key>" -e REGION_LIST="" -e GOOGLE_APPLICATION_CREDENTIALS="path_to_credentials_file_in_the_container" -v <local_folder_that_contains_gcp_credentials>:<location_to_map_the_credentials_inside_the_container> coralogixrepo/snowbit-cspm
Configuring the scan settings
Inside the security tab in your Coralogix account, you will find the SCAN SETTINGS button:
Scan Now will start the scan of the selected environment(s) in up to 10 minutes from pressing (according to the configured cronjob)
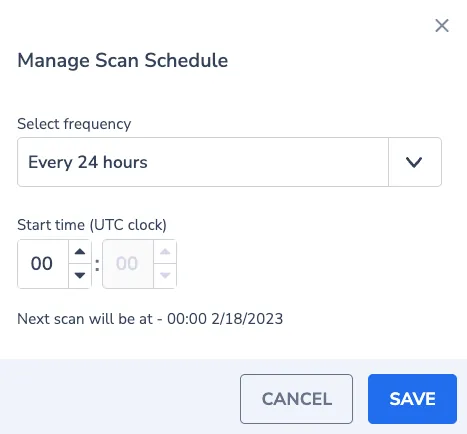
Scan Schedule allows choosing the frequency of the scans, and the start time of each scan. the default is every 24 hours
Limitations
CSPM does not support Scopes. To restrict user access to CSPM test results—such as those specific AWS accounts or resources—follow these steps:
Deactivate the user’s CSPM permissions in the
SNOWBITpreset:Description Action View CSPM Data SNOWBIT.CSPM:READView Snowbit Overview Data SNOWBIT.OVERVIEW:READView Snowbit Resource Explorer Data SNOWBIT.RESOURCE-EXPLORER:READView Snowbit SSPM Data SNOWBIT.SETUP:MANAGEView CSPM logs in Explore or Custom Dashboards, both supporting Scopes. Filter using
cspmas application and/or subsystem name.
Additional resources
| Coralogix Endpoints | Coralogix Endpoints |