Ship OpenTelemetry Data to Coralogix via Reverse Proxy (Caddy 2)
It is commonplace for organizations to restrict their IT systems from having direct or unsolicited access to external networks or the Internet, with network proxies serving…

This Terraform tutorial is an excellent introduction to configuration management tools. Terraform is growing due to it simplifying the management of environments in the cloud. Several cloud services appeared over time and what was supposed to be a simple task ended up becoming a complex thing. There are public and private clouds, multi-clouds and hybrid clouds. Terraform arrived with the intent of being the tool to manage resources in varied cloud providers:
Terraform’s main strength is being able to manage resources in different providers. This quick-start section will show how to prepare an environment to use Terraform to manage AWS and VMware vSphere resources.
Work environment:
Managed Resources:
Goals:
Terraform can be installed on Windows, MacOS and many different Linux distributions. The binaries can be downloaded from the official site. Unzip them and put them on the system’s path.
The tool is also available as a Chocolatey package for Windows and as a Snap package for Linux distributions.
For Windows, the most practical installation is using Chocolatey. It automatically puts the binary in the system’s path and allows it to be easily updated. To install it, use the following command on an elevated prompt:
PS C:\Users\battousai> choco install -y terraform
For a Linux box, the binary will be downloaded from the official site and be put in the user’s bin folder.First use wget to download it to the user home folder:
[battousai@himura ~]$ wget https://releases.hashicorp.com/terraform/0.12.24/terraform_0.12.24_linux_amd64.zip
After the download finishes, extract the executable file to ~/.local/bin/, so it is in the user’s path, making it executable from any directory.
[battousai@himura ~]$ unzip terraform_0.12.24_linux_amd64.zip -d ~/.local/bin/
Close and open your terminal to apply the changes. To test, use the command
terraform --version
C:\Users\battousai> terraform.exe --version
Terraform v0.12.24
Configuring AWS Credentials
For this step, you should have AWS CLI installed. In order not to have credentials hard-coded into *.tf files, those should be persisted on disk using the aws configure command. Since the information is stored in plain text, take the necessary precautions to ensure the credential file cannot be accessed by other users.
On Linux and MacOS, the default location for the credential files is ~/.aws/credentials. On Windows it is %USERPROFILE%\.aws\credentials..
If you don’t have an access key already, create a new one on AWS Console. Click on your username and then on the “My Security Credentials” menu option. Expand the “Access keys (access key ID and secret access key)” section and create the access key. Make note of the key id and the secret.
Execute the following commands to configure the access key and to define the “us-east-1” as the default region:
PS C:\Users\battousai> aws configure set region us-east-1
PS C:\Users\battousai> aws configure set aws_access_key_id KEY_ID
PS C:\Users\battousai> aws configure set aws_secret_access_key KEY_SECRET
The files config and credentials will be created on %USERPROFILE%\.aws\ or ~/.aws/ after executing these commands.
References:
https://learn.hashicorp.com/terraform/getting-started/build
https://docs.aws.amazon.com/cli/latest/userguide/cli-configure-files.html
Configuring Azure Credentials
For running Terraform interactively, the most practical way to set up Azure credentials is to use the az login command. Having Azure CLI installed is required. A browser window will be opened to complete the login process. After it is concluded, thet login information will be printed to console like the following example (the GUIDs have been randomly generated):
PS C:\Users\battousai> az login
# browser will open to complete the login process
You have logged in. Now let us find all the subscriptions to which you have access...
[
  {
    "cloudName": "AzureCloud",
    "homeTenantId": "c55b136e-5c3b-4940-98d4-2e8312bb0be9",
    "id": "38ad7677-78fc-42cb-81e0-fe143b50f530",
    "isDefault": true,
    "managedByTenants": [],
    "name": "Pay-As-You-Go",
    "state": "Enabled",
    "tenantId": "8fac985f-adbc-4e8b-b09d-f904ff41530f",
    "user": {
      "name": "[email protected]",
      "type": "user"
    }
  }
]
For non-interactive Terraform executions, it is necessary to use other authentication mechanisms such as Managed Service Identity, Service Principals with User Certificates or Client Secret.
Terraform Goal 1 – Deploy VMs on different Cloud Providers
First, create a folder that will contain the code definitions of the infrastructure to be created.
PS C:\Users\battousai> mkdir terraform-vms
PS C:\Users\battousai> cd terraform-vms
Now, create the myvms.tf file with the following code for an EC2 Amazon Linux VM:
provider "aws" {
  profile = "default"
  region  = "us-east-1"
}

resource "aws_instance" "tokyo" {
  ami           = "ami-0fc61db8544a617ed"
  instance_type = "t2.micro"
  key_name      = "personal-key"

}
The provider block will define which plugin Terraform will use to create the objects defined in “myvms.tf.” In this example, the AWS plugin was defined.
The resource block will define a piece of infrastructure. In the example, an Amazon Linux AMI will be used. The type of the instance is t2.micro and an ssh key with the name “personal-key” will be configured on the VM.
Add to the “myvms.tf” file the following code to create an Ubuntu 18.04 LTS virtual machine on Azure:
# Azure Virtual Machine

provider "azurerm" {
  version = "2.2.0"
  features {}
}

resource "azurerm_resource_group" "myrg" {
  name     = "kamiyadojo"
  location = "eastus"
}

resource "azurerm_virtual_network" "mynetwork" {
  name                = "rouroni-network"
  address_space       = ["10.0.0.0/16"]
  location            = azurerm_resource_group.myrg.location
  resource_group_name = azurerm_resource_group.myrg.name
}

resource "azurerm_subnet" "mysubnet" {
  name                 = "internal"
  resource_group_name  = azurerm_resource_group.myrg.name
  virtual_network_name = azurerm_virtual_network.mynetwork.name
  address_prefix       = "10.0.1.0/24"
}

resource "azurerm_network_interface" "myvmnic" {
  name                = "tokyo-default-nic"
  location            = azurerm_resource_group.myrg.location
  resource_group_name = azurerm_resource_group.myrg.name

  ip_configuration {
    name                          = "internal"
    subnet_id                     = azurerm_subnet.mysubnet.id
    private_ip_address_allocation = "Dynamic"
  }
}

resource "azurerm_linux_virtual_machine" "myazure_vm" {
  name                = "tokyo"
  computer_name       = "tokyo"
  resource_group_name = azurerm_resource_group.myrg.name
  location            = azurerm_resource_group.myrg.location
  size                = "Standard_B1ls"
  admin_username      = "battousai"
  network_interface_ids = [
    azurerm_network_interface.myvmnic.id,
  ]

  admin_ssh_key {
    username   = "battousai"
    public_key = file("~/.ssh/id_rsa.pub")
  }

  os_disk {
    caching              = "ReadWrite"
    storage_account_type = "Standard_LRS"
  }

  source_image_reference {
    publisher = "Canonical"
    offer     = "UbuntuServer"
    sku       = "18_04-lts-gen2"
    version   = "latest"
  }
}
There are more requirements to create a VM on Azure, which causes the code to be significantly longer. However, it shows that all the infrastructure pieces necessary to deploy a VM on Azure can be constructed with Terraform. The preceding code defines the infrastructure necessary to deploy an Ubuntu Server 18.04 LTS VM, with a network interface on a private network.
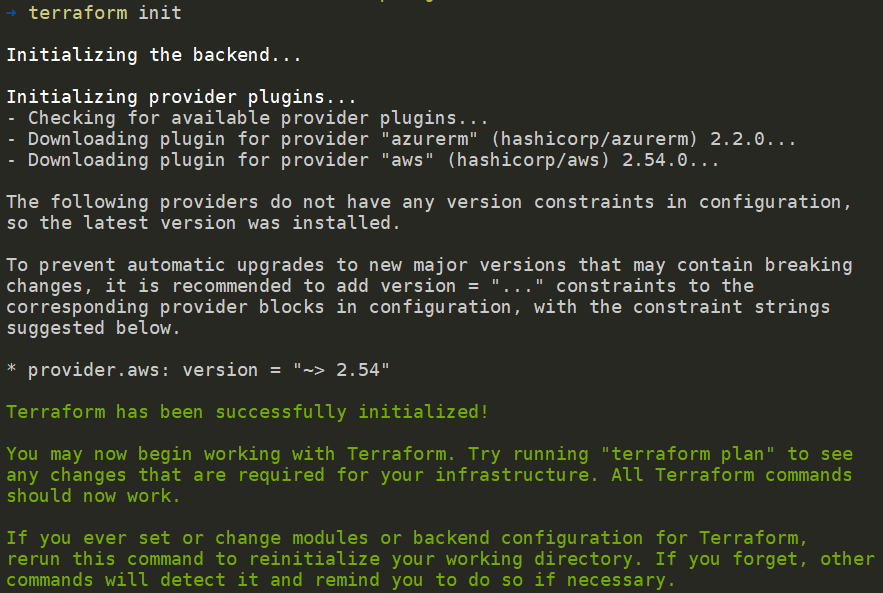
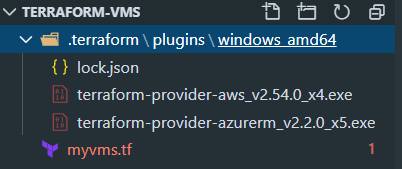
The first command that should be run to start a new configuration is “terraform init”. It will analyze the .tf files in the directory and download the necessary plugins to execute the configuration. They will be stored in the .terraform directory inside the working folder.
To ensure the code has the correct syntax and necessary elements, execute terraform validate. It will give basic information on encountered errors.
After the validation, it is possible to check what operations will be done with the terraform plan command. If everything is correct, an output similar to the one below will be printed on the console:
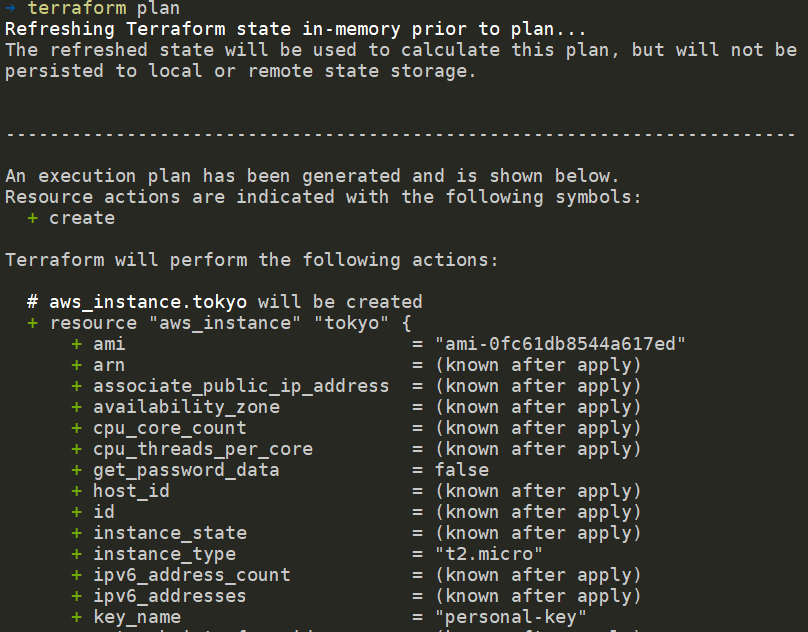
To create the infrastructure defined, execute terraform apply. The execution time will depend on the infrastructure being created and on the provider. Similar to the output of the terraform plan command, the objects to be created will be printed on the console. The user will have to type “yes” to continue the process. After that, a similar output to the one below will be printed (the GUIDs have been randomly generated):
[...]
Plan: 6 to add, 0 to change, 0 to destroy.

Do you want to perform these actions?
  Terraform will perform the actions described above.
  Only 'yes' will be accepted to approve.

  Enter a value: yes

aws_instance.tokyo: Creating...
aws_instance.tokyo: Still creating... [10s elapsed]
azurerm_resource_group.myrg: Creating...
azurerm_resource_group.myrg: Creation complete after 5s [id=/subscriptions/38ad7677-78fc-42cb-81e0-fe143b50f530/resourceGroups/kamiyadojo]
azurerm_virtual_network.mynetwork: Creating...
aws_instance.tokyo: Still creating... [20s elapsed]
azurerm_virtual_network.mynetwork: Creation complete after 8s [id=/subscriptions/38ad7677-78fc-42cb-81e0-fe143b50f530/resourceGroups/kamiyadojo/providers/Microsoft.Network/virtualNetworks/rouroni-network]
azurerm_subnet.mysubnet: Creating...
azurerm_subnet.mysubnet: Creation complete after 3s [id=/subscriptions/38ad7677-78fc-42cb-81e0-fe143b50f530/resourceGroups/kamiyadojo/providers/Microsoft.Network/virtualNetworks/rouroni-network/subnets/internal]
azurerm_network_interface.myvmnic: Creating...
aws_instance.tokyo: Still creating... [30s elapsed]
azurerm_network_interface.myvmnic: Creation complete after 8s [id=/subscriptions/38ad7677-78fc-42cb-81e0-fe143b50f530/resourceGroups/kamiyadojo/providers/Microsoft.Network/networkInterfaces/tokyo-default-nic]
azurerm_linux_virtual_machine.myazure_vm: Creating...
aws_instance.tokyo: Still creating... [40s elapsed]
aws_instance.tokyo: Creation complete after 42s [id=i-042648d2fd32fe6d5]
azurerm_linux_virtual_machine.myazure_vm: Creating...
azurerm_linux_virtual_machine.myazure_vm: Still creating... [10s elapsed]
[supressed]
azurerm_linux_virtual_machine.myazure_vm: Creation complete after 1m40s [id=/subscriptions/38ad7677-78fc-42cb-81e0-fe143b50f530/resourceGroups/kamiyadojo/providers/Microsoft.Compute/virtualMachines/tokyo]
To delete all the resources defined, execute the terraform destroy command. By default, a backup of the configuration will be created in the directory. The operation will have to be confirmed by typing “yes”.
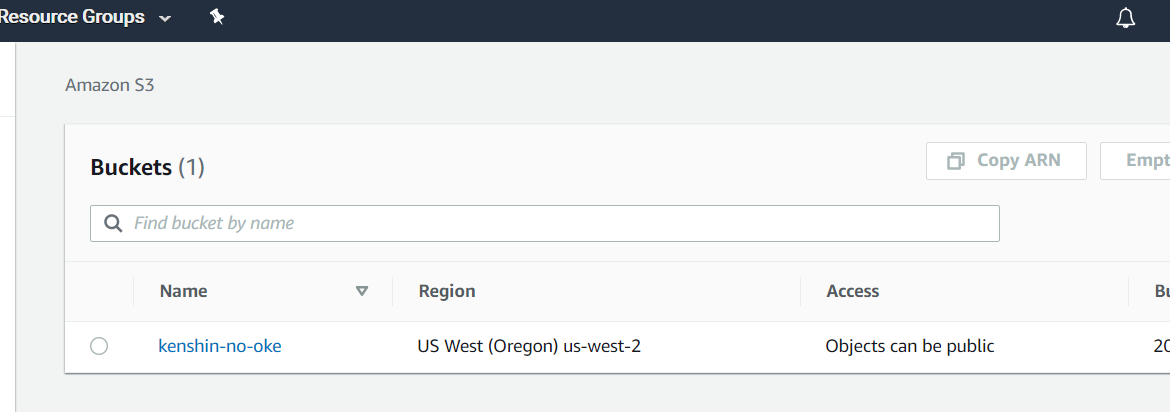
Terraform Goal 2 – Create an S3 Bucket
An S3 (Simple Storage Service) Bucket is one of the storage options available on AWS. It is very simple to create it using Terraform with the aws_s3_bucket resource.
provider "aws" {
  profile = "default"
  region  = "us-east-1"
}

resource "aws_s3_bucket" "mybucket" {
  bucket = "kenshin-no-oke"
  acl    = "private"

  tags = {
    Name        = "oke"
    Environment = "stage"
  }
}
After executing “terraform apply”, the created bucket can be verified on the S3 Console page.
It is commonplace for organizations to restrict their IT systems from having direct or unsolicited access to external networks or the Internet, with network proxies serving…

What is AWS Systems Manager Before we jump into this, it’s important to note that older names, and still in use in some areas of AWS,…

Infrastructure as Code is an increasingly popular DevOps paradigm. IaC has the ability to abstract away the details of server provisioning. This tutorial will look at…