The new standard of observability is here. Discover Olly, the industry’s first
How To Build an ML Platform from Scratch

As your data science team grows and you start deploying models to production, the need for proper ML infrastructure becomes crucial – a standard way to design, train and deploy models.
In this guide, together we will build a basic ML Platform using open-source tools like Cookiecutter, DVC, MLFlow, FastAPI, Pulumi and more.
Keep in mind that this type of project can be huge – often taking a lot of time and resources – therefore our toy ML Platform won’t have tons of features – just the basics, but it should teach you the basic principles of how to build your own ML platform
This how-to guide is based on the following workshop I did for the MLOps Community:
Architecture
Our toy ML Platform will use DVC for data versioning, MLFlow for experiments management, and FastAPI for model serving.
We’re going to build all of this on top of AWS, but in theory you could also use Azure, Google Cloud or any other cloud provider.
It’s important to note that when building your own machine learning platform, you should NOT take these tools for granted. You should evaluate the alternatives – as they may be more appropriate for your specific use case.
Model Template
The first component in our machine learning platform is going to be the model template, which we’re going to build using Cookiecutter for templating, and Poetry for package management.
The idea is that when a data scientist starts working on a new project, they will clone our model template (which contains a standard folder structure, Python linting, etc), develop their model, and easily deploy it when it’s ready for production.
The machine learning models template will contain basic training and serving code
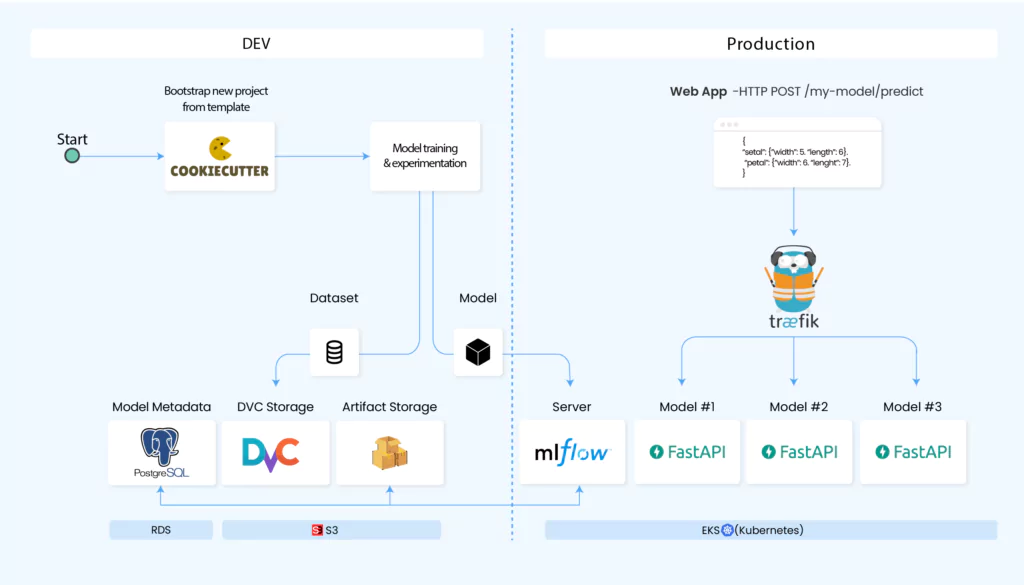
Data & Experiment Tracking
The training code in the model template will use the MLFlow client to track experiments.
Those experiments will be sent to the MLFlow Server that we’ll run on top of Kubernetes (EKS).
The model artifact itself is going to be saved in a S3 Bucket (the Artifact Storage), and metadata about experiments will be saved in a PostgreSQL database.
We’ll also track versions of the dataset using DVC, in a S3 bucket.
Model Serving
For model serving, we will build a FastAPI server that’ll be responsible for preprocessing, making predictions, etc.
These model servers are going to run on Kubernetes, and we’ll expose them to the internet using Traefik.
Infrastructure as Code
All our infrastructure is going to be deployed using Pulumi, which is an Infrastructure as Code tool similar to Terraform.
Here are some major advantages of using this method:
- Versioned: Your infrastructure is versioned, so if you have a bug you can easily revert it to a previous version.
- Code Reviewed: Each change to the infrastructure can be code reviewed and you’re less prone to mistakes.
- Sharable: You can easily share infrastructure components, just send the source code for the component.
With Pulumi, you can choose to write your infrastructure in a real programming language, such as TypeScript, Python, C# and more.
Even though the natural choice for an ML platform would be Python, I chose TypeScript because at the time of writing this post (July 2021), Pulumi’s implementation of TypeScript is more feature complete.
Repositories & CI/CD
We’re going to have 2 GitHub repositories:
- mlplatform-infra – the Pulumi code for the shared infrastructure of the ML Platform. Infrastructure that isn’t model-specific. Kubernetes, MLFlow, S3 buckets, etc.
- model-template – the model template code that data scientists can clone, including basic training code, FastAPI server, etc.
For CI/CD we’re going to use GitHub Actions.
Let’s start building!
Let’s start by setting up Kubernetes with MLFlow server.
Create a new GitHub repo called mlplatform-infra. This repo will contain the underlying infrastructure that’s shared between models.
Clone it and run:
pulumi new
Open index.ts and write the code for creating a new EKS cluster:
// Create a Kubernetes cluster.

const cluster = new eks.Cluster('mlplatform-eks', {
  createOidcProvider: true,
});
export const kubeconfig = cluster.kubeconfig;
The createOidcProvider is required because MLFlow is going to access the artifact storage (see architecture), which is a S3 bucket, so we need to create a Kubernetes ServiceAccount that can access S3 buckets.
There are more interesting arguments in this API, you should definitely check them out before deploying to production.
MLFlow Installation
To install packages like MLFlow on Kubernetes, we’re going to use Helm, which is a very popular package manager for Kubernetes.
Specifically, we’re going to use the labirras/mlflow Helm chart:
// Install MLFlow
const mlflow = new k8s.helm.v3.Chart("mlflow", {
  chart: "mlflow",
  fetchOpts: { repo: "https://larribas.me/helm-charts" },
}, { provider: cluster.provider });
This should install an MLFlow server, but unfortunately it’s not going to work because we still need to connect it to an artifact storage and a model metadata database.
Let’s create an S3 bucket for the artifact storage, and configure MLFlow to use it using the Helm chart’s values:
// Create S3 bucket for MLFlow artifact storage
const artifactStorage = new aws.s3.Bucket("artifact-storage", {
  acl: "public-read-write",
});

// Install MLFlow
const mlflow = new k8s.helm.v3.Chart("mlflow", {
  chart: "mlflow",
  values: {
    defaultArtifactRoot: artifactStorage.bucket.apply((bucketName: string) => `s3://${bucketName}`),
  },
  fetchOpts: { repo: "https://larribas.me/helm-charts" },
}, { provider: cluster.provider });
This should almost work, but there’s one problem: the MLFlow server, which is running on Kubernetes, isn’t going to have access to S3 buckets (see comment above on createOidcProvider).
To fix the permissions issue, let’s create a ServiceAccount that can access S3 buckets and use it:
// Create S3 bucket for MLFlow artifact storage
const artifactStorage = new aws.s3.Bucket("artifact-storage", {
  acl: "public-read-write",
});

// Create a k8s ServiceAccount that can access S3 buckets for MLFlow
const mlflowServiceAccount = new S3ServiceAccount('mlflow-service-account', {
  namespace: "default",
  oidcProvider: cluster.core.oidcProvider!,
  readOnly: false,
}, { provider: cluster.provider });

// Install MLFlow
const mlflow = new k8s.helm.v3.Chart("mlflow", {
  chart: "mlflow",
  values: {
    defaultArtifactRoot: artifactStorage.bucket.apply((bucketName: string) => `s3://${bucketName}`),
    serviceAccount: {
      create: false,
      name: mlflowServiceAccount.name,
    }
  },
  fetchOpts: { repo: "https://larribas.me/helm-charts" },
}, { provider: cluster.provider });
The S3ServiceAccount is available here.
Finally, we need to set up the Postgres database for model metadata. We’ll use RDS for that:
// Create Postgres database for MLFlow
const dbPassword = new random.RandomPassword('mlplatform-db-password', { length: 16, special: false });
const db = new aws.rds.Instance('mlflow-db', {
  allocatedStorage: 10,
  engine: "postgres",
  engineVersion: "11.10",
  instanceClass: "db.t3.medium",
  name: "mlflow",
  password: dbPassword.result,
  skipFinalSnapshot: true,
  username: "postgres",

  // Make sure EKS has access to this db
  vpcSecurityGroupIds: [cluster.clusterSecurityGroup.id, cluster.nodeSecurityGroup.id],
});

// Install MLFlow
const mlflow = new k8s.helm.v3.Chart("mlflow", {
  chart: "mlflow",
  values: {
    ....
    backendStore: {
      postgres: {
        username: db.username,
        password: db.password,
        host: db.address,
        port: db.port,
        database: "mlflow"
      }
    },
  },
  fetchOpts: { repo: "https://larribas.me/helm-charts" },
}, { provider: cluster.provider });
That’s it, run pulumi up and you should see MLFlow running on your new Kubernetes cluster!
Exposing K8s apps to the Internet using Traefik
Even though MLFlow is running successfully, you have no way of accessing it. Let’s open MLFlow to the internet!
Security Warning
In real life you shouldn’t just expose MLFlow to the Internet of course 🙂 Instead, think of an authentication & authorization mechanisms that work for your organization.
To expose Kubernetes applications to the Internet, we are going to use Traefik – an open-source API gateway.
To install Traefik:
const traefik = new k8s.helm.v3.Chart('traefik', {
  chart: 'traefik',
  fetchOpts: { repo: 'https://containous.github.io/traefik-helm-chart' },
}, { provider: cluster.provider })
To expose MLFlow on the Traefik we just installed:
// Expose MLFlow in Traefik as /mlflow
new TraefikRoute('mlflow', {
  prefix: '/mlflow',
  service: mlflow.getResource('v1/Service', 'mlflow', 'mlflow'),
  namespace: 'default',
}, { provider: cluster.provider, dependsOn: [mlflow] });
The TraefikRoute component is available here.
To get Traefik’s public hostname, add the following line:
export const hostname = traefik.getResource('v1/Service', 'traefik').status.loadBalancer.ingress[0].hostname;
After running pulumi up again, you should be able to get that hostname by running:
pulumi stack output hostname
You can now create a CNAME record in your domain’s DNS provider.
You should now be able to access MLFlow at https://yourdomain.com/mlflow 🙂
Security Warning
In real-life you would want to set up HTTPS and remove HTTP in Traefik’s Helm chart values. In this guide we use HTTP only.
Model Template: Training
Let’s start building our model template. Clone the model-template repo and start a new Poetry package:
poetry new --src my_model
We’ll call it my_model for now, and change to Cookiecutter variables later on.
Create a my_model.training package and add your training starting point. Here we’ll use a simple LightGBM example:
from sklearn.model_selection import train_test_split
from sklearn.metrics import accuracy_score, log_loss
import pandas as pd
import lightgbm as lgb


# Prepare training data
df = pd.read_csv('data/iris.csv')
flower_names = {'Setosa': 0, 'Versicolor': 1, 'Virginica': 2}


X = df[['sepal.length', 'sepal.width', 'petal.length', 'petal.width']]
y = df['variety'].map(flower_names)

X_train, X_test, y_train, y_test = train_test_split(X, y, test_size=0.2, random_state=42)

train_data = lgb.Dataset(X_train, label=y_train)

def main():
  # Train model
  params = {
    "objective": "multiclass",
    "num_class": 3,
    "learning_rate": 0.2,
    "metric": "multi_logloss",
    "feature_fraction": 0.8,
    "bagging_fraction": 0.9,
    "seed": 42,
  }

  model = lgb.train(params, train_data, valid_sets=[train_data])

  # Evaluate model
  y_proba = model.predict(X_test)
  y_pred = y_proba.argmax(axis=1)

  loss = log_loss(y_test, y_proba)
  acc = accuracy_score(y_test, y_pred)


if __name__ == "__main__":
    main()
To make it work, you will need to iris.csv dataset from here.
You can also add a Poetry script to make training easy to run. Add this to your pyproject.toml file:
[tool.poetry.scripts]
train = "src.my_model.training.train:main"
And now you can run:
poetry run train
OK, let’s add MLFlow client to this training code. I’ve highlighted the changes:
from sklearn.model_selection import train_test_split
from sklearn.metrics import accuracy_score, log_loss
import pandas as pd
import lightgbm as lgb
import mlflow
import mlflow.lightgbm


# Enable auto logging
mlflow.set_tracking_uri('https://yourdomain.com/mlflow')
mlflow.lightgbm.autolog()


# Prepare training data
df = pd.read_csv('data/iris.csv')
flower_names = {'Setosa': 0, 'Versicolor': 1, 'Virginica': 2}


X = df[['sepal.length', 'sepal.width', 'petal.length', 'petal.width']]
y = df['variety'].map(flower_names)

X_train, X_test, y_train, y_test = train_test_split(X, y, test_size=0.2, random_state=42)

train_data = lgb.Dataset(X_train, label=y_train)

def main():
  with mlflow.start_run() as run:
    # Train model
    params = {
      "objective": "multiclass",
      "num_class": 3,
      "learning_rate": 0.2,
      "metric": "multi_logloss",
      "feature_fraction": 0.8,
      "bagging_fraction": 0.9,
      "seed": 42,
    }

    model = lgb.train(params, train_data, valid_sets=[train_data])

    # Evaluate model
    y_proba = model.predict(X_test)
    y_pred = y_proba.argmax(axis=1)

    loss = log_loss(y_test, y_proba)
    acc = accuracy_score(y_test, y_pred)

    # Log custom metrics if you want
    mlflow.log_metrics({
      "log_loss": loss,
      "accuracy": acc
    })

  print("Run ID:", run.info.run_id)

if __name__ == "__main__":
    main()
Try to train the model again and go to your MLFlow server. You should now see the new experiment and download the model file from the browser 🙂
Model Template: Serving
Let’s implement the model server based on FastAPI.
Create a my_model.serving package, and create a basic FastAPI server that can make predictions for your basic model. In our case:
import os
import uvicorn
import mlflow
import numpy as np
import pandas as pd
from fastapi import FastAPI, Request
from pydantic import BaseModel


class FlowerPartSize(BaseModel):
    length: float
    width: float

class PredictRequest(BaseModel):
    sepal: FlowerPartSize
    petal: FlowerPartSize


app = FastAPI()

# Load model
model = mlflow.lightgbm.load_model(f'runs:/{os.environ["MLFLOW_RUN_ID"]}/model')

flower_name_by_index = {0: 'Setosa', 1: 'Versicolor', 2: 'Virginica'}


@app.post("/predict")
def predict(request: PredictRequest):
    df = pd.DataFrame(columns=['sepal.length', 'sepal.width', 'petal.length', 'petal.width'],
                      data=[[request.sepal.length, request.sepal.width, request.petal.length, request.petal.width]])

    y_pred = np.argmax(model.predict(df))
    return {"flower": flower_name_by_index[y_pred]}


def main():
    uvicorn.run(app, host="0.0.0.0", port=8000)

if __name__ == "__main__":
    main()
Note that the model is loaded from the Artifact Storage (the S3 bucket) through MLFlow.
OK, we’ll now need to do some DevOps to make this server run on our Kubernetes. Let’s start by containerizing it.
Add a Dockerfile:
FROM python:3.8-slim
WORKDIR /my_model
STOPSIGNAL SIGINT

ENV LISTEN_PORT 80

# System dependencies
RUN apt update && apt install -y libgomp1
RUN pip3 install poetry

# Project dependencies
COPY poetry.lock pyproject.toml ./

RUN poetry config virtualenvs.create false
RUN poetry install --no-interaction --no-ansi --no-dev

COPY . .

WORKDIR /my_model/src
ENTRYPOINT uvicorn my_model.serving.main:app --host 0.0.0.0 --port $LISTEN_PORT --workers 2
Next, let’s create a Pulumi package for the model that can build & push this Docker image to ECR, and deploy it to Kubernetes.
Create an infra directory inside the model template and run pulumi new, as before.
The Pulumi code should look something like:
import * as pulumi from '@pulumi/pulumi';
import * as awsx from '@pulumi/awsx';
import * as k8s from '@pulumi/kubernetes';
import * as kx from '@pulumi/kubernetesx';
import TraefikRoute from './TraefikRoute';

const config = new pulumi.Config();
const baseStack = new pulumi.StackReference(config.require('baseStackName'))

// Connect to the Kubernetes we created in mlplatform-infra
const provider = new k8s.Provider('provider', {
  kubeconfig: baseStack.requireOutput('kubeconfig'),
})

// Build & push Docker image to ECR
const image = awsx.ecr.buildAndPushImage('my-model-image', {
  context: '../',
});

const podBuilder = new kx.PodBuilder({
  containers: [{
    image: image.imageValue,
    ports: { http: 80 },
    env: {
      'LISTEN_PORT': '80',
      'MLFLOW_TRACKING_URI': 'https://yourcompany.com/mlflow',
      'MLFLOW_RUN_ID': config.require('runID'),
    }
  }],
  serviceAccountName: baseStack.requireOutput('modelsServiceAccountName'),
});

const deployment = new kx.Deployment('my-model-serving', {
  spec: podBuilder.asDeploymentSpec({ replicas: 3 })
}, { provider });

const service = deployment.createService();


// Expose model in Traefik
new TraefikRoute('my-model', {
  prefix: '/models/my-model',
  service,
  namespace: 'default',
}, { provider, dependsOn: [service] });
Note that on line 30 we use a special Kubernetes ServiceAccount that can read from S3 buckets.
This is similar to the ServiceAccount we created for MLFlow, but it is read-only – you can just copy-paste that piece of code in mlplatform-infra and change readOnly to true.