Elasticsearch Hadoop Tutorial with Hands-on Examples


In this Hadoop Tutorial lesson, we’ll learn how we can use Elasticsearch Hadoop to process very large amounts of data. For our exercise, we’ll use a simple Apache access log to represent our “big data”. We’ll learn how to write a MapReduce job to ingest the file with Hadoop and index it into Elasticsearch.
What Is Hadoop?
When we need to collect, process/transform, and/or store thousands of gigabytes of data, thousands of terabytes, or even more, Hadoop can be the appropriate tool for the job. It is built from the ground up with ideas like this in mind:
- Use multiple computers at once (forming a cluster) so that it can process data in parallel, to finish the job much faster. We can think of it this way. If one server needs to process 100 terabytes of data, it might finish in 500 hours. But if we have 100 servers, each one can just take a part of the data, for example, server1 can take the first terabyte, server2 can take the second terabyte, and so on. Now they each have only 1 terabyte to process and they can all work on their own section of data, at the same time. This way, the job can be finished in 5 hours instead of 500. Of course, this is theoretical and imaginary, as in practice we won’t get a 100 times reduction in the time it takes, but we can get pretty close to that if conditions are ideal.
- Make it very easy to adjust the computing power when needed. Have a lot more data to process, and the problem is much more complex? Add more computers to the cluster. In a sense, it’s like adding more CPU cores to a supercomputer.
- Data grows and grows, so Hadoop must be able to easily and flexibly expand its storage capacity too, to keep up with demand. Every computer we add to the cluster expands the total storage space available to the Hadoop Distributed File System (HDFS).
- Unlike other software, it doesn’t just try to recover from hardware failure when it happens. The design philosophy actually assumes that some hardware will certainly fail. When having thousands of computers, working in parallel, it’s guaranteed that something, somewhere, will fail, from time to time. As such, Hadoop, by default, creates replicas of chunks of data and distributes them on separate hardware, so nothing should be lost when the occasional server goes up in flames or a hard-disk or SSD dies.
To summarize, Hadoop is very good at ingesting and processing incredibly large volumes of information. It distributes data across the multiple nodes available in the cluster and uses the MapReduce programming model to process it on multiple machines at once (parallel processing).
But this may sound somewhat similar to what Elasticsearch data ingestion tools do. Although they’re made to deal with rather different scenarios, they may sometimes overlap a bit. So why and when would we use one instead of the other?
Hadoop vs Logstash/Elasticsearch
First of all, we shouldn’t think in terms of which one is better than the other. Each excels at the jobs it’s created for. Each has pros and cons.
To try to paint a picture and give you an idea of when we’d use one or the other, let’s think of these scenarios:
- When we’d need to ingest data from billions of websites, as a search engine like Google does, we’d find a tool like Elasticsearch Hadoop very useful and efficient.
- When we need to store data and index it in such a way that it can later be searched quickly and efficiently, we’ll find something like Elasticsearch very useful.
- And, finally, when we want to gather real time data, like the price of USD/EUR from many exchanges available on the Internet, we’d find a tool like Logstash is good for the job.
Of course, if the situation allows it, Hadoop and Elasticsearch can also be teamed up, so we can get the best of both worlds. Remember the scenario of scanning information on billions of websites? Hadoop would be great at collecting all that data, and send it to be stored in Elasticsearch. Elasticsearch would then be great at quickly returning results to the users that search through that data.
With Elasticsearch, you can think: awesome search capabilities, good enough in the analytics and data visualization department.
With Elasticsearch Hadoop, you can think: capable of ingesting and processing mind-blowing amounts of data, in a very efficient manner, and allow for complex, fine-tuned data processing.
How MapReduce Works
As mentioned, while tools like Logstash or even Spark are easier to use, they also confine us to the methods they employ. That is, we can only fine-tune the settings they allow us to adjust and we can’t change how their programming logic works behind the scenes. That’s not usually a problem, as long as we can do what we want.
With Hadoop, however, we have more control over how things work at a much lower level, allowing for much more customization and more importantly, optimization. When we deal with petabytes of data, optimization can matter a lot. It can help us reduce the time needed for a job, from months to weeks, and significantly reduce operation costs and resources needed.
Let’s take a first look at MapReduce, which adds complexity to our job but also allows for the higher level of control mentioned earlier.
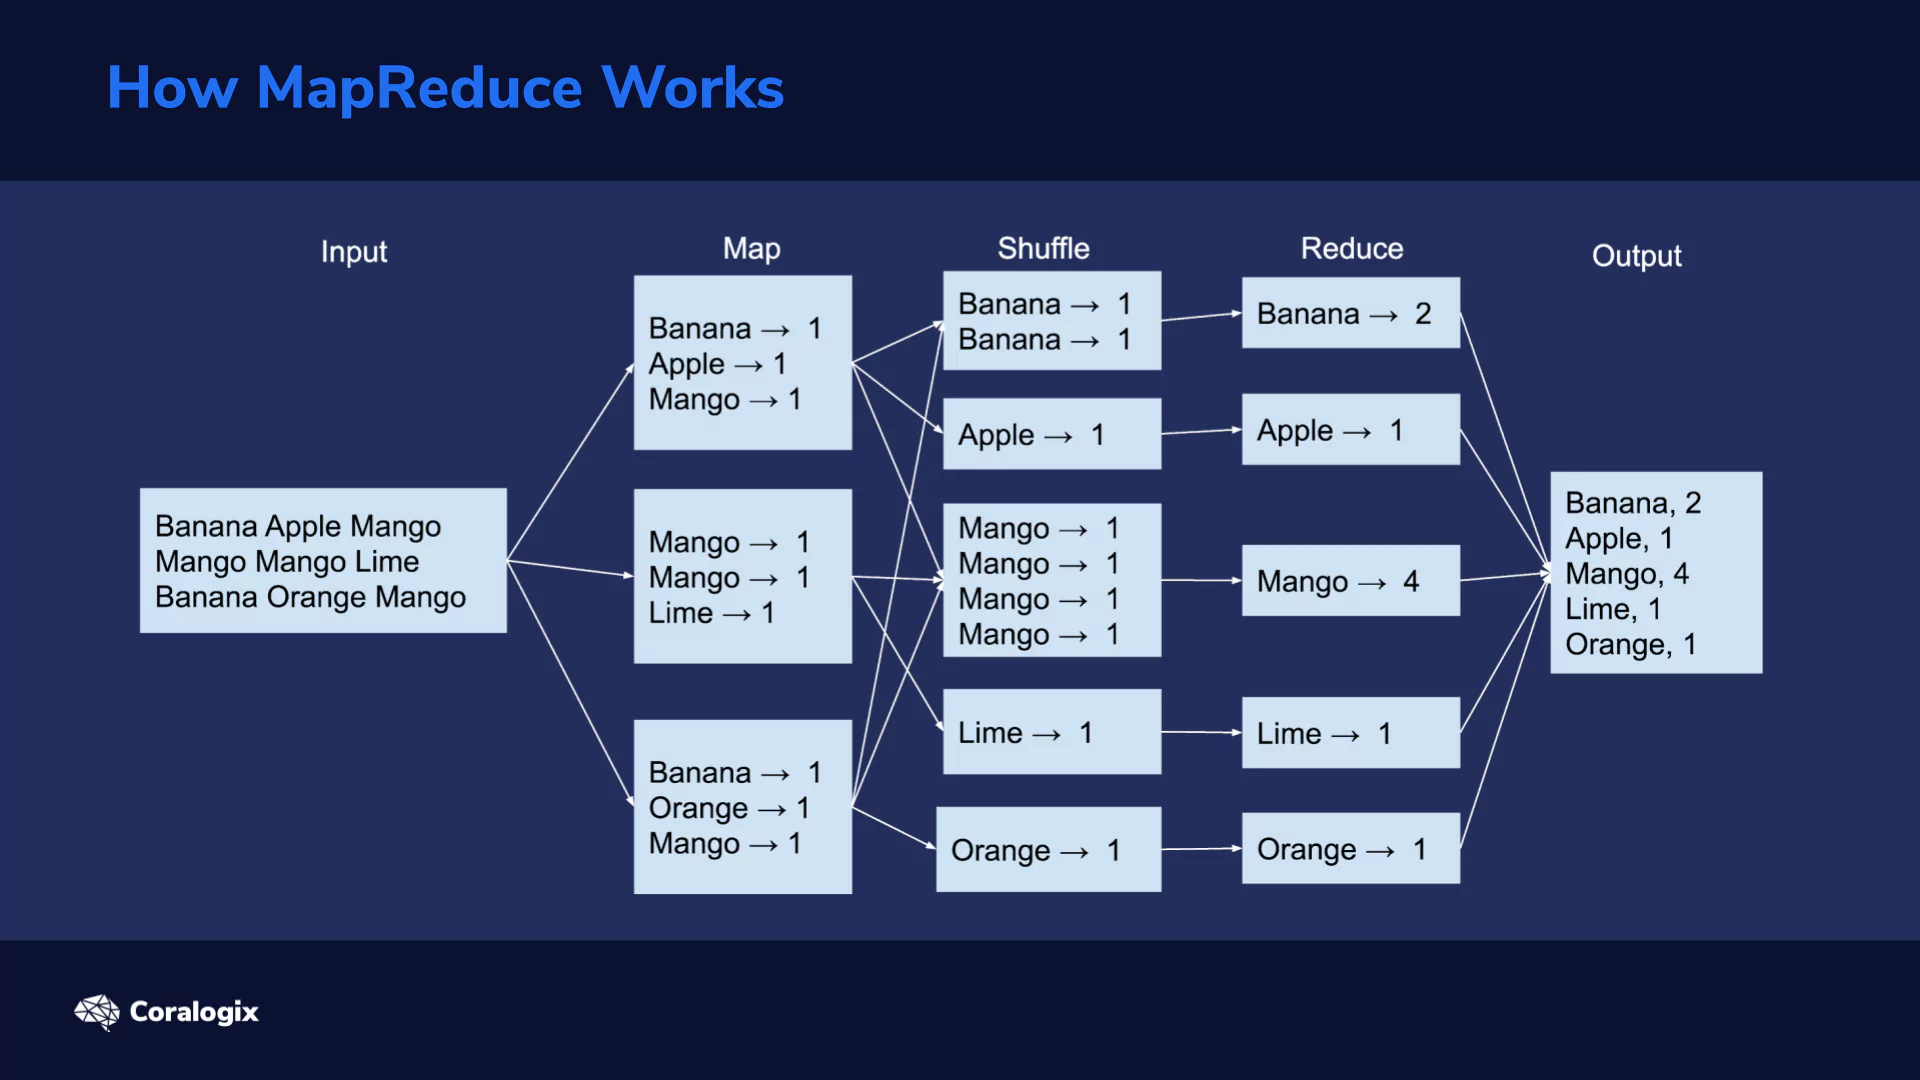
A MapReduce procedure typically consists of three main stages: Map, Shuffle and Reduce.
Initially, data is split into smaller chunks that can be spread across different computing nodes. Next, every node can execute a map task on its received chunk of data. This kind of parallel processing greatly speeds up the procedure. The more nodes the cluster has, the faster the job can be done.
Pieces of mapped data, in the form of key/value pairs, now sit on different servers. All the values with the same key need to be grouped together. This is the shuffle stage. Next, shuffled data goes through the reduce stage.
This image exemplifies these stages in action on a collection of three lines of words.
Here, we assume that we have a simple text file and we need to calculate the number of times each word appears within.
The first step is to read the data and split it into chunks that can be efficiently sent to all processing nodes. In our case, we assume the file is split into three lines.
Map Stage
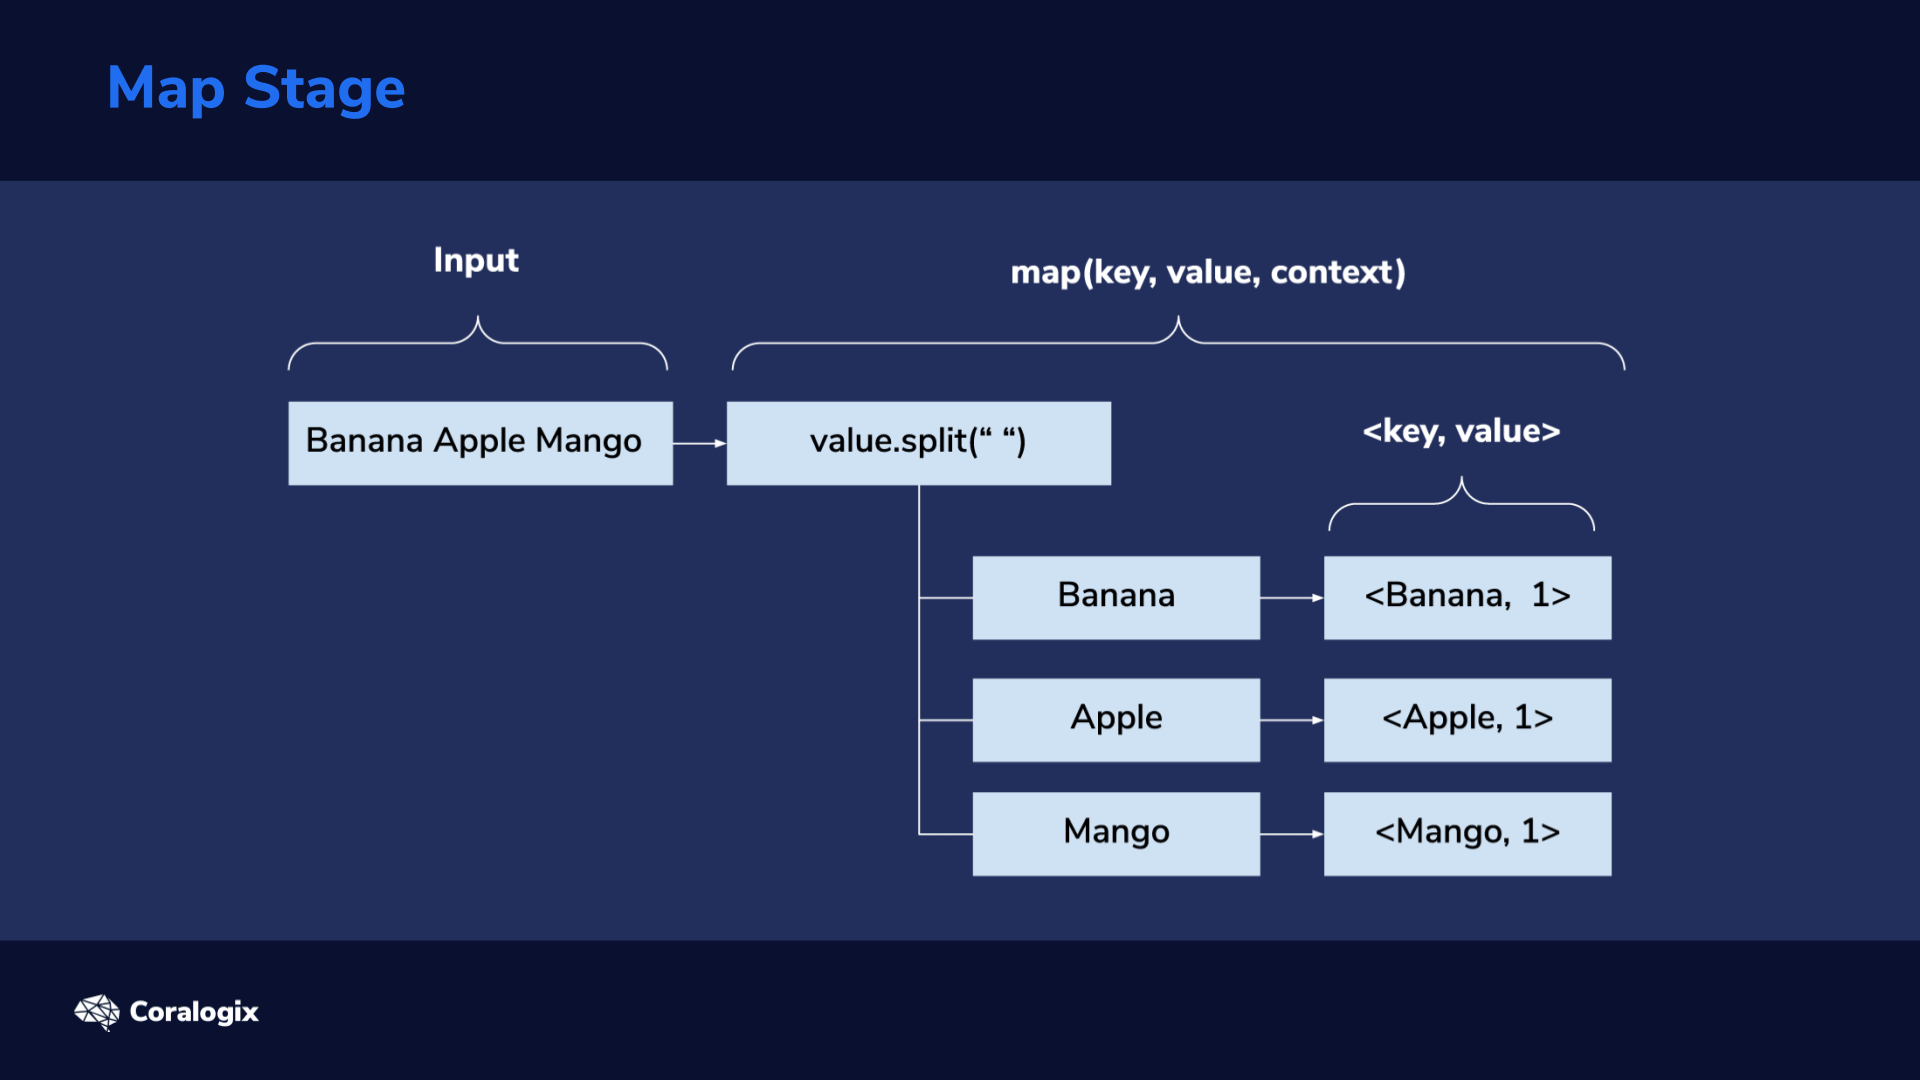
Next comes the Map stage. Lines are used as input for the map(key, value, context) method. This is where we’ll have to program our desired custom logic. For this word count example, the “value” parameter will hold the line input (line of text from file). We’ll then split the line, using the space character as a word separator, then iterate through each of the splits (words) and emit a map output using context.write(key, value). Here, our key will be the word, for example, “Banana” and the value will be 1, indicating it’s a single occurrence of the word. From the image above we can see that for the first line we get <Banana, 1>, <Apple, 1>, <Mango, 1> as key/value pairs.
Shuffle Stage
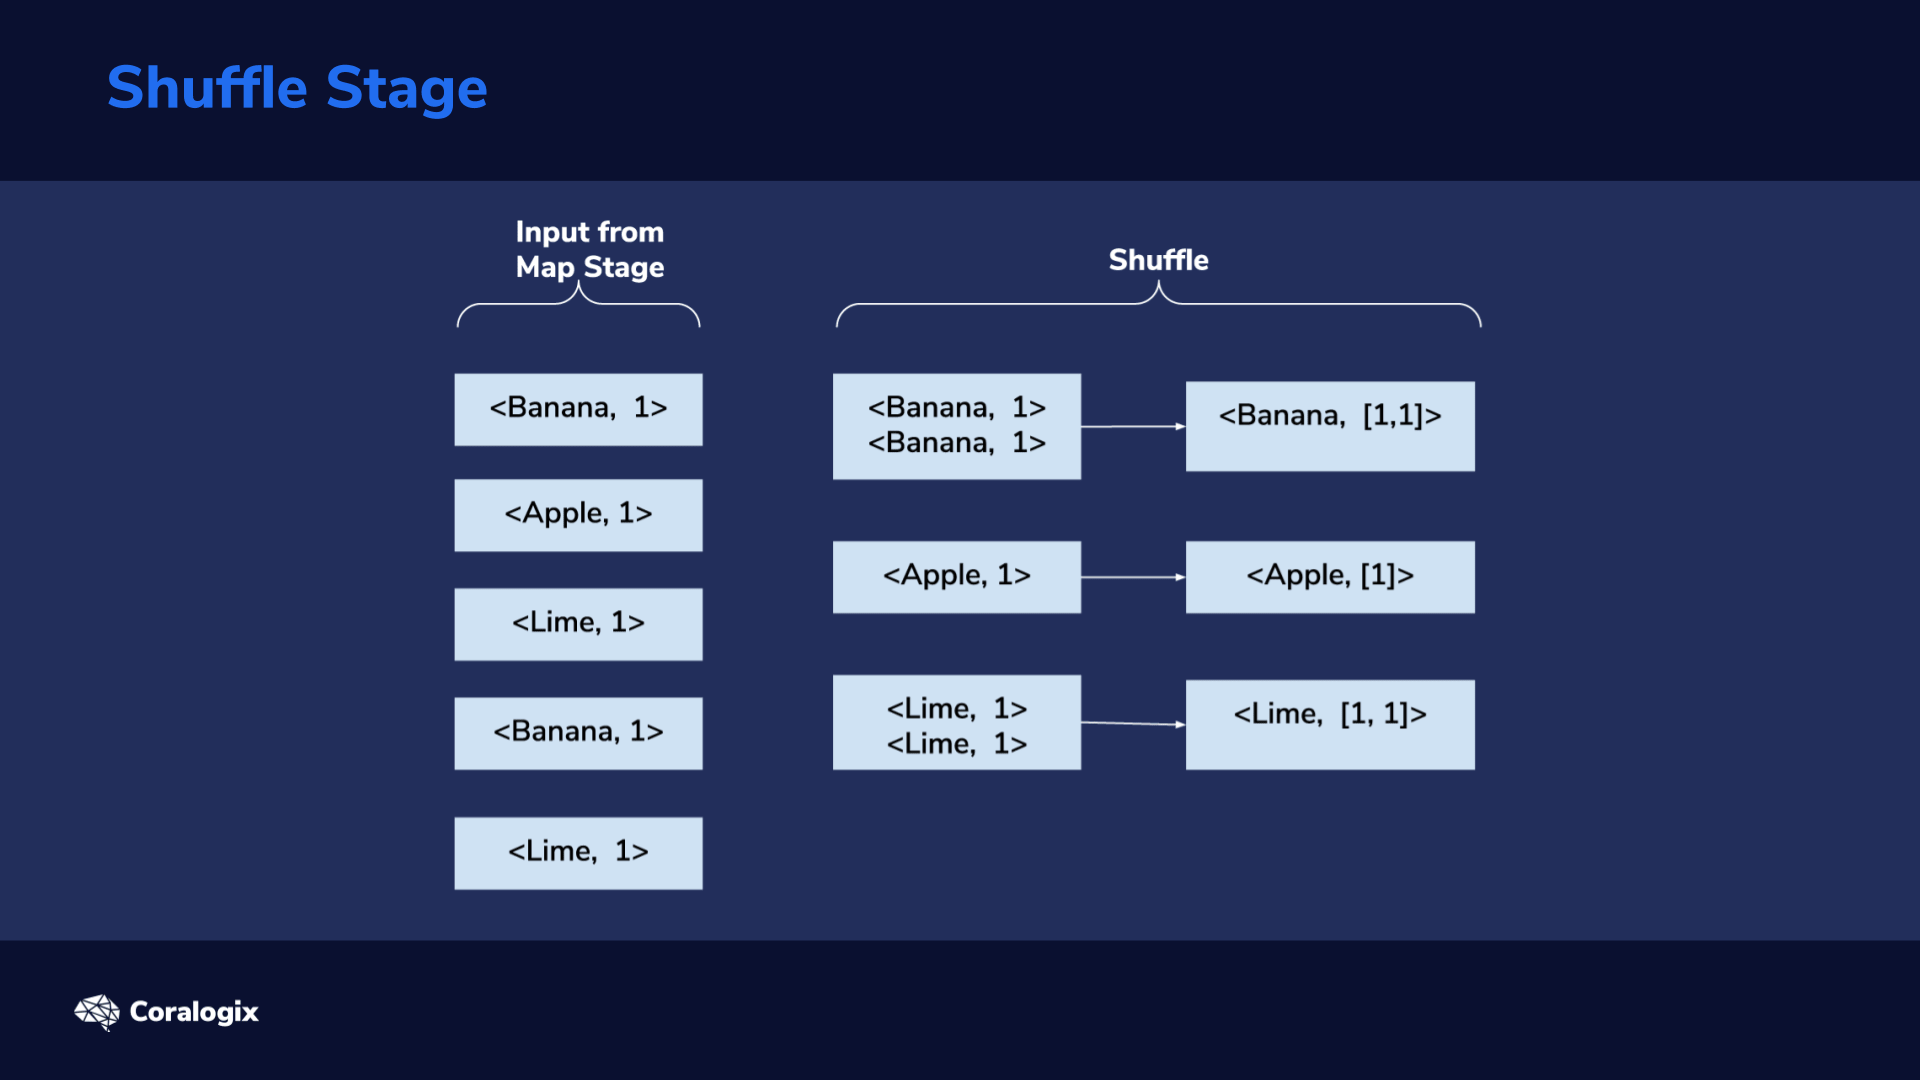
The shuffle stage is responsible for taking <key, value> pairs from the mapper, and, based on a partitioner, decide to which reducer each goes to.
From the image showing each stage in action, we can see that we end up with five partitions in the reduce stage. Shuffling is done internally by the framework, so we will not have any custom code for that here.
Reduce Stage
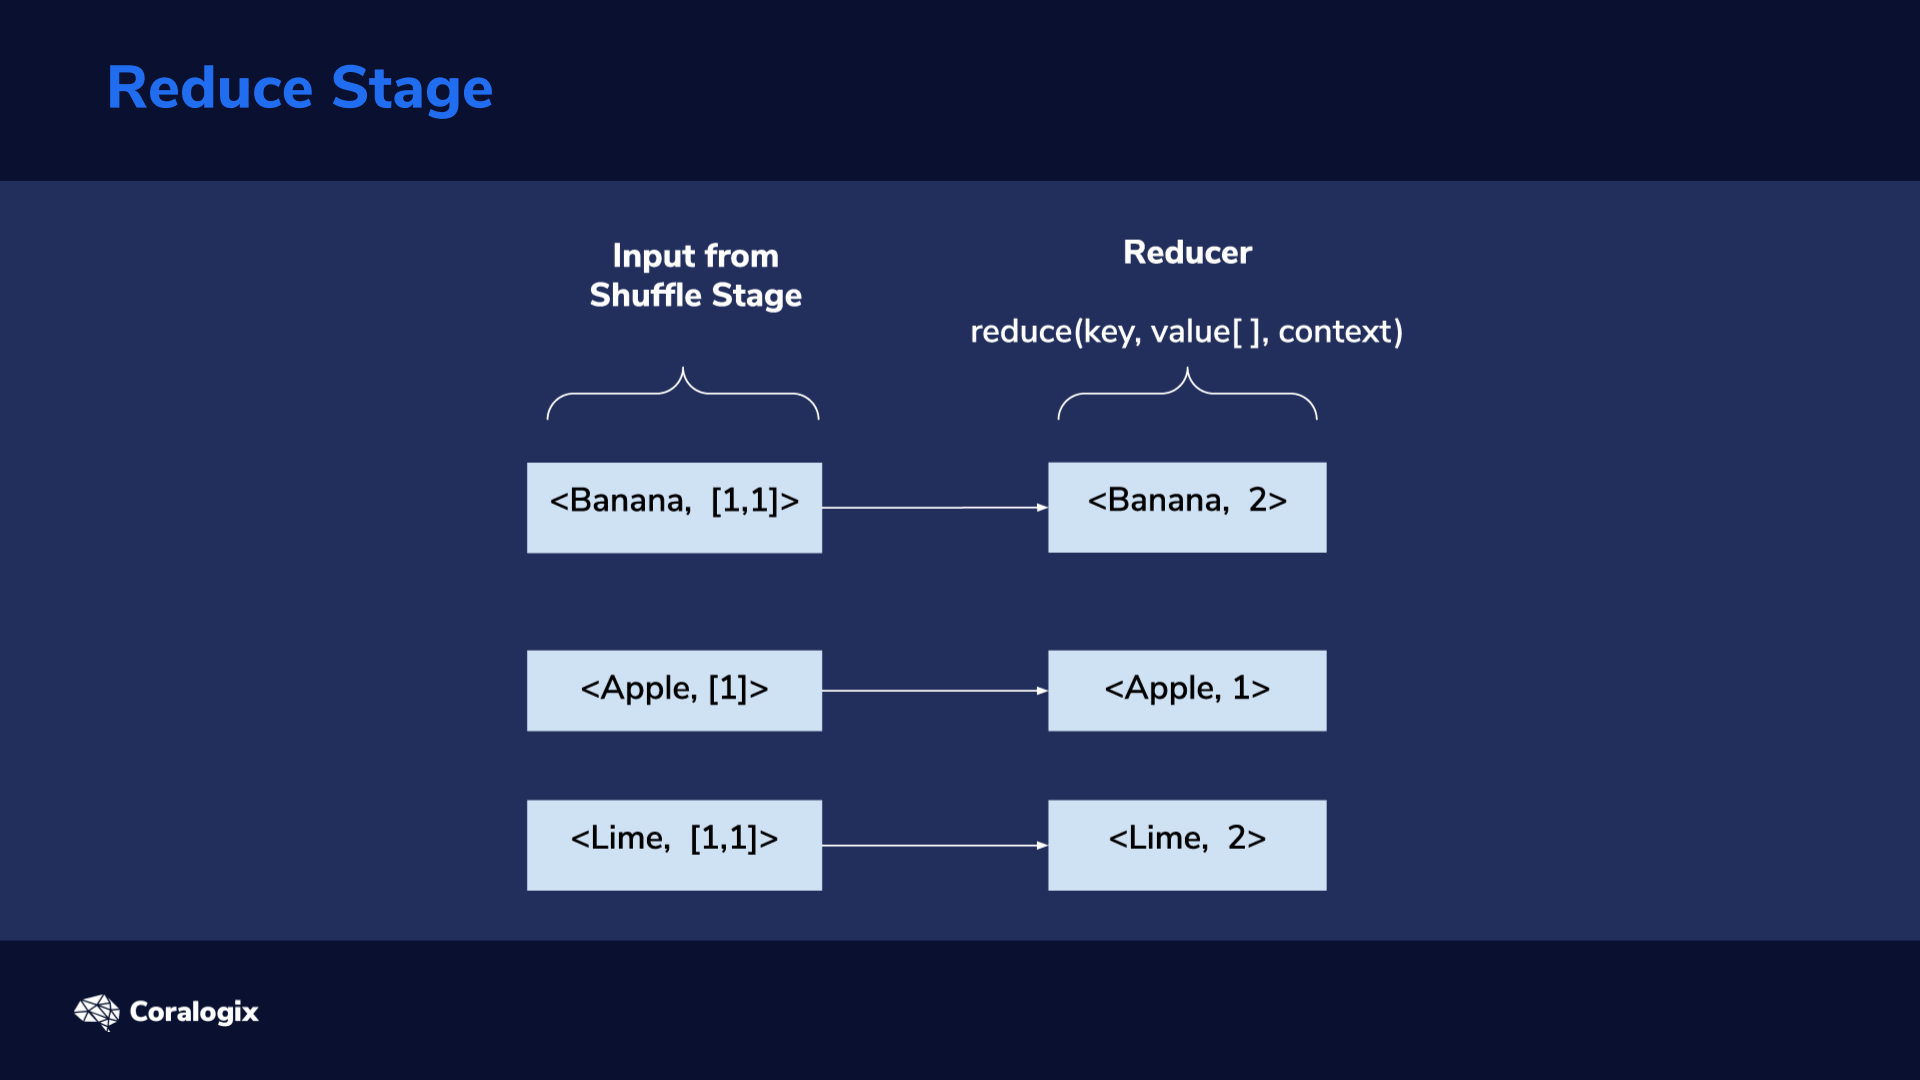
The output of the shuffle stage is fed into the reduce stage: as its input, each reducer receives one of the groups formed in the shuffle stage. This consists of a key and a list of values related to the key. Here, we again have to program custom logic we want to be executed in this stage. In this example, for every key, we have to calculate the sum of the elements in its value list. This way, we get the total count of each key, which ultimately represents the count for each unique word in our text file.
The output of the reduce stage also follows the <key, value> format. As mentioned, in this example, the key will represent the word and the value the number of times the word has been repeated.
Hands-On Exercise
OpenJDK Prerequisite
Wow! There’s a lot of theory behind Hadoop, but practice will help us cement the concepts and understand everything better.
Let’s learn how to set up a simple Hadoop installation.
Since Elasticsearch is already installed, the appropriate Java components are already installed too. We can verify with:
java -version
This should show us an output similar to this:
openjdk version "11.0.7" 2020-04-14
OpenJDK Runtime Environment (build 11.0.7+10-post-Ubuntu-2ubuntu218.04)
OpenJDK 64-Bit Server VM (build 11.0.7+10-post-Ubuntu-2ubuntu218.04, mixed mode, sharing)
OpenJDK is required by Hadoop and on an instance where this is not available, you can install it with a command such as “sudo apt install default-jdk”.
Create a Hadoop User
Now let’s create a new user, called “hadoop”. Hadoop related processes, such as the MapReduce code we’ll use, will run under this user. Remember the password you set for this user, as it’s needed later, when logging in, and using sudo commands while logged in.
sudo adduser hadoop
We’ll add the user to the sudo group, to be able to execute some later commands with root privileges.
sudo usermod -aG sudo hadoop
Let’s log in as the “hadoop” user.
su - hadoop
Install Hadoop Binaries
Note: For testing purposes commands below can be left unchanged. On production systems, however, you should first visit https://www.apache.org/dyn/closer.cgi/hadoop/common/stable and find out which Hadoop version is the latest stable one. Afterward, you will need to modify “https” links to point to the latest stable version and change text strings containing “hadoop-3.2.1” in commands used below to whatever applies to you (as in, change “3.2.1” version number to current version number). It’s a very good idea to also follow instructions regarding verifying integrity of downloads with GPG (verify signatures).
While logged in as the Hadoop user, we’ll download the latest stable Hadoop distribution using the wget command.
wget https://downloads.apache.org/hadoop/common/hadoop-3.2.1/hadoop-3.2.1.tar.gz
Next, let’s extract the files from the tar archive compressed with gzip.
tar -xvzf hadoop-3.2.1.tar.gz
Once this is done, we’ll move the extracted directory to “/usr/local/hadoop/”.
sudo mv hadoop-3.2.1 /usr/local/hadoop
With the method we followed, the “/usr/local/hadoop” directory should already be owned by the “hadoop” user and group. But to make sure this is indeed owned by this user and group, let’s run the next command.
sudo chown -R hadoop:hadoop /usr/local/hadoop
Hadoop uses environment variables to orient itself about the directory paths it should use. Let’s set these variables according to our setup.
nano ~/.bashrc
Let’s scroll to the end of the file and add these lines:
export HADOOP_HOME=/usr/local/hadoop
export HADOOP_INSTALL=$HADOOP_HOME
export HADOOP_MAPRED_HOME=$HADOOP_HOME
export HADOOP_COMMON_HOME=$HADOOP_HOME
export HADOOP_HDFS_HOME=$HADOOP_HOME
export YARN_HOME=$HADOOP_HOME
export HADOOP_COMMON_LIB_NATIVE_DIR=$HADOOP_HOME/lib/native
export PATH=$PATH:$HADOOP_HOME/sbin:$HADOOP_HOME/bin
export HADOOP_OPTS="-Djava.library.path=$HADOOP_HOME/lib/native"
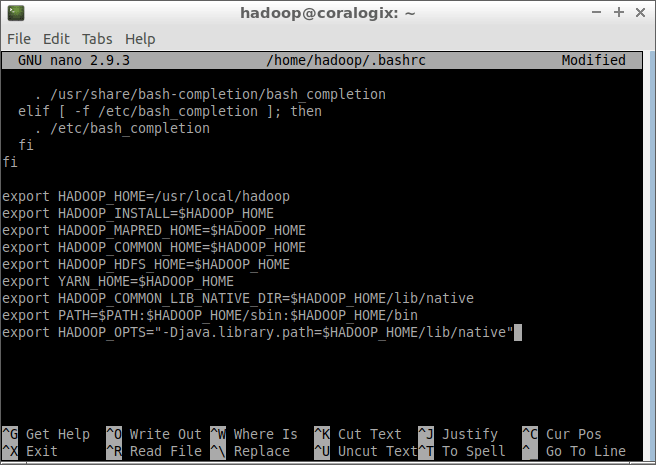
To quit the nano editor and save our file we’ll first press CTRL+X, then type “y” and finally press ENTER.
To make the environment variables specified in the “.bashrc” file take effect, we’ll use:
source ~/.bashrc
Configure Hadoop Properties
Hadoop needs to know where it can find the Java components it requires. We point it to the correct location by using the JAVA_HOME environment variable.
Let’s see where the “javac” binary is located:
readlink -f $(which javac)
In the case of OpenJDK 11, this will point to “/usr/lib/jvm/java-11-openjdk-amd64/bin/javac“.
We’ll need to copy the path starting with “/usr” and ending with “openjdk-amd64“, which means we exclude the last part: “/bin/javac” in this case.
In the case of OpenJDK 11, the path we’ll copy is:
/usr/lib/jvm/java-11-openjdk-amd64
and we’ll paste it at the end of the last line: export JAVA_HOME=
Let’s open the “hadoop-env.sh” file in the nano editor and add this path to the JAVA_HOME variable.
sudo nano $HADOOP_HOME/etc/hadoop/hadoop-env.sh
We’ll scroll to the end of the file and add this line:
export JAVA_HOME=/usr/lib/jvm/java-11-openjdk-amd64
Remember, if the OpenJDK version you’re using is different, you will need to paste a different string of text after “export JAVA_HOME=“.
Once again, we’ll press CTRL+X, then type “y” and finally press ENTER to save the file.
Let’s test if our setup is in working order.
hadoop version
We should see an output similar to this
Hadoop 3.2.1
Source code repository https://gitbox.apache.org/repos/asf/hadoop.git -r b3cbbb467e22ea829b3808f4b7b01d07e0bf3842
Compiled by rohithsharmaks on 2019-09-10T15:56Z
Compiled with protoc 2.5.0
From source with checksum 776eaf9eee9c0ffc370bcbc1888737
This command was run using /usr/local/hadoop/share/hadoop/common/hadoop-common-3.2.1.jar
Creating MapReduce Project
In this exercise, we’ll index a sample access log file which was generated in the Apache Combined Log Format. We’ll use the maven build tool to compile our MapReduce code into a JAR file.
In a real scenario, you would have to follow a few extra steps:
- Install an integrated development environment (IDE) that includes a code editor, such as Eclipse, to create a project and write the necessary code.
- Compile project with maven, on local desktop.
- Transfer compiled project (JAR), from local desktop to your Hadoop instance.
We’ll explain the theory behind how you would create such a project, but we’ll also provide a GitHub repository containing a ready-made, simple Java project. This way, you don’t have to waste time writing code for now, and can just start experimenting right away and see MapReduce in action. Furthermore, if you’re unfamiliar with Java programming, you can take a look at the sample code to better understand where all the pieces go and how they fit.
So, first, let’s look at the theory and see how we would build MapReduce code, and what is the logic behind it.
Setting Up pom.xml Dependencies
To get started, we would first have to create an empty Maven project using the code editor we prefer. Both Eclipse and IntelliJ have built-in templates to do this. We can skip archetype selection when creating the maven project; an empty maven project is all we require here.
Once the project is created, we would edit the pom.xml file and use the following properties and dependencies. Some versions numbers specified below may need to be changed in the future, when new stable versions of Hadoop and Elasticsearch are used.
< properties >
   < maven.compiler.source >1.8< /maven.compiler.source >
   < maven.compiler.target >1.8</ maven.compiler.target >
< /properties >


< dependencies >
   < dependency >
       < groupId >org.apache.hadoop< /groupId >
       < artifactId >hadoop-client< /artifactId >
       < version >3.2.1< /version >
   < /dependency >
   < dependency >
       < groupId >org.elasticsearch< /groupId >
       < artifactId >elasticsearch-hadoop-mr< /artifactId >
       < version >7.8.0< /version >
   < /dependency >
   < dependency >
       < groupId >commons-httpclient< /groupId >
       < artifactId >commons-httpclient< /artifactId >
       < version >3.1< /version >
   < /dependency >
< /dependencies >
The hadoop-client library is required to write MapReduce Jobs. In order to write to an Elasticsearch index we are using the official elasticsearch-hadoop-mr library. commons-httpclient is needed too, because elasticsearch-hadoop-mr uses this to be able to make REST calls to the Elasticsearch server, through the HTTP protocol.
Defining the Logic of Our Mapper Class
We’ll define AccessLogMapper and use it as our mapper class. Within it, we’ll override the default map() method and define the programming logic we want to use.
import org.apache.hadoop.mapreduce.Mapper;
import java.io.IOException;

public class AccessLogIndexIngestion {

   public static class AccessLogMapper extends Mapper {
       @Override
       protected void map(Object key, Object value, Context context) throws IOException, InterruptedException {
       }
   }

   public static void main(String[] args) {

   }
}
As mentioned before, we don’t need a reducer class in this example.
Defining the Elasticsearch Index for Hadoop
Here is a sample of what the log file looks like
77.0.42.68 - - [17/May/2015:23:05:48 +0000] "GET /favicon.ico HTTP/1.1" 200 3638 "-" "Mozilla/5.0 (X11; Ubuntu; Linux x86_64; rv:27.0) Gecko/20100101 Firefox/27.0"
77.0.42.68 - - [17/May/2015:23:05:32 +0000] "GET /images/jordan-80.png HTTP/1.1" 200 6146 "https://www.semicomplete.com/projects/xdotool/" "Mozilla/5.0 (X11; Ubuntu; Linux x86_64; rv:27.0) Gecko/20100101 Firefox/27.0"
77.0.42.68 - - [18/May/2015:00:05:08 +0000] "GET /images/web/2009/banner.png HTTP/1.1" 200 52315 "https://www.semicomplete.com/style2.css" "Mozilla/5.0 (X11; Ubuntu; Linux x86_64; rv:27.0) Gecko/20100101 Firefox/27.0"
207.241.237.101 - - [18/May/2015:00:05:42 +0000] "GET /blog/geekery/find-that-lost-screen-session.html HTTP/1.0" 200 11214 "https://www.semicomplete.com/blog/tags/tools" "Mozilla/5.0 (compatible; archive.org_bot +https://www.archive.org/details/archive.org_bot)"
120.202.255.147 - - [18/May/2015:00:05:57 +0000] "GET /files/logstash/logstash-1.1.0-monolithic.jar HTTP/1.1" 304 - "-" "Mozilla/5.0 Gecko/20100115 Firefox/3.6"
207.241.237.104 - - [18/May/2015:00:05:43 +0000] "GET /geekery/find-that-lost-screen-session-2.html HTTP/1.0" 404 328 "https://www.semicomplete.com/blog/tags/tools" "Mozilla/5.0 (compatible; archive.org_bot +https://www.archive.org/details/archive.org_bot)"
We’ve dealt with theory only up to this point, but here, it’s important we execute the next command.
Let’s send this curl request to define the index in Elasticsearch. For the purpose of this exercise, we ignore the last two columns in the log in this index structure.
curl -X PUT "localhost:9200/logs?pretty" -H 'Content-Type: application/json' -d'
{
	"mappings" : {
    	"properties" : {
        	"ip" : { "type" : "keyword" },
        	"dateTime": {"type" : "date", "format" : "dd/MMM/yyyy:HH:mm:ss"},
        	"httpStatus": {"type" : "keyword"},
        	"url" : { "type" : "keyword" },
        	"responseCode" : { "type" : "keyword" },
        	"size" : { "type" : "integer" }

    	        }
	}
}
'
Having the dateTime field defined as a date is essential since it will enable us to visualize various metrics using Kibana. Of course, we also needed to specify the date/time format used in the access log, “dd/MMM/yyyy:HH:mm:ss”, so that values passed along to Elasticsearch are parsed correctly.
Defining map() Logic
Since our input data is a text file, we use the TextInputFormat.class. Every line of the log file will be passed as input to the map() method.
Finally, we can define the core logic of the program: how we want to process each line of text and get it ready to be sent to the Elasticsearch index, with the help of the EsOutputFormat.class.
The value input parameter of the map() method holds the line of text currently extracted from the log file and ready to be processed. We can ignore the key parameter for this simple example.
import org.elasticsearch.hadoop.util.WritableUtils;
import org.apache.hadoop.io.NullWritable;
import java.io.IOException;
import java.util.LinkedHashMap;
import java.util.Map;

@Override
protected void map(Object key, Object value, Context context) throws IOException, InterruptedException {

   String logEntry = value.toString();
   // Split on space
   String[] parts = logEntry.split(" ");
   Map<String, String> entry = new LinkedHashMap<>();

   // Combined LogFormat "%h %l %u %t "%r" %>s %b "%{Referer}i" "%{User-agent}i"" combined
   entry.put("ip", parts[0]);
   // Cleanup dateTime String
   entry.put("dateTime", parts[3].replace("[", ""));
   // Cleanup extra quote from HTTP Status
   entry.put("httpStatus", parts[5].replace(""",  ""));
   entry.put("url", parts[6]);
   entry.put("responseCode", parts[8]);
   // Set size to 0 if not present
   entry.put("size", parts[9].replace("-", "0"));
   context.write(NullWritable.get(), WritableUtils.toWritable(entry));
}
We split the line into separate pieces, using the space character as a delimiter. Since we know that the first column in the log file represents an IP address, we know that parts[0] holds such an address, so we can prepare that part to be sent to Elasticsearch as the IP field. Similarly, we can send the rest of the columns from the log, but some of them need special processing beforehand. For example, when we split the input string, using the space character as a delimiter, the time field got split into two entries, since it contains a space between the seconds number and timezone (+0000 in our log). For this reason, we need to reassemble the timestamp and concatenate parts 3 and 4.
The EsOutputFormat.class ignores the “key” of the Mapper class output, hence in context.write() we set the key to NullWriteable.get()
MapReduce Job Configuration
We need to tell our program where it can reach Elasticsearch and what index to write to. We do that with conf.set(“es.nodes”, “localhost:9200”); and conf.set(“es.resource”, “logs”);.
import org.apache.hadoop.mapreduce.Job;
import org.apache.hadoop.mapreduce.Mapper;
import org.apache.hadoop.mapreduce.lib.input.FileInputFormat;
import org.apache.hadoop.mapreduce.lib.input.TextInputFormat;
import org.elasticsearch.hadoop.mr.EsOutputFormat;

import org.apache.hadoop.conf.Configuration;
import org.apache.hadoop.fs.Path;


public static void main(String[] args) throws IOException, ClassNotFoundException, InterruptedException {
   Configuration conf = new Configuration();
   conf.setBoolean("mapred.map.tasks.speculative.execution", false);
   conf.setBoolean("mapred.reduce.tasks.speculative.execution", false);
   conf.set("es.nodes", "localhost:9200");
   conf.set("es.resource", "logs");

   Job job = Job.getInstance(conf);
   job.setInputFormatClass(TextInputFormat.class);
   job.setOutputFormatClass(EsOutputFormat.class);
   job.setMapperClass(AccessLogMapper.class);
   job.setNumReduceTasks(0);

   FileInputFormat.addInputPath(job, new Path(args[0]));
   System.exit(job.waitForCompletion(true) ? 0 : 1);
}
Under normal circumstances, speculative execution in Hadoop can sometimes optimize jobs. But, in this case, since output is sent to Elasticsearch, it might accidentally cause duplicate entries or other issues. That’s why it’s recommended to disable speculative execution for such scenarios. You can read more about this, here: https://www.elastic.co/guide/en/elasticsearch/hadoop/current/configuration-runtime.html#_speculative_execution. These lines disable the feature:
conf.setBoolean(“mapred.map.tasks.speculative.execution”, false);
conf.setBoolean(“mapred.reduce.tasks.speculative.execution”, false);
Since the MapReduce job will essentially read a text file in this case, we use the TextInputFormat class for our input: job.setInputFormatClass(TextInputFormat.class);
And, since we want to write to an Elasticsearch index, we use the EsOutputFormat class for our output: job.setOutputFormatClass(EsOutputFormat.class);
Next, we set the Mapper class we want to use, to the one we created in this exercise: job.setMapperClass(AccessLogMapper.class);
And, finally, since we do not require a reducer, we set the number of reduce tasks to zero: job.setNumReduceTasks(0);
Building the JAR File
Once all the code is in place, we have to build an executable JAR. For this, we use the maven-shade-plugin, so we would add the following to “pom.xml“.
< build >
   < plugins >
       < plugin >
           < groupId >org.apache.maven.plugins< /groupId >
           < artifactId >maven-shade-plugin< /artifactId >
           < version >3.2.4< /version >
           < executions >
               < execution >
                   < phase >package< /phase >
                   < goals >
                       < goal >shade< /goal >
                   < /goals >
                   < configuration >
                       < transformers >
                           < transformer implementation="org.apache.maven.plugins.shade.resource.ManifestResourceTransformer" >
                               < manifestEntries >
                                   < Main-Class >com.coralogix.AccessLogIndexIngestion< /Main-Class >
                                   < Build-Number >123< /Build-Number >
                               < /manifestEntries >
                           < /transformer >
                       < /transformers >
                   < /configuration >
               < /execution >
           < /executions >
       < /plugin >
   < /plugins >
< /build >
Let’s pull in the finished project from GitHub. In case you don’t already have git installed on your machine, first install it with:
sudo apt update && sudo apt install git
Next, let’s download our Java project.
git clone https://github.com/coralogix-resources/elasticsearch-with-hadoop-mr-lesson.git
Let’s enter into the directory of this project.
cd elasticsearch-with-hadoop-mr-lesson/
We’ll need to install maven.
sudo apt install maven
And, finally, we can build our JAR file.
mvn clean package
We’ll see a lot of output and files being pulled in, and, when the process is done, we should see a “BUILD SUCCESS” message.
[INFO] ------------------------------------------------------------------------
[INFO] BUILD SUCCESS
[INFO] ------------------------------------------------------------------------
[INFO] Total time:  01:23 min
[INFO] Finished at: 2020-07-25T22:11:41+03:00
[INFO] ------------------------------------------------------------------------
Running the MapReduce Job
Let’s download the Apache access log file that will represent the data we want to process with Hadoop.
wget https://raw.githubusercontent.com/linuxacademy/content-elastic-log-samples/master/access.log
Now let’s copy the JAR file we compiled earlier, to the same location where our access log is located (include the last dot “.” in this command, as that tells the copy command that “destination is current location”).
cp target/eswithmr-1.0-SNAPSHOT.jar .
Finally, we can execute the MapReduce job.
hadoop jar eswithmr-1.0-SNAPSHOT.jar access.log
When the job is done, the last part of the output should look similar to this:
File System Counters
		FILE: Number of bytes read=2370975
		FILE: Number of bytes written=519089
		FILE: Number of read operations=0
		FILE: Number of large read operations=0
		FILE: Number of write operations=0
	Map-Reduce Framework
		Map input records=10000
		Map output records=10000
		Input split bytes=129
		Spilled Records=0
		Failed Shuffles=0
		Merged Map outputs=0
		GC time elapsed (ms)=33
		Total committed heap usage (bytes)=108003328
	File Input Format Counters
		Bytes Read=2370789
	File Output Format Counters
		Bytes Written=0
	Elasticsearch Hadoop Counters
		Bulk Retries=0
		Bulk Retries Total Time(ms)=0
		Bulk Total=10
		Bulk Total Time(ms)=1905
		Bytes Accepted=1656164
		Bytes Received=40000
		Bytes Retried=0
		Bytes Sent=1656164
		Documents Accepted=10000
		Documents Received=0
		Documents Retried=0
		Documents Sent=10000
		Network Retries=0
		Network Total Time(ms)=2225
		Node Retries=0
		Scroll Total=0
		Scroll Total Time(ms)=0
We should pay close attention to the Map-Reduce Framework section. In this case, we can see everything went according to plan: we had 10.000 input records and we got 10.000 output records.
To verify the records are indexed into Elasticsearch, let’s run the following command:
curl 'localhost:9200/_cat/indices?v'
We should see a docs.count matching the number of records, 10.000 in this case.
health status index uuid               	pri rep docs.count docs.deleted store.size pri.store.size
yellow open   logs  WEPWCieYQXuIRp2LlZ_QIA   1   1  	10000        	0  	1.1mb      	1.1mb
Visualizing Hadoop Data with Kibana
Creating an Index Pattern in Kibana
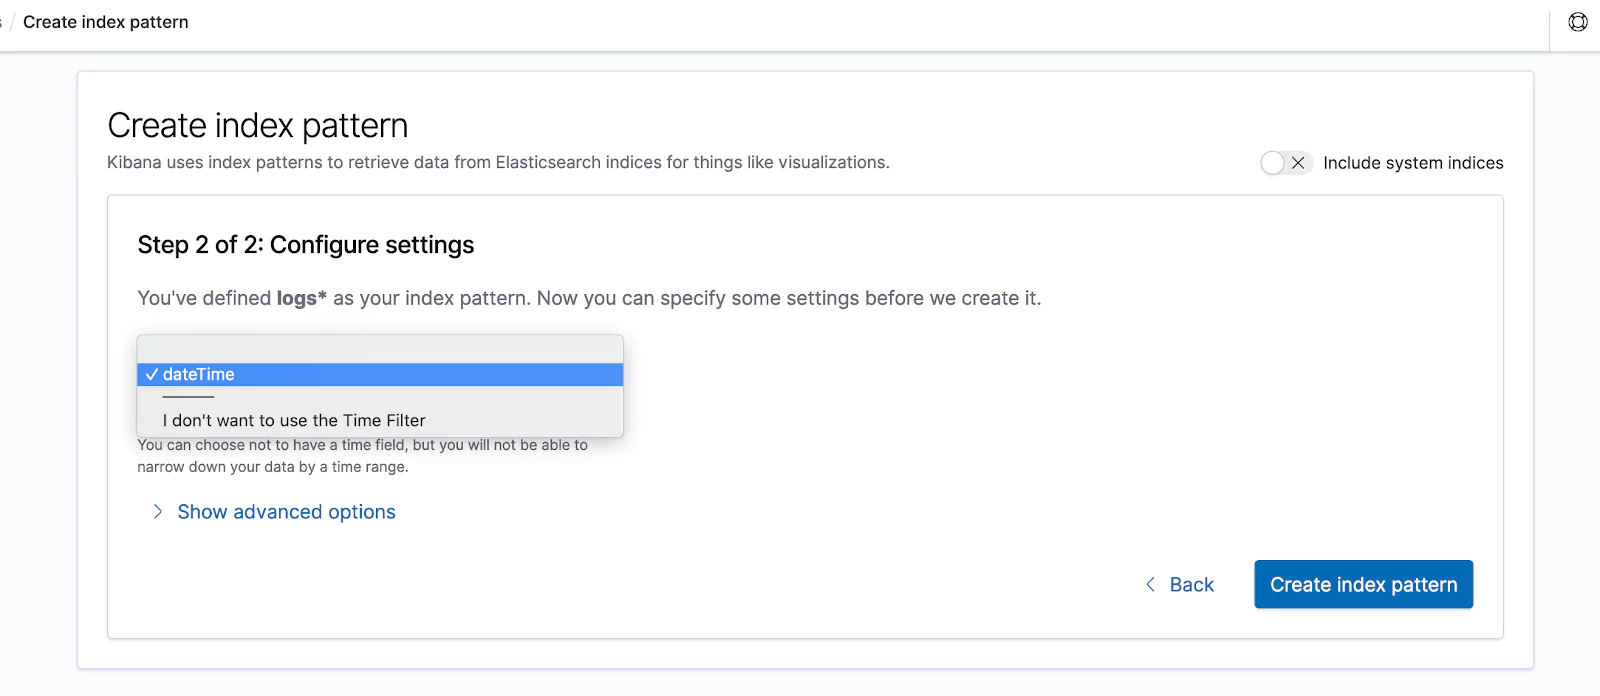
In a web browser, let’s open up this address:
https://localhost:5601/app/kibana#/management/kibana/index_pattern?_g=()
We’ll create a new Index Pattern named “logs*”.
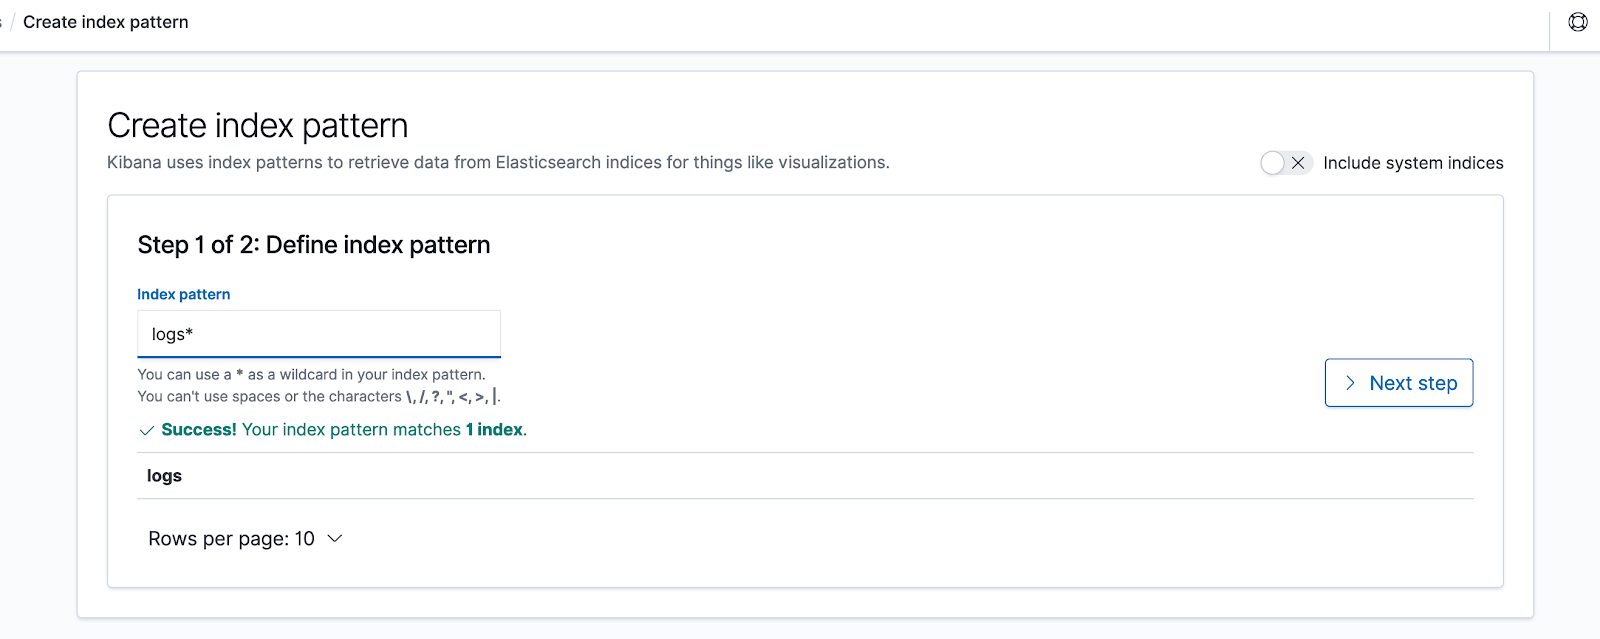
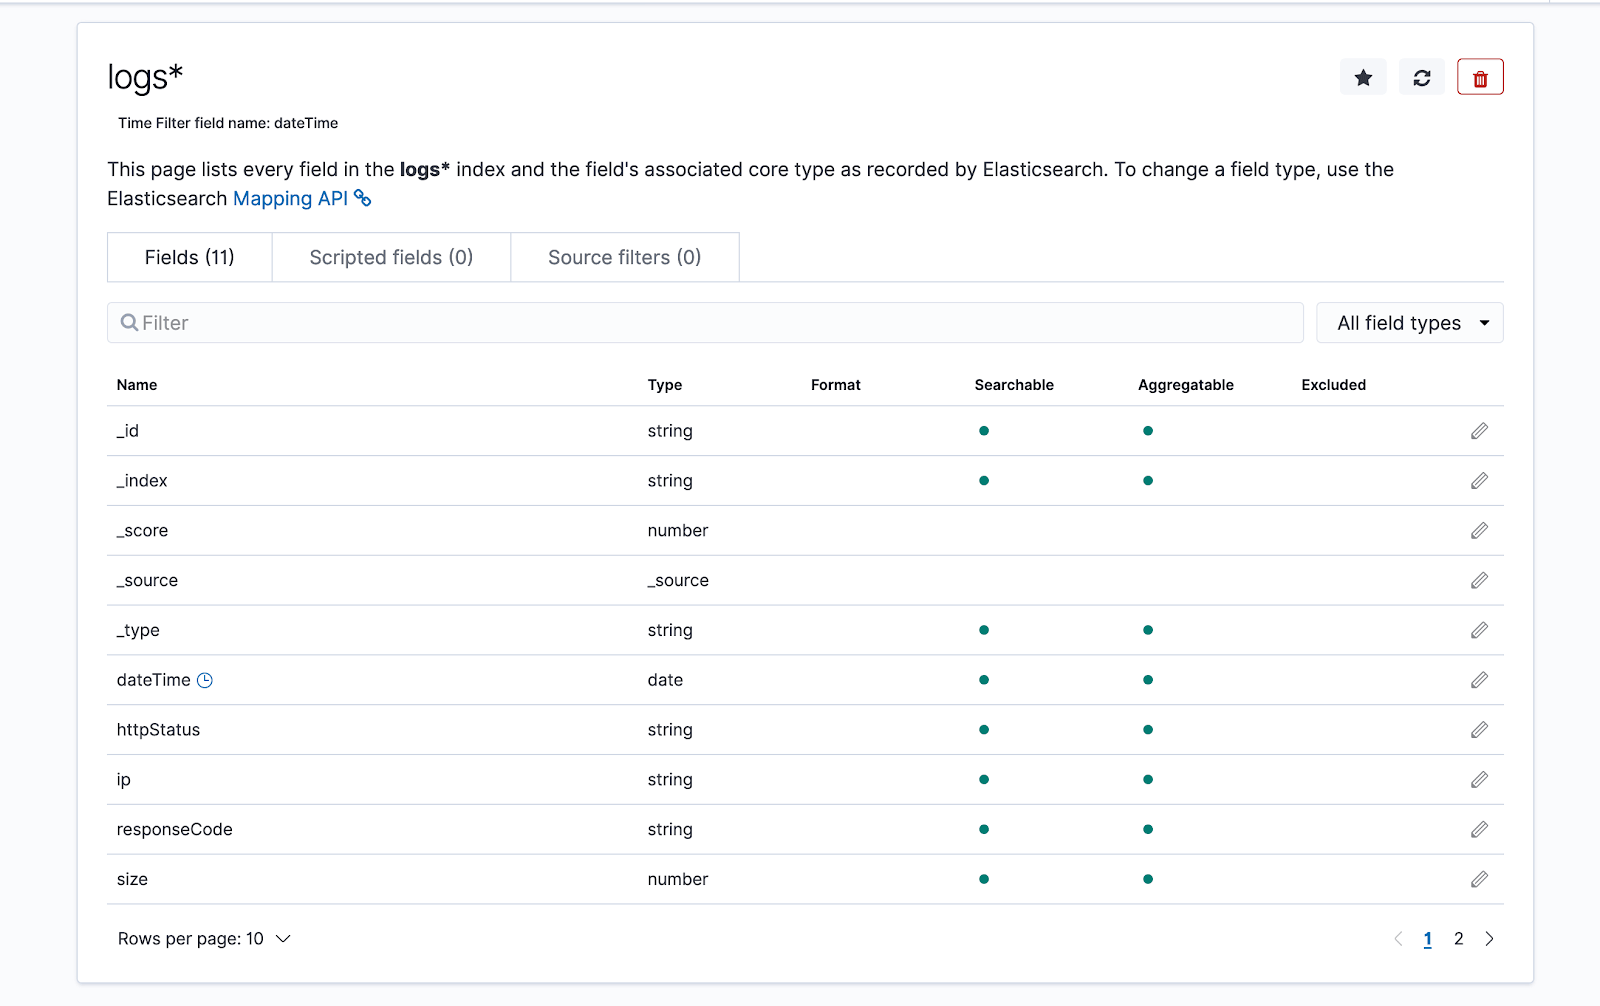
After clicking on “Next step“, from the drop-down list titled “Time Filter field name” we choose “dateTime” and then click on “Create index pattern“.
We’ll land on a screen like this:
Visualize Data in Kibana
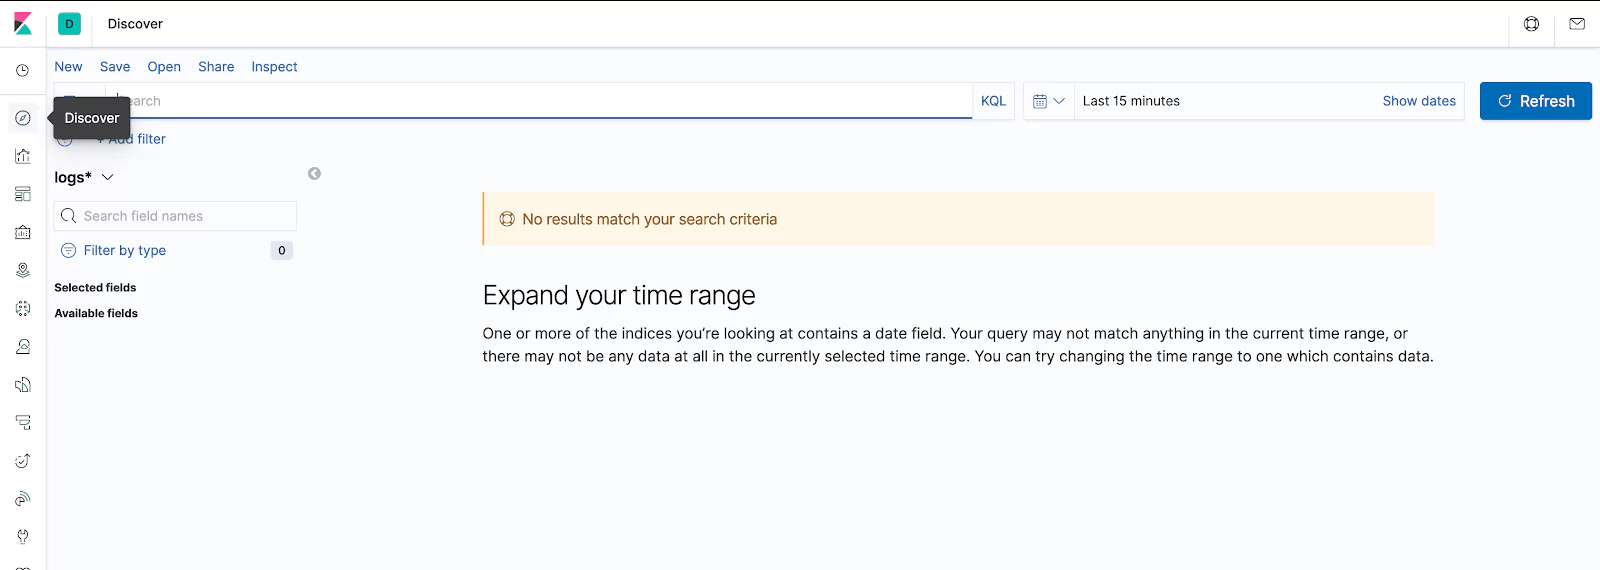
In the left side menu, let’s navigate to the Discover page.
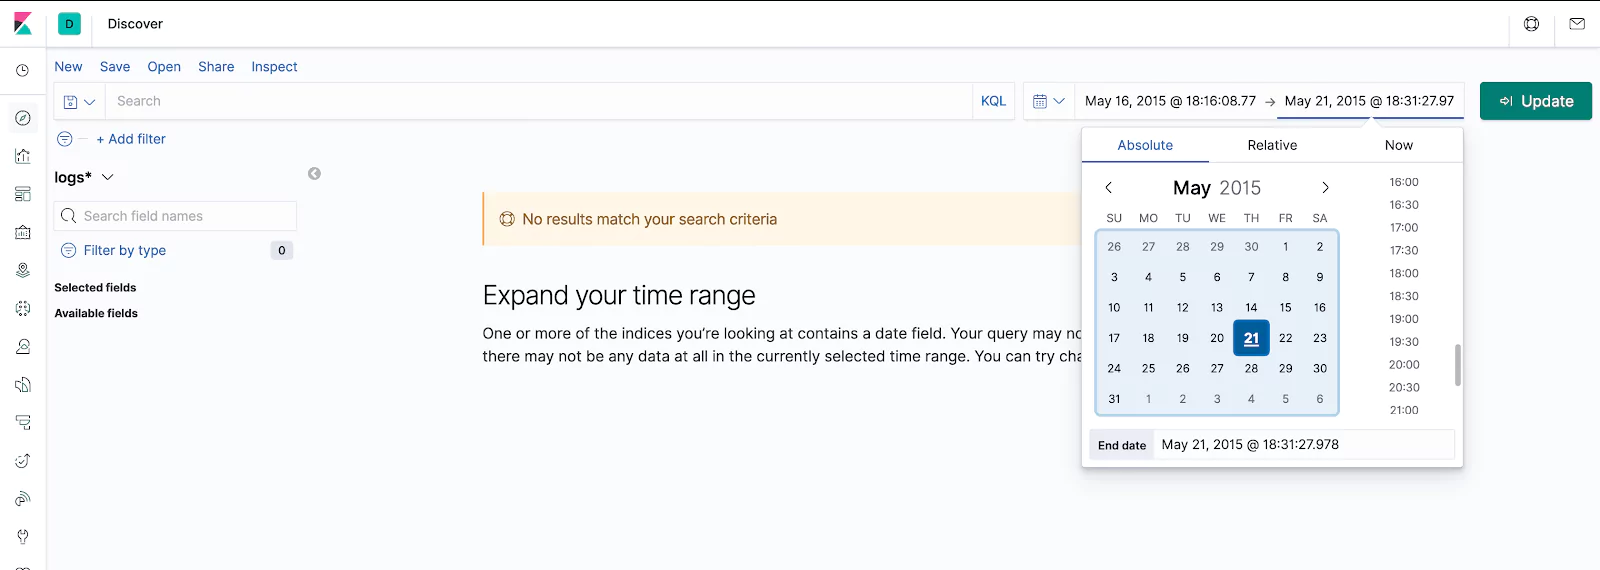
Now let’s set the time range from 16th of May to 21st of May 2015 and then click the “Update” button.
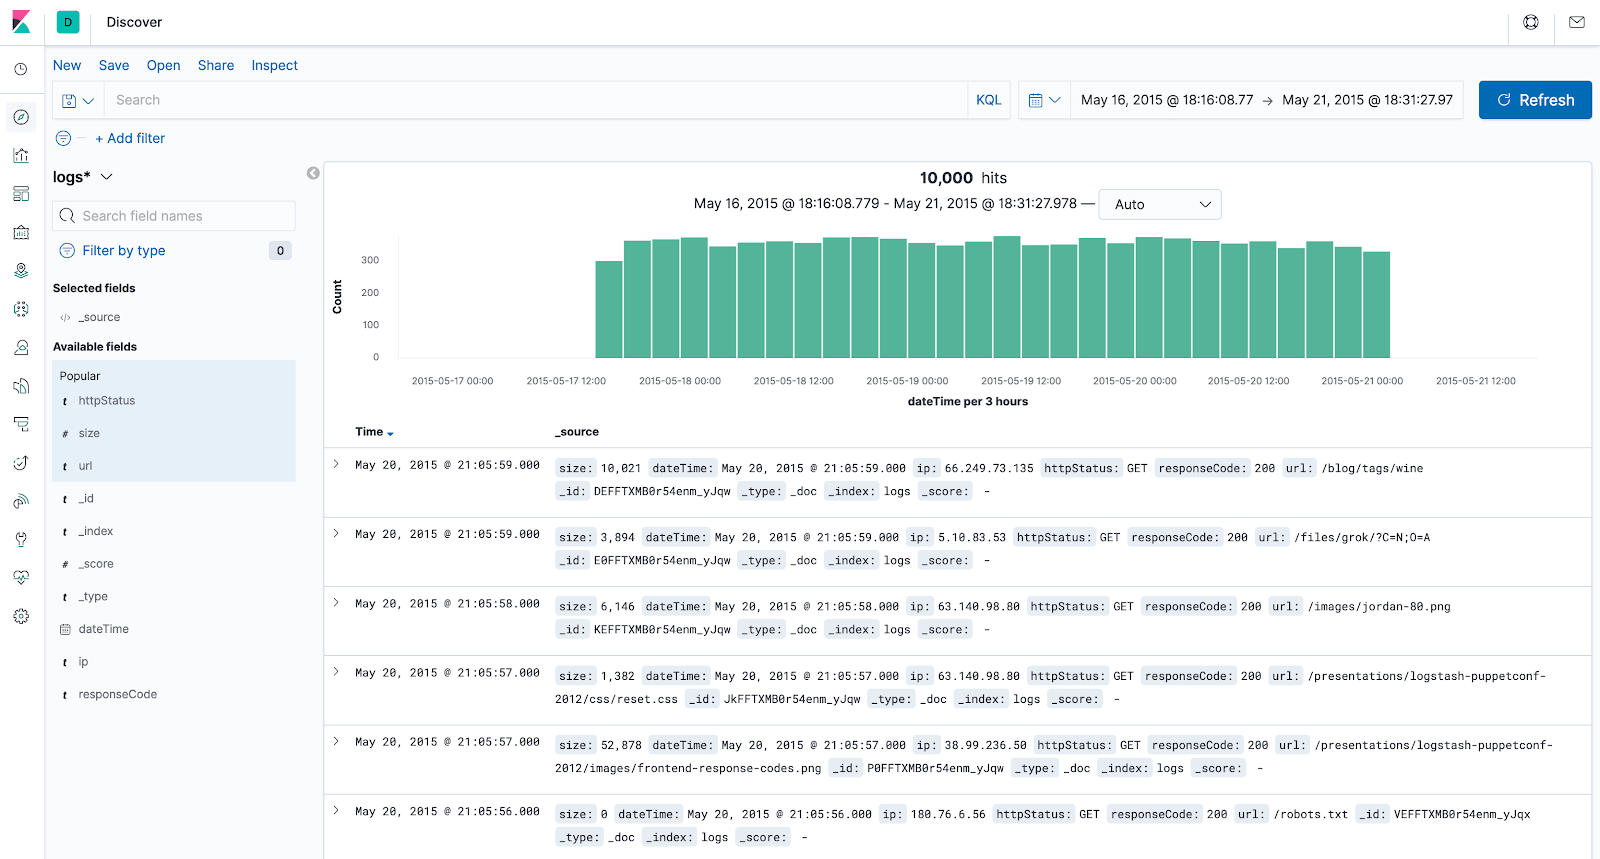
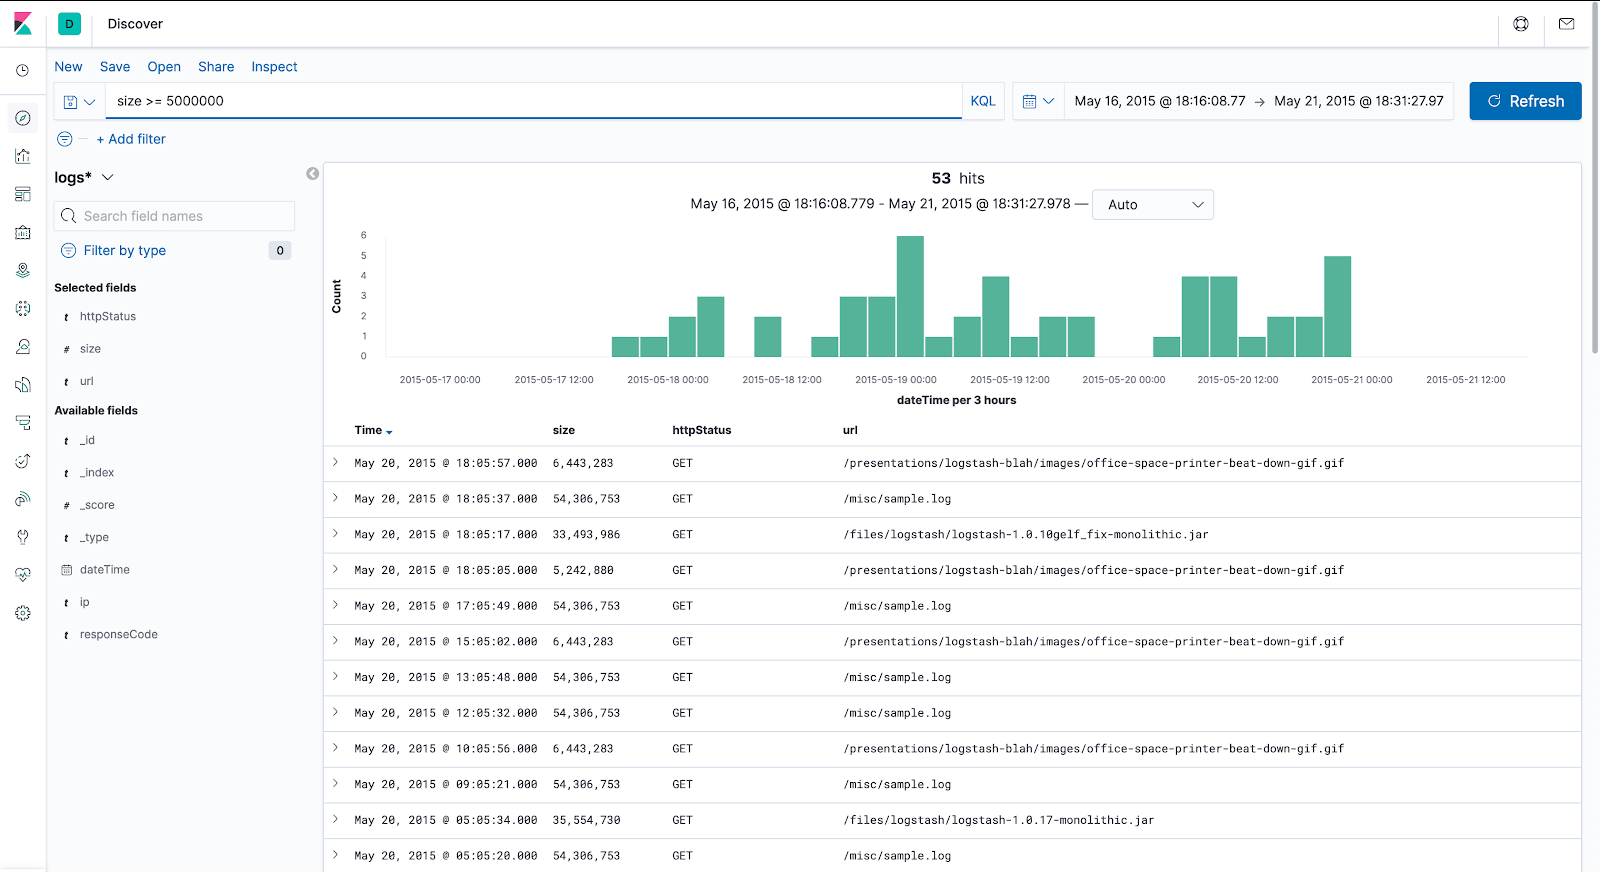
The visualized data should look like this:
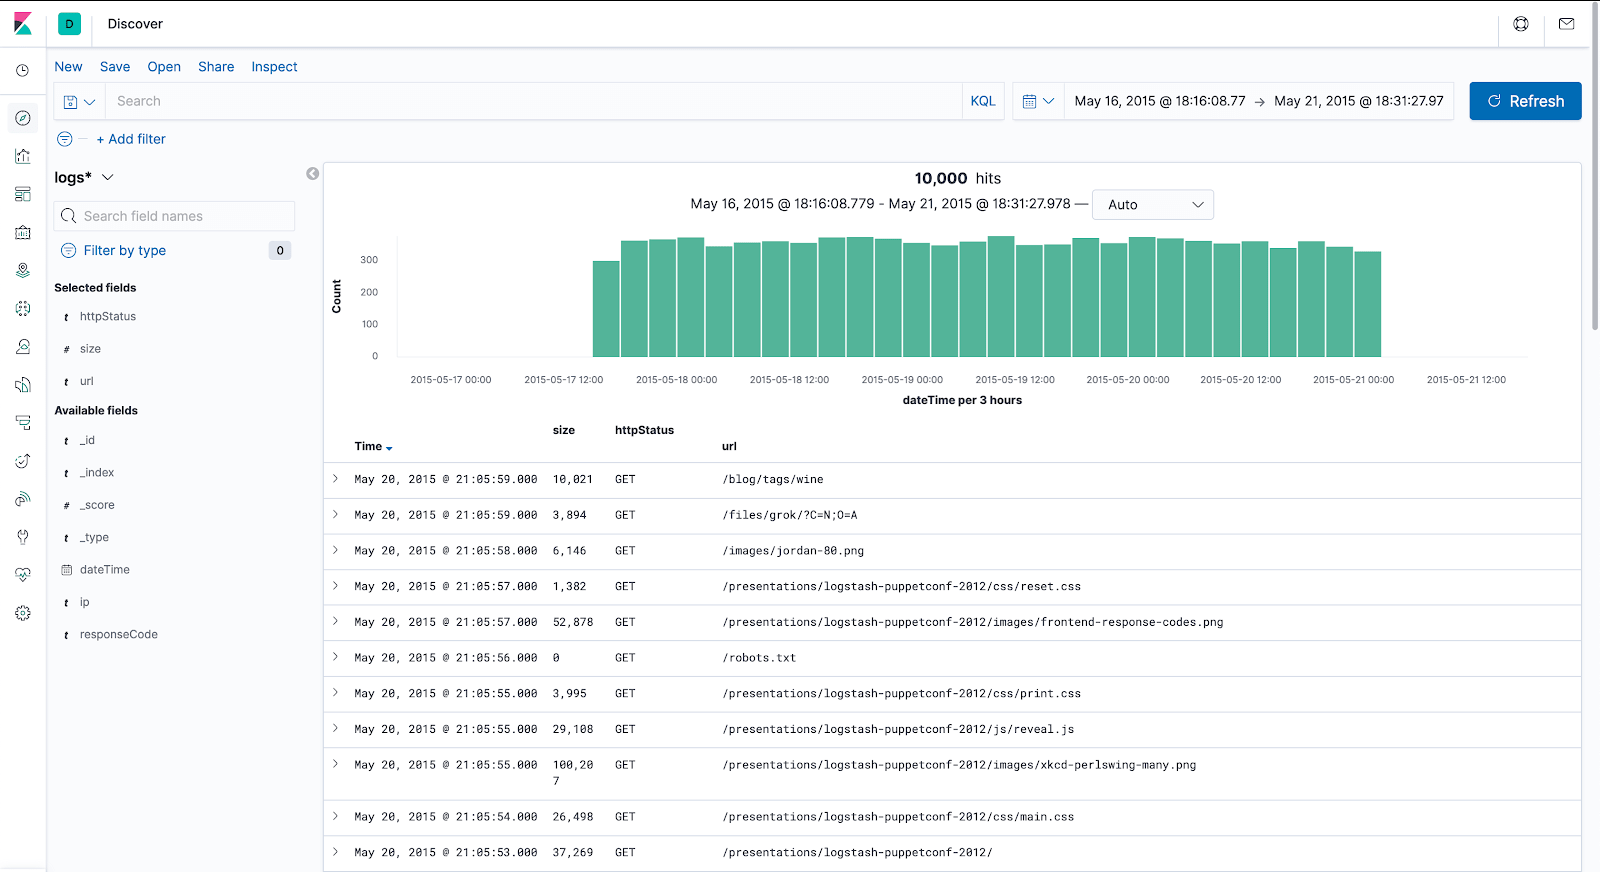
From the “Available fields” section on the left, highlight “httpStatus”, “url” and “size“, and hit the “Add” button that appears next to them. Now we only see the metrics we’re interested in and get much cleaner output.
Filtering Data in Kibana
Since we have set the “size” property of the index to be of type integer, we can run filters based on the size. Let’s view all requests which returned data larger than 5MB.
In the Search box above, type
size >= 5000000
and press ENTER.
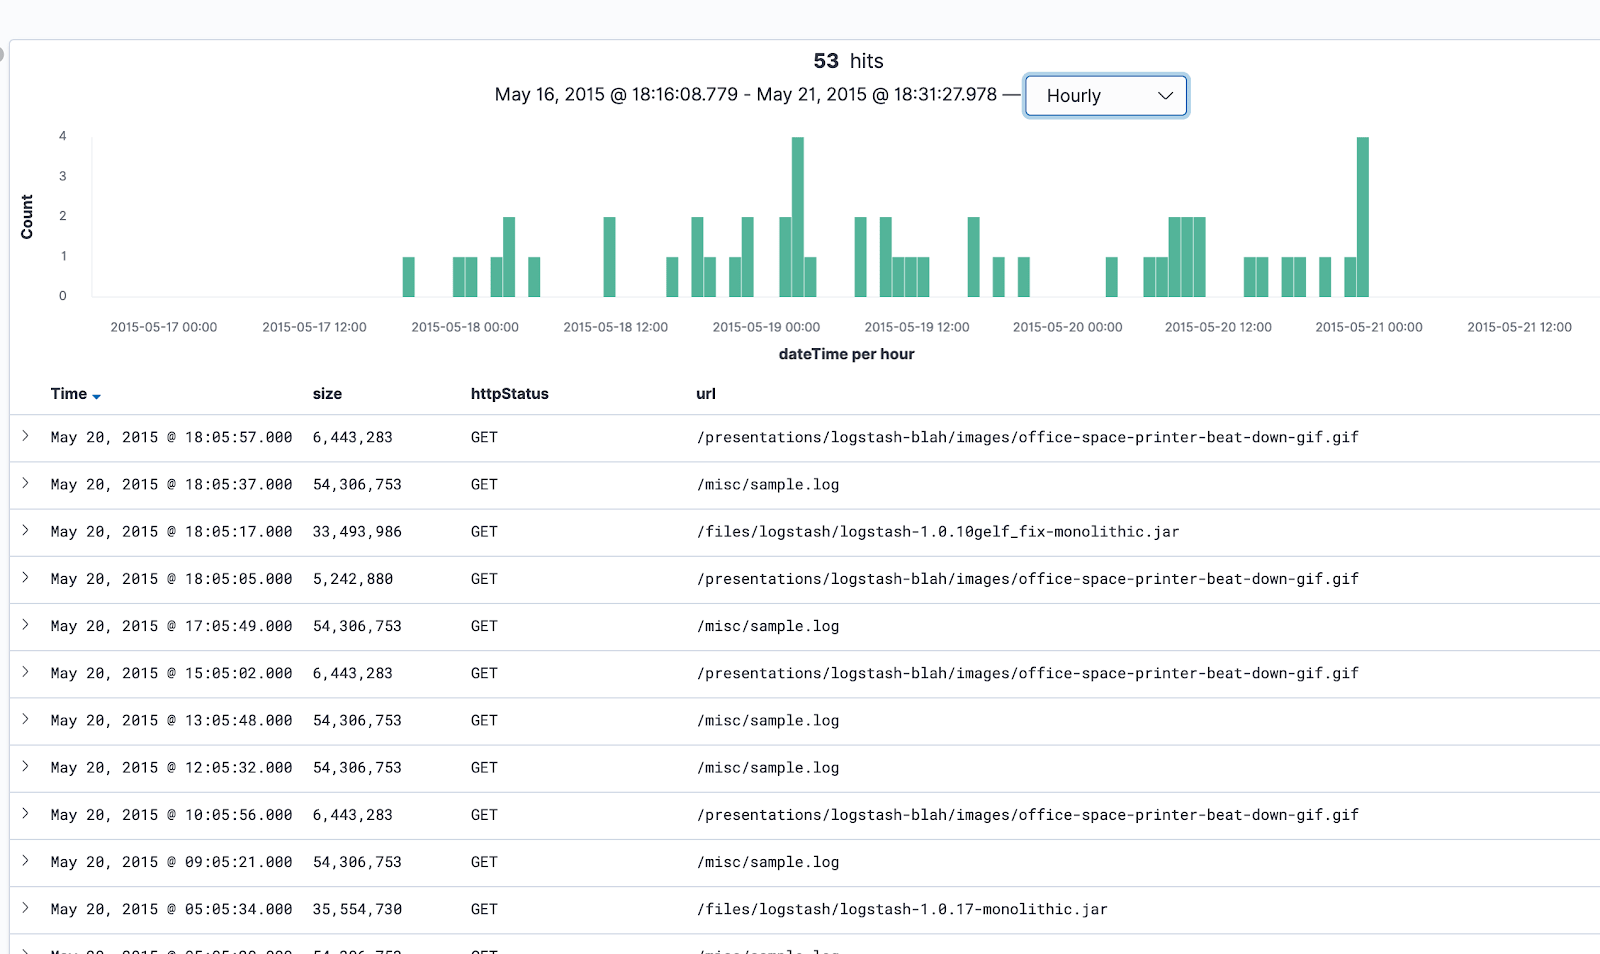
Above the bar chart, we can click on the drop-down list displaying “Auto” and change that time interval to “Hourly“. Now each bar displayed represents data collected in one hour.
Clean Up Steps
Let’s remove the index we have created in this lesson:
curl -XDELETE 'localhost:9200/logs'
In the terminal window where we are still logged in as the “hadoop” user, we can also remove the files we created, such as the JAR file, the Java code, access log, and so on. Of course, if you want to keep them and continue experimenting, you can skip the next command.
To remove all the files, we run:
cd && rm -rf elasticsearch-with-hadoop-mr-lesson/
And, finally, we remove the Hadoop installation archive:
rm hadoop-3.2.1.tar.gz
Conclusion
These are the basic concepts behind writing, compiling and executing MapReduce jobs with Hadoop. Although setting up a multi-node cluster is a much more complex operation, the concepts behind creating a MapReduce algorithm and running it, in parallel, on all the computers in the cluster, instead of a single machine, remain almost the same.
Source Code
package com.coralogix

import org.apache.hadoop.conf.Configuration;
import org.apache.hadoop.fs.Path;
import org.apache.hadoop.io.NullWritable;
import org.apache.hadoop.mapreduce.Job;
import org.apache.hadoop.mapreduce.Mapper;
import org.apache.hadoop.mapreduce.lib.input.FileInputFormat;
import org.apache.hadoop.mapreduce.lib.input.TextInputFormat;
import org.elasticsearch.hadoop.mr.EsOutputFormat;
import org.elasticsearch.hadoop.util.WritableUtils;

import java.io.IOException;
import java.util.LinkedHashMap;
import java.util.Map;

public class AccessLogIndexIngestion {

   public static class AccessLogMapper extends Mapper {
       @Override
       protected void map(Object key, Object value, Context context) throws IOException, InterruptedException {

           String logEntry = value.toString();
           // Split on space
           String[] parts = logEntry.split(" ");
           Map<String, String> entry = new LinkedHashMap<>();

           // Combined LogFormat "%h %l %u %t "%r" %>s %b "%{Referer}i" "%{User-agent}i"" combined
           entry.put("ip", parts[0]);
           // Cleanup dateTime String
           entry.put("dateTime", parts[3].replace("[", ""));
           // Cleanup extra quote from HTTP Status
           entry.put("httpStatus", parts[5].replace(""",  ""));
           entry.put("url", parts[6]);
           entry.put("responseCode", parts[8]);
           // Set size to 0 if not present
           entry.put("size", parts[9].replace("-", "0"));

           context.write(NullWritable.get(), WritableUtils.toWritable(entry));
       }
   }

   public static void main(String[] args) throws IOException, ClassNotFoundException, InterruptedException {
       Configuration conf = new Configuration();
       conf.setBoolean("mapred.map.tasks.speculative.execution", false);
       conf.setBoolean("mapred.reduce.tasks.speculative.execution", false);
       conf.set("es.nodes", "localhost:9200");
       conf.set("es.resource", "logs");

       Job job = Job.getInstance(conf);
       job.setInputFormatClass(TextInputFormat.class);
       job.setOutputFormatClass(EsOutputFormat.class);
       job.setMapperClass(AccessLogMapper.class);
       job.setNumReduceTasks(0);

       FileInputFormat.addInputPath(job, new Path(args[0]));
       System.exit(job.waitForCompletion(true) ? 0 : 1);
   }

}