Ansbile Quick Start Tutorial


This quick start Ansible tutorial will explain how to get started quickly using this open-source configuration management tool. Due to the great (and increasing) number of supported resources and its ease of use, Ansible is a great choice for those starting with configuration management and infrastructure-as-code. This tutorial will help you get started quickly with Ansible from basic concepts like playbooks and modules to hands-on exercises with Ansible commands.
The tool is ideal when automating tasks that do not depend on maintaining state. So first installations of software, correcting configuration files across several instances, backing up switches configuration and similar activities are easily automated with Ansible.
In heterogeneous environments, Ansible is an excellent choice because it allows all these resources to be managed with a single tool. Being able to manage Windows and Linux boxes or provisioning resources in more than one cloud provider and on-premises with the same tool saves a lot of time for the Ops teams.
Even the management of different Linux distributions can be simplified with a few adaptations to playbooks. It is necessary to note that support for Linux and Unix-like systems is greater than support for Windows in Ansible. However, Ansible can be used to orchestrate PowerShell scripts and Desired State Configuration (DSC) resources if a specific Windows Module was not yet developed.
Getting Started with Ansible
There are two components when using Ansible: Ansible Control and the managed node. Ansible Control is just a computer that has Ansible binaries installed. It can be a workstation or a server. However, it has to be a flavor of Linux or MacOS. If on Windows, Ansible can be installed on Windows Subsystem for Linux. The official documentation states that this configuration is not supported and should not be used on production systems[1], but it will run without major issues.
A managed node is any resource supported by Ansible. Linux boxes do not require any additional configuration to be managed with Ansible. Windows boxes require PowerShell Remoting to be configured to allow connections through Windows Remote Management (WinRM). An example script is provided in the official documentation to help users with this task.
Test Environment
For example, consider the following environment:
Ansible version: 2.9
Ansible control: A Debian-based workstation
Managed node: CentOS 8 Virtual Machine on Virtualbox named himura.
User: battousai
Password: degozaru
Goals:
- Install Ansible on the Ansible Control workstation
- Test the connection to the managed node
- Install Apache on the managed node
- Deploy a static site
Ansible Goal 1 – Install Ansible on the Ansible Control workstation
The most practical way to install Ansible binaries is through the distributions package manager. Other alternatives are installing through PIP or building it from source. In this example, APT package manager will be used to install Ansible. To install it run
$ sudo apt install ansible
After the installation is done, the workstation is ready to run ad-hoc commands or playbooks.
Ansible Goal 2 – Test the connection to the managed node
To be able to test the connection to the managed node, we need first to create an inventory, which is the list of resources that will be managed with Ansible. There are some Inventory Directory Layouts that can be used to organize inventory files.[2] For this example, a static inventory in an .ini file will be created.
The inventory file will be named hugo-vm.ini and its contents will be:
himura ansible_host=192.168.56.107 ansible_user=battousai
“himura” is the name of the node
“ansible_host” is a variable used to determine the IP or domain name of a node.
“ansible_user” is a variable used to determine the user that will be used to connect to a node. If not specified, the user running Ansible will be used.
The ping module is used to test the connection to a managed node. It does not send ICMP packets to the node. Instead, it will make an SSH connection to the node, verify a usable Python binary and return pong upon success[3]. To do that, the command will be
$ ansible himura -i hugo-vm.ini -m ping --ask-pass
The -i parameter specifies the inventory file to be used. -m specifies which module Ansible will use. When running ad-hoc commands, only one module can be specified. –ask-pass will require the user’s password to be typed upon execution (the short option is -k). Other authentication options are available, being ssh keys the most common.
If everything goes well, the output of the command above will be:
$ ansible himura -i hugo-vm.ini -m ping --ask-pass
SSH password: degozaru
himura | SUCCESS => {
    "ansible_facts": {
        "discovered_interpreter_python": "/usr/libexec/platform-python"
    },
    "changed": false,
    "ping": "pong"
}
Ansible Goals 3 & 4 – Install Apache on the managed node and Deploy a static site
For goals 3 & 4 a playbook will be used. The standard structure of a playbook is as follows:
---
- name: Name of the playbook
  hosts: nodes # nodes that will be managed
  become: yes # specify if privilege escalation will be used

  tasks:
    - name: Task name
      module-name:
        arg1: “value”
        arg2: “value”
The indentation should be done with spaces. The standard is to use two spaces to differentiate indentation levels. This is the most common problem faced by people starting with Ansible. Just as it is with Python code, one space missing will make the playbook execution fail. Unfortunately, because YAML is a human friendly markup language, the error identification by the parser is inaccurate, so using the ansible-lint utility and the –syntax-check option from ansible-playbook is highly advised.
The first thing to do is to install the Apache Web server. Apache is installed through the dnf package manager. A task that installs the package can be written like this:
- name: Install Apache Web Server
      dnf:
        name: httpd
        update_cache: yes
        state: present

    - name: Enable httpd service
      service:
          name: httpd
          enabled: yes
          state: started
After the httpd package is installed, the service is enabled and started..
It is also necessary to allow traffic on port 80 on the firewall. For that, the firewalld module will be used.
 - name: Enable http traffic on firewall
      firewalld:
        state: enabled
        zone: public
        service: http
        immediate: yes
        permanent: yes
In this task, the http service (ports 80/tcp, 80/udp and 80/sctp of firewalld is being enabled on the public zone and the configuration should be permanent. This task is equivalent to running the commands below:
# firewall-cmd --zone=public --add-service=http --permanent
# firewall-cmd --reload
Next, the site contents must be copied to /var/www/html on the VM. The files are in the files/site folder. If there is a large number of files to be copied, consider compressing them first to make the transfer faster. Then extract the contents to the appropriate directory.
    - name: Copy site contents
      copy:
        dest: /var/www/html
        src: files/site/
      notify: restart-apache

  handlers:
    - name: Restart Apache
      service:
        name: httpd
        state: restarted
      listen: restart-apache
This task includes the use of a “handler”. Handlers are special tasks that are only executed if a specific event occurs. It is generally used to restart services, but any module can be specified in a handler. In this example, a handler is defined to restart the apache service and it is triggered by the task “Copy site contents”.
After all steps that are needed to deploy a site have been determined, the complete playbook would look like this:
---
- name: Install Apache on CentOS. Deploy super elaborate static site
  hosts: himura
  become: yes

  tasks:
    - name: Install Apache Web Server
      dnf:
        name: httpd
        update_cache: yes
        state: present

    - name: Enable httpd service
      service:
          name: httpd
          enabled: yes
          state: started

    - name: Enable http traffic on firewall
      firewalld:
        state: enabled
        zone: public
        service: http
        immediate: yes
        permanent: yes

    - name: Copy site contents
      copy:
        dest: /var/www/html
        src: files/site/
      notify: restart-apache

  handlers:
    - name: Restart Apache
      service:
        name: httpd
        state: restarted
      listen: restart-apache
...
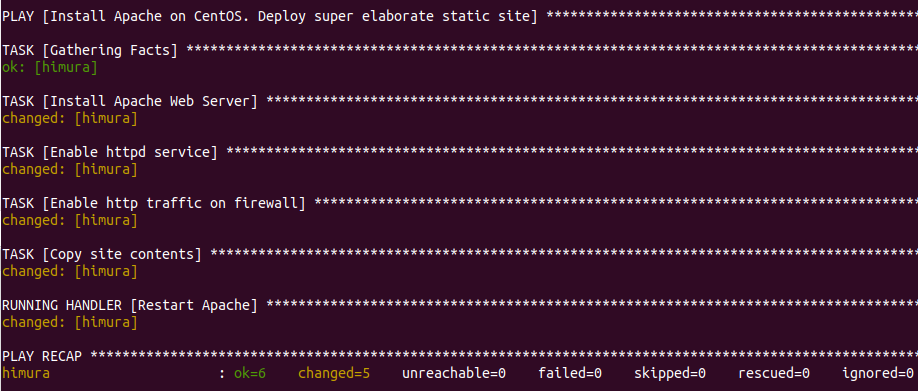
Finally, to execute the playbook the command will be
$ ansible-playbook install-on-centos.yml -i inventory/hugo-vm.ini -k -K
The -k and -K options are necessary so the ssh password and “become” password are prompted.
The output of the execution will look like this:
Extra: What’s with the Name “Ansible”?
It’s a science fiction reference. An ansible is a fictional communication device that can transfer information faster than the speed of light. The author Ursula K. Le Guin invented the concept in her book Rocannon’s World, and other sci-fi authors have since borrowed the idea from Le Guin.
More specifically, Michael DeHaan took the name Ansible from the book Ender’s Game by Orson Scott Card. In that book, the ansible was used to control a large number of remote ships at once, over vast distances. Think of it as a metaphor for controlling remote servers.[4]
[1] “Windows Frequently Asked Questions – Ansible Documentation.” Accessed 7 Mar. 2020.
[2] “Best Practices — Ansible Documentation.” Accessed 7 Mar. 2020.
[3] “ping – Ansible Documentation.” Accessed 7 Mar. 2020.
[4] Hochstein, Lorin. Ansible, up & Running: Sebastopol, CA: OReilly, 2015.