Easily Build Jenkins Pipelines – Tutorial


Are you building and deploying software manually and would like to change that? Are you interested in learning about building a Jenkins pipeline and better understand CI/CD solutions and DevOps at the same time? In this first post, we will go over the fundamentals of how to design pipelines and how to implement them in Jenkins. Automation is the key to eliminating manual tasks and to reducing the number of errors while building, testing and deploying software. Let’s learn how Jenkins can help us achieve that with hands-on examples with the Jenkins parameters. By the end of this tutorial, you’ll have a broad understanding of how Jenkins works along with its Syntax and Pipeline examples.
What is a pipeline anyway?
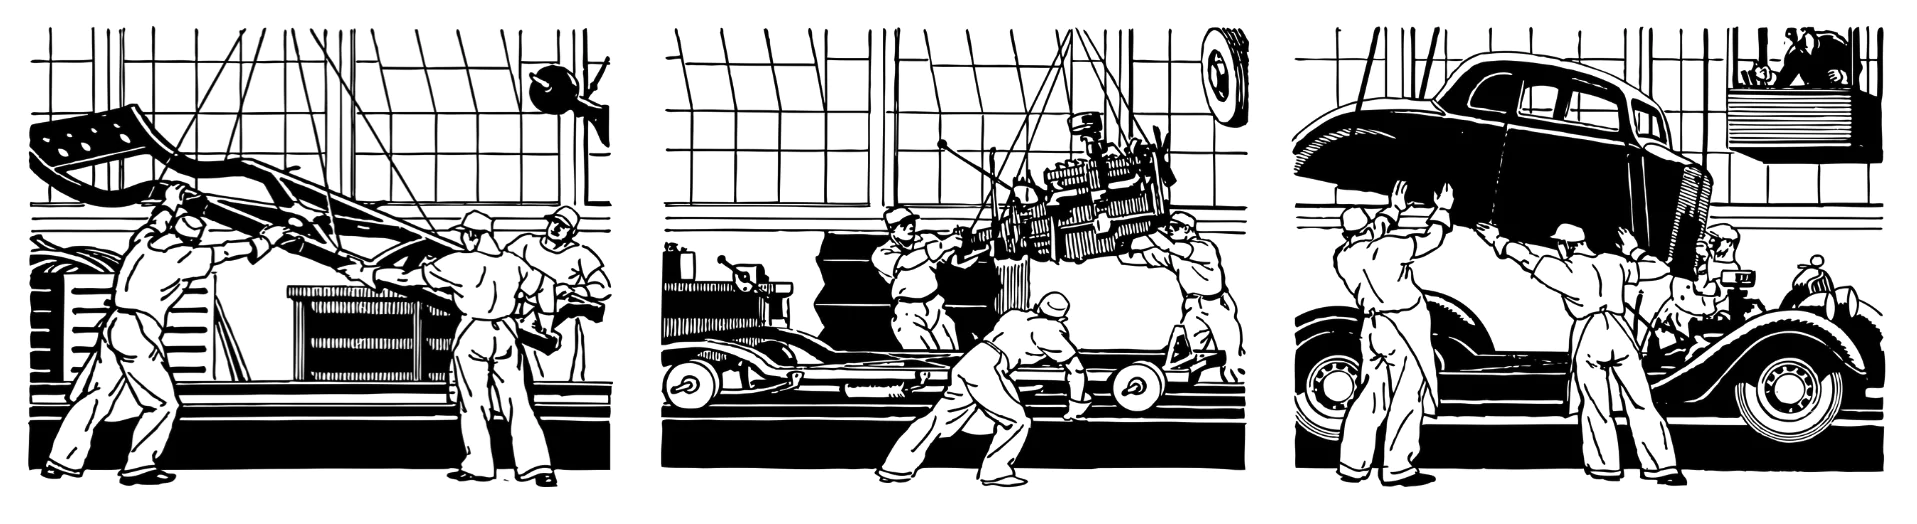
Let’s start with a short analogy to a car manufacturing assembly line. I will oversimplify this to only three stages of a car’s production:
- Bring the chassis
- Mount the engine on the chassis
- Place the body on the car
Even from this simple example, notice a few aspects:
-
- These are a series of pipeline steps that need to be done in a particular order
- The steps are connected: the output from the previous step is the input for the next step
In software development, a pipeline is a chain of processing components organized so that the output of one component is the input of the next component.
At the most basic level, a component is a command that does a particular task. The goal is to automate the entire process and to eliminate any human interaction. Repetitive tasks cost valuable time and often a machine can do repetitive tasks faster and more accurately than a human can do.
What is Jenkins?
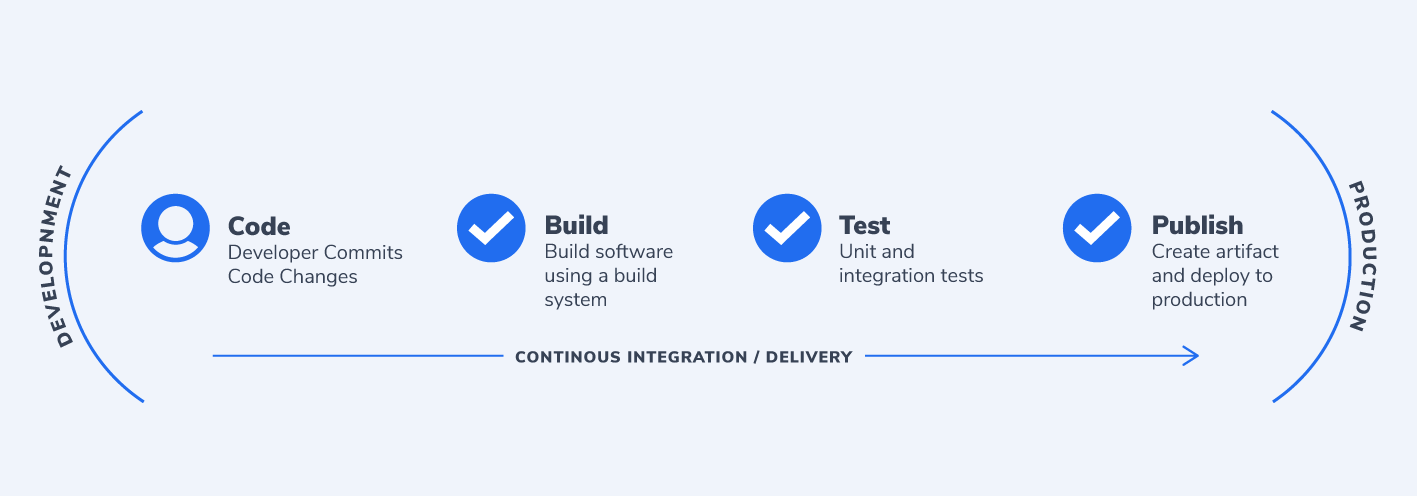
Jenkins is an automation tool that automatically builds, tests, and deploys software from our version control repository all the way to our end users. A Jenkins pipeline is a sequence of automated stages and steps to enable us to accelerate the development process – ultimately achieving Continuous Delivery (CD). Jenkins helps to automatically build, test, and deploy software without any human interaction – but we will get into that a bit later.
If you don’t already have Jenkins installed, make sure that you check this installation guide to get you started.
Create a Jenkins Pipeline Job
Let’s go ahead and create a new job in Jenkins. A job is a task or a set of tasks that run in a particular order. We want Jenkins to automatically execute the task or tasks and to record the result. It is something we assign Jenkins to do on our behalf.
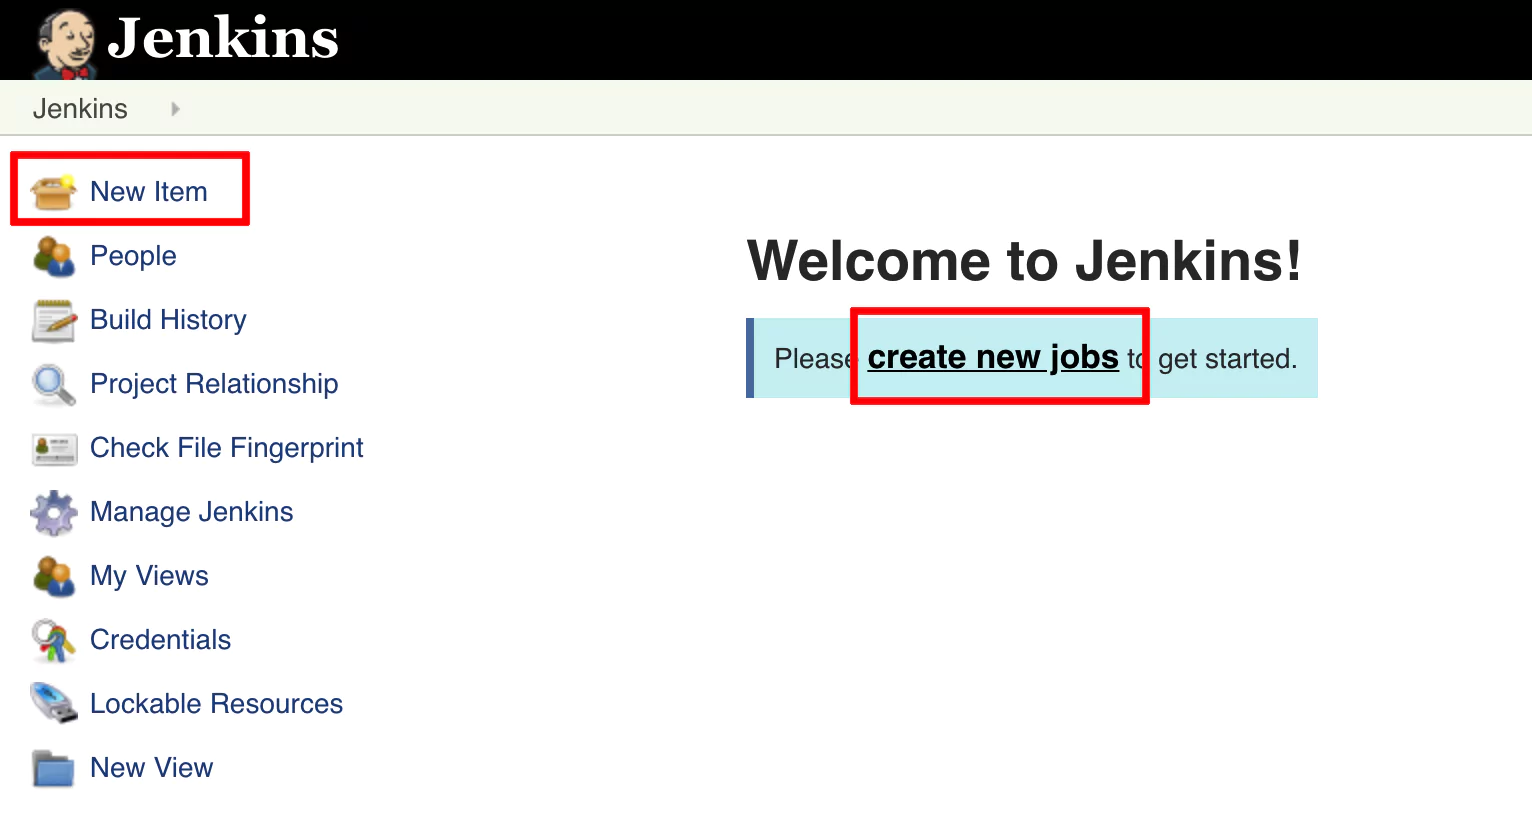
Click on Create new jobs if you see the text link, or from the left panel, click on New Item (an Item is a job).
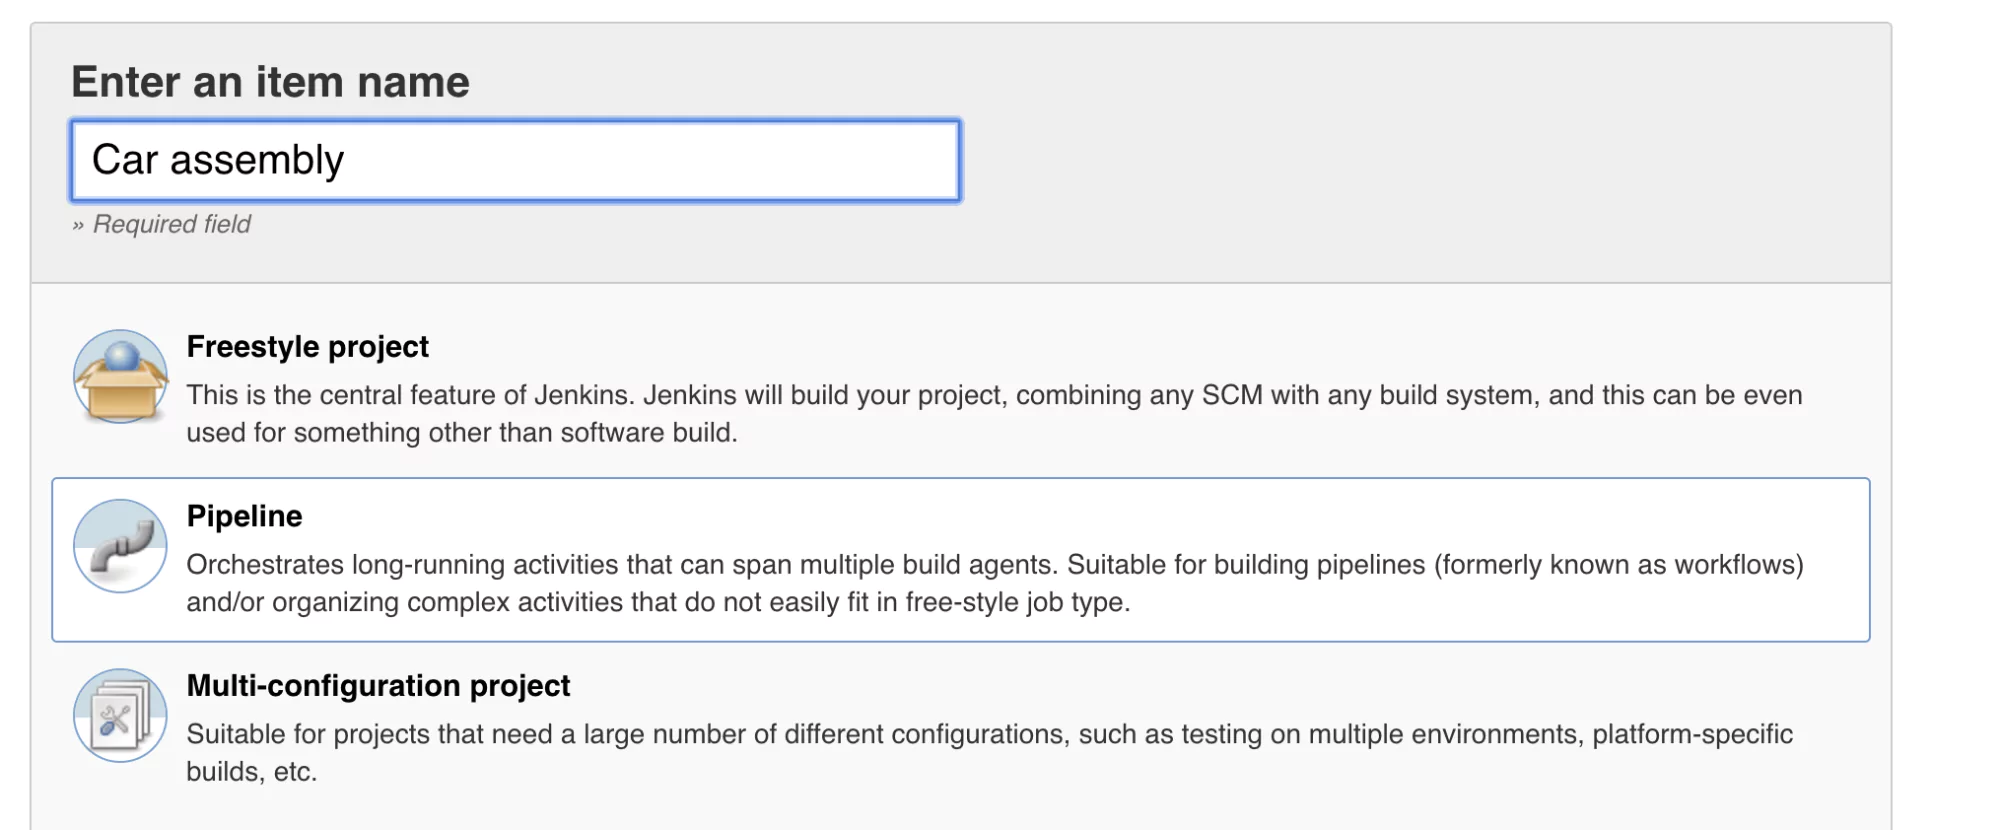
Name your job Car assembly and select the Pipeline type. Click ok.
Configure Pipeline Job
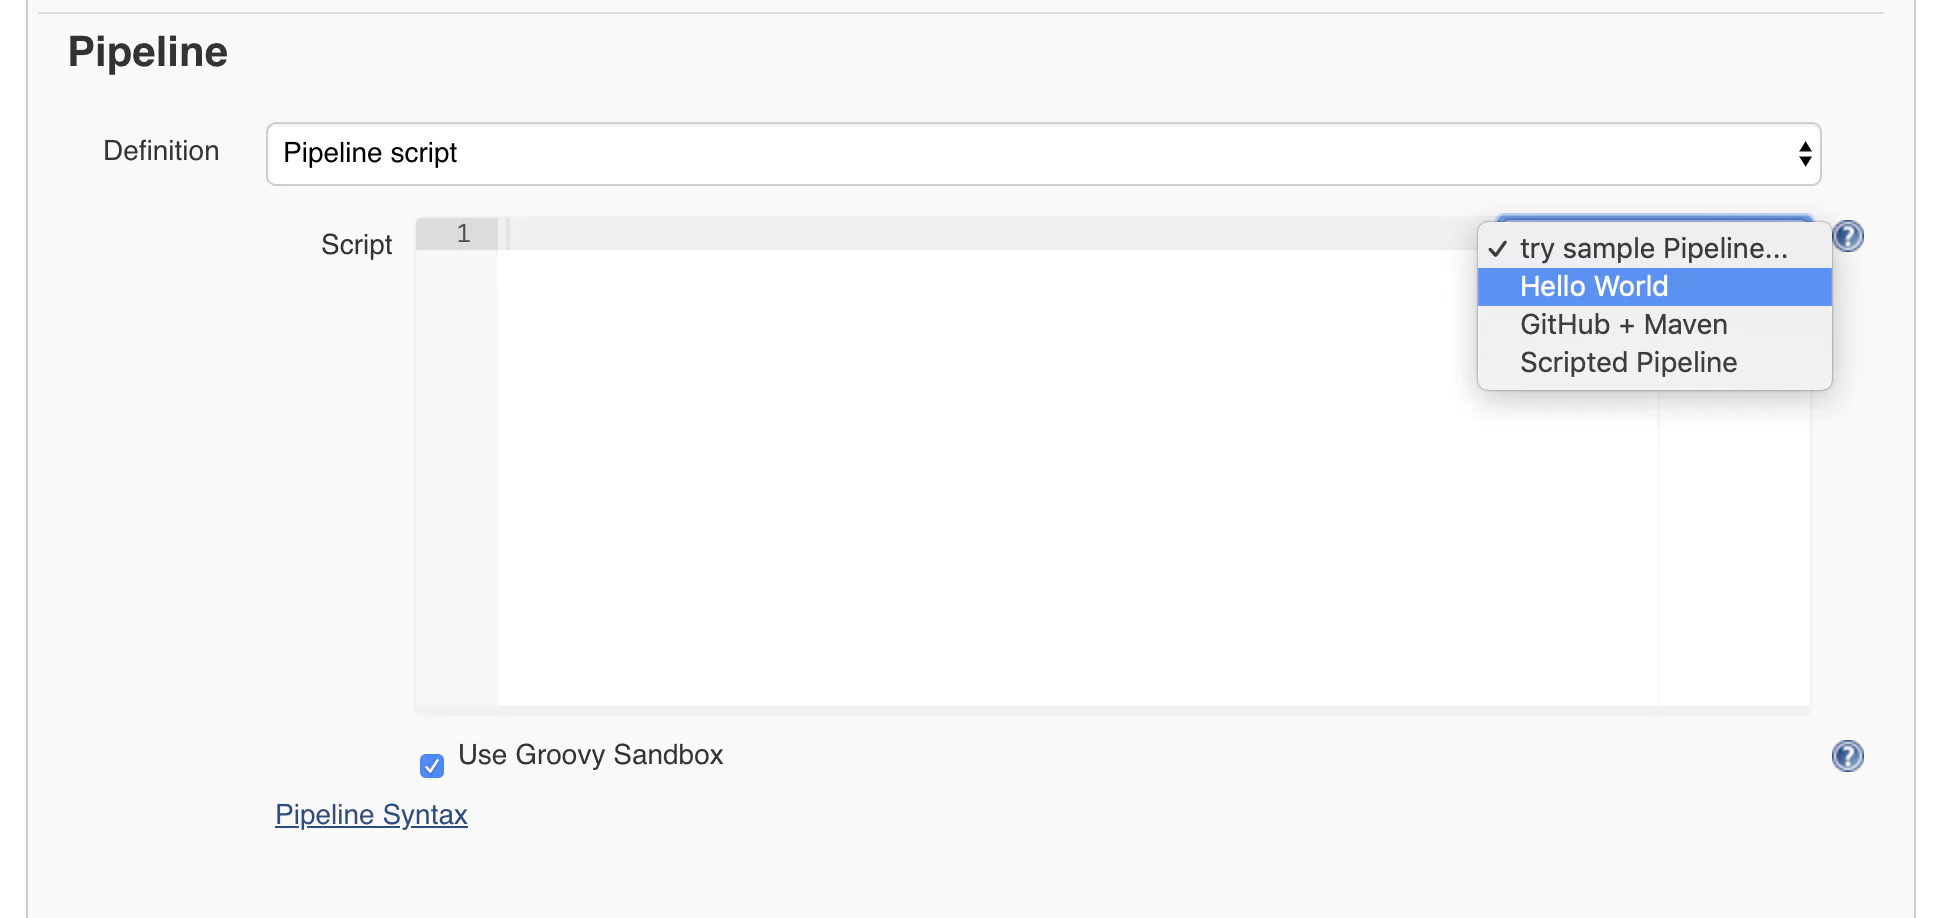
Now you will get to the job configuration page where we’ll configure a pipeline using the Jenkins syntax. At first, this may look scary and long, but don’t worry. I will take you through the process of building Jenkins pipeline step by step with every parameter provided and explained. Scroll to the lower part of the page until you reach a part called Pipeline. This is where we can start defining our Jenkins pipeline. We will start with a quick example. On the right side of the editor, you will find a select box. From there, choose Hello World.
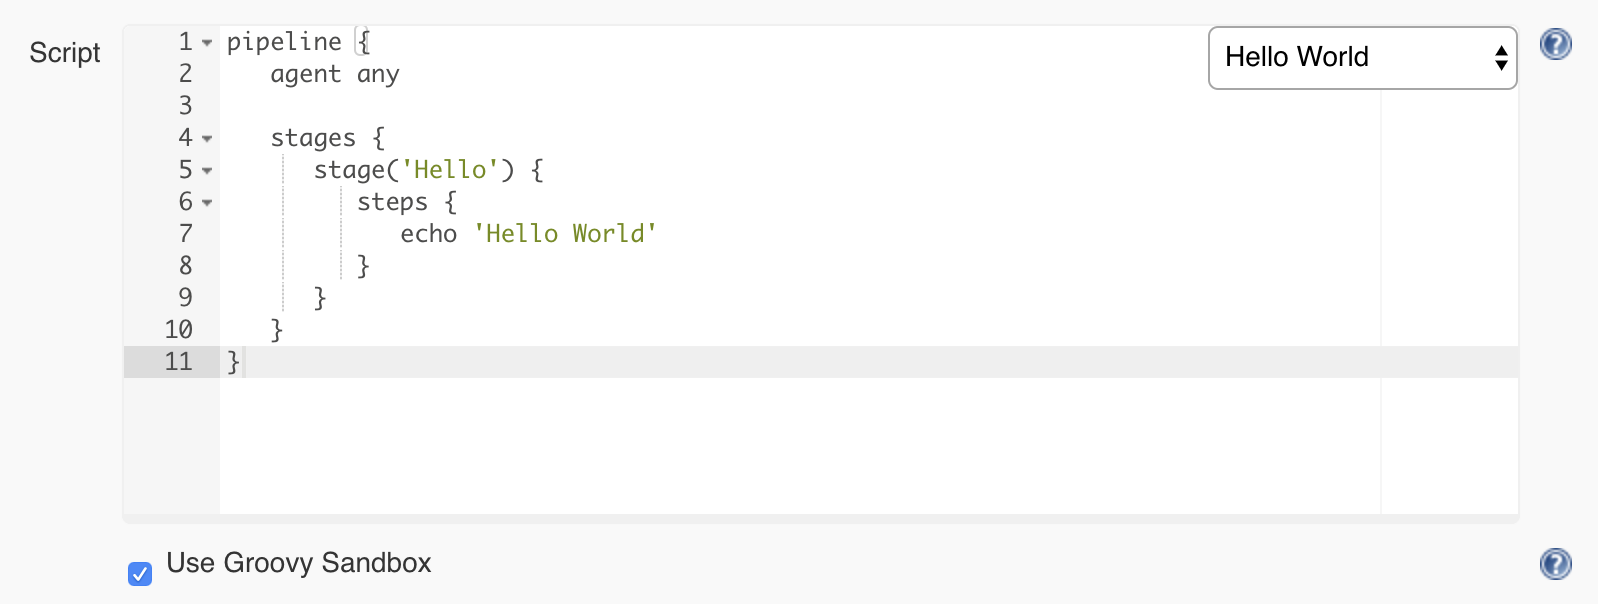
You will notice that some code was generated for you. This is a straightforward pipeline that only has one step and displays a message using the command echo ‘Hello World’.
Click on Save and return to the main job page.
Build The Jenkins Pipeline
From the left-side menu, click on Build Now.
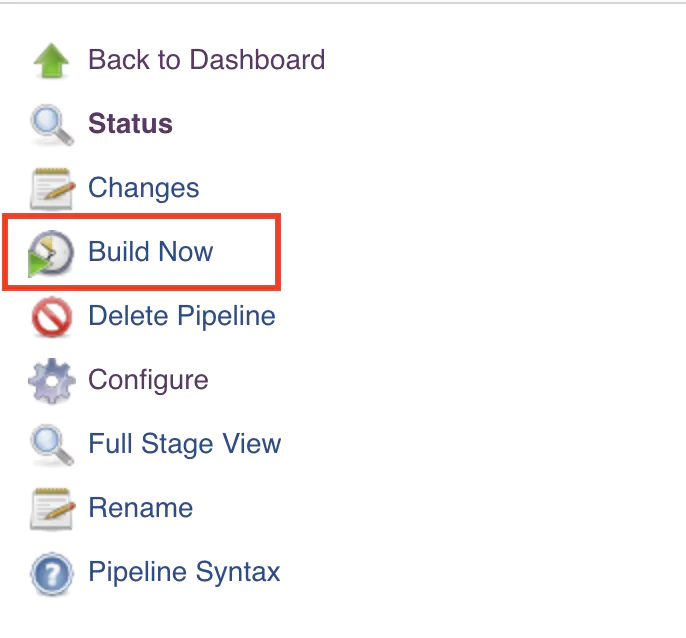
This will start running the job, which will read the configuration and begin executing the steps configured in the pipeline. Once the execution is done, you should see something similar to this layout:
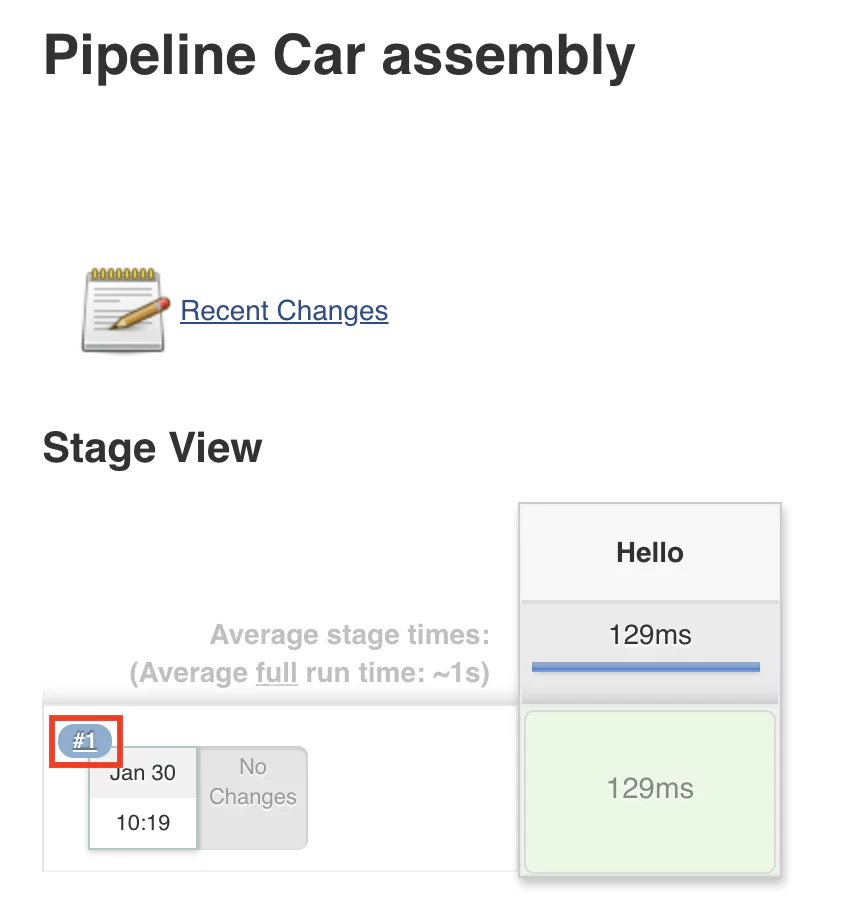
A green-colored stage will indicate that the execution was successful and no errors where encountered. To view the console output, click on the number of the build (in this case #1). After this, click on the Console output button, and the output will be displayed.
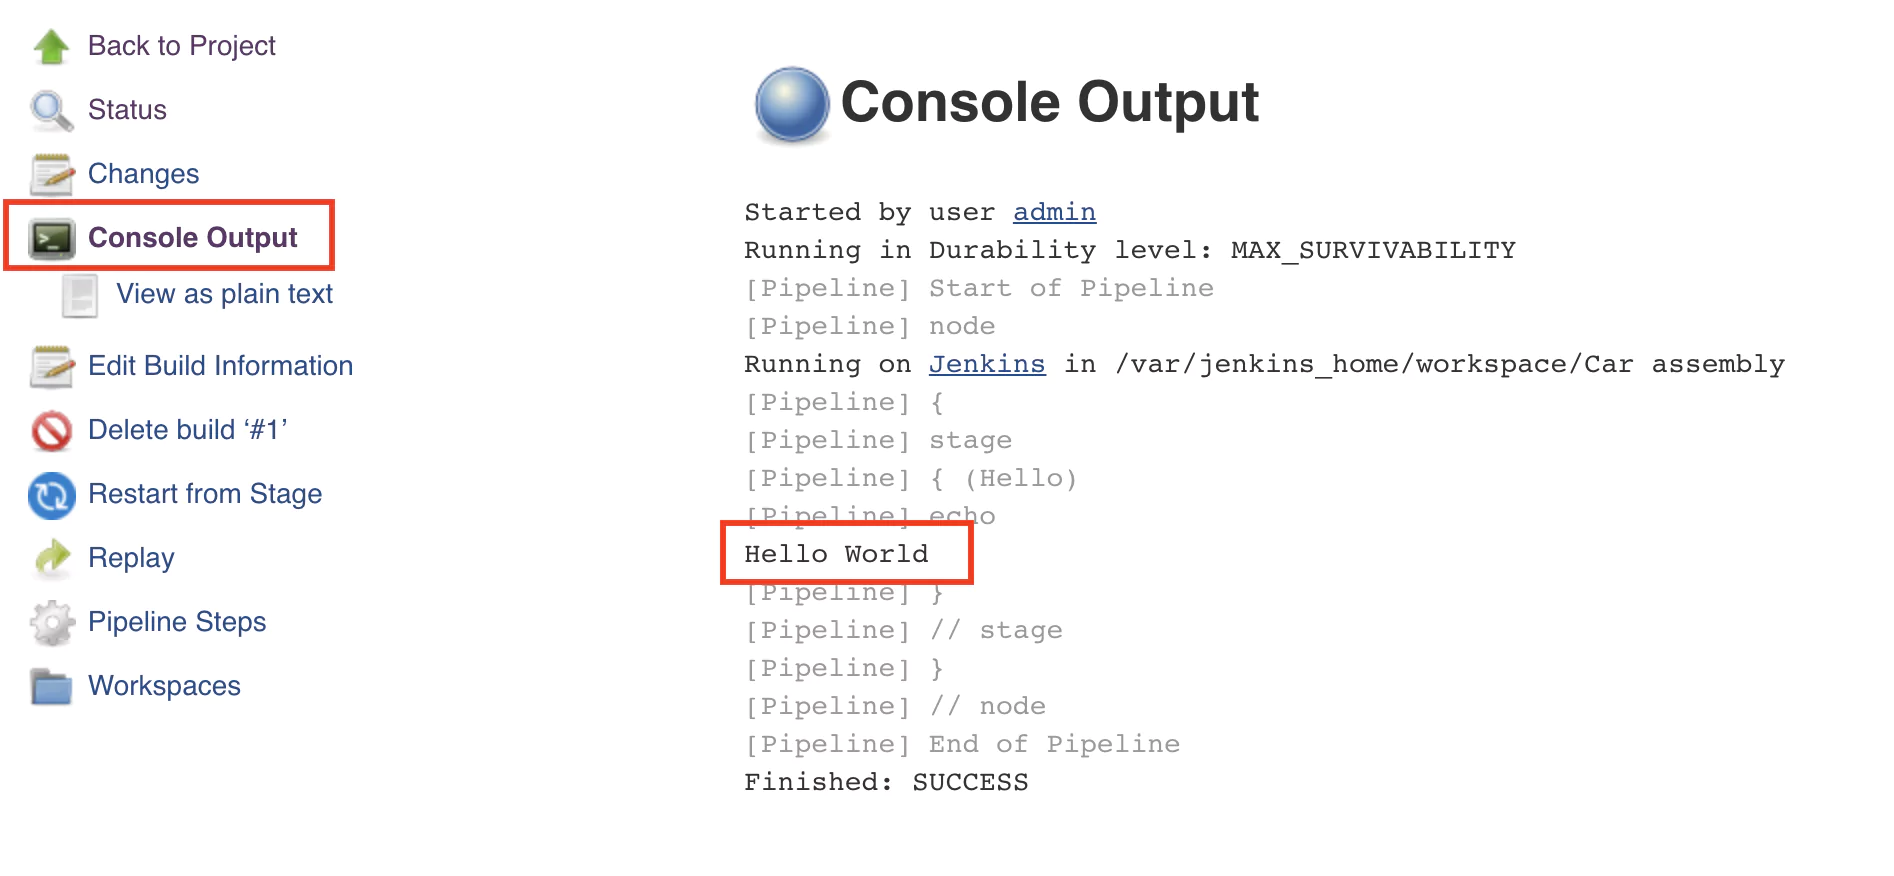
Notice the text Hello world that was displayed after executing the command echo ‘Hello World’.
Congratulations! You have just configured and executed your first pipeline in Jenkins.
A Basic Pipeline Build Process
When building software, we usually go through several stages. Most commonly, they are:
- Build – this is the main step and does the automation work required
- Test – ensures that the build step was successful and that the output is as expected
- Publish – if the test stage is successful, this saves the output of the build job for later use
We will create a simple car assembly pipeline but only using folders, files, and text. So we want to do the following in each stage:
Build
- create a build folder
- create a car.txt file inside the build folder
- add the words “chassis”, “engine” and “body” to the car.txt file
Test
- check that the car.txt file exists in the build folder
- words “chassis”, “engine” and “body” are present in the car.txt file
Publish
- save the content of the build folder as a zip file
The Jenkins Build Stage
Note: the following steps require that Jenkins is running on a Unix-like system. Alternatively, the Windows system running Jenkins should have some Unix utilities installed.
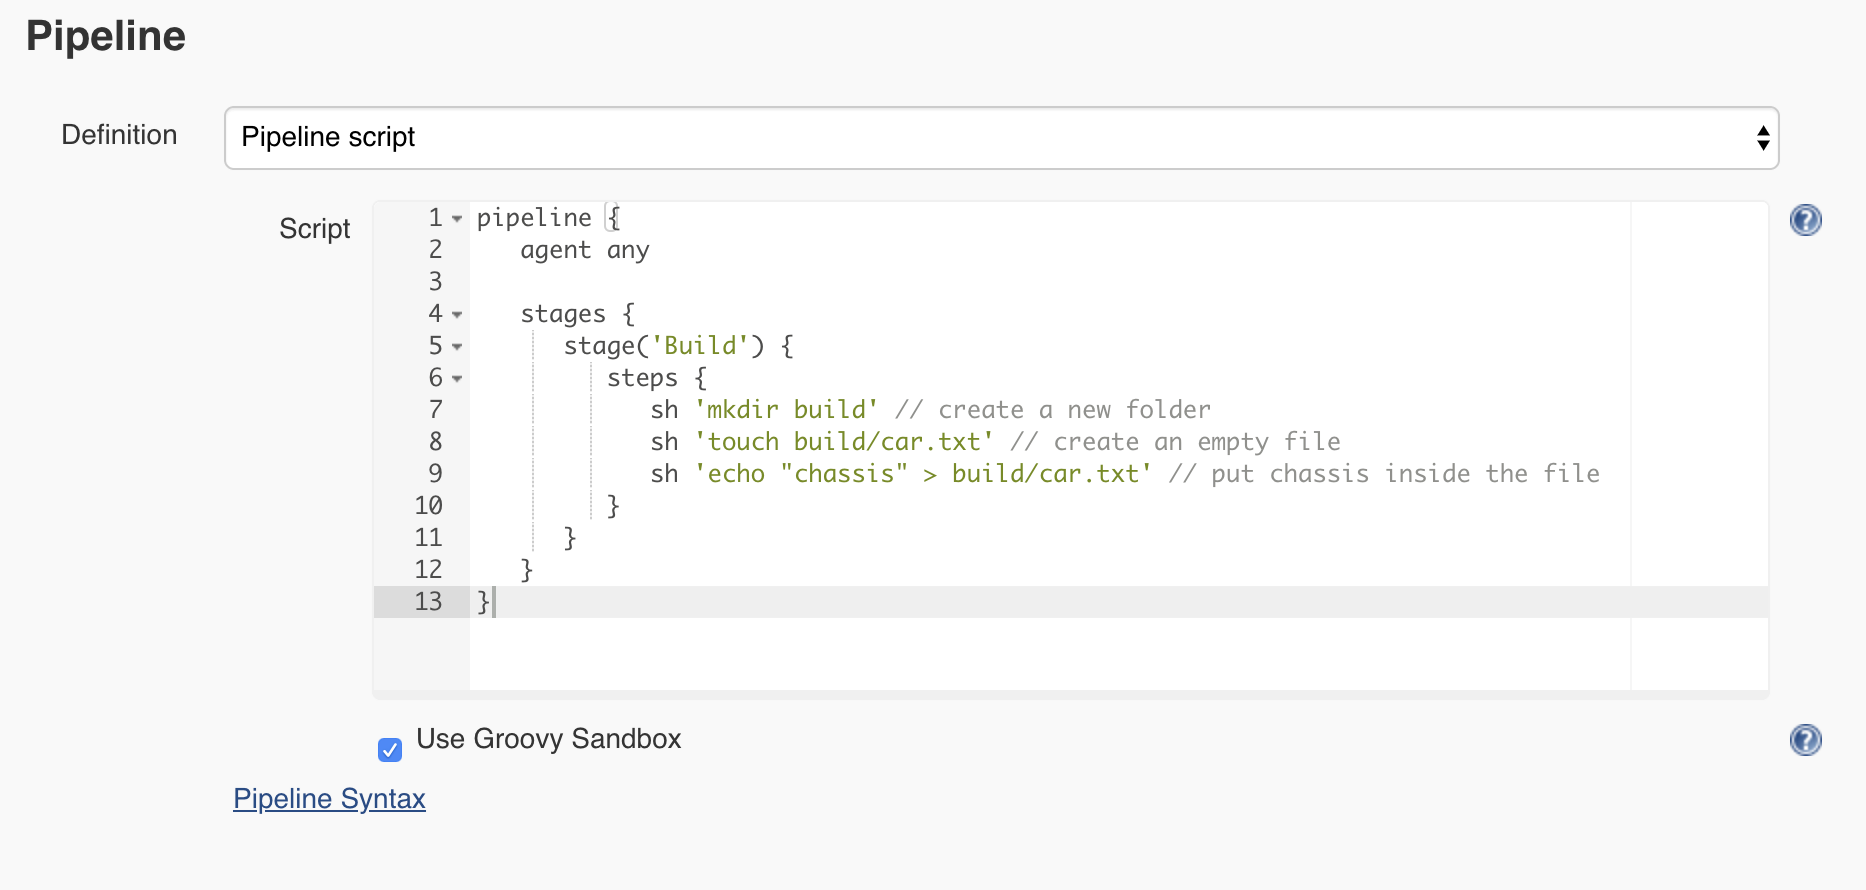
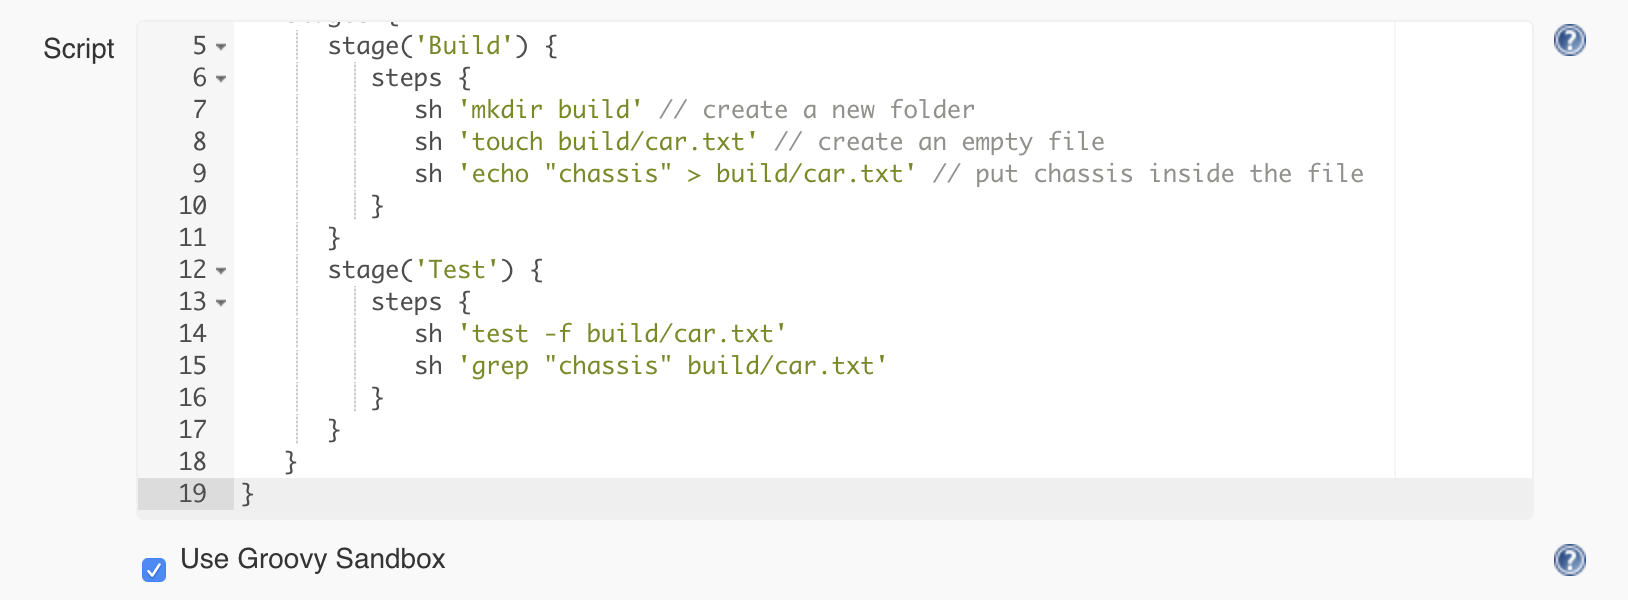
Let’s go back to the Car assembly job configuration page and rename the step that we have from Hello to Build. Next, using the pipeline step sh, we can execute a given shell command. So the Jenkins pipeline will look like this:
Let’s save and execute the pipeline. Hopefully, the pipeline is successful again, but how do we know if the car.txt file was created? Do inspect the output, click on the job number and on the next page from the left menu select Workspaces.
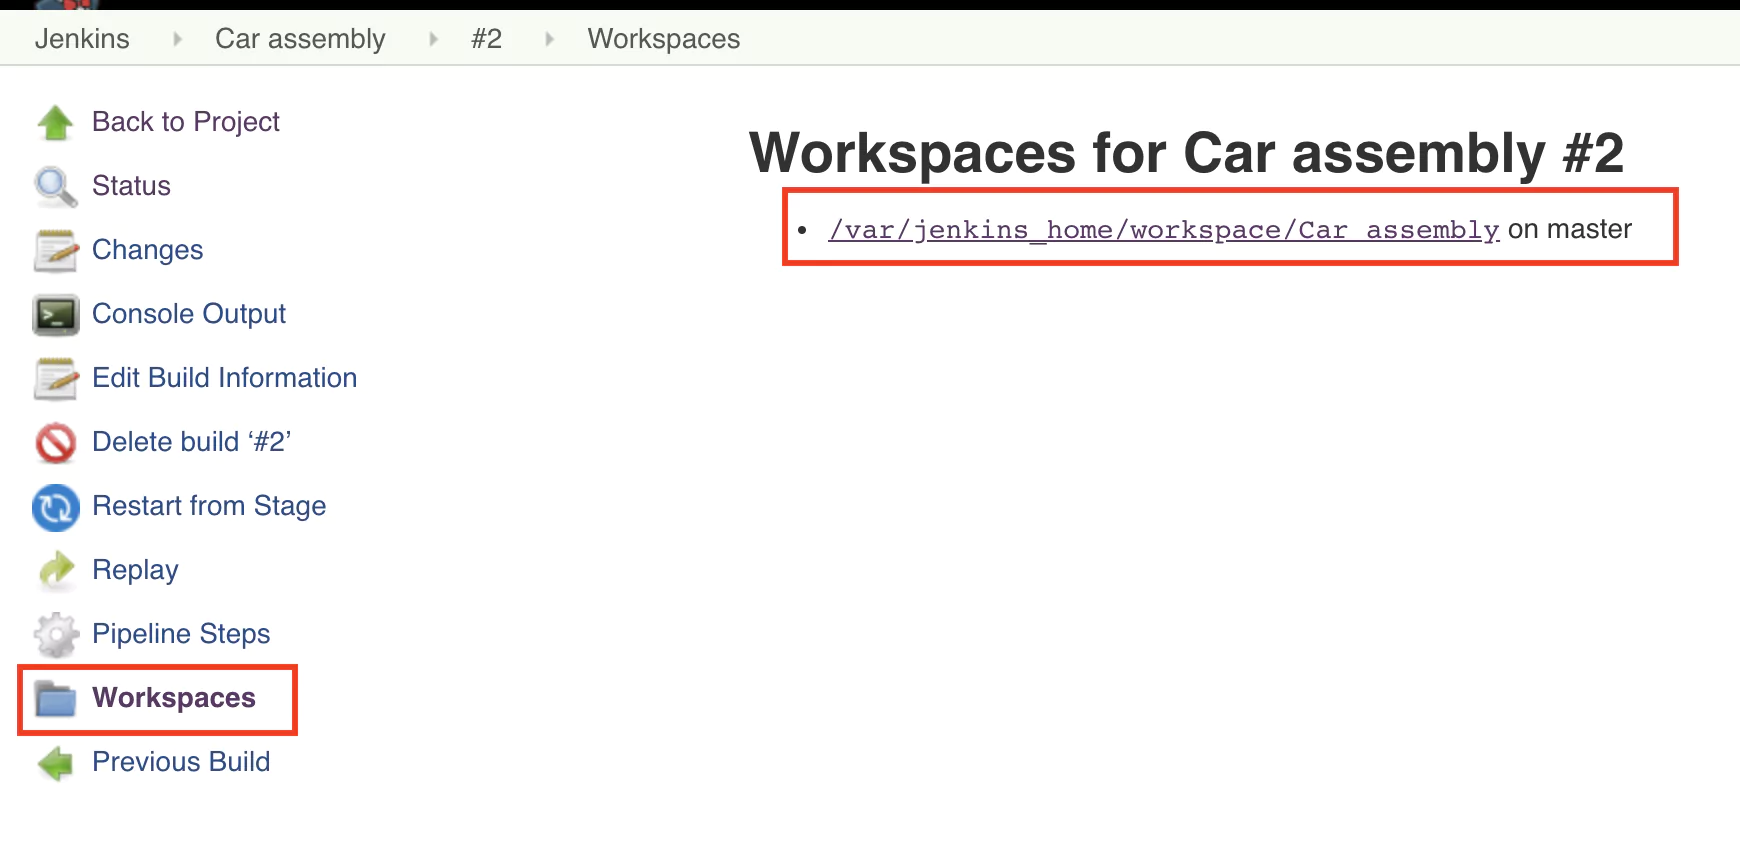
Click on the folder path displayed and you should soon see the build folder and its contents.
The Jenkins Test Stage
In the previous step, we manually checked that the folder and the file were created. As we want to automate the process, it makes sense to write a test that will check if the file was created and has the expected contents.
Let’s create a test stage and use the following commands to write the test:
- the test command combined with the -f flag allows us to test if a file exists
- the grep command will enable us to search the content of a file for a specific string
So the pipeline will look like this:
Why did the Jenkins pipeline fail?
If you save the previous configuration and run the pipeline again, you will notice that it will fail, indicated by a red color.

The most common reasons for a pipeline to fail is because:
- The pipeline configuration is incorrect. This first problem is most likely due to a syntax issue or because we’ve used a term that was not understood by Jenkins.
- One of the build step commands returns a non-zero exit code. This second problem is more common. Each command after executing is expected to return an exit code. This tells Jenkins if the command was successful or not. If the exit code is 0, it means the command was successful. If the exit code is not 0, the command encountered an error.
We want to stop the execution of the pipeline as soon as an error has been detected. This is to prevent future steps from running and propagating the error to the next stages. If we inspect the console output for the pipeline that has failed, we will identify the following error:
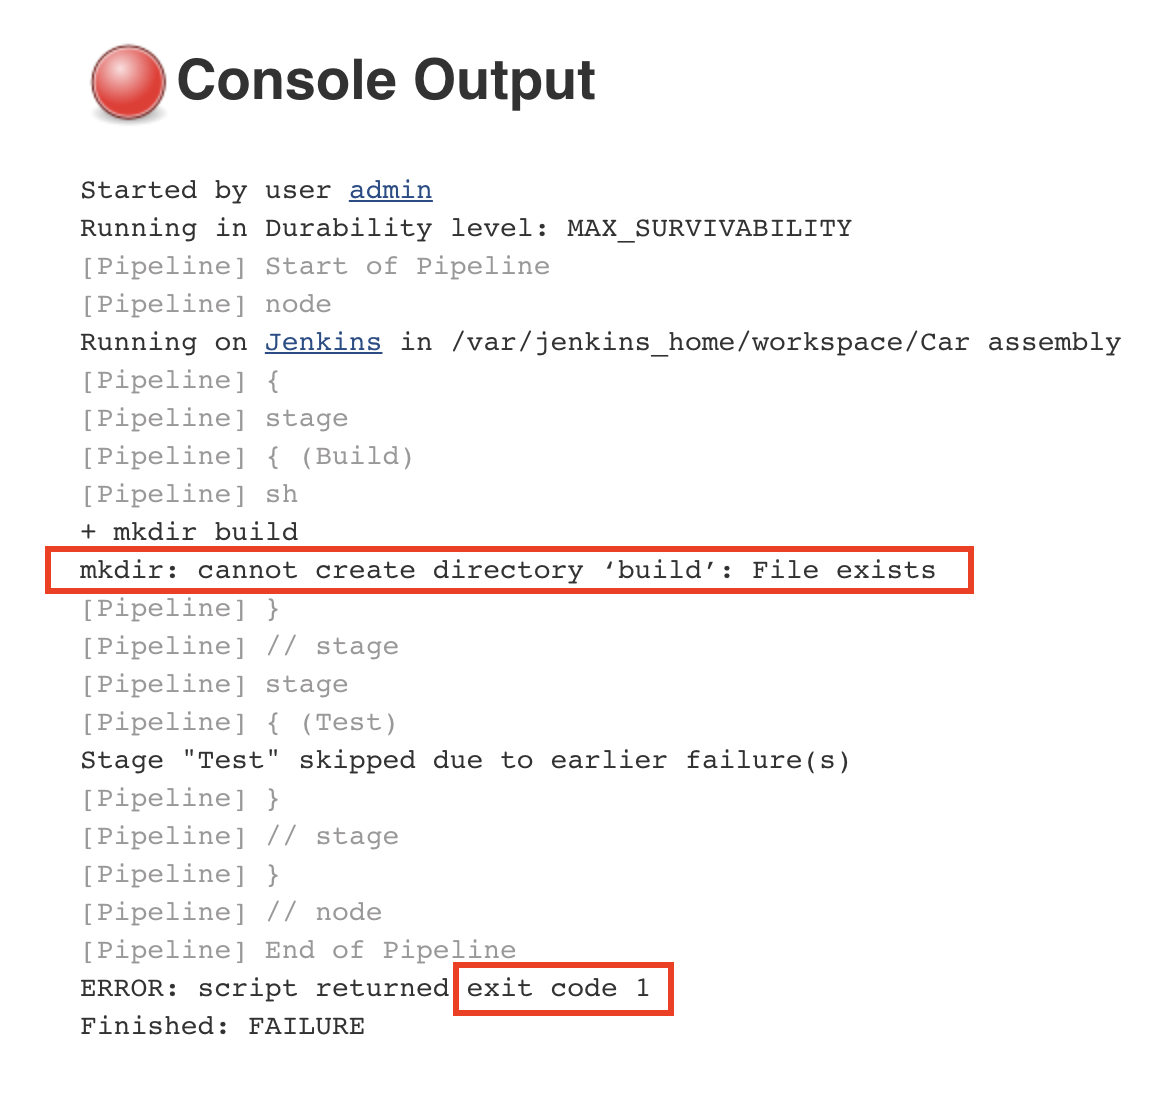
The error tells us that the command could not create a new build folder as one already exists. This happens because the previous execution of the pipeline already created a folder named ‘build’. Every Jenkins job has a workspace folder allocated on the disk for any files that are needed or generated for and during the job execution. One simple solution is to remove any existing build folder before creating a new one. We will use the rm command for this.
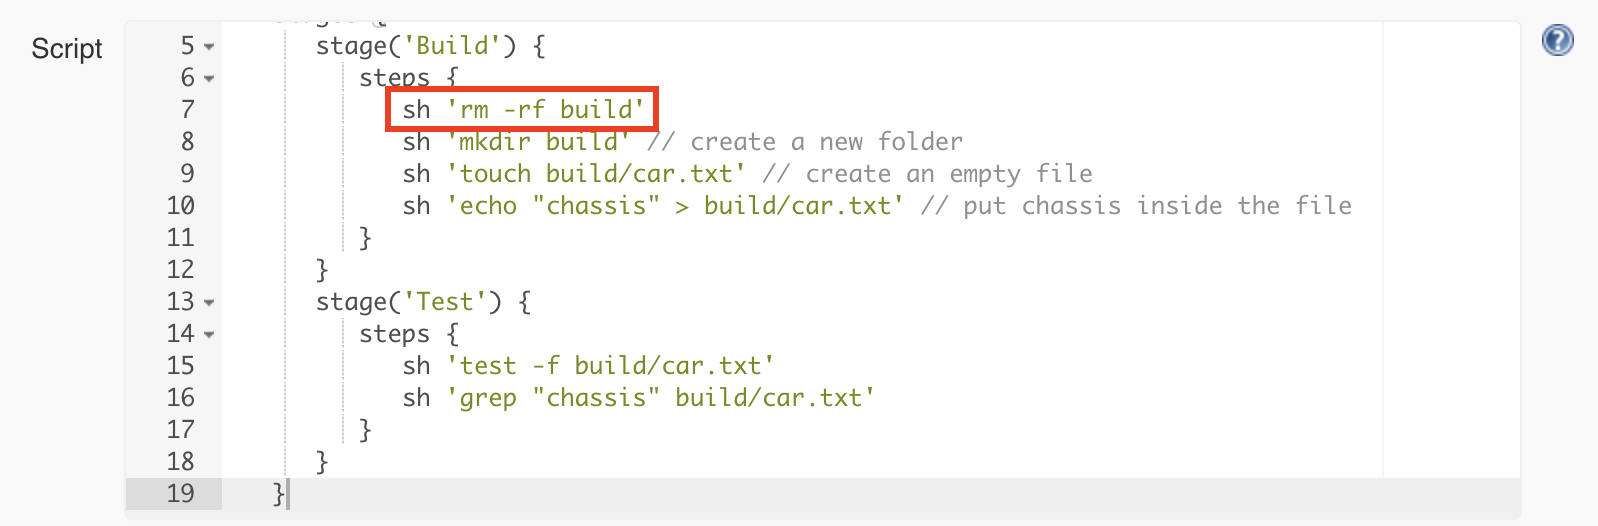
This will make the pipeline work again and also go through the test step.
The Jenkins Publishing Stage
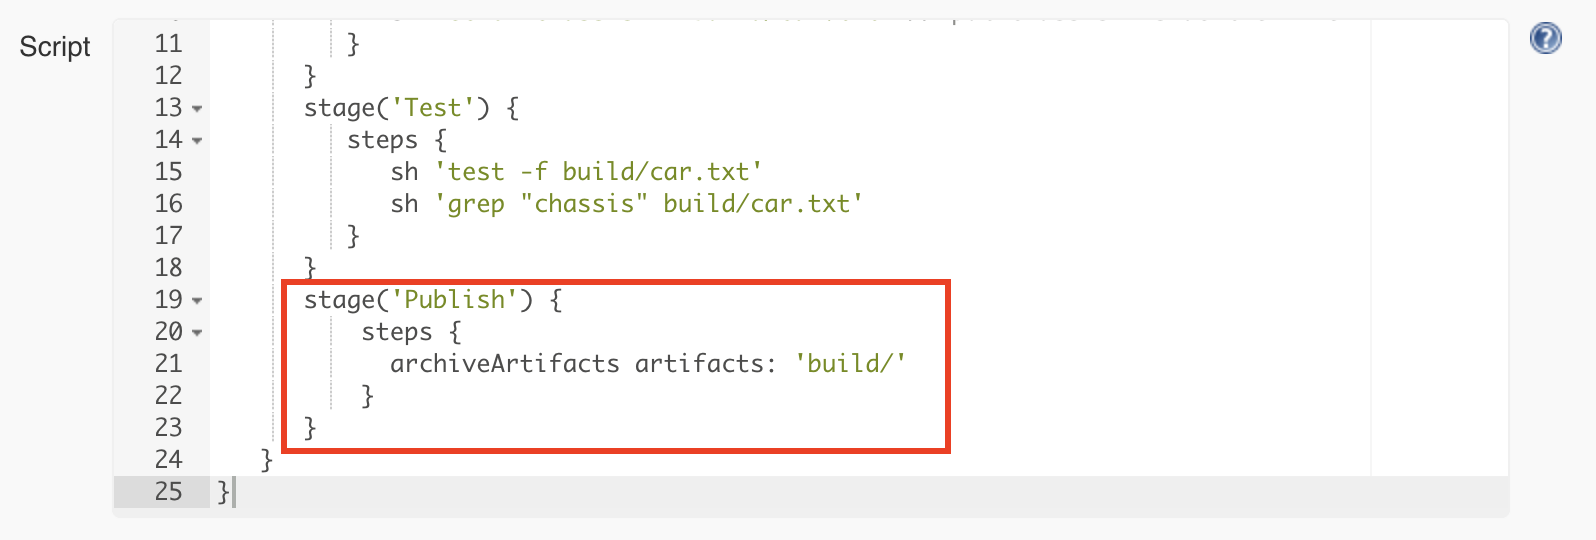
If the tests are successful, we consider this a build that we want to keep for later use. As you remember, we remove the build folder when starting rerunning the pipeline, so it does not make sense to keep anything in the workspace of the job. The job workspace is only for temporary purposes during the execution of the pipeline. Jenkins provides a way to save the build result using a build step called archiveArtifacts.
So what is an artifact? In archaeology, an artifact is something made or given shape by humans. Or in other words, it’s an object. Within our context, the artifact is the build folder containing the car.txt file.

We will add the final stage responsible for publishing and configuring the archiveArtifacts step to publish only the contents of the build folder:
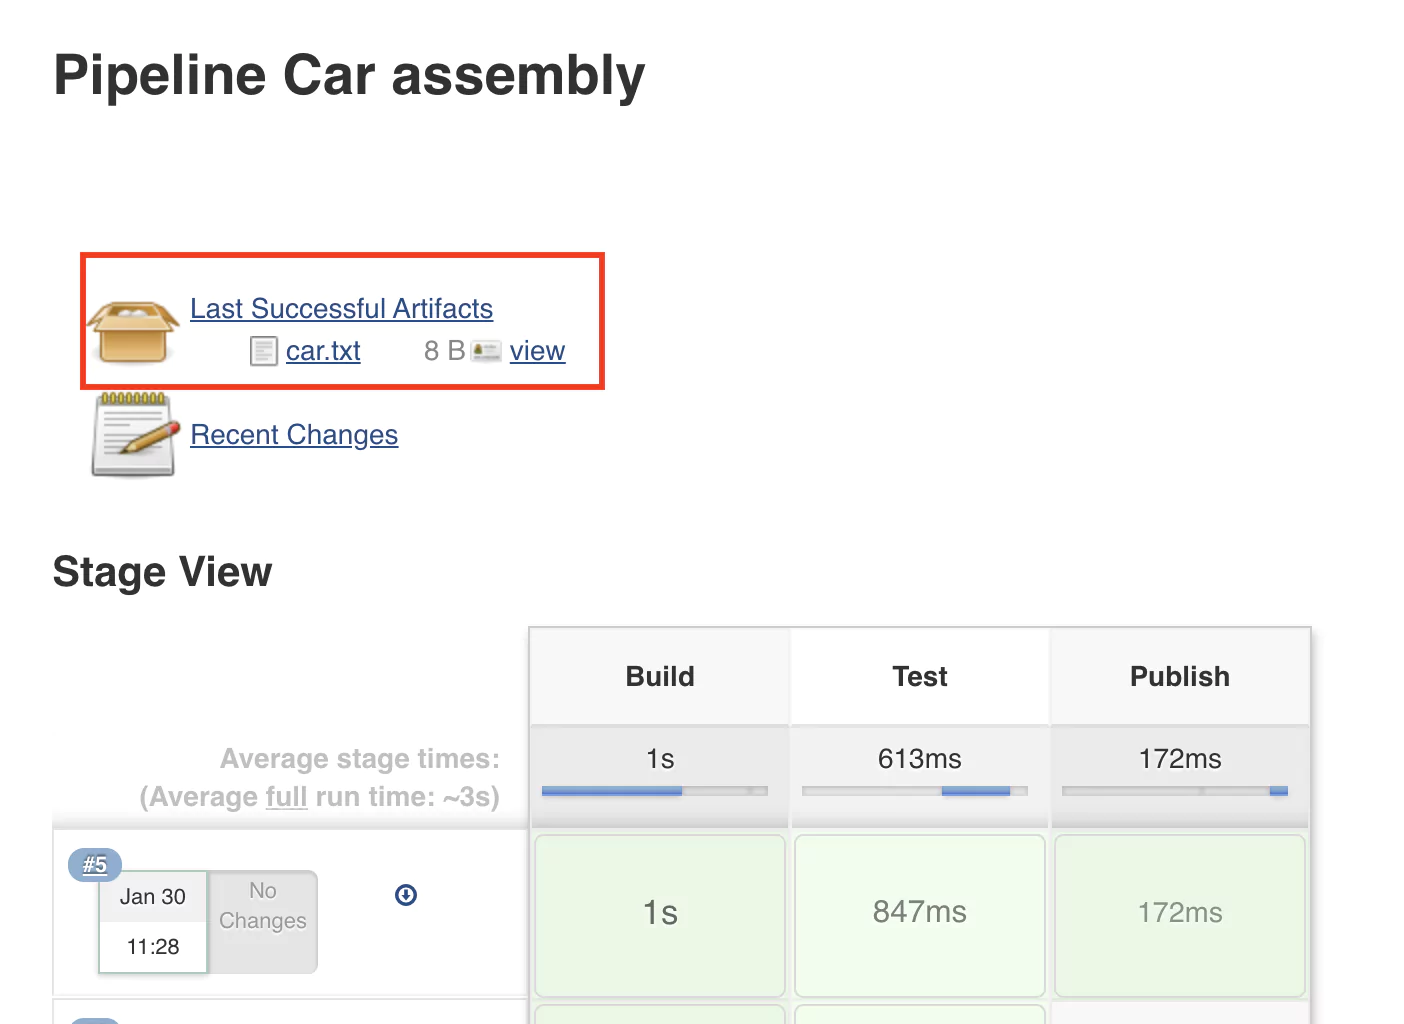
After rerunning the pipeline, the job page will display the latest successful artifact. Refresh the page once or twice if it does not show up.
(17-last-artifact.png)
Complete & Test the Pipeline
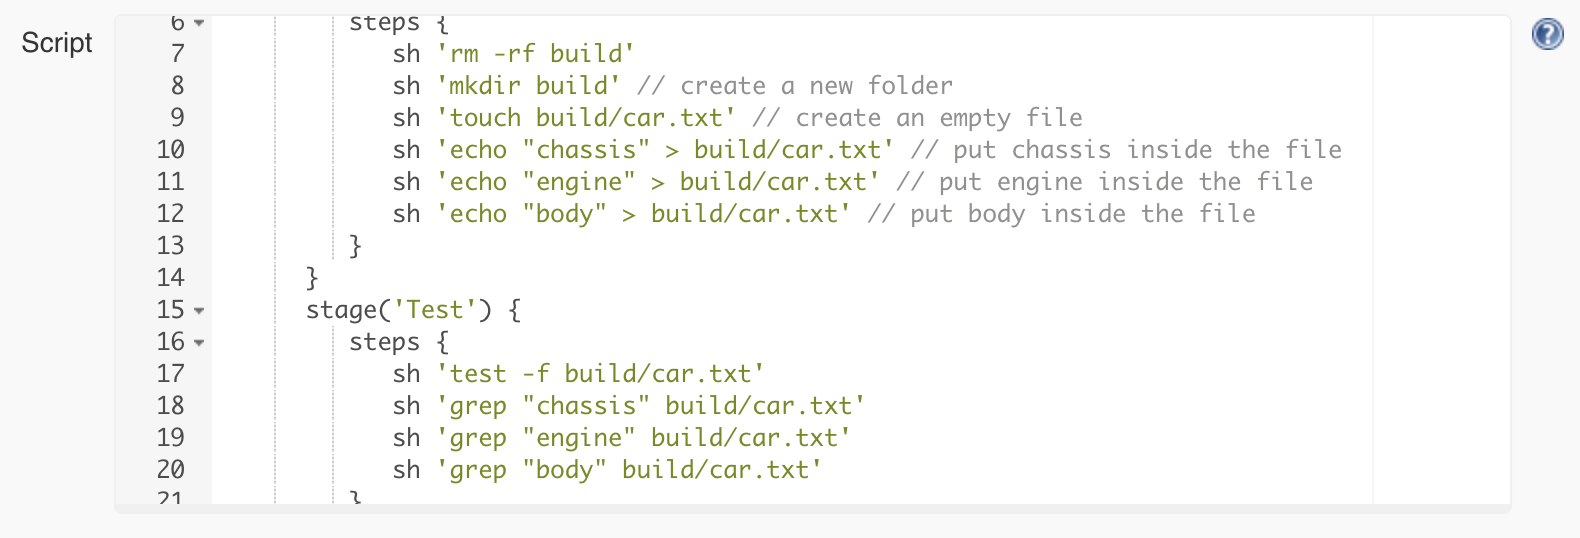
Let’s continue adding the other parts of the car: the engine and the body. For this, we will adapt both the build and the test stage as follows:
pipeline {
   agent any

   stages {
      stage('Build') {
         steps {
            sh 'rm -rf build'
            sh 'mkdir build' // create a new folder
            sh 'touch build/car.txt' // create an empty file
            sh 'echo "chassis" > build/car.txt' // add chassis
            sh 'echo "engine" > build/car.txt' // add engine
            sh 'echo "body" > build/car.txt' // body
         }
      }
      stage('Test') {
          steps {
              sh 'test -f build/car.txt'
              sh 'grep "chassis" build/car.txt'
              sh 'grep "engine" build/car.txt'
              sh 'grep "body" build/car.txt'
          }
      }
   }
}
Saving and rerunning the pipeline with this configuration will lead to an error in the test phase.
The reason for the error is that the car.txt file now only contains the word “body”. Good that we tested it! The > (greater than) operator will replace the entire content of the file, and we don’t want that. So we’ll use the >> operator just to append text to the file.

pipeline {
   agent any

   stages {
      stage('Build') {
         steps {
            sh 'rm -rf build'
            sh 'mkdir build'
            sh 'touch build/car.txt'
            sh 'echo "chassis" >> build/car.txt'
            sh 'echo "engine" >> build/car.txt'
            sh 'echo "body" >> build/car.txt'
         }
      }
      stage('Test') {
          steps {
              sh 'test -f build/car.txt'
              sh 'grep "chassis" build/car.txt'
              sh 'grep "engine" build/car.txt'
              sh 'grep "body" build/car.txt'
          }
      }
   }
}
Now the pipeline is successful again, and we’re confident that our artifact (i.e. file) has the right content.
Pipeline as Code
If you remember, at the beginning of the tutorial, you were asked to select the type of job you want to create. Historically, many jobs in Jenkins were and still are configured manually, with different checkboxes, text fields, and so on. Here we did something different. We called this approach Pipeline as Code. While it was not apparent, we’ve used a Domain Specific Language (DSL), which has its foundation in the Groovy scripting language. So this is the code that defines the pipeline.
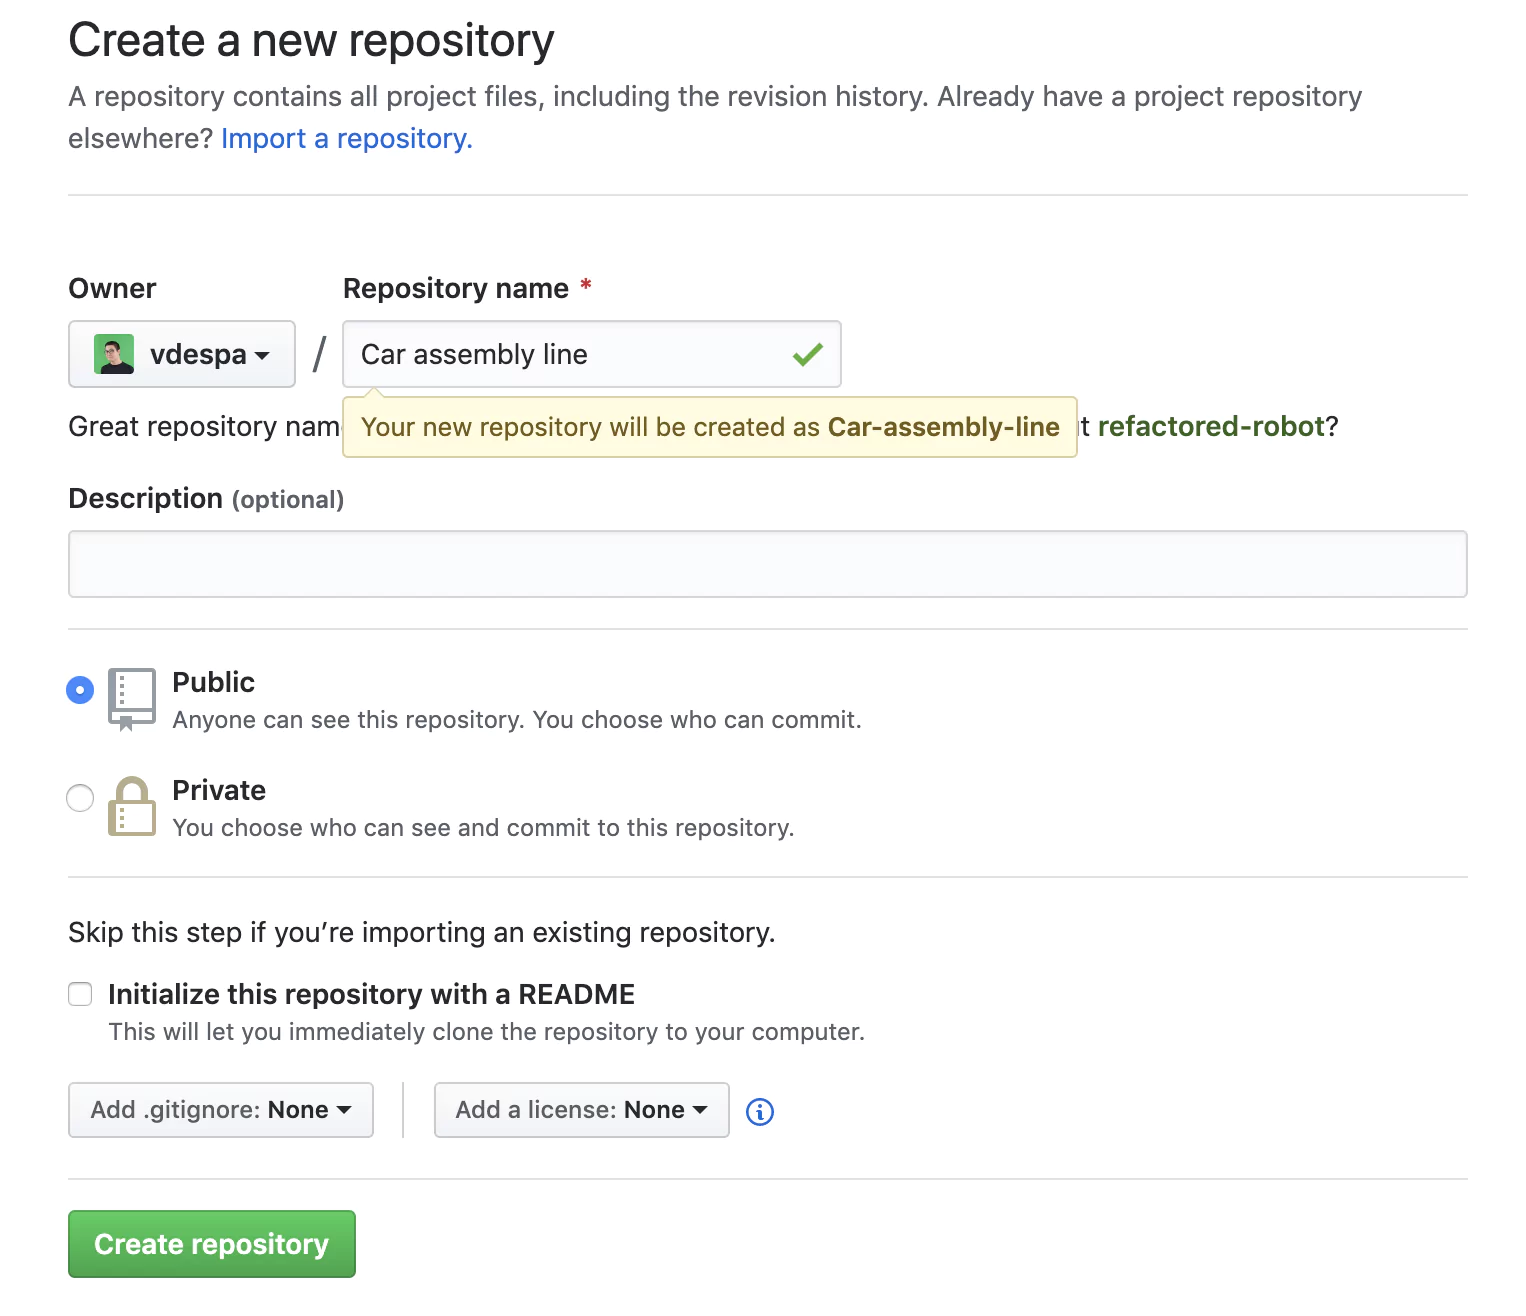
As you can observe, even for a relatively simple scenario, the pipeline is starting to grow in size and become harder to manage. Also, configuring the pipeline directly in Jenkins is cumbersome without a proper text editor. Moreover, any work colleagues with a Jenkins account can modify the pipeline, and we wouldn’t know what changed and why. There must be a better way! And there is. To fix this, we will create a new Git repository on Github.
To make things simpler, you can use this public repository under my profile called Jenkins-Car-Assembly.
Jenkinsfile from a Version Control System
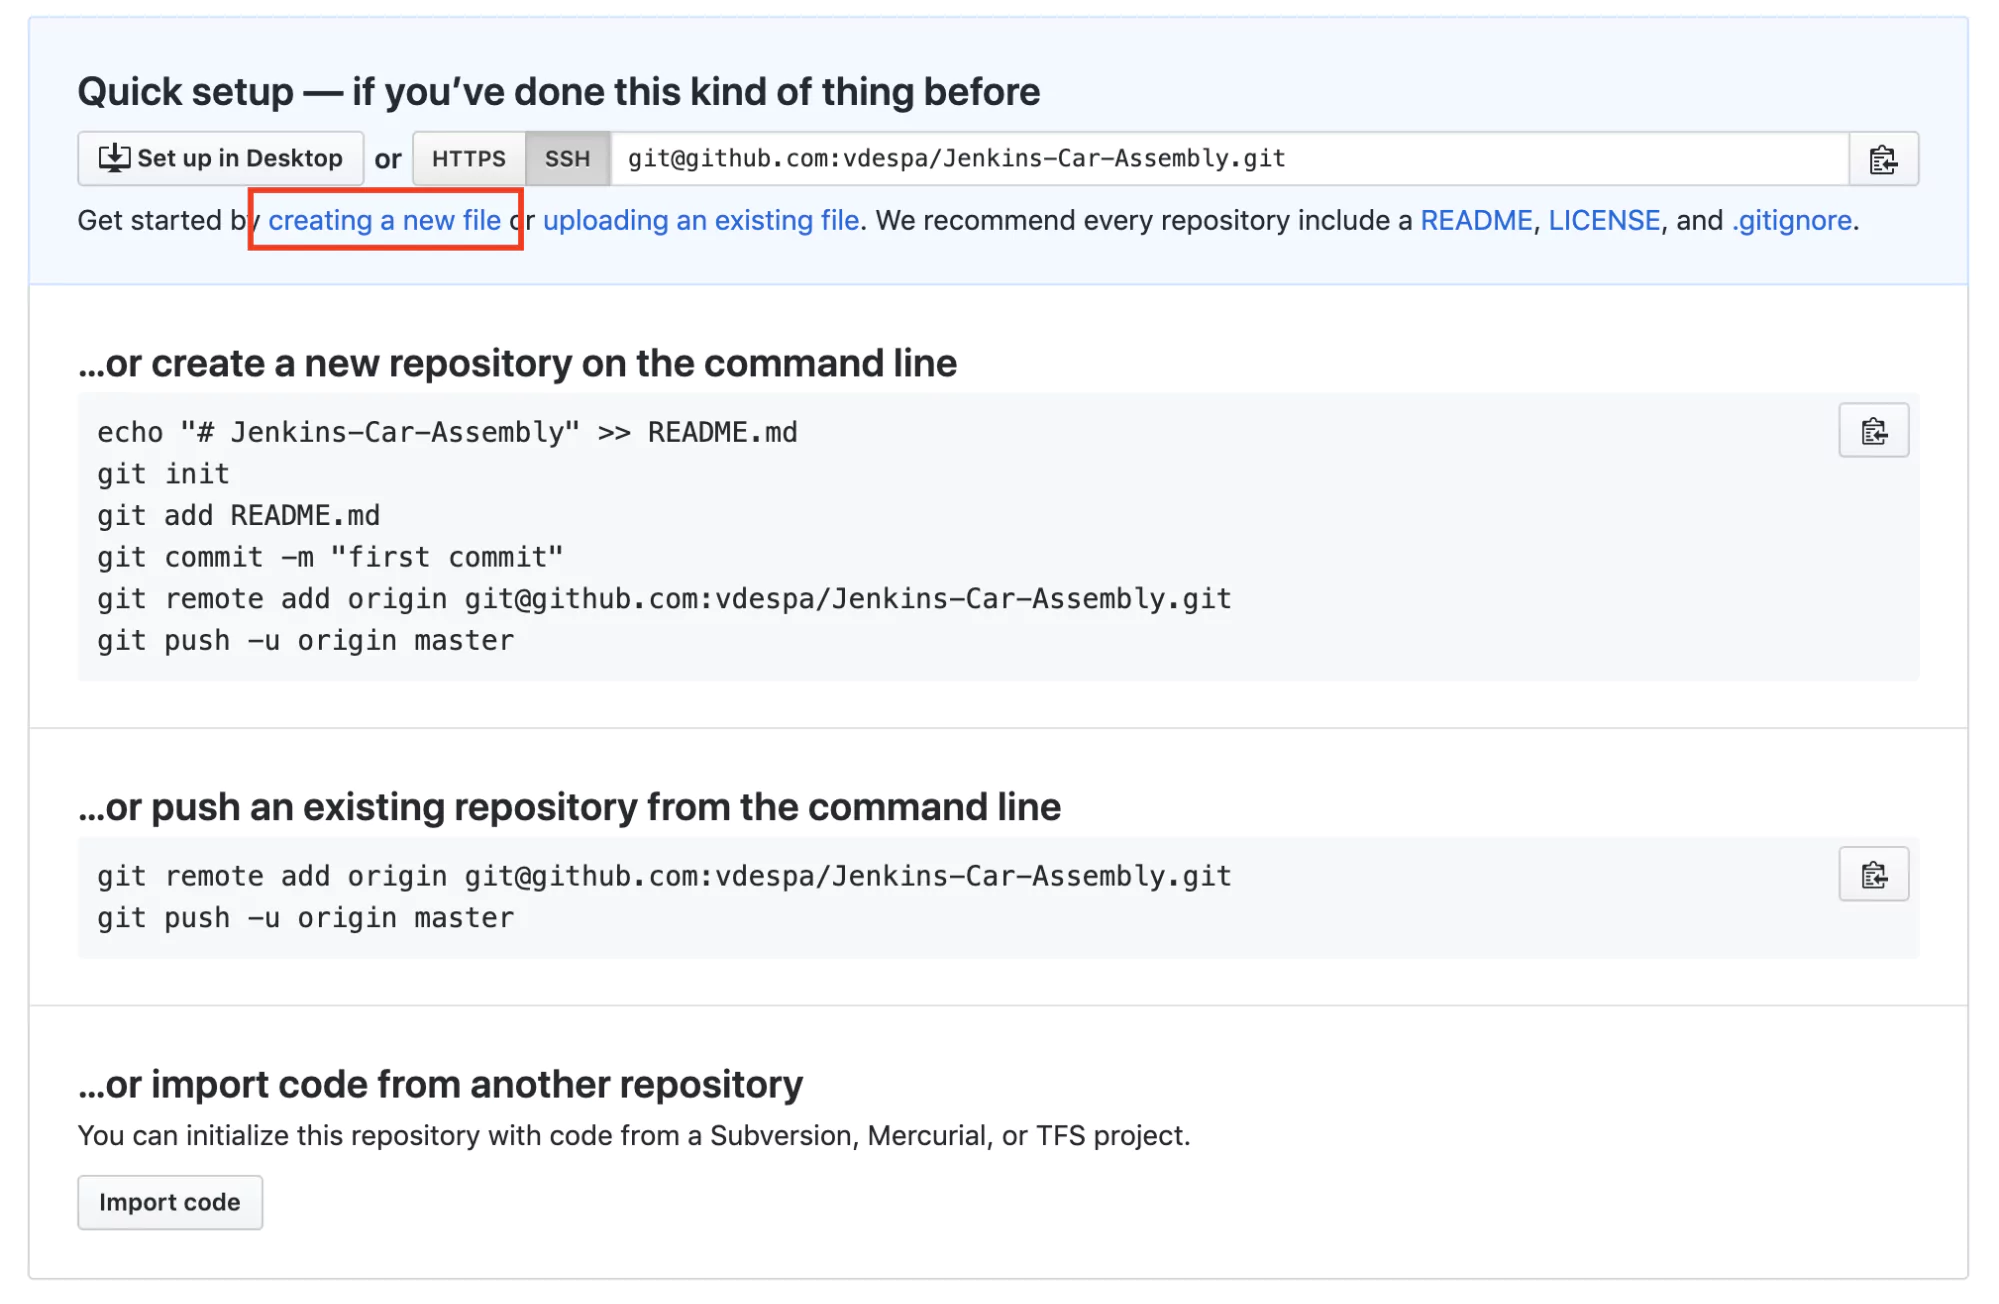
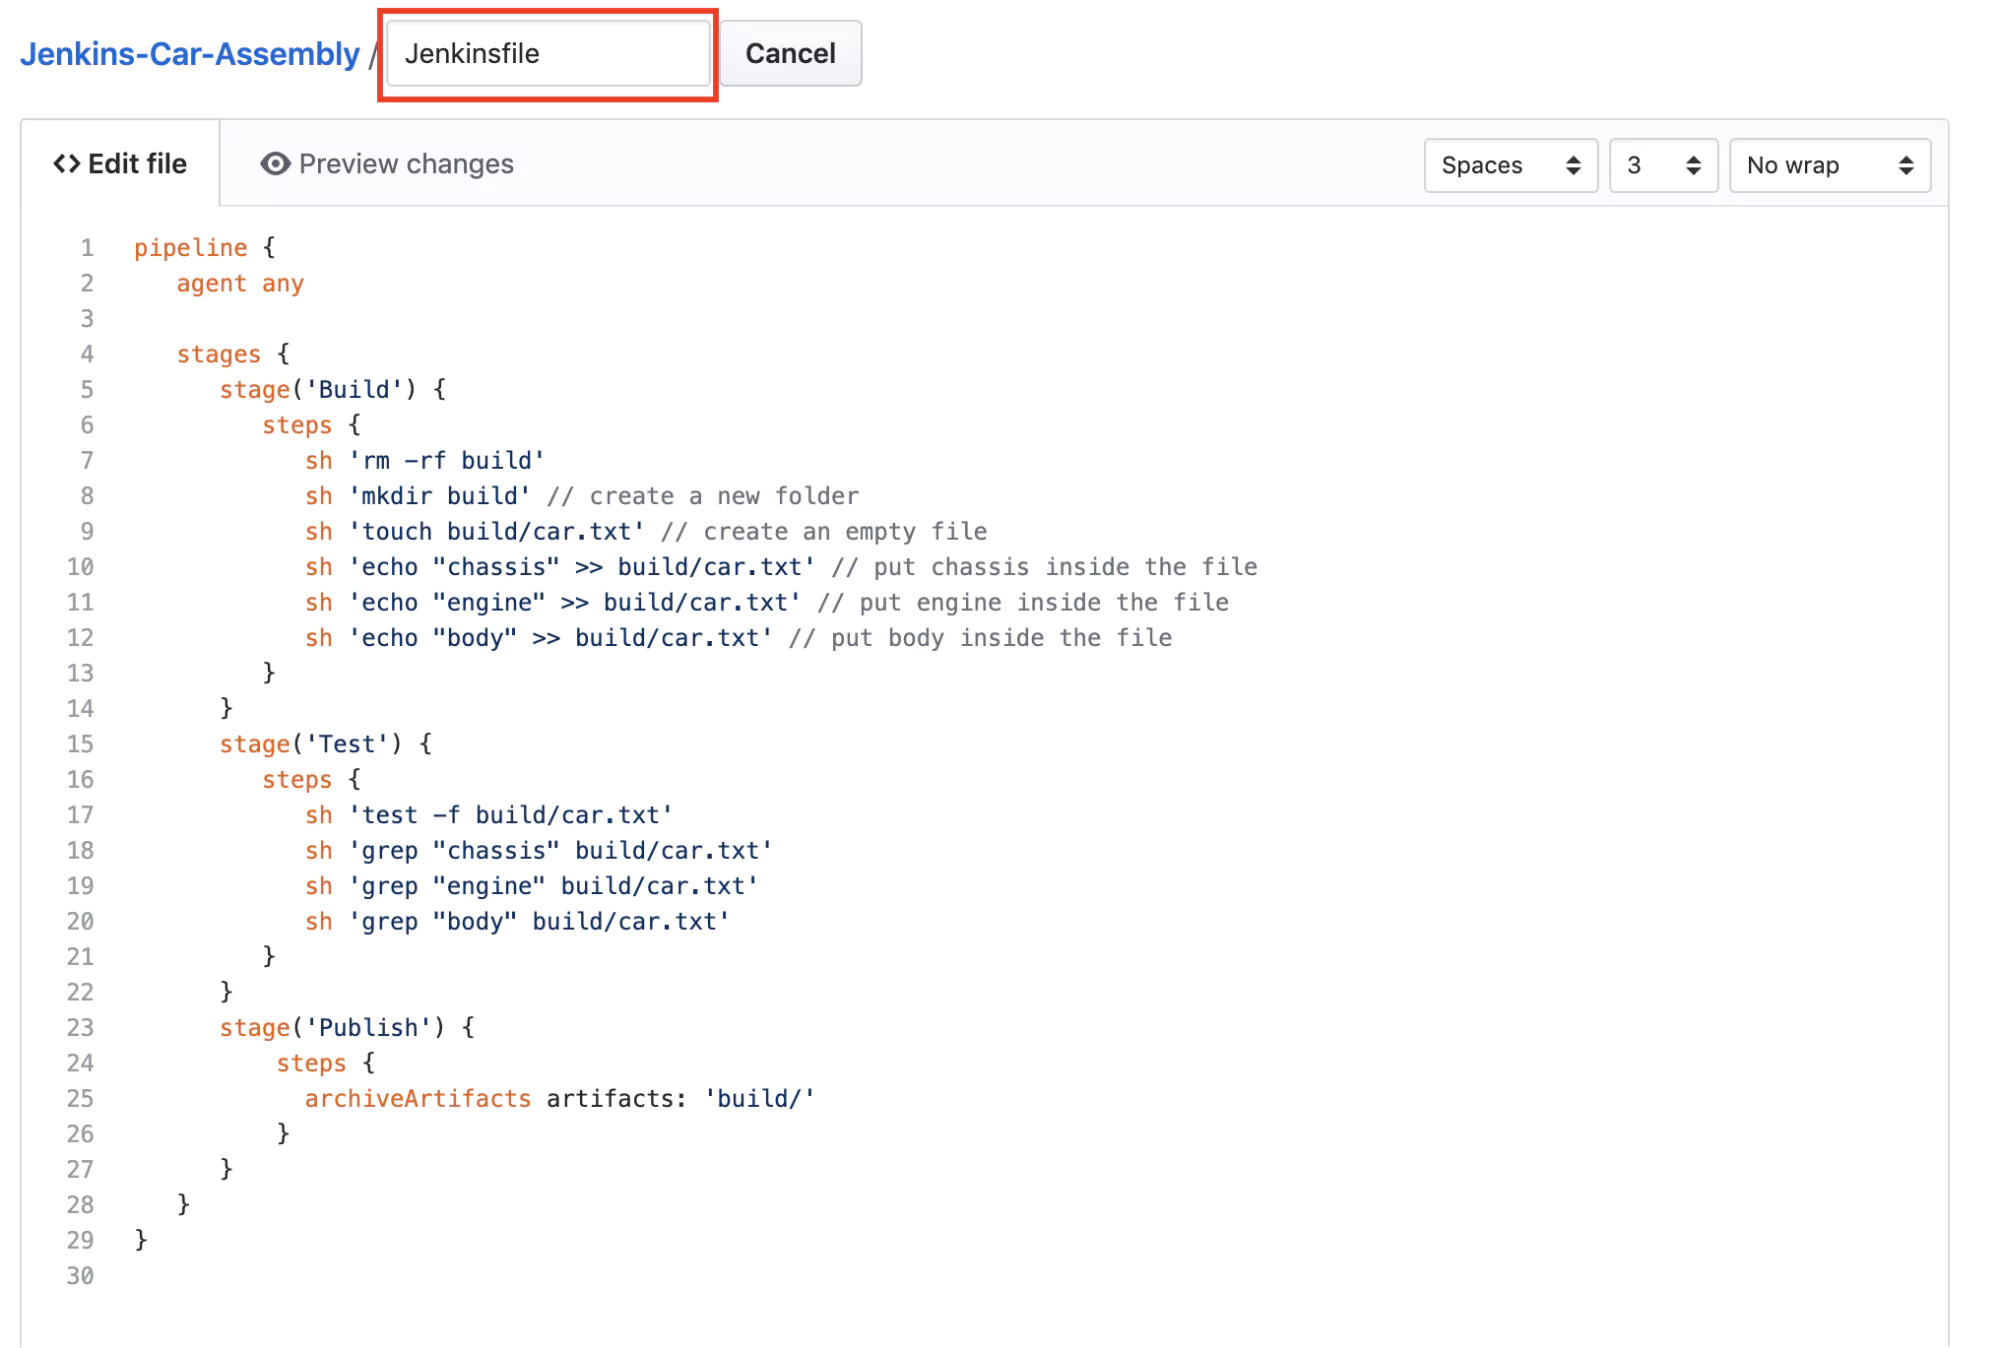
The next step is to create a new file called Jenkinsfile in your Github repository with the contents of the pipeline from Jenkins.
Read Pipeline from Git
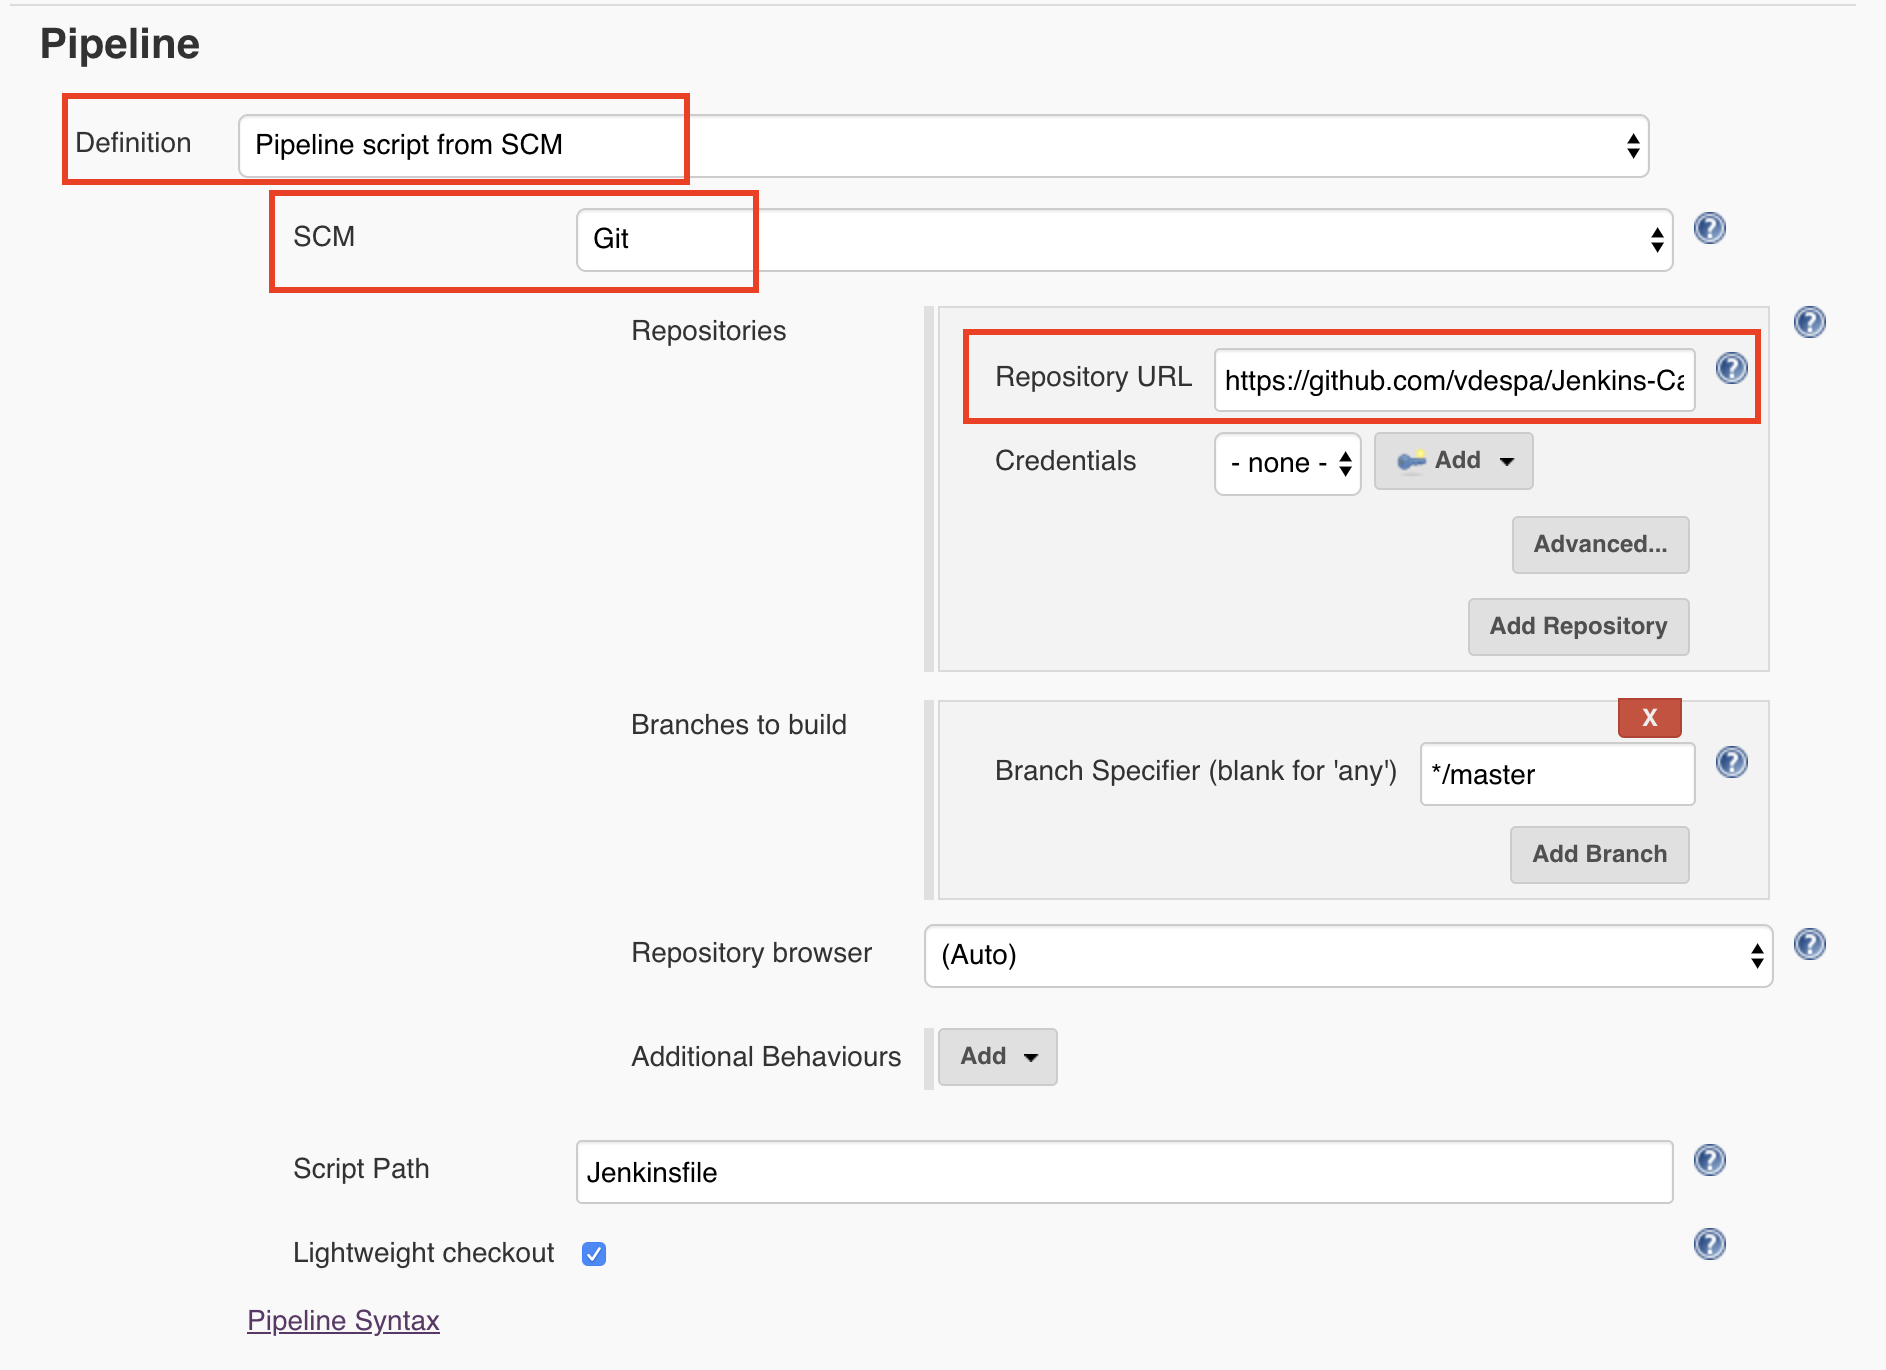
Finally, we need to tell Jenkins to read the pipeline configuration from Git. I have selected the Definition as Pipeline Script from SCM which in our case, refers to Github. By the way, SCM stands for Source code management.
Saving and rerunning the pipeline leads to a very similar result.
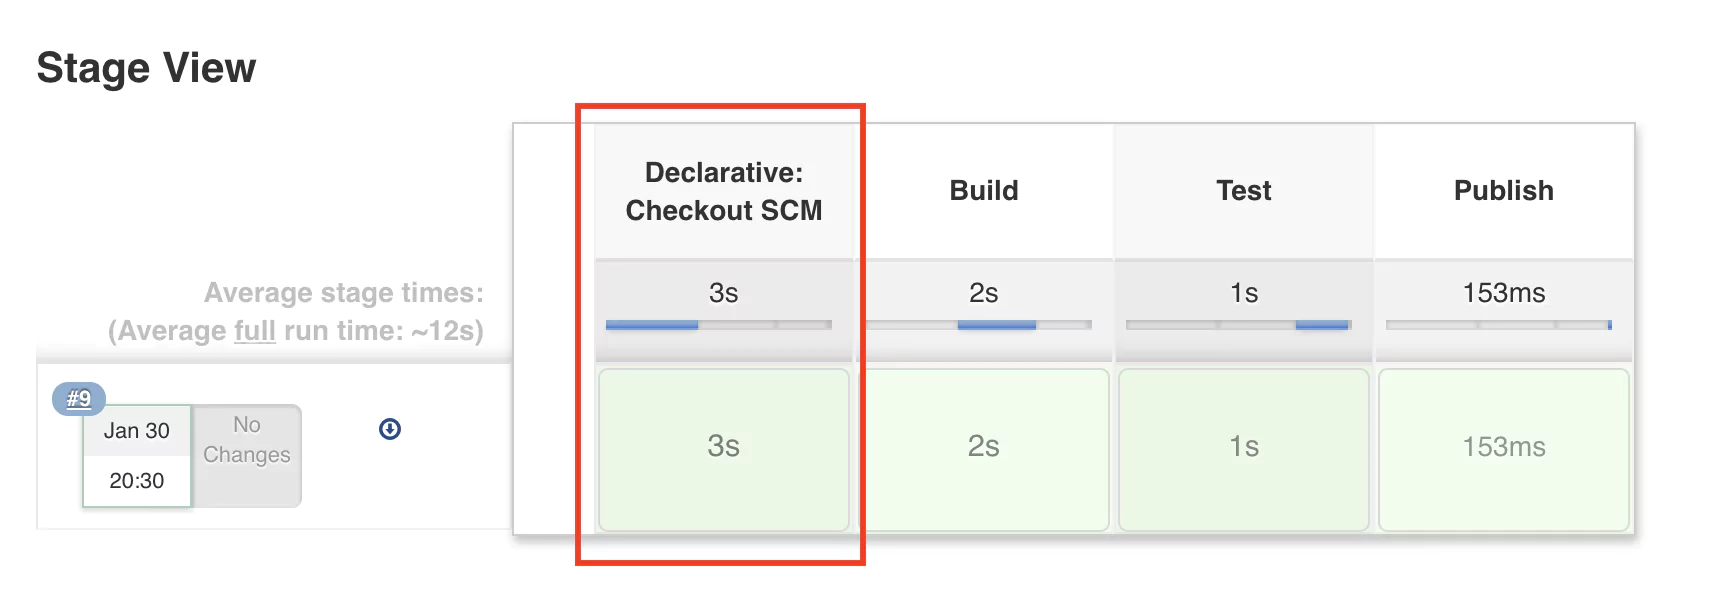
So what happened? Now we use Git to store the pipeline configuration in a file called Jenkinsfile. This allows us to use any text editing software to change the pipeline but now we can also keep track of any changes that happen to the configuration. In case something doesn’t work after making a Jenkins configuration change, we can quickly revert to the previous version.
Typically, the Jenkinsfile will be stored in the same Git repository as the project we are trying to build, test, and release. As a best practice, we always store code in an SCM system. Our pipeline belongs there as well, and only then can we really say that we have a ‘pipeline as code’.
Conclusion
I hope that this quick introduction to Jenkins and pipelines has helped you understand what a pipeline is, what are the most typical stages, and how Jenkins can help automate the build and test process and ultimately deliver more value to your users faster.
For your reference, you can find the Github repository referenced in this tutorial here:
Next: Learn about how Coralogix integrates with Jenkins to provide monitoring and analysis of your CI/CD processes.