Creating a Free Data Lake with Coralogix

Like many cool tools out there, this project started from a request made by a customer of ours.
Having recently migrated to our service, this customer had ~30TB of historical logging data.
This is a considerable amount of operational data to leave behind when moving from one SaaS platform to another. Unfortunately, most observability solutions are built around the working assumption that data flows are future-facing.
To put it in layman’s terms, most services won’t accept an event message older than 24 hours. So, we have this customer coming to us and asking how we can migrate this data over, but those events were over a year old! So, of course, we got to thinking…
Data Source Requirements
This would be a good time to describe the data sources and requirements that we received from the customer.
We were dealing with:
- ~30 TB of data
- Mostly plain text logs
- Various sizes of gzip files from 1GB to 200KB
- A mix of spaces and tabs
- No standardized time structure
- Most of the text represents a certain key/value structure
So, we brewed a fresh pot of coffee and rolled out the whiteboards…
Sending the Data to Coralogix
First, we created a small bit of code to introduce the log lines into Coralogix. The code should work in parallel and be as frugal as possible.
Once the data is coming into Coralogix, the formatting and structuring of the data can be done by our rules engine. All we needed is to extract the timestamp, make it UNIX compatible, and we are good to go.
We chose to do this by implementing a Lambda function with a SAM receipt. The Lambda will trigger for each S3 PUT event so we can have a static system costing us nothing on idle and always ready to handle any size of data dump we throw its way.
You can check out the code on our GitHub.
Standardizing Timestamps
Now that we have the data streaming in, we need to make sure it keeps its original timestamp.
Don’t forget it basically has two timestamps now:
- Time of original message
- Time of entry to Coralogix
In this part, we make the past timestamp the field by which we will want to search our data.
Like every good magic trick, the secret is in the moment of the swap, and for this solution this is it.
Since we have the original time stamp, we can configure it to be of a Date type. All we need to do in Coralogix is make sure the field name has the string timestamp in its name
(i.e. coralogix_custom_timestamp).
Some parts of Coralogix are based on the community versions of Elastic stack, so we also place some of the advanced configurations at the user’s disposal (i.e. creation of index templates or Kibana configurations).
Creating Index Patterns
At this point, we need to create a template for new indexes to use our custom timestamp field.
While the Elastic engine will detect new fields and classify them accordingly by default, we can override this as part of the advanced capabilities of Coralogix.
Once this part is done, we will have the ability to search the “Past” in a native way. We will be able to set an absolute time in the past.
To create the templates, click on the Kibana logo on the top right of the Coralogix UI -> select Management -> Index Patterns. This is essentially where we can control the template which creates the data structures of Coralogix.
First, we should remove the current pattern template (i.e. *:111111_newlogs*).
Note – This step will only take effect on the creation of the new index (00:00:00 UTC).
Clicking on Create index format, one of the first parameters we are asked to provide is the field which will indicate the absolute time for new indices. In this case, “Time filter field name”.
If using the example field name suggested earlier, the field selected should be “coralogix_custom_timestamp”.
Sending Data to S3
Now that we have a team with flowing historical data and a time axis aware of the original time, all we have left is to point the Coralogix account to an S3 bucket to grant us endless retention. Essentially, the data goes through Coralogix but does not stay there.
For this step, we will use our TCO optimizer feature to configure a new policy for the application name we set on our Lambda. This policy will send all of our data to our S3 bucket.
Now the magic is ready!
Wrapping Up
Once a log gzip file is placed in S3, it will trigger an event for our Lambda to do some pre-parsing for it, and send it to Coralogix.
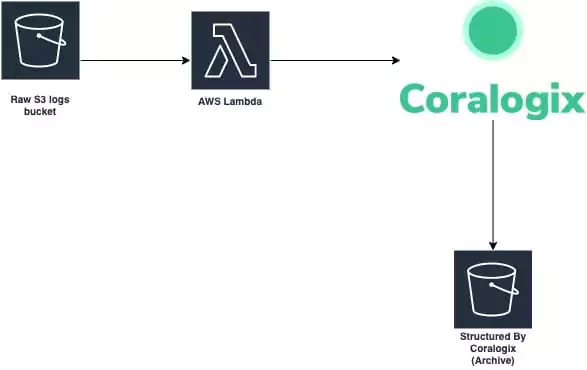
As data flows through Coralogix, it will be formatted by the rules we set for that application.
The data will then be structured and sent to S3 in a structured format. Once the data is sent to S3, it is no longer stored in the Coralogix platform in order to save on storage costs. You can still use Athena or any search engine to query the data with low latency. Behold! Your very own data lake was created with the help of Coralogix. If you have any questions about this or are interested in implementing something similar with us, don’t hesitate to reach out!