Tutorial: Logstash Grok Patterns with Examples

Logstash can parse CSV and JSON files easily because data in those formats are perfectly organized and ready for Elasticsearch analysis. Sometimes, though, we need to work with unstructured data, like plain-text logs. In these cases, we’ll need to parse the data to turn it into structured data using Logstash Grok or another 3rd party service like Coralogix. This tutorial will help you use Elasticsearch’s analysis and querying capabilities by parsing with Logstash Grok.
So, let’s dive in and learn how to deal with unstructured data using the Logstash Grok filter.
Why Choose Grok?
Logstash Grok isn’t the only option available to parse unstructured logs. Plenty of other plugins, such as Dissect, third-party log management tools, or just plain RegEx, could do the trick. We can even build our own custom parsing logic if we have super-specific needs.
Grok is a popular choice for a multitude of reasons, starting with how easy it is to use. Grok patterns are relatively easy to understand, especially if we are already familiar with regular expressions, and come with a wide range of built-in patterns for common log formats such as timestamps, IP addresses, and URLs. We can also create custom patterns to cater to our exact requirements.
While there are standalone Grok parser libraries available for various programming languages, Logstash Grok is specifically designed for Logtsash and the tight integration means we can easily incorporate Grok patterns into our Logstash configurations. On top of that, the plugin has been available for years and has a large community of users who share new patterns and best practices online.
Dissect Vs Grok
People often ask if they should use Grok or Dissect to parse their logs in Logstash.
While Grok uses regular expressions to match patterns within log lines, Dissect operates by splitting log lines into key-value pairs based on predefined delimiters such as spaces, commas, or other characters. Dissect is often faster and more efficient than Grok if our log formats have well-defined structures and consistent delimiters. It also means that Dissect configurations are simpler and more concise than Grok patterns, especially for straightforward log formats. However, it is worth noting that Dissect is less flexible than Grok when dealing with more complex unstructured log data. We can decide to use one or the other, or both for a hybrid use case when a section of the line is reliably repeated, but the entire line is not.
Now that we have learned more about Grok and the alternatives let’s dive into Logstash Grok filters.
Theory
In a CSV file, each record has an identical list of fields. The sequence of these fields repeats predictably for any program to read in a structured way. Naturally, this is an ideal situation for Elasticsearch.
In other cases, information cannot be organized in this ideal way. Consider a typical Linux system log.
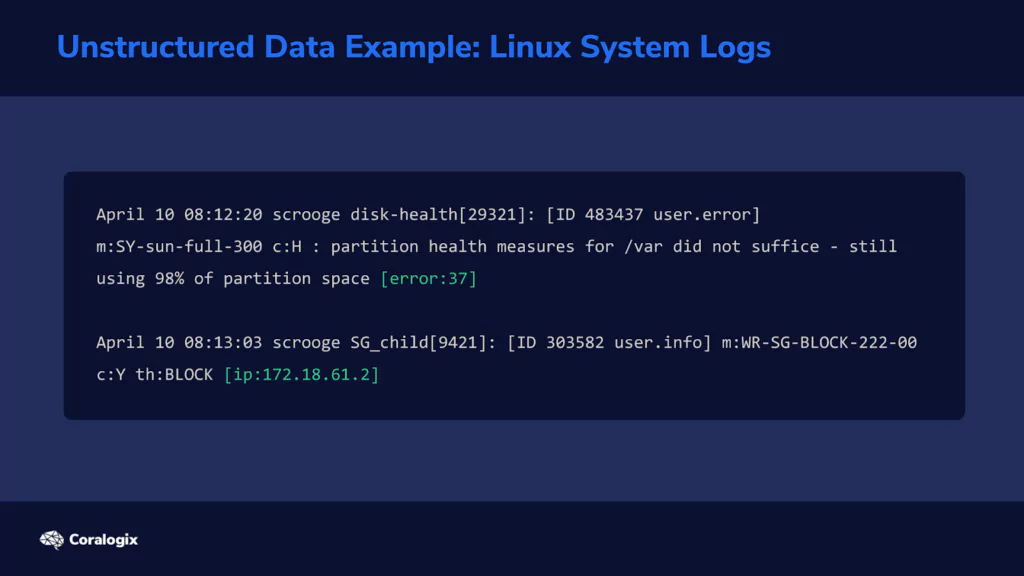
Multiple programs write their status or error messages to the same log file. On one line in the log, the last field might be an error code. But on the following line, the last field might be an IP address. This means that the parser now needs to have a way to “detect” what each field represents. Let’s look at how the Grok filter does this.
Understanding Grok Patterns and Syntax
When we see something like “john@example.com,” we immediately think of “email address” because we have learned to recognize this pattern. Grok can do the same thing by analyzing each piece of text and checking if it matches the patterns you instruct it to look for.
Grok uses regular expressions, or RegEx for short, behind the scenes, which can look weird for someone unfamiliar. For example, here’s how a regular expression that matches an email looks like:
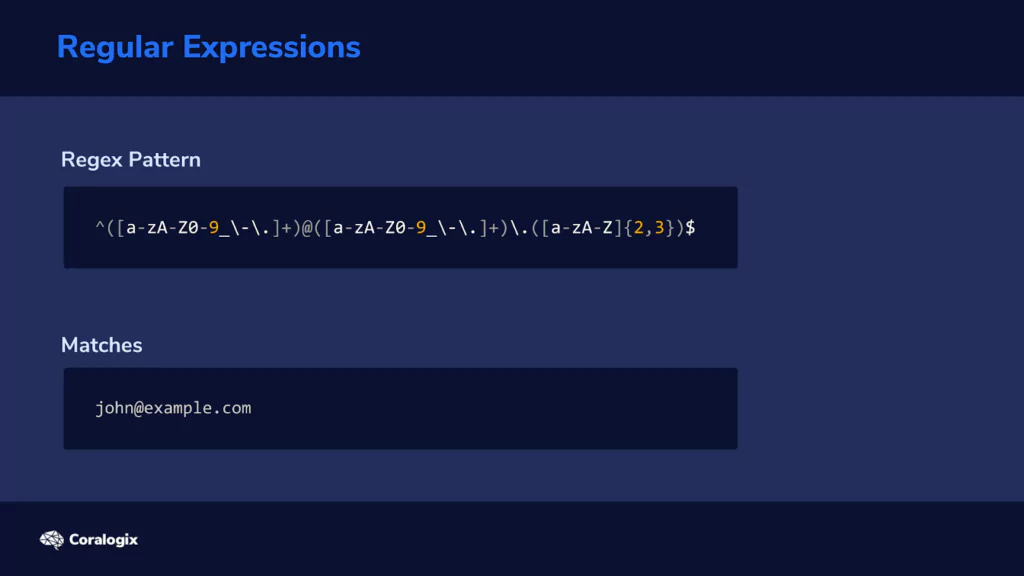
Fortunately, many common expressions are already predefined in Logstash’s Grok filter, and we can use their pattern names instead of writing those complicated strings of characters ourselves.
We can find a list of these predefined pattern names on the documentation page for the Grok filter plugin.
The generic Grok syntax looks like this:

In a nutshell, we tell it what pattern to look for and how to label the strings that match those patterns.
Back to our earlier example, this is how to define and label email addresses:

This Grok pattern will look for all email addresses and identify each as “client_email.” You’re free to choose whatever identifier name you want.
In our case, identifiers will be used as field names for matched values that will be imported to the index. We’ll see how this works in the hands-on exercises to follow.
Example Grok Filter
Let’s analyze how we would use Grok. Consider the following line in a log file:
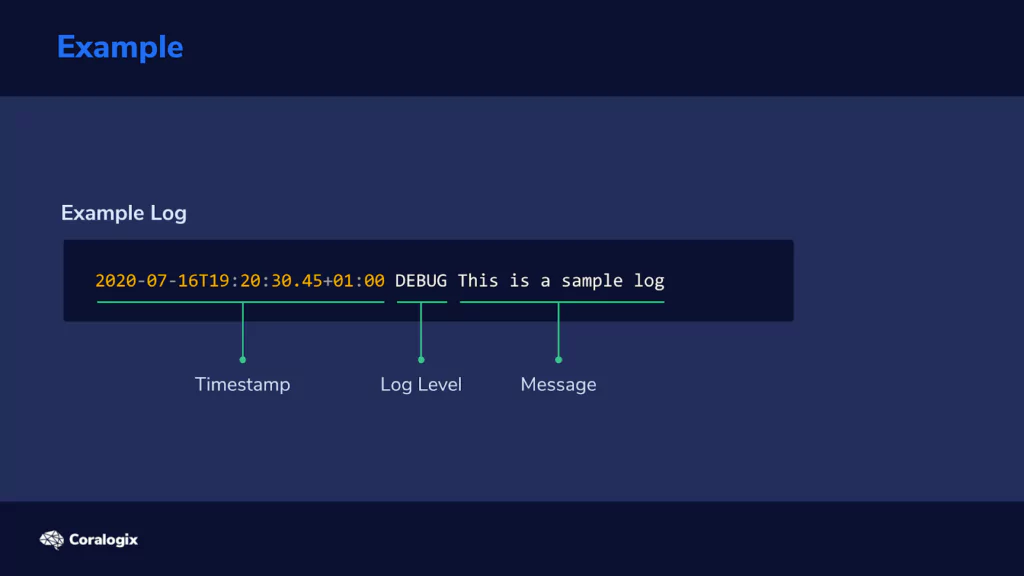
We can see three logical components here: a timestamp, the level of logging, and the error or status message.
The timestamp is in the so-called ISO format, which is useful since we have a Grok pattern that is already available.
How would we define a Grok filter that would extract the three components from this piece of log text? Well, here it is:
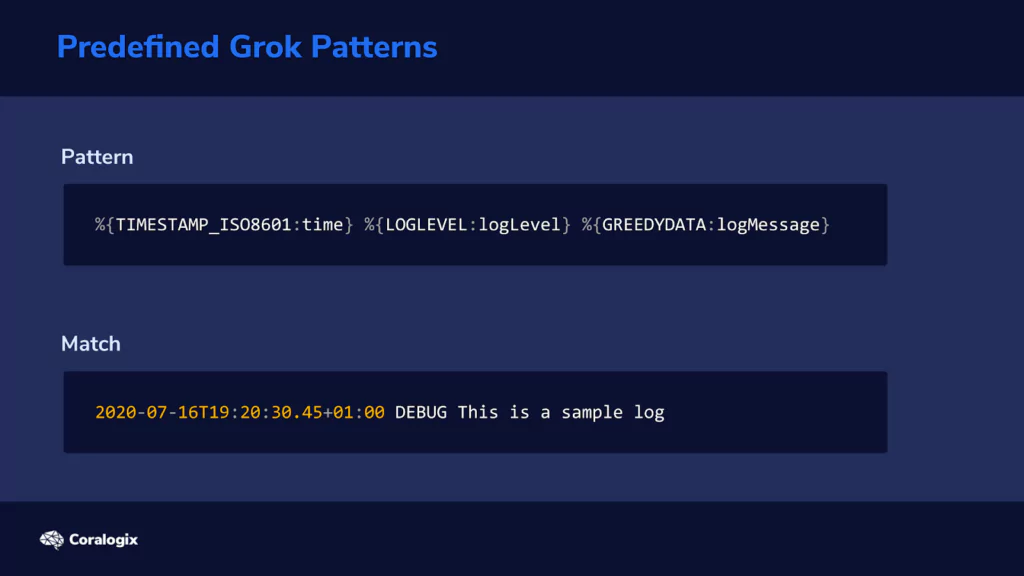
GREEDYDATA might sound mysterious, but all it does is match all other characters in the string analyzed, so it extracts the rest of the text.
Naturally, we would also like to test these Grok filters and see if they work as intended, on our specific data. For this purpose, we can use the Grok Debugger tool.
With the Grok Debugger, we can copy and paste the Grok filter in the first “Grok Pattern” field and the example log line in the second “Samples” field.
The output would look like this:
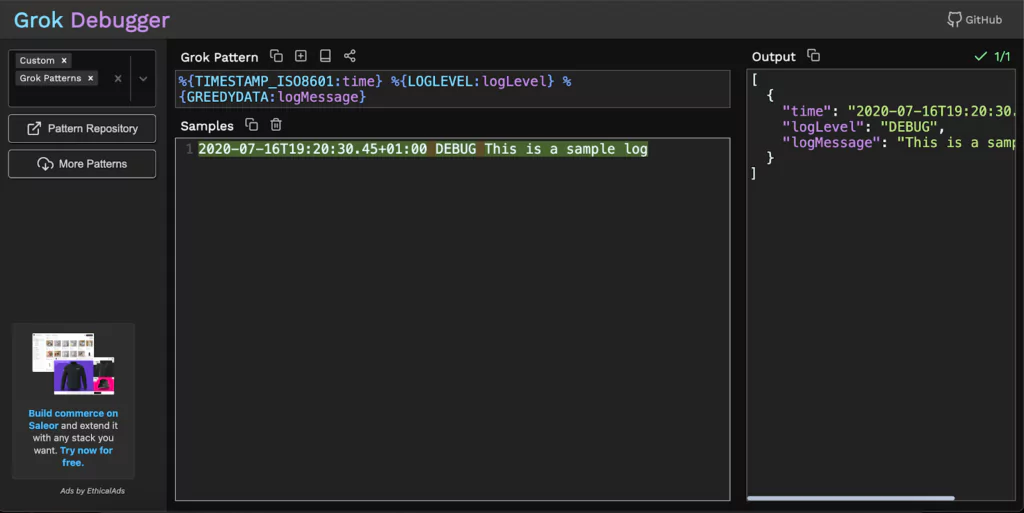
Now that we’ve established some Grok fundamentals, let’s explore the concepts using various examples.
Hands-On Exercises
Parsing a Log File with Grok
Let’s apply this newly acquired knowledge and see how to use the Logstash Grok filter plugin on a sample log file.
First, let’s create a directory where we will store our sample data:
$ mkdir -p /home/student/03-grok-examples
Next, let’s create the file we will parse:
$ nano /home/student/03-grok-examples/sample.log
Now let’s copy and paste the following text into the nano editor:
2020-10-11T09:49:35Z INFO variable server value is tomcat
2020-03-14T22:50:34Z ERROR cannot find the requested resource
2020-01-02T14:58:40Z INFO initializing the bootup
2020-06-04T06:56:04Z DEBUG initializing checksum
2020-05-07T03:07:11Z INFO variable server value is tomcat
Finally, let’s press CTRL+X, then type Y and then press ENTER to save the file.
We can now create the Logstash configuration file:
$ sudo nano /etc/logstash/conf.d/grok-example.conf
And enter the following content:
input {
  file {
   path => "/home/student/03-grok-examples/sample.log"
   start_position => "beginning"
   sincedb_path => "/dev/null"
  }
}
  filter {
   grok {
    match => { "message" => ['%{TIMESTAMP_ISO8601:time} %{LOGLEVEL:logLevel} %{GREEDYDATA:logMessage}'] }
  }
}
output {
  elasticsearch {
   hosts => "https://localhost:9200"
   index => "demo-grok"
}

stdout {}

}
Once again, we press CTRL+X, followed by Y and then ENTER to save the file.
We can see the configuration under the filter section is quite straightforward. We instruct Logstash to use the grok filter plugin and add match instructions where we used the same patterns and identifiers we explored earlier.
"message" => ['%{TIMESTAMP_ISO8601:time} %{LOGLEVEL:logLevel} %{GREEDYDATA:logMessage}']
Let’s run Logstash with our new configuration and see what happens.
$ sudo /usr/share/logstash/bin/logstash -f /etc/logstash/conf.d/grok-example.conf
After a few seconds, the output shows that the entries have been parsed and imported. At that point, we can press CTRL+C to exit from Logstash.
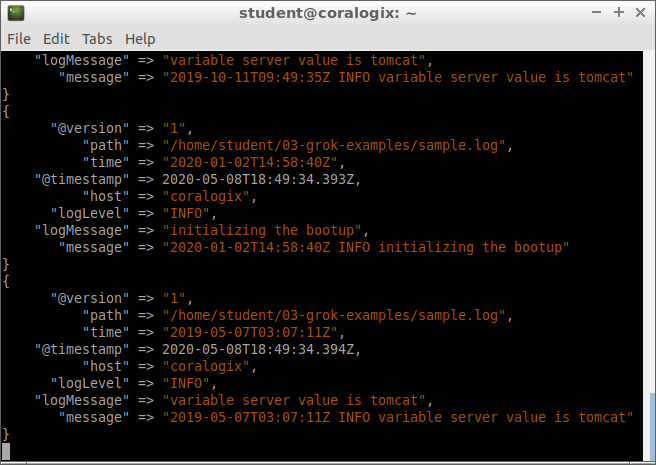
Let’s explore the contents added to the index:
$ curl -XGET "https://localhost:9200/demo-grok/_search?pretty=true" -H 'Content-Type: application/json' -d'{
  "_source": [
   "logLevel",
   "time",
   "logMessage"
  ]
}'

We’ll see our log entries neatly organized in the proper fields. Here’s an example of a document from the index:
 {
 "_index" : "demo-grok",
 "_type" : "_doc",
 "_id" : "FDyf9XEBIGK-cCtPEo5n",
 "_score" : 1.0,
 "_source" : {
 "logLevel" : "INFO",
 "logMessage" : "variable server value is tomcat",
 "time" : "2020-05-07T03:07:11Z"
 }
}
In our scenario, things are optimal since each log line has precisely three components, in the same order and each matches every Grok pattern. But what if some text didn’t match any pattern we defined?
How Grok Deals with Lines that Don’t Match Patterns
Let’s edit our sample log:
$ nano /home/student/03-grok-examples/sample.log
and add the following line at the end:
55.12.32.134 GET /user/id/properties
Our sample log should now have six lines and look like this:
2020-10-11T09:49:35Z INFO variable server value is tomcat
2020-03-14T22:50:34Z ERROR cannot found the requested resource
2020-01-02T14:58:40Z INFO initializing the bootup
2020-06-04T06:56:04Z DEBUG initializing checksum
2020-05-07T03:07:11Z INFO variable server value is tomcat
55.12.32.134 GET /user/id/properties
Once again, we press CTRL+X, then Y and ENTER to save the file.
We don’t want to write over previous data we imported into our index, so let’s delete that first:
$ curl -XDELETE "https://localhost:9200/demo-grok"
Now let’s rerun Logstash:
$ sudo /usr/share/logstash/bin/logstash -f /etc/logstash/conf.d/grok-example.conf
After the job is done, we press CTRL+C to exit. Let’s see what our index looks like this time:
$ curl -XGET "https://localhost:9200/demo-grok/_search?pretty=true" -H 'Content-Type: application/json' -d'{ }'
Besides the entries we saw the first time, we will now see a sixth entry that looks like this:
{
"_index" : "demo-grok",
"_type" : "_doc",
"_id" : "Gjyr9XEBIGK-cCtPRI4L",
"_score" : 1.0,
"_source" : {
"tags" : [
"_grokparsefailure"
],
"@timestamp" : "2020-05-08T19:02:53.768Z",
"path" : "/home/student/03-grok-examples/sample.log",
"message" : "55.12.32.134 GET /user/id/properties",
"@version" : "1",
"host" : "coralogix"
}
We can see that the document lacks the fields “time,” “logLevel,” and “logMessage.” The “message” field shows the line from our sample log that generated this document. We can see that this line doesn’t have any fields matching our Grok filter patterns. A tag called _grokparsefailure is added to signal that the parser had trouble with this line from the file.
We now saw what happens when Grok patterns can’t match anything on a line. Let’s explore the next scenario.
Multiple Grok Filters to Parse Complex Files
In our previous Logstash configuration, Grok tried to match our three patterns against each line in the sample log. But what if we want each line scanned for a second pair of patterns in case the first pair doesn’t match anything?
For example, in our case, if the line doesn’t have a timestamp, log level and log message, then Grok should try to search for another set of patterns. In this scenario, it will look for an IP address, an HTTP method and a URL.
Let’s create another configuration file for this:
$ sudo nano /etc/logstash/conf.d/grok-example-02.conf
In the nano editor, we copy and paste this content:
input {
  file {
   path => "/home/student/03-grok-examples/sample.log"
   start_position => "beginning"
   sincedb_path => "/dev/null"
  }
}
filter {
  grok {
   match => { "message" => [
   '%{TIMESTAMP_ISO8601:time} %{LOGLEVEL:logLevel} %{GREEDYDATA:logMessage}',
   '%{IP:clientIP} %{WORD:httpMethod} %{URIPATH:url}'
   ] }
 }
}
output {
  elasticsearch {
   hosts => "https://localhost:9200"
   index => "demo-grok-multiple"
 }

stdout {}

}
Once again, we press CTRL+X, followed by Y and then ENTER to save the file.
We notice the change in the config file is the new line added to the match option:
'%{IP:clientIP} %{WORD:httpMethod} %{URIPATH:url}'

We also see that these two sets of patterns are separated by a comma. So it’s pretty straightforward to add multiple pairs of patterns to a Grok filter.
But why would we do this? Well, this way, we can process complex logs where multiple programs log to the same file, as one example. Say Nginx and MySQL logged to the same file. One set of patterns can deal with log lines generated by Nginx, the other set can deal with lines generated by MySQL.
Let’s run Logstash with these new options:
$ sudo /usr/share/logstash/bin/logstash -f /etc/logstash/conf.d/grok-example-02.conf
As usual, we wait for the program to finish and then press CTRL+C to exit.
Let’s see what has been added to the index:
$ curl -XGET "https://localhost:9200/demo-grok-multiple/_search?pretty" -H 'Content-Type: application/json' -d'{
  "_source": {
   "excludes": [
    "@timestamp",
   "host",
  "path"
  ]
 }
}
No more _grokparsefailure tags. Also, a new document corresponds to the new line we added to our sample log:
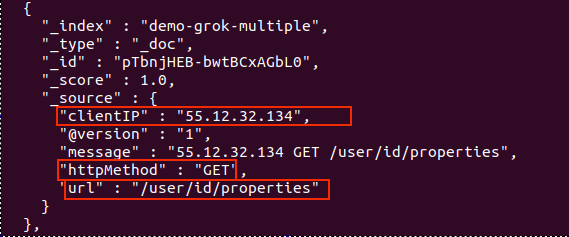
Nice! We got our log data neatly organized in Elasticsearch! We now have the freedom to parse almost any kind of text file, even if its information doesn’t follow a fixed pattern.


