Flux Tutorial: Implementing Continuous Integration Into Your Kubernetes Cluster

This hands-on Flux tutorial explores how Flux can be used at the end of your continuous integration pipeline to deploy your applications to Kubernetes clusters.
What is Flux?
Flux is an open-source tool that enables you to automate your application delivery pipelines to Kubernetes clusters. Flux uses source control platforms like Git, enabling users to describe their desired application state. While it was originally developed by Weaveworks, it’s recently been open-sourced.
Flux has been rapidly growing in popularity, as it integrates into Kubernetes and is straightforward to set up. Much like the Terraform project, Flux enables DevOps engineers to deploy solutions to Kubernetes using a declarative configuration file. It’s simple to read and straightforward to update.
Additionally, the configuration files reside within your application’s existing source control platform, enabling a single point for all of your application’s code and configuration.
Why Use Flux?
Once deployed, Flux synchronizes the Kubernetes manifests stored in your source control system with your Kubernetes clusters. This in turn uses periodical polling updating the cluster when changes are identified.
This automated approach removes the need to run kubectl commands and monitor your clusters to see if they have deployed the correct configuration and workloads!
The key benefits of deploying Flux are as follows:
- Your source control becomes a single source of the truth.
- Your source control becomes a central place for all of your environments, and configurations which are defined in code.
- All changes are observable and verified.
How Does Flux Work?
Before we jump into deploying Flux, let’s familiarize ourselves with how the platform works!
Flux configuration files are written in YAML manifests declaratively. These configuration files define everything required to deploy your application to your Kubernetes clusters. The steps for deployment & changes are as follows:
- The team describes the Kubernetes cluster configuration and defines this in a manifest that resides in their source control platform which is normally git.
- The memcached pod stores the running configuration.
- Flux periodically connects to your source control platform and compares the running configuration from the memcached pod vs the source control manifest.
- If changes are detected, Flux runs several kubectl apply and delete commands to bring the cluster in sync. The new running configuration is then saved to the memcached pod.
Flux can also poll container registries and update the Kubernetes manifest with the latest versions. This is very powerful should you wish to automate the deployment of new containers.
Deploying Flux
In this Flux tutorial, we are going to deploy PodInfo to our Kubernetes cluster, but you can convert what we are doing to suit your requirements.
We are now going to run through the process of deploying Flux and configuring the solution to achieve the above. Before we jump in, make sure you have access to your Kubernetes cluster and access to the cluster-admin role.
Note: We are assuming that your Kubernetes cluster is version 1.16 or newer and your kubectl binary is version 1.18 or newer.
Install FluxCTL
Flux provides a binary that is used to deploy and manage Flux on your Kubernetes clusters. The first step of this Flux tutorial is to get Flux installed so we can start deploying it to our Kubernetes cluster.
To install Flux we will run the following command on macOS (In this tutorial we are using brew which is a package manager for OSX).
brew install Fluxcd/tap/Flux
If you are using Linux:
curl -s https://toolkit.Fluxcd.io/install.sh | sudo bash
For Windows, you can find the binary here – https://github.com/Fluxcd/Flux2/releases
To confirm you have installed Flux and it’s working run:
deklan@Deklans-MacBook-Pro ~ % Flux -v
You should get back the below:
deklan@Deklans-MacBook-Pro ~ % Flux -v

Flux version 0.8.2

deklan@Deklans-MacBook-Pro ~ %
Using Flux to Create a Repo & Configuration
Before we use Flux to deploy to our cluster, we need to have a repository with our Kubernetes configuration. In this step of the Flux tutorial, we are going to create a repo in Git and define our workspace and namespace within it. The Flux binary will take care of all of this for you. This tutorial expects that you have already got kubectl working and your cluster is connected.
First, let’s define our Github credentials for Flux to use to deploy your new repo and link it to your cluster.
export GITHUB_TOKEN='<YOUR TOKEN>’

export GITHUB_USER='<YOUR USERNAME>’
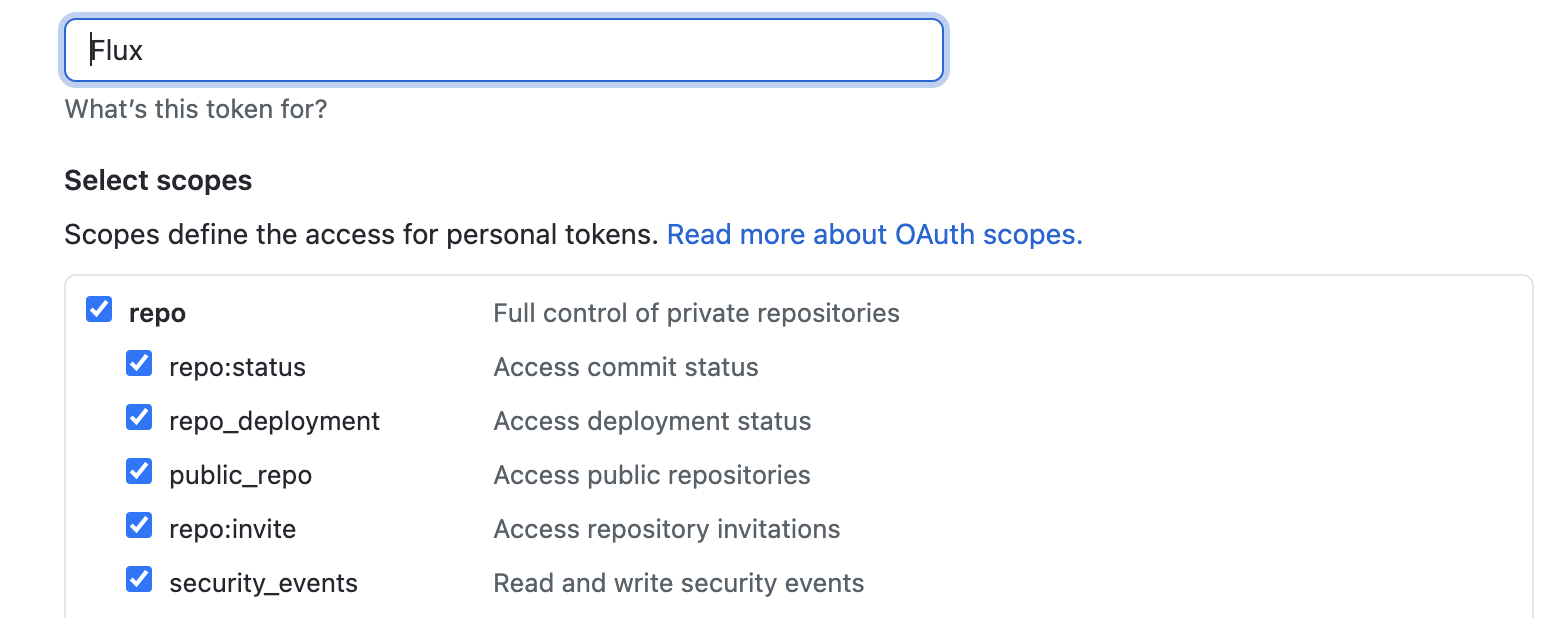
Generating a Github token is done on the Github site. Go to your profile and then select ‘Developer Settings’ on the left-hand side. From there select ‘Personal access token’ and then ‘Generate new token’. Flux requires the permissions below:

With your credentials loaded as environmental variables, we can now use the Flux command to create a repo, create configuration files and link them to your cluster. Run the below (modify the example to suit your requirements):
Flux bootstrap github

  --owner=$GITHUB_USER

  --repository=Flux

  --branch=main

  --path=./clusters/my-cluster

  --personal
You should get a response like this:
deklan@Deklans-MacBook-Pro FluxTutorial % Flux bootstrap github

  --owner=$GITHUB_USER

  --repository=Flux

  --branch=main

  --path=./clusters/my-cluster

  --personal

► connecting to github.com

✔ repository created

✔ repository cloned

✚ generating manifests

✔ components manifests pushed

► installing components in Flux-system namespace

namespace/Flux-system created

customresourcedefinition.apiextensions.k8s.io/alerts.notification.toolkit.Fluxcd.io created

customresourcedefinition.apiextensions.k8s.io/buckets.source.toolkit.Fluxcd.io created

customresourcedefinition.apiextensions.k8s.io/gitrepositories.source.toolkit.Fluxcd.io created

customresourcedefinition.apiextensions.k8s.io/helmcharts.source.toolkit.Fluxcd.io created

customresourcedefinition.apiextensions.k8s.io/helmreleases.helm.toolkit.Fluxcd.io created

customresourcedefinition.apiextensions.k8s.io/helmrepositories.source.toolkit.Fluxcd.io created

customresourcedefinition.apiextensions.k8s.io/kustomizations.kustomize.toolkit.Fluxcd.io created

customresourcedefinition.apiextensions.k8s.io/providers.notification.toolkit.Fluxcd.io created

customresourcedefinition.apiextensions.k8s.io/receivers.notification.toolkit.Fluxcd.io created

serviceaccount/helm-controller created

serviceaccount/kustomize-controller created

serviceaccount/notification-controller created

serviceaccount/source-controller created

clusterrole.rbac.authorization.k8s.io/crd-controller-Flux-system created

clusterrolebinding.rbac.authorization.k8s.io/cluster-reconciler-Flux-system created

clusterrolebinding.rbac.authorization.k8s.io/crd-controller-Flux-system created

service/notification-controller created

service/source-controller created

service/webhook-receiver created

deployment.apps/helm-controller created

deployment.apps/kustomize-controller created

deployment.apps/notification-controller created

deployment.apps/source-controller created

networkpolicy.networking.k8s.io/allow-scraping created

networkpolicy.networking.k8s.io/allow-webhooks created

networkpolicy.networking.k8s.io/deny-ingress created

◎ verifying installation

✔ install completed

► configuring deploy key

✔ deploy key configured

► generating sync manifests

✔ sync manifests pushed

► applying sync manifests

◎ waiting for cluster sync

✔ bootstrap finished
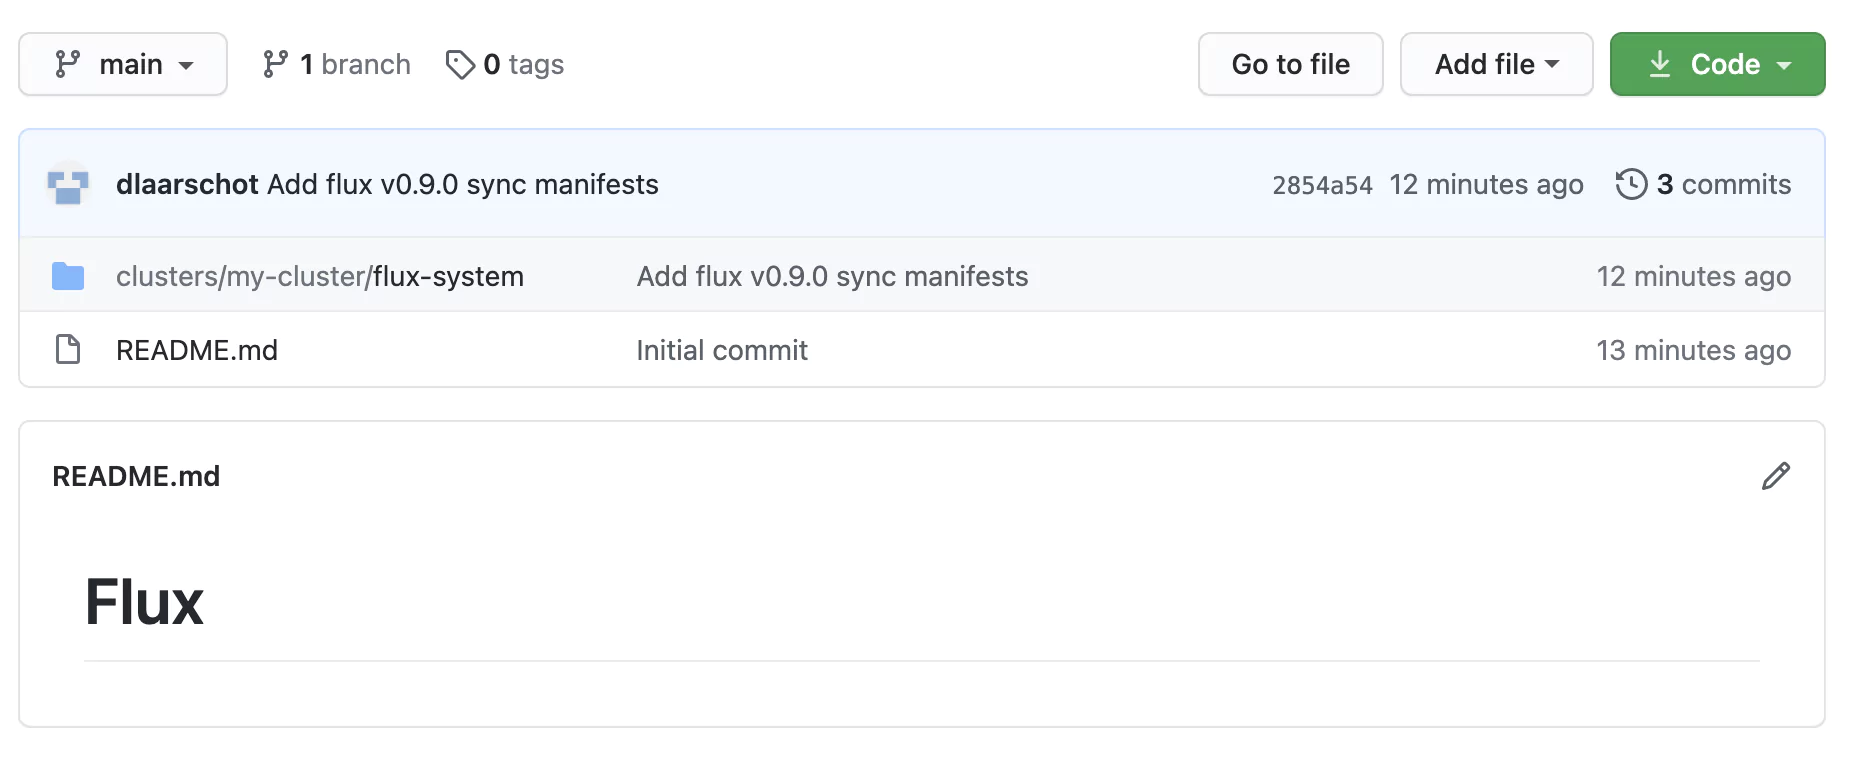
A quick check of our GitHub repo confirms the required configuration manifest files have been created!

Let’s check to see if the Flux pods are running. Using kubectl, run the following command:
kubectl get pods -n Flux-system
The results should be similar to the below:
deklan@Deklans-MacBook-Pro Flux-system % kubectl get pods -n Flux-system

NAME                                       READY   STATUS    RESTARTS   AGE

helm-controller-657d76475b-kb5b7           1/1     Running   0          19m

kustomize-controller-54fdf84b79-25dpw      1/1     Running   0          19m

notification-controller-769876bb9f-x76wv   1/1     Running   0          19m

source-controller-c55db769d-lmbh9          1/1     Running   0          19m
Using the Flux command, we can check to see the currently deployed service on the cluster. Run:
Flux get kustomizations
This command will display all the services running on the cluster. Yours should look like the below:
NAME            READY   MESSAGE                                                         REVISION                                        SUSPENDED

Flux-system     True    Applied revision: main/08d4eb338ce75292b0669eef84b64e7db2b161cf main/08d4eb338ce75292b0669eef84b64e7db2b161cf   False
Now Flux is running! It’s time to deploy an application.
Files & Folders Created
First, let’s clone the new repo we have created to our local machine:
git clone <YOUR REPO>
Open the new repo up and navigate to the clusters/my-cluster/ folder. Your file structure should look similar to the below:
- cluster

- my-cluster

- Flux-system

- gotk-components.yaml

- gotk-sync.yaml

- kustomization.yaml
The Flux-system folder contains the configuration for the Flux service running on the cluster. When deploying a new application, you should create a new folder under your cluster name to house the manifest files. Also for multi-cluster setups (for example development and production), you will have separate <my-cluster> folders to house their respective configuration.
Deploying an Application
In this part of the Flux tutorial, we are going to deploy Podinfo. Podinfo is a tiny web application made with Go that showcases best practices of running microservices in Kubernetes. Now that we have a repo and it’s connected to our Kubernetes cluster using Flux, it’s time to build our configuration to define how our cluster should operate.
Add Podinfo Repository to Flux
Let’s deploy the Podinfo web app to the cluster. We will be using a public repository https://github.com/stefanprodan/podinfo.
Make sure you are in the base level of your local GitHub repository. Create a GitRepository manifest pointing to hello-kubernetes repository’s master branch:
Now, create a folder to house the manifests:
mkdir ./clusters/my-cluster/app-podinfo
And, create the manifest files:
Flux create source git podinfo

  --url=https://github.com/stefanprodan/podinfo

  --branch=master

  --interval=30s

  --export > ./clusters/my-cluster/app-podinfo/podinfo-source.yaml
Note: We are exporting our manifest to the app-podinfo folder. Refer to the section above for more information on the file structure.
The above command will create the following manifest:
---

apiVersion: source.toolkit.Fluxcd.io/v1beta1

kind: GitRepository

metadata:

  name: podinfo

  namespace: Flux-system

spec:

  interval: 30s

  ref:

    branch: master

  url: https://github.com/paulbouwer/podinfo-kubernetes
Let’s commit and push it back to our remote GitHub repository so that Flux will pick it up and add it to our Flux running configuration:
git add -A && git commit -m "Add Hello-Kube GitRepository"
And then commit this to the remote repo:
git push
Deploy the Podinfo Application
Now we have the connection to the repository configured, it’s time to deploy the application. Next, we will create a Flux Kustomization manifest for podinfo. This configures Flux to build and apply the kustomize directory located in the podinfo repository. Using the Flux command run the following:
Flux create kustomization podinfo

  --source=podinfo

  --path="./kustomize"

  --prune=true

  --validation=client

  --interval=5m

  --export > ./clusters/my-cluster/app-podinfo/podinfo-kustomization.yaml
The above command will create the below manifest file:
---

apiVersion: kustomize.toolkit.Fluxcd.io/v1beta1

kind: Kustomization

metadata:

  name: podinfo

  namespace: Flux-system

spec:

  interval: 5m0s

  path: ./kustomize

  prune: true

  sourceRef:

    kind: GitRepository

    name: podinfo

  validation: client
Now let’s push our changes to git.
git add .

git commit -m 'Adding Podinfo’'

git push
Flux will monitor the repository and detect the changes. It should take about 30 seconds for the new changes to be deployed. You can check using the following command (it will run the Flux get command every two seconds:
watch Flux get kustomizations
Before Flux updated:
NAME            READY   MESSAGE                                                         REVISION                                        SUSPENDED

Flux-system     True    Applied revision: main/b774a7985a53a0855ceda7ba47633599272f9070 main/b774a7985a53a0855ceda7ba47633599272f9070   False
After Flux updated:
Every 2.0s: Flux get kustomizations


NAME            READY   MESSAGE                                                                 REVISION                                        SUSPENDED

Flux-system     True    Applied revision: main/28833d5292122eac421cbe05b5fbc0d439723f99         main/28833d5292122eac421cbe05b5fbc0d439723f99   False

podinfo         True    Applied revision: master/e43ebfa5bf4b87c46f2e1db495eb571cd398e2f7       master/e43ebfa5bf4b87c46f2e1db495eb571cd398e2f7 False
If we check our running pods using kubectl we can see that the application has been deployed and is running:
kubectl get pods

NAME                       READY   STATUS    RESTARTS   AGE

podinfo-65c5bdfc77-9zvp2   1/1     Running   0          94s

podinfo-65c5bdfc77-pl8j7   1/1     Running   0          110s
Deploying an Operator
In this section of the Flux tutorial, we are going to deploy an operator to our cluster. Operators are extensions to Kubernetes that enable functions to support your applications. A great example of this is the Coralogix operator that enables log shipping from your applications. The advantage of using operators in Flux is that their configuration resides in your Flux repository providing a single source of the truth.
The example used in this Flux tutorial assumes you have an application configured ready for use with the Coralogix Kubernetes operator. We are going to use the Helm commandlet to deploy this operator.
Helm can be installed on OSX using Brew:
Brew install helm
On Linux:
Apt-get install helm
And on Windows check out the helm website – https://helm.sh/docs/intro/install/
Now we will use helm to deploy the operator. Firstly we need to add the repo to helm:
helm repo add cx-operator https://coralogix.github.io/cx-operator/
The Coralogix operator requires an API key that can be stored in the keymanager of our cluster:
kubectl create secret generic coralogix-operator-secrets --from-literal=RULES_API_TOKEN=<KEY>
Now let’s use the helm package manager to check that the package is available for installation:
helm search repo cx-operator
The result should be similar to this:
deklan@Deklans-MacBook-Pro ~ % helm search repo cx-operator

NAME                    CHART VERSION APP VERSION DESCRIPTION

cx-operator/cx-operator 0.3.7+e08afe2 0.3.7       Coralogix Kubernetes Operator

deklan@Deklans-MacBook-Pro ~ %
Now we know the package exists, let’s get it installed! We are setting the Coralogix API to the EU server in this command.
deklan@Deklans-MacBook-Pro ~ % helm install --set config.coralogixApi.host=grpc-api.coralogixstg.wpengine.com cx-operator cx-operator/cx-operator
Great! We now have the operator installed! This operator can be used to define your integrations with Coralogix in your application configuration. The advantage is a simple interface defined as code that can be included in your Git repository which configures any additional services your application may require. You can find out more about the Coralogix operator for Kubernetes, so that you can increase your system observability and enhance your Flux deployment.
Conclusion
When it comes to continuous integration and Kubernetes clusters, Flux is one of the most lightweight platforms available to declaratively define your Kubernetes configuration. Flux enables you to push code rather than containers, and with operators like the Coralogix cx-operator, you can build your entire stack in a YAML manifest.
The benefits include no learning curve for new engineers, a standardized deployment process, and a single source of the truth. Moreover, the Flux system is simple to use and provides the ability to sync multiple clusters for example development and production.
This Flux tutorial has covered the basics so go ahead and get building the GitOps way!


