 The new standard of observability is here. Discover Olly, the industry’s first
Logstash CSV: Import & Parse Your Data [Hands-on Examples]
![Logstash CSV: Import & Parse Your Data [Hands-on Examples]](https://coralogix.com/wp-content/uploads/2025/06/42.png)

The CSV file format is widely used across the business and engineering world as a common file for data exchange. The basic concepts of it are fairly simple, but unlike JSON which is more standardized, you’re likely to encounter various flavors of CSV data. This lesson will prepare you to understand how to import and parse CSV using Logstash before being indexed into Elasticsearch.
What is a CSV?
CSV, short for Comma Separated Format, is a popular file format that stores tabular data and is used by spreadsheet software like Microsoft Excel and Google Sheets.
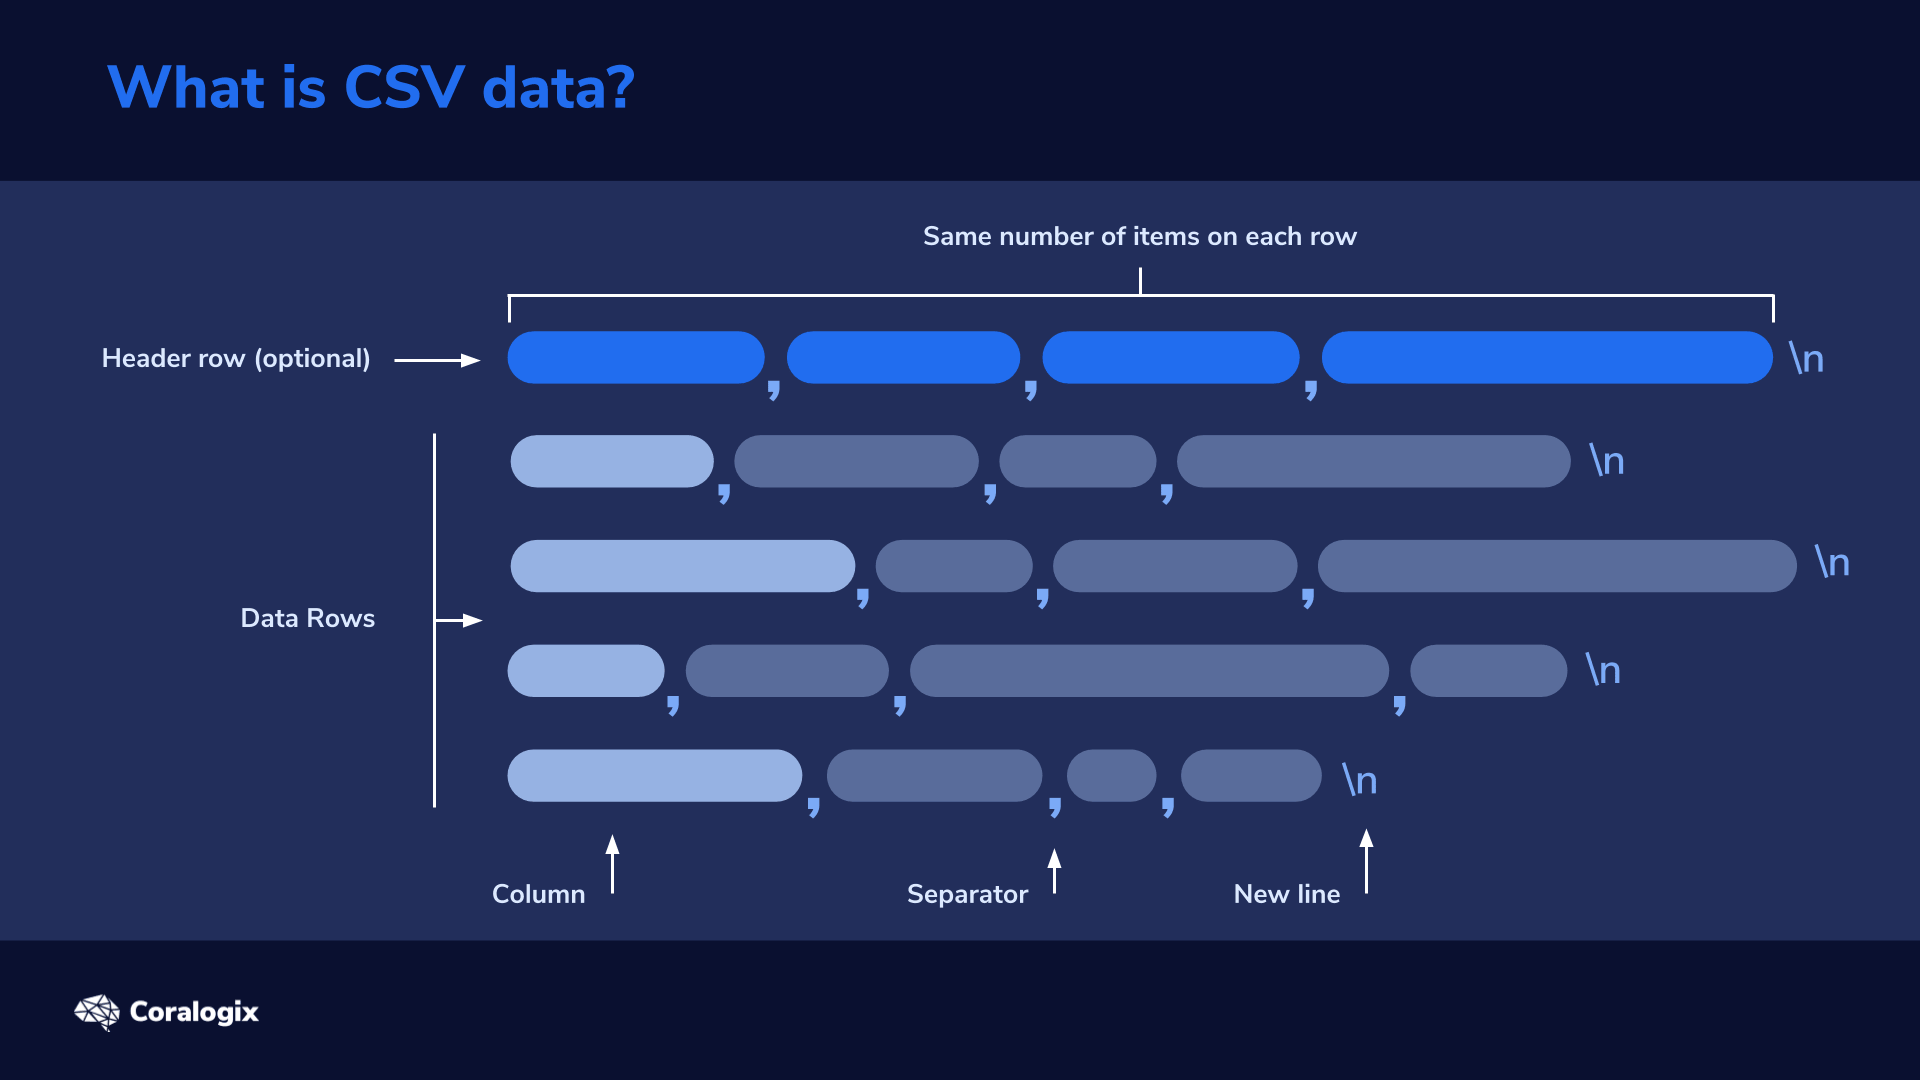
Here’s a quick rundown of the general rules for the CSV format:
- The delimiter sets the boundaries between lists of items in the file. The name CSV stands for comma-separated values because these files mostly use commas as the delimiter.
- CSV organizes data into the same number of items per row, so that every row has the same number of items, even if some of those are empty. This enables a program to reliably parse each item or quickly search across an entire column, instead of row-by-row.
- Each row in the file is separated by a newline character.
- Column headers, which describe each column’s data, will typically appear as the first row in the CSV file, but it’s an optional row. All other rows that follow include the actual data.
- Some parts like the header rows are optional, and while many CSVs use commas to separate the items contained in the file, in reality, this separator can be any character, so the same parsing configuration may not work for all CSV files.
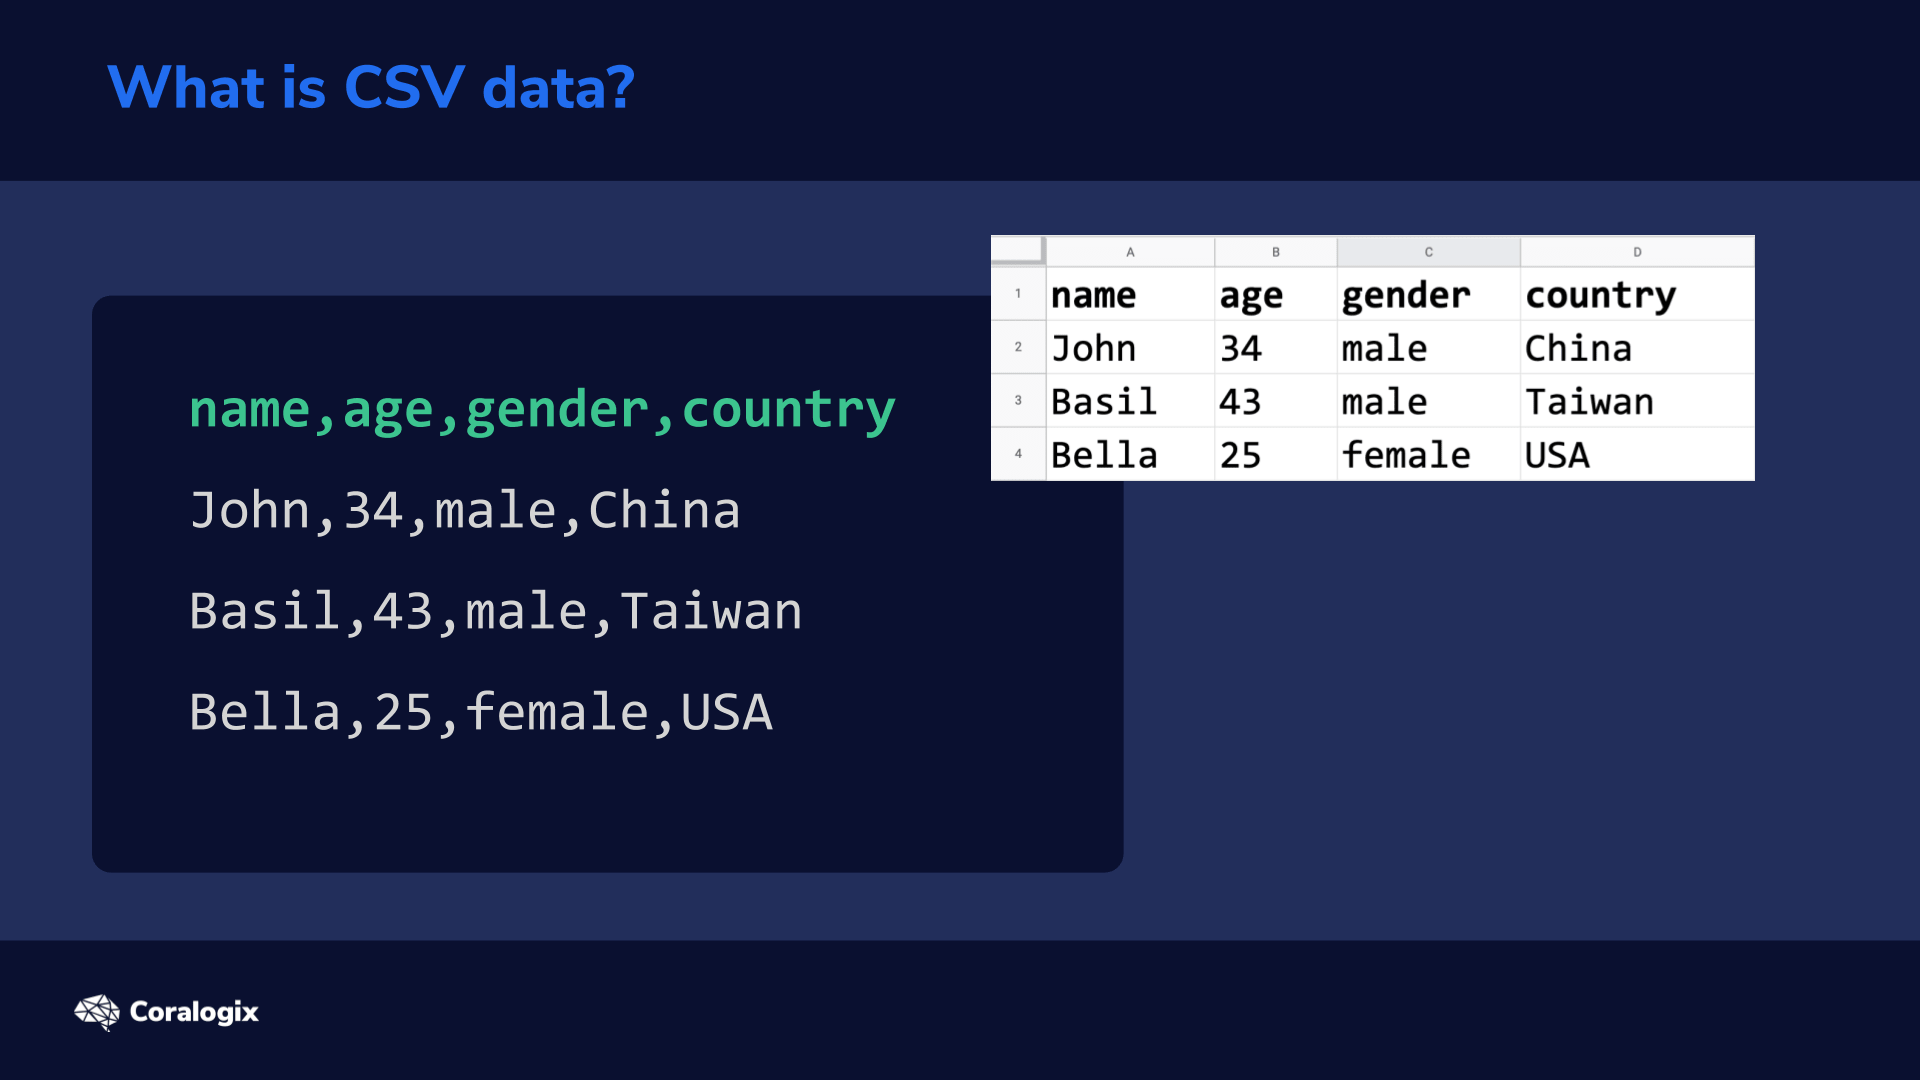
Let’s take a look at some sample CSV data:name,age,gender,country
John,34,male,China
Basil,43,male,Taiwan
Bella,25,female,USA
The first row here is the “header row” and defines the names of the fields. The following rows display the actual values of those header row fields.
A program that processes this CSV data will associate the first field of “name” with the first value on every subsequent row after the header. In other words, John, Basil and Bella would all be associated with the “name” field.
This process of interpreting data, extracting values and converting them in the process to another format, is usually called parsing.
Hands-On Exercises
Creating the CSV File
Let’s create a directory for saving the CSV file we’ll work with:
mkdir -p /home/student/csv-data
Next, we can download the sample CSV data from Github repository and add it to the folder we just created with the following command:
cd /home/student/csv-data && { curl -O https://raw.githubusercontent.com/coralogix-resources/elk-course-samples/master/csv-schema-short-numerical.csv ; cd -; }
After running the command, the sample CSV file will be downloaded to the folder /home/student/csv-data
This CSV file contains an example of payment information log data containing various customers along with their IP addresses, gender, country and so on.
Now let’s see what is in the CSV file by typing in the command:
cat /home/student/csv-data/csv-schema-short-numerical.csv
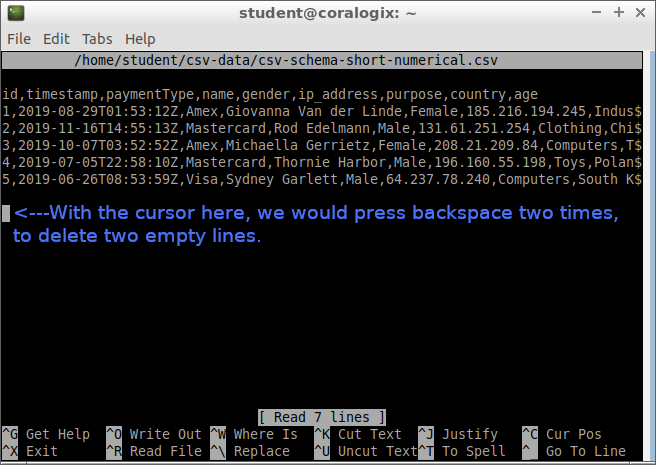
This will display the contents of the fileid,timestamp,paymentType,name,gender,ip_address,purpose,country,age
1,2019-08-29T01:53:12Z,Amex,Giovanna Van der Linde,Female,185.216.194.245,Industrial,Philippines,55
2,2019-11-16T14:55:13Z,Mastercard,Rod Edelmann,Male,131.61.251.254,Clothing,China,32
3,2019-10-07T03:52:52Z,Amex,Michaella Gerrietz,Female,208.21.209.84,Computers,Thailand,32
4,2019-07-05T22:58:10Z,Mastercard,Thornie Harbor,Male,196.160.55.198,Toys,Poland,51
5,2019-06-26T08:53:59Z,Visa,Sydney Garlett,Male,64.237.78.240,Computers,South Korea,25
Press the DOWN arrow key until you reach the last line and then delete the empty lines, by pressing BACKSPACE. It’s important there are no empty lines in this CSV file, otherwise Logstash will try to process them. If there are empty rows, Logstash would try to parse them and the rows would still be indexed, but without associated fields. So in effect the empty lines will create empty documents in Elasticsearch causing us to unnecessarily increase the document count.
To save our file, we press CTRL+X, then press Y and finally ENTER.
In our next step, let’s look at how a CSV file can be imported into Elasticsearch, by using Logstash.
Logstash Configuration
We’ll be using a configuration file to instruct Logstash on how to execute the import operation.
Let’s download the configuration file to the /etc/logstash/conf.d folder by typing in the command:
sudo wget -P /etc/logstash/conf.d https://raw.githubusercontent.com/coralogix-resources/elk-course-samples/master/csv-read.conf
Now let’s keep the configuration file open by typing in:
sudo cat /etc/logstash/conf.d/csv-read.conf
This will open the configuration file as shown:
Original image link here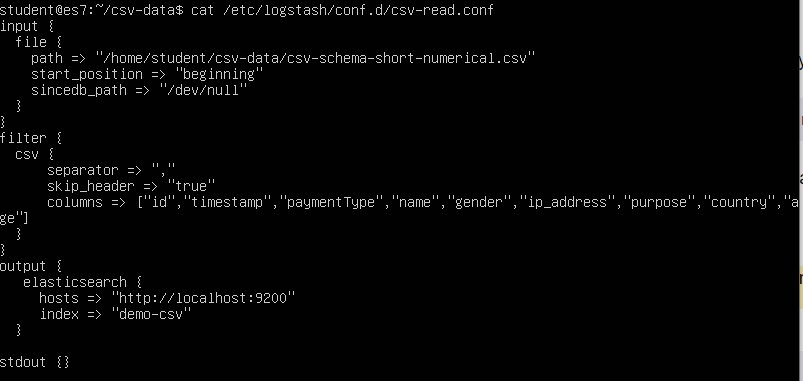
Let’s first break down how this configuration file works section-by-section. First, let’s check the input section:
Input
input {
  file {
    path => "/home/student/csv-data/csv-schema-short-numerical.csv"
    start_position => "beginning"
    sincedb_path => "/dev/null"
  }
}
Here, the “file” subsection indicates that a file will be used for the input. Within, we use these options:
- path which indicates the full path to the input file (in our case, the CSV file we prepared earlier).
- Start_position is where we instruct Logstash to read the file from the beginning. This setting only applies to files that are read for the first time. By default, the program would prefer to read from the end, since it expects to process a file that would have data added to it periodically. This way, it could import only the new data whenever it’s added to the end of the CSV file. If the file has been seen before, the next parameter will be used to decide what to do.
- sincedb_path points to a database file that keeps track of the last line parsed in an input file (in this scenario, the CSV file). The next time the input file would be parsed, the process would continue from the position recorded in the sincedb file. Here, we set this to “/dev/null” so that Logstash won’t be able to record the last line it previously read for that particular file. This way, it will process the entire file each time, from beginning, rather than continue where it left off.
Filter
Now let’s break down the filter section of the configuration file.
filter {
  csv {
      separator => ","
      skip_header => "true"
      columns => ["id","timestamp","paymentType","name","gender","ip_address","purpose","country","age"]
  }
}
We’re going to use “csv” as a subsection to specify that this is the type of file we intend to parse. Within that, we declare the following options:
- separator where we pass the comma character “,”. This way, Logstash will know that commas are used as a delimiter to separate fields.
- skip_header is important here, telling the parser to ignore the first line, which only indicates column names and not the actual data fields we intend to import.
- columns where we specify the names of the columns that will be imported. In this case, we are telling our parser that the first field on each line is an ID, the second is a timestamp, and so on, until the last one which is an age.

Output
Now let’s explore the final section in our configuration file, the “output” section:
output {
   elasticsearch {
     hosts => "https://localhost:9200"
     index => "demo-csv"
  }

stdout {}

}
- elasticsearch subsection instructs our program that we intend to send the data to Elasticsearch.
- hosts option specifies the host and port where our Elasticsearch accepts incoming connections.
- index option defines the name of the Elasticsearch index where imported data will be stored.
- stdout will make the import action display its status output and log information in the terminal.
Running Logstash with the Config File
Now, that we have seen the different sections of the configuration file, let’s run this configuration file with the options we just defined:
sudo /usr/share/logstash/bin/logstash -f /etc/logstash/conf.d/csv-read.conf
After the process completes, the result will look similar to the following:
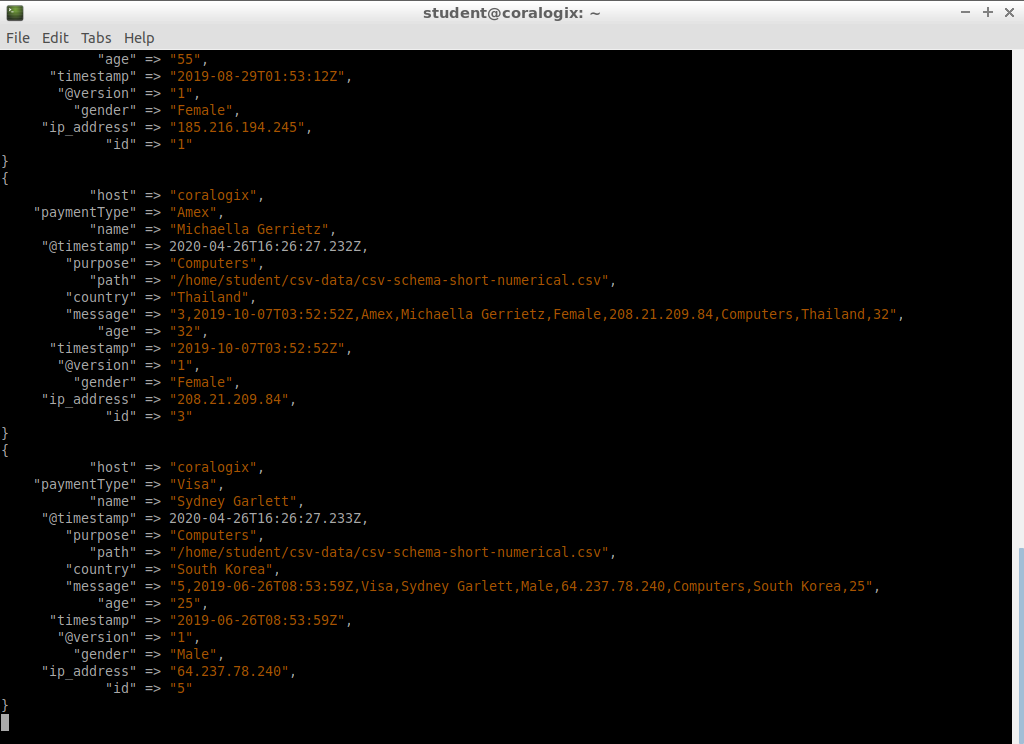
This output shows that our entries have been successfully imported.
Now, every time we make a change to a configuration and run it, we need to exit Logstash. So let’s go ahead and press CTRL+C to exit Logstash
We can check the data that was inserted, with this cURL request:
curl -XGET localhost:9200/demo-csv/_search?pretty=true
Logstash CSV Output Example
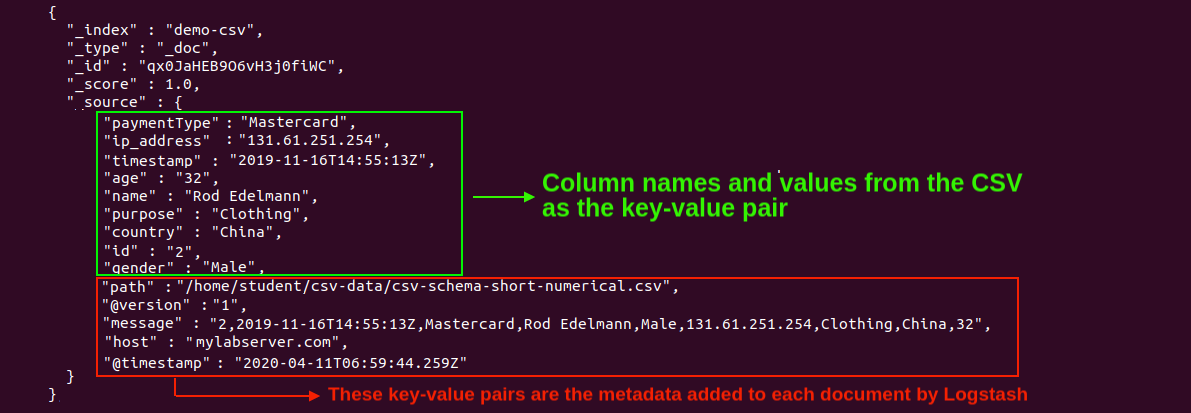
The output should look something like this:
{
        "_index" : "demo-csv",
        "_type" : "_doc",
        "_id" : "gDpPt3EBMenH6gYIupRG",
        "_score" : 1.0,
        "_source" : {
          "host" : "coralogix",
          "paymentType" : "Visa",
          "name" : "Sydney Garlett",
          "@timestamp" : "2020-04-26T16:26:27.233Z",
          "purpose" : "Computers",
          "path" : "/home/student/csv-data/csv-schema-short-numerical.csv",
          "country" : "South Korea",
          "message" : "5,2019-06-26T08:53:59Z,Visa,Sydney Garlett,Male,64.237.78.240,Computers,South Korea,25",
          "age" : "25",
          "timestamp" : "2019-06-26T08:53:59Z",
          "@version" : "1",
          "gender" : "Male",
          "ip_address" : "64.237.78.240",
          "id" : "5"
        }
There’s a lot of useful information in this output. For example, it shows us the file that was used for the imported data, column names, field values, and so on.
Logstash Mutate Filter Plugin
So far, we’ve only played around with the basics of importing CSV files but we can already see that it’s pretty straightforward.
But that’s only because we haven’t been picky about the exact nature of the data. Other times though, we may need to be specific with what data we use and how. For example, we may need to skip importing some fields that are unnecessary, change the mapping of the selected fields, convert the data type of some values or process them in some other way, by changing all characters to uppercase, for example.
These kinds of scenarios can be configured by adding another entry to our Logstash configuration located in the filter section which is called mutate.
To make the next part easier, you can download the configuration file which we are going to be working with. You can do so by typing in the following command:
sudo wget -P /etc/logstash/conf.d https://raw.githubusercontent.com/coralogix-resources/elk-course-samples/master/csv-read-drop.conf
Now to see what’s in the configuration file, let’s use the cat command which we previously used:
sudo cat /etc/logstash/conf.d/csv-read-drop.conf
This will show the configuration file:
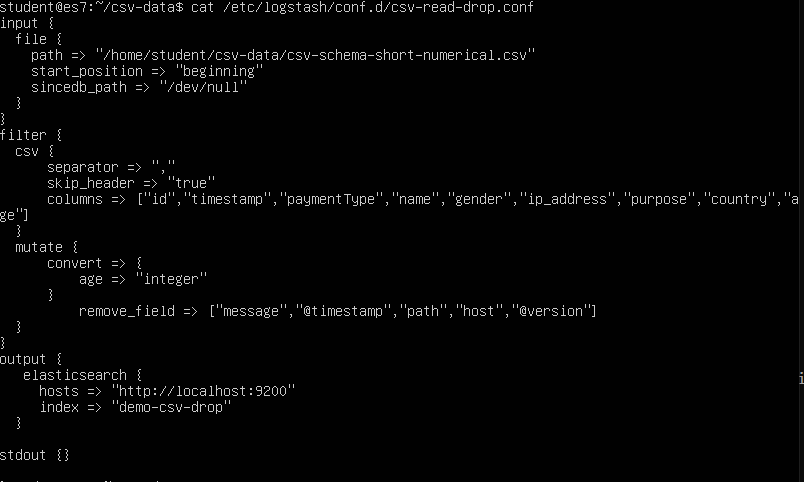
Let’s have a look at the mutate section:
filter {
  csv {
      separator => ","
      skip_header => "true"
      columns => ["id","timestamp","paymentType","name","gender","ip_address","purpose","country","age"]
  }
  mutate {
      convert => {
          age => "integer"
      }
        remove_field => ["message","@timestamp","path","host","@version"]
  }
}
In this example, the filter section has two main entries: “csv” and “mutate“.
Keep in mind that the order in which these appear is important. In this case, the parameters from the “csv” section will be applied first, and only afterwards will the ones from “mutate” be applied.
The convert section is pretty straight forward. All values in the age field will be converted to integer values. For example, the age value of “30.5” will be converted to the integer value “30”.
Under remove_field we specify all the fields that we want to remove.
Now, we can run Logstash with these new settings with this command:
sudo /usr/share/logstash/bin/logstash -f /etc/logstash/conf.d/csv-read-drop.conf
After the action is completed, press CNTRL+C to exit from the execution screen.
Now, let’s check if the fields were removed as we specified in the configuration file with the following cURL command:
curl -XGET "https://localhost:9200/demo-csv-drop/_search?pretty=true" -H 'Content-Type: application/json' -d'{ "size":1}'
Part of the response will look like this:
{
        "_index" : "demo-csv-drop",
        "_type" : "_doc",
        "_id" : "gzpdt3EBMenH6gYIOJQL",
        "_score" : 1.0,
        "_source" : {
          "name" : "Giovanna Van der Linde",
          "gender" : "Female",
          "purpose" : "Industrial",
          "timestamp" : "2019-08-29T01:53:12Z",
          "age" : 55,
          "paymentType" : "Amex",
          "ip_address" : "185.216.194.245",
          "country" : "Philippines",
          "id" : "1"
        }
We can see here that the fields we specified were indeed removed, as intended.
Let’s also check the mapping for the index named “demo-csv-drop”:
curl -XGET "https://localhost:9200/demo-csv-drop/_mapping/field/age?pretty=true"
A response such as the following shows us that, indeed, the age field is of the integer data type we specified. Notice that it’s called “long” here, but that’s just an integer type, called a long integer, which can store more digits than a short integer.
{
  "demo-csv-drop" : {
    "mappings" : {
      "age" : {
        "full_name" : "age",
        "mapping" : {
          "age" : {
            "type" : "long"
          }
        }
      }
    }
  }
}
Well, there you go! you now know how to parse and import data from CSV files into Elasticsearch via Logstash and modify the data to your needs.
More Resources
To learn how to customize import operations in even greater detail, here are a few useful links:


