Puppet Quick Start Tutorial

Puppet is an open-core software configuration management tool recommended for orchestrating environments that have rigid compliance requirements, maintaining an immutable configuration of nodes, with reports and role-based access control.
This quick-start Puppet tutorial will explain how to install a default Puppet infrastructure with one Puppet Master and one Linux managed node. The installation process will be done with Puppet Bolt to demonstrate how the tool can be used, but it is not mandatory.
Test Environment
- Windows 10 Pro workstation with Windows PowerShell.
- CentOS 7 VM for Puppet Master named kamiya.
- Specs: 2 CPU, 4GB RAM, and 20 GB hard disk.
- Fedora 31 VM for Managed Node named himura.
Goals
- Install a Puppet master using Bolt
- Install a Puppet agent on a managed node using Bolt
- Create a folder on a managed node
Environment PreparationInstall Puppet Bolt on the workstation
The install process for Puppet Bolt is simple. There are repositories for the main Linux distributions. On macOS, it can be installed with the brew utility or with the macOS Installer. On Windows, aside from downloading the installer, it is also possible to install the tool with the Chocolatey Package Manager. For all the available options, visit Installing Bolt | Puppet.com.
For this example, the tool will be installed using Chocolatey.
Puppet Bolt project quick-start
PS C:> choco install puppet-bolt
Bolt works in a project directory context. As such, it will read a predefined set of configuration files from the current working directory. To create the bolt-project directory, use the command “bolt project init”:
PS C:> bolt project init bolt-project
A new directory will be created with an empty bolt.yaml file inside. For this example, it will not be necessary to modify it.
The next step is to create an inventory file in order to manage the test environment. This file must be called inventory.yaml. The contents of the file are the following:
groups:
groups:
  - name: puppetmaster
    targets:
      - kamiya
    config:
      transport: ssh
      ssh:
        user: kaoru
        password: kenshin
        run-as: root
        sudo-password: kenshin

  - name: managednode
    targets:
      - tokyo
    config:
      transport: ssh
      ssh:
        user: battousai
        password: degozaru
        run-as: root
        sudo-password: degozaru
It is the same logic that Ansible follows. The inventory should have all the information necessary to connect to a host. It is very important that the name resolution for the servers and resources is working correctly.
In the example, the hosts were organized into two groups: puppetmaster and managednode. Using groups is optional, but helps greatly when managing many nodes with similar configurations.
Visit Bolt configuration options and Inventory Files to check all the available configuration options.
Puppet Master requirements
Puppet Master is only supported on Linux boxes. There are packages available for Red Hat Enterprise Linux, RHEL-derived distros, Fedora, Debian and Ubuntu. It can also be built from source for other distributions. Other POSIX-compliant systems are not officially supported, but it might work.
The server will use 2GB of RAM by default, but that amount should be modified to adapt to the environment.
Puppet Master installation with Puppet Bolt
First add the repository that provides the packages. Use the appropriate distro repository.
PS C:bolt-project> bolt task run package --targets kamiya action=install name=”https://yum.puppet.com/puppet6-release-el-7.noarch.rpm”

Apparently, because the package was installed from an uri, the result didn’t show if the operation was successful. To verify it, use the command
bolt task run package --targets kamiya action=
status
name=puppet6-release

Install puppet server
The bolt task command will also be used to install the puppetserver package.
PS C:bolt-project> bolt task run package --targets kamiya action=install name="puppetserver"

After the package is installed, the service puppetserver needs to be enabled and started. The service resource cannot be used to enable services on Linux, as of version 2.2.0. So, “bolt command” will be used to enable the service and “bolt service” will be used to start the service.
PS C:bolt-project> bolt command run -t kamiya “systemctl enable puppetserver”

PS C:bolt-project> bolt task run service -t kamiya action=start name=puppetserver

After that, login on the kamiya server to open the necessary ports:
sudo firewall-cmd --zone=public --add-service=puppetmaster --permanent
sudo firewall-cmd --reload
sudo firewall-cmd --list-services

Now the Puppet Server can receive connections on port 8140/TCP.
Managed Node configuration
Bolt has a specific task to install the puppet agent. It discovers the Operating Systems and executes the necessary steps to install the package. For the managed node in this example, Bolt installed the repository for Fedora and proceeded to install the package puppet-agent-6.14.0-1.fc31.x86_64. Below is an excerpt of the execution.
PS C:bolt-project> bolt task run --targets tokyo puppet_agent::install

When the installation is finished, access the managed node over SSH to enable the puppet agent service and to test the default configuration.
# puppet resource service puppet ensure=running enable=true

Now, it is necessary to sign the certificate on the Puppet Server. On kamiya, run the following command as root:
# puppetserver ca list

It shows that the tokyo VM correctly registered with the Puppet Server. To sign all the pending certificates, execute:
puppetserver ca sign --all.

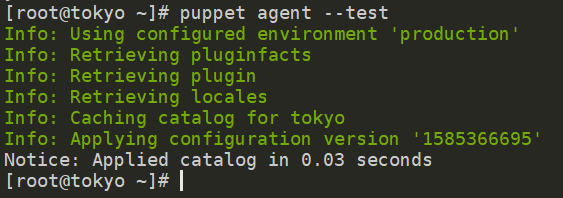
Back on tokyo, execute puppet agent –test to test the agent.

With the connection between the Puppet server and managed node concluded, it is now possible to make a test manifest and apply it to tokyo. For this example, a folder named sakabatou will be created inside the home folder of the user battousai. Create the file /etc/puppetlabs/code/environments/production/manifests/site.pp, which is the main manifest file, with the content below:
node 'tokyo' {
  file { '/home/battousai/sakabatou':
    ensure => 'directory',
    owner  => 'battousai',
    group  => 'battousai',
    mode   => '0770',
  }
}
On tokyo, run puppet agent –test again

Check if the folder was correctly created using ls -ld /home/battousai/sakabatou

References:
Managing essential configuration with Puppet
How To Install Puppet 6.x On CentOS 7 / RHEL 7


