The new standard of observability is here. Discover Olly, the industry’s first

Fluent Bit is a fast and lightweight log processor, stream processor, and forwarder for Linux, OSX, Windows, and BSD family operating systems. Its focus on performance allows the collection of events from different sources and the shipping to multiple destinations without complexity. It is lightweight, allowing it to run on embedded systems as well as complex cloud-based virtual machines. In this post, we will cover the main use cases and configurations for Fluent Bit.
Fluent Bit Installation
Fluent Bit has simple installations instructions. Coralogix has a straight forward integration but if you’re not using Coralogix, then we also have instructions for Kubernetes installations.
Fluent Bit Configuration
Configuring Fluent Bit is as simple as changing a single file. You’ll find the configuration file at /fluent-bit/etc/fluent-bit.conf.
Concepts in the Fluent Bit Schema
The schema for the Fluent Bit configuration is broken down into two concepts:
- Sections
- Entries: Key/Value – One section may contain many Entries. An entry is a line of text that contains a Key and a Value
When writing out these concepts in your configuration file, you must be aware of the indentation requirements. Each configuration file must follow the same pattern of alignment from left to right.
The Types of Sections
The Fluent Bit configuration file supports four types of sections, each of them has a different set of available options.
- The Service section – defines global properties of the service
- The Input section – the source from where Fluent Bit can collect data
- The Filter section – altering the data before sending it to your destination
- The Output section – a destination where Fluent Bit should flush the information
Service
The Service section defines the global properties of the Fluent Bit service. This is an example of a common Service section that sets Fluent Bit to flush data to the designated output every 5 seconds with the log level set to debug. It also points Fluent Bit to the custom_parsers.conf as a Parser file.
[SERVICE]
    Flush 5
    Daemon Off
    Log_Level debug
    Parsers_File custom_parsers.conf
There are additional parameters you can set in this section. Check the documentation for more details.
Input
The INPUT section defines a source plugin. You can specify multiple inputs in a Fluent Bit configuration file. Each input is in its own INPUT section with its own configuration keys. The Name is mandatory and it lets Fluent Bit know which input plugin should be loaded. The Tag is mandatory for all plugins except for the input forward plugin (as it provides dynamic tags).
[INPUT]
    Name cpu
    Tag my_cpu
Fluent Bit supports various input plugins options. For example, if you want to tail log files you should use the Tail input plugin. There are a variety of input plugins available.
Filter
In addition to the Fluent Bit parsers, you may use filters for parsing your data. A filter plugin allows users to alter the incoming data generated by the input plugins before delivering it to the specified destination. You may use multiple filters, each one in its own FILTER section.
[FILTER]
    Name modify
    Match *
    Add user coralogix
This is a simple example for a filter that adds to each log record, from any input, the key user with the value coralogix. The Name is mandatory and it lets Fluent Bit know which filter plugin should be loaded. The Match or Match_Regex is mandatory for all plugins. If both are specified, Match_Regex takes precedence. There are lots of filter plugins to choose from.
Output
The OUTPUT section specifies a destination that certain records should follow after a Tag match. The following is a common example of flushing the logs from all the inputs to stdout.
[OUTPUT]

    Name stdout

    Match *
Similar to the INPUT and FILTER sections, the OUTPUT section requires The Name to let Fluent Bit know where to flush the logs generated by the input/s. Match or Match_Regex is mandatory as well. If both are specified, Match_Regex takes precedence. For all available output plugins.
Injecting Environment Variables into your Fluent Bit Config
Your configuration file supports reading in environment variables using the bash syntax. For example:
[OUTPUT]
    Name  ${MY_ENV_VAR}
    Match *
Breaking down your Configuration files
The @INCLUDE keyword is used for including configuration files as part of the main config, thus making large configurations more readable. You can create a single configuration file that pulls in many other files. This allows you to organize your configuration by a specific topic or action. All paths that you use will be read as relative from the root configuration file.
@INCLUDE somefile.conf
@INCLUDE someOtherFile.conf
Defining Variables
The @SET command is another way of exposing variables to Fluent Bit, used at the root level of each line in the config. This means you can not use the @SET command inside of a section. You can use this command to define variables that are not available as environment variables. They are then accessed in the exact same way.
@SET my_input=cpu

[SERVICE]
    Flush 1

[INPUT]
    Name ${my_input}
Parsing Structured and Unstructured Logs
Fluent Bit is able to capture data out of both structured and unstructured logs, by leveraging parsers. Parsers are pluggable components that allow you to specify exactly how Fluent Bit will parse your logs. For example, you can use the JSON, Regex, LTSV or Logfmt parsers. There are plenty of common parsers to choose from that come as part of the Fluent Bit installation. Parsers play a special role and must be defined inside the parsers.conf file.
[PARSER]
    Name        docker-logs
    Format      json
    Time_Key    time
    Time_Format %Y-%m-%dT%H:%M:%S %z
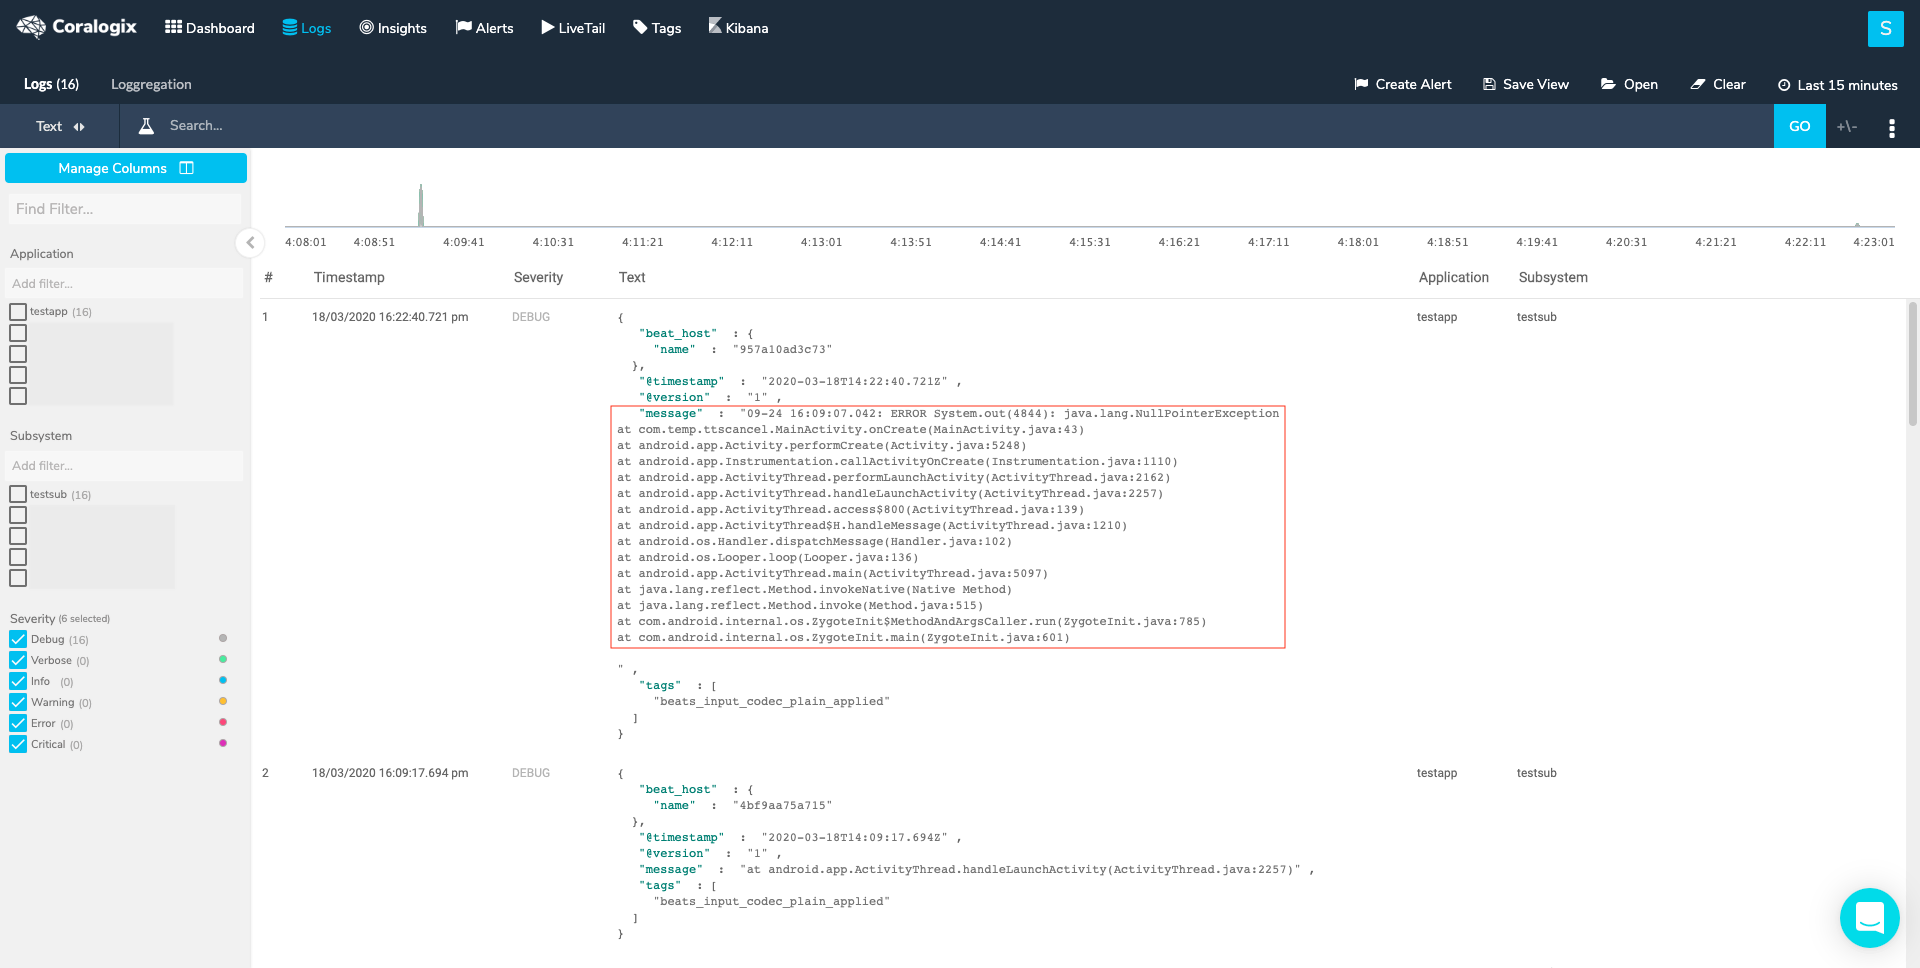
Parsing Multi-Line Logs
If you are using tail input and your log files include multiline log lines, you should set a dedicated parser in the parsers.conf. You are then able to set the multiline configuration parameters in the main Fluent Bit configuration file. Multiline logs are a common problem with Fluent Bit and we have written some documentation to support our users.
Fluent Bit Configuration Examples
We have included some examples of useful Fluent Bit configuration files that showcase a specific use case. Each file will use the components that have been listed in this article and should serve as concrete examples of how to use these features.
Example 1 – Simple Tail Input to Coralogix
The Chosen application name is “prod” and the subsystem is “app”, you may later filter logs based on these metadata fields.
[SERVICE]
    # setting application logs level to debug
    Log_Level debug
    # setting location for the parsers file
    Parsers_File parsers.conf
[INPUT]
    # using tail input to tail log files
    Name        tail
    # setting the path for the file to tail
    Path        /var/log/fluent-bit/app.log
    # enabling multiline options
    Multiline On
    # using the parser called multiline_pattern for determine first line
    Parser_Firstline multiline_pattern
    # Adding a field named filename to be assigned with the path of the tailed file
    Path_Key filename
[FILTER]
    # nest filter allows to place data in a map
    Name nest
    # all logs will go through this filter
    Match *
    # you can place data in a map using 'nest' or move the data up using 'lift'
    Operation nest
    # the wildcard will nest what matches the key
    Wildcard *
    # the data will be mapped under a field named json
    Nest_under json
[FILTER]
    # using modify filter we can add fields to our log
    Name modify
    # all logs will go through this filter
    Match *
    # adding field applicationName named training
    Add applicationName training
    # adding field subsystemName named fluentbit
    Add subsystemName fluentbit
    # adding field computerName which gets his value according to the hostname
    Add computerName ${HOSTNAME}
[OUTPUT]
    # setting up http output plugin to forward logs to the specified host
    Name http
    # forward all logs from all inputs
    Match *
    # the cluster the account located in
    Host api.coralogixstg.wpengine.com
    # secured port (HTTPS)
    Port 443
    # the api the ingests the logs
    URI /logs/rest/singles
    # the format the message is sent
    Format json_lines
    # when sending messages on port 443 TLS must be on
    TLS On
    # here you add your Coralogix account private key as a header for http format
    Header  Private_Key xxxxxxxx-xxxx-xxxx-xxxx-xxxxxxxxxxxx
    # compressing the message in gzip
    compress gzip
    # defining a retry mechanisem in case message wasnt sent
    Retry_Limit 10
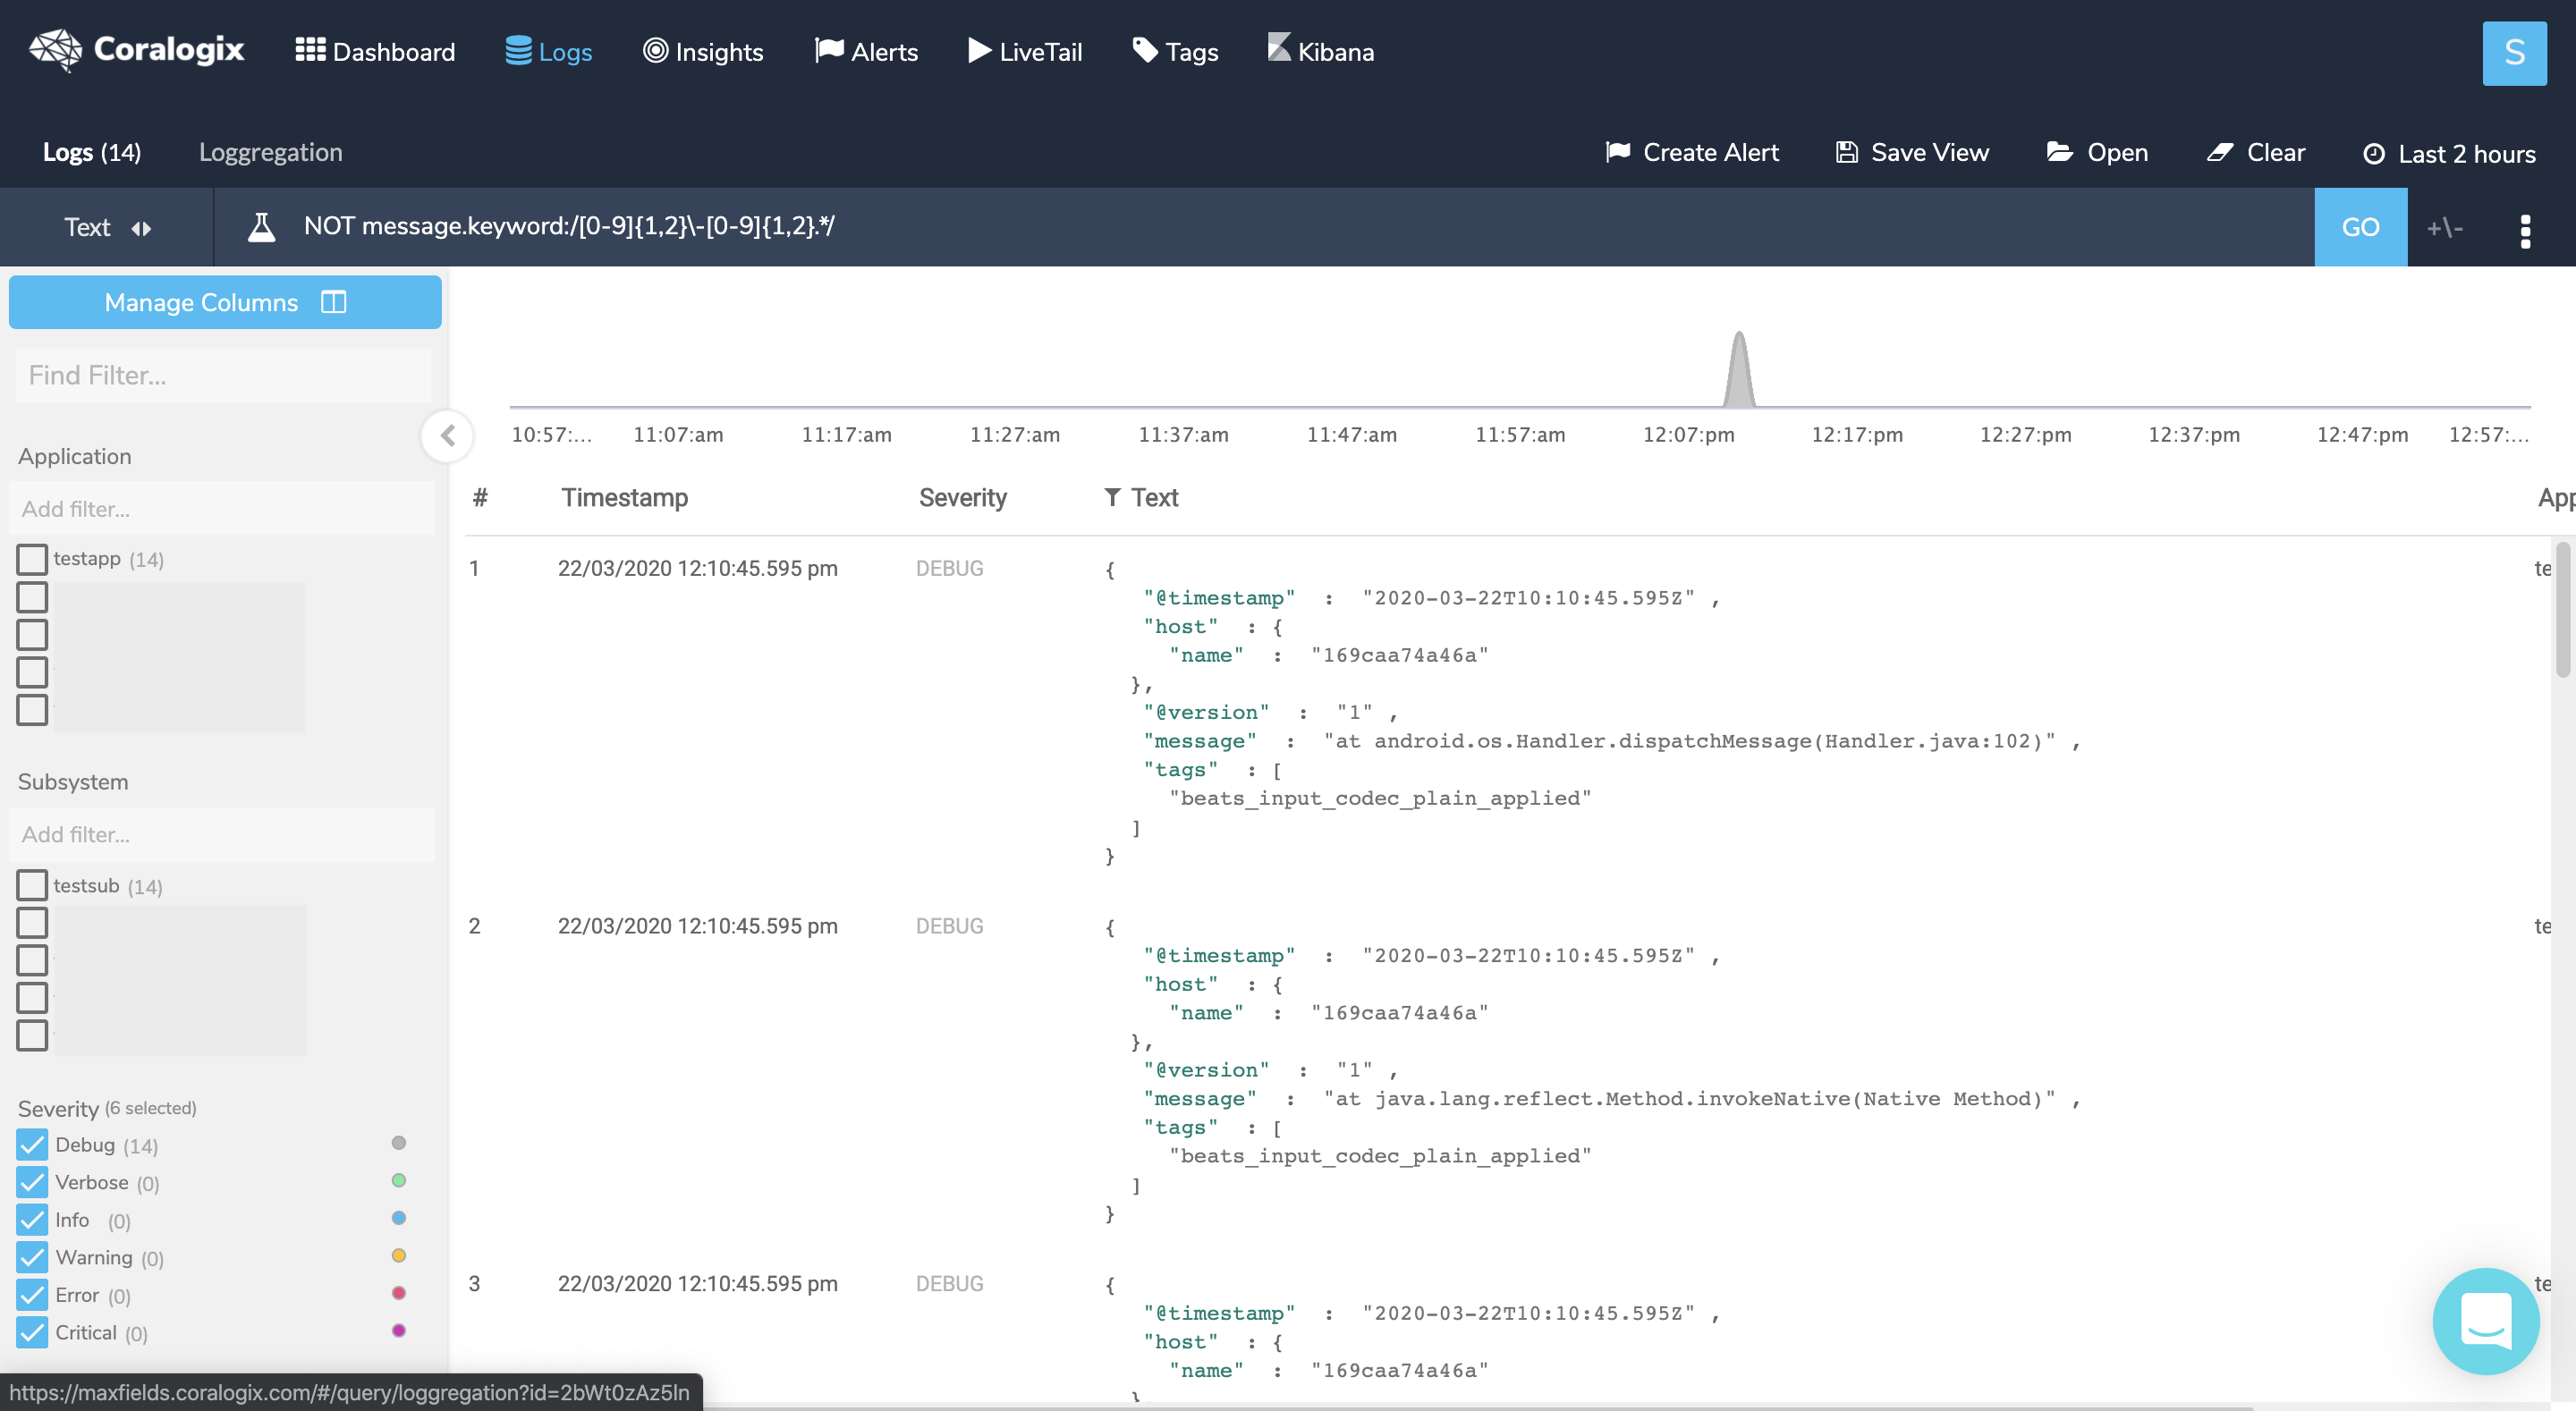
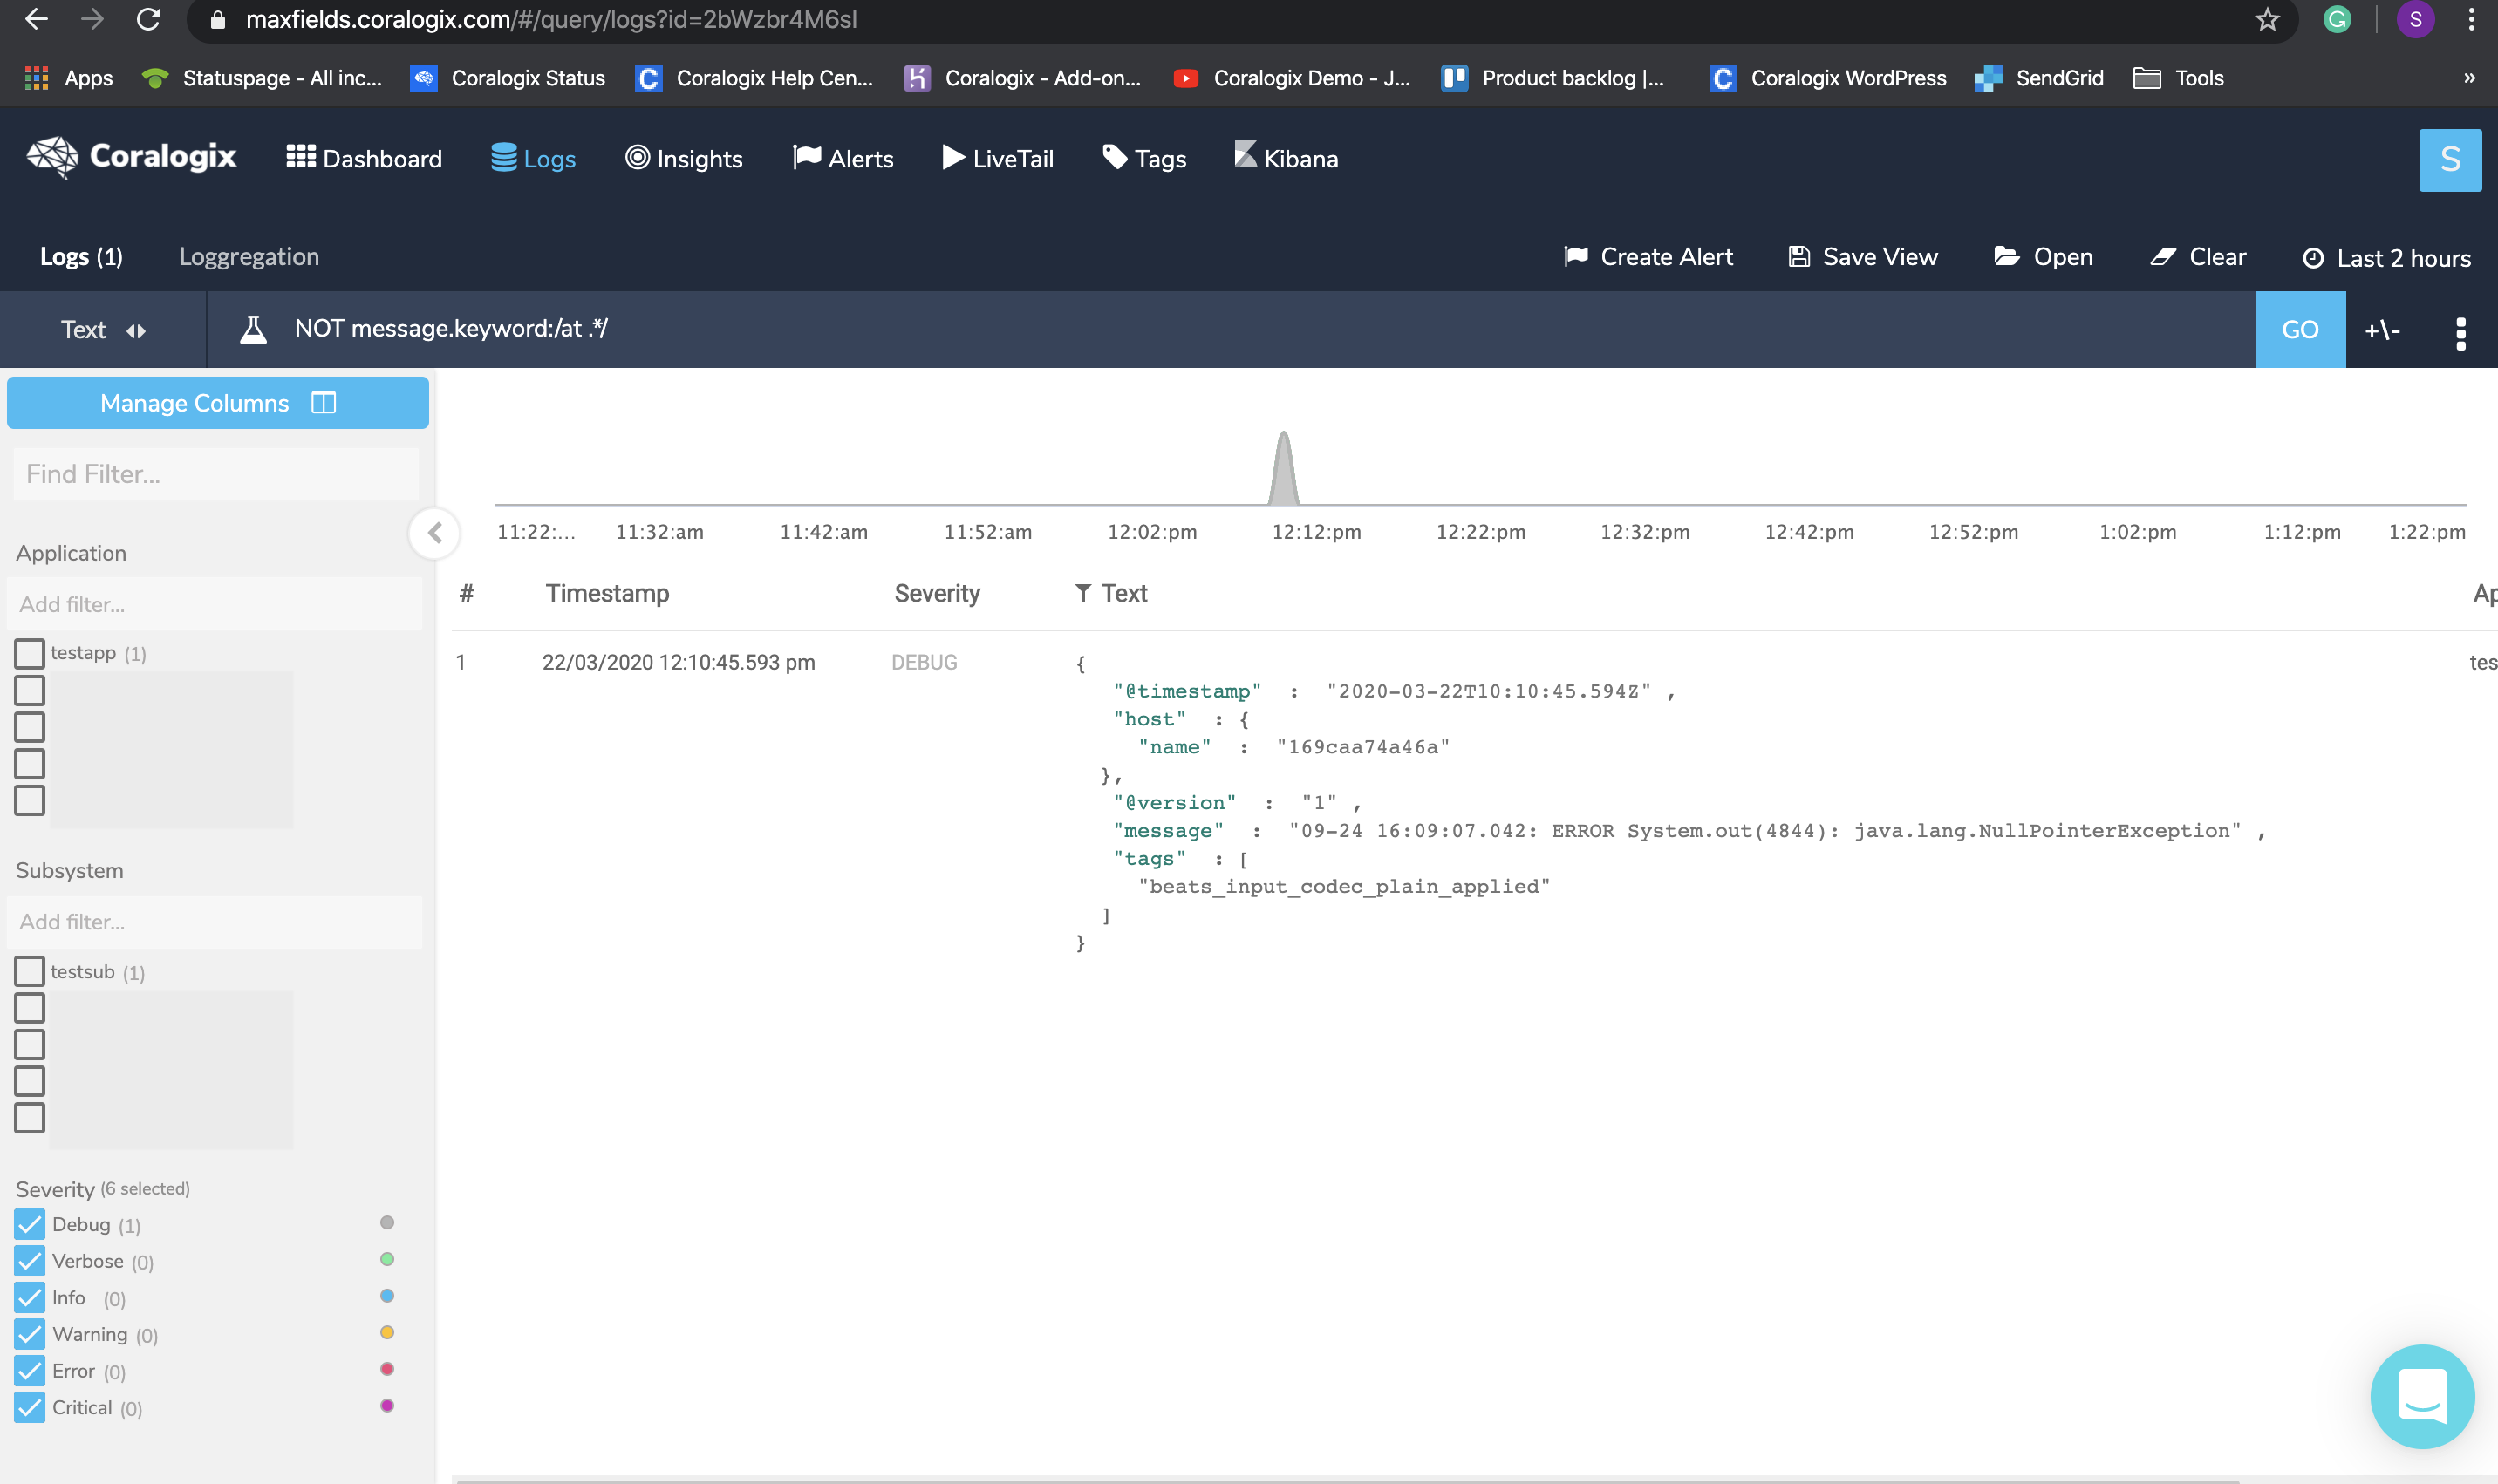
The parsers file includes only one parser, which is used to tell Fluent Bit where the beginning of a line is. It was built to match a beginning of a line as written in our tailed file, e.g.
[2020-03-12 14:14:55] .....
[PARSER]
    Name	multiline_pattern
    Format	regex
    Regex  	^[(?<timestamp>[0-9]{2,4}-[0-9]{1,2}-[0-9]{1,2} [0-9]{1,2}:[0-9]{1,2}:[0-9]{1,2})] (?<message>.*)
Any other line which does not start similar to the above will be appended to the former line. This parser also divides the text into 2 fields, timestamp and message, to form a JSON entry where the timestamp field will possess the actual log timestamp, e.g. 2020-03-12 14:14:55, and Fluent Bit places the rest of the text into the message field.
Example 2 – Kubernetes Integration
Here we can see a Kubernetes Integration. This time, rather than editing a file directly, we need to define a ConfigMap to contain our configuration:
kind: ConfigMap
apiVersion: v1
metadata:
  name: fluent-bit-coralogix-config
  namespace: kube-system
  labels:
  k8s-app: fluent-bit-coralogix-logger
  data:
  fluent-bit.conf: |-
    [SERVICE]
        # flush timeout to define when is required to flush the records ingested by input plugins through the defined output plugins
        Flush         1
        # boolean value to set if Fluent Bit should run as a Daemon (background) or not
        Daemon        Off
        # setting application logs level to warning
        Log_Level     warning
        # enable built-in HTTP Server
        HTTP_Server   On
        # setting location for the parsers file
        Parsers_File  parsers.conf
        # setting location for Coralogix plugin
        Plugins_File  plugins.conf
    [INPUT]
        # using tail input to tail log files
        Name              tail
        # tagging the input
        Tag               kube.*

        # setting the paths for the kubernetes cluster files to tail
        Path              /var/log/containers/*.log
        # specify the name of a parser to interpret the entry as a structured message
        Parser            docker
        # specify the database file to keep track of monitored files and offsets
        DB                /var/log/flb_kube.db
        # set a limit of memory that Tail plugin can use when appending data to the Engine.
        # if the limit is reach, it will be paused; when the data is flushed it resumes
        Mem_Buf_Limit     5MB
        # when a monitored file reach it buffer capacity due to a very long line (Buffer_Max_Size), the default behavior is to stop monitoring that file.
        # skip_Long_Lines alter that behavior and instruct Fluent Bit to skip long lines and continue processing other lines that fits into the buffer size
        Skip_Long_Lines   On
        # the interval of refreshing the list of watched files in seconds
        Refresh_Interval  10
    [FILTER]
        # name of the filter plugin
        Name                kubernetes
        # a pattern to match against the tags of incoming records
        Match               kube.*
        # allow Kubernetes Pods to exclude their logs from the log processor
        K8S-Logging.Exclude On
    [FILTER]
        # nest filter allows to place data in a map
        Name nest
        # all logs will go through this filter
        Match *
        # you can place data in a map using 'nest' or move the data up using 'lift'
        Operation nest
        # the wildcard will nest what matches the key
        Wildcard *
        # the data will be mapped under a field named json
        Nest_under json
    [FILTER]
        # using modify filter we can add fields to our log
        Name modify
        # all logs will go through this filter
        Match *
        # adding field applicationName that will be dynamic, using the namespace value
        Add applicationName kubernetes.namespace_name
        # adding field subsystemName that will be dynamic, using the container name
        Add subsystemName kubernetes.container_name
        # adding field computerName which gets his value according to the hostname
        Add computerName ${HOSTNAME}
    [OUTPUT]
        # setting up http output plugin to forward logs to the specified host
        Name http
        # forward all logs from all inputs
        Match *
        # the cluster the account located in
        Host api.coralogixstg.wpengine.com
        # secured port (HTTPS)
        Port 443
        # the api the ingests the logs
        URI /logs/rest/singles
        # the format the message is sent
        Format json_lines
        # when sending messages on port 443 TLS must be on
        TLS On
        # coralogix account private key, which already exists after creating secret
        Header  Private_Key ${PRIVATE_KEY}
        # compressing the message in gzip
        compress gzip
        # defining a retry mechanisem in case message wasnt sent
        Retry_Limit 10
That’s a wrap
We’ve gone through the basic concepts involved in Fluent Bit. It is a very powerful and flexible tool, and when combined with Coralogix, you can easily pull your logs from your infrastructure and develop new, actionable insights that will improve your observability and speed up your troubleshooting.