CI/CD Tutorial: How to deploy an AWS Jenkins Pipeline

In the previous article, we have created the Continuous Integration (CI) pipeline for a simple Java application. It is now time to start working on the Continuous Deployment (CD) pipeline that will take the Java application and deploy it to AWS. To build the CD pipeline, we will extend the existing AWS Jenkins pipeline. If you have missed the previous article on building Cotinuous Integration solutions for a Java application using Jenkins, make sure you read that first before continuing. 

Quick introduction to AWS

Amazon Web Services or simply AWS is a cloud platform offering over 170 cloud-based services available in data centers located worldwide. Such services include virtual servers, managed databases, file storage, machine learning, and many others.

While AWS is the most popular cloud platform, many other providers, including Google Cloud, Microsoft Azure, or DigitalOcean share similar concepts and services to the ones presented here.

In case you don’t already have an AWS account, head over to https://aws.amazon.com/, and create one. You will have 12-months free-tier access, but you still need to enter your billing information and credit card number just in case you go over the free limits. 

As a general recommendation, terminate any services once you don’t use them anymore before costs start adding up. 

Once you have successfully signed up, you can open the AWS Management console available at https://console.aws.amazon.com/. The console will give you an overview of all the services that AWS has to offer.

AWS Jenkins Pipeline to deploy a Java application

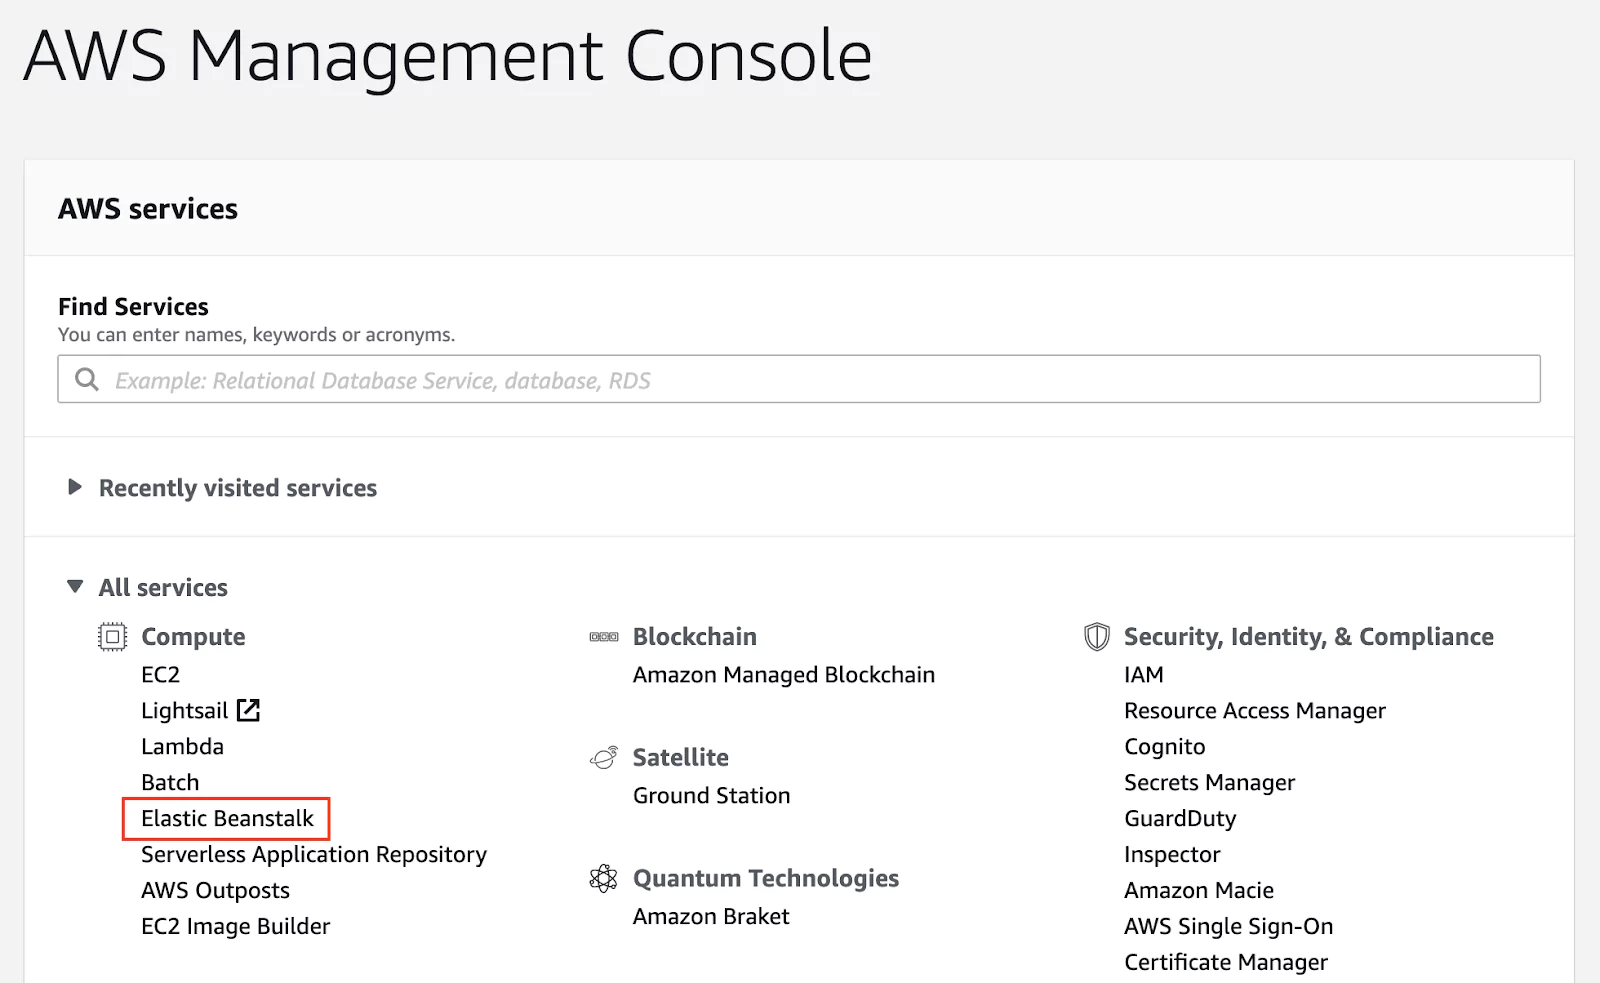
One of the easiest ways to deploy an application to the AWS infrastructure without getting into many technical aspects is using a service called Elastic Beanstalk (EB). From the console overview page, locate the Elastic Beanstalk service.

(01-aws-console.png)

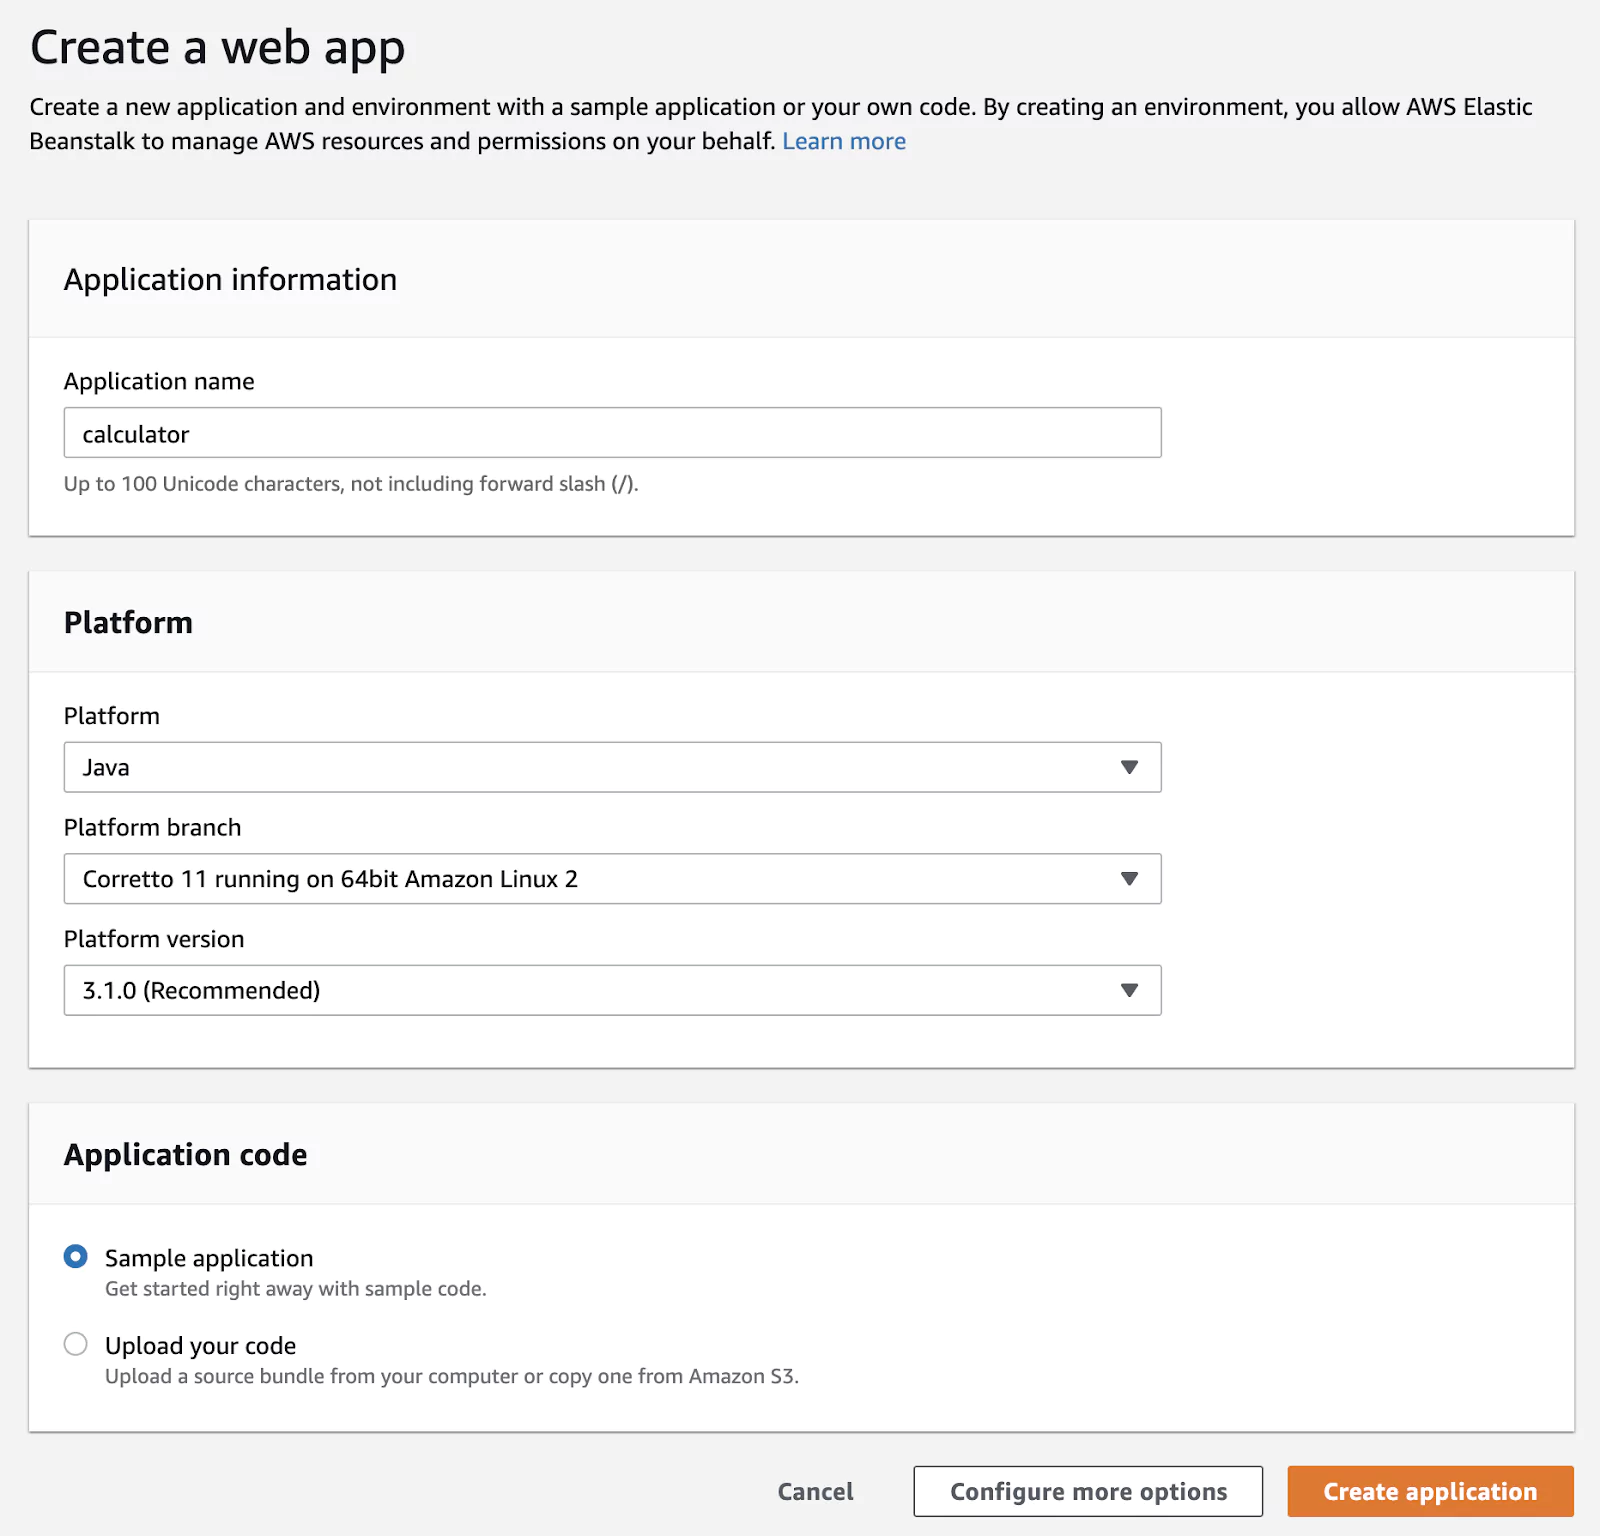
The next step is to create a new application. 

(02-eb-create-application.png)

I have named the application calculator, but you are free to call the application as you wish. Since we are trying to deploy a Java application, we need to select the Java platform. Leave the rest of the platform fields to their default values.

(03-eb-new-app-config.png)

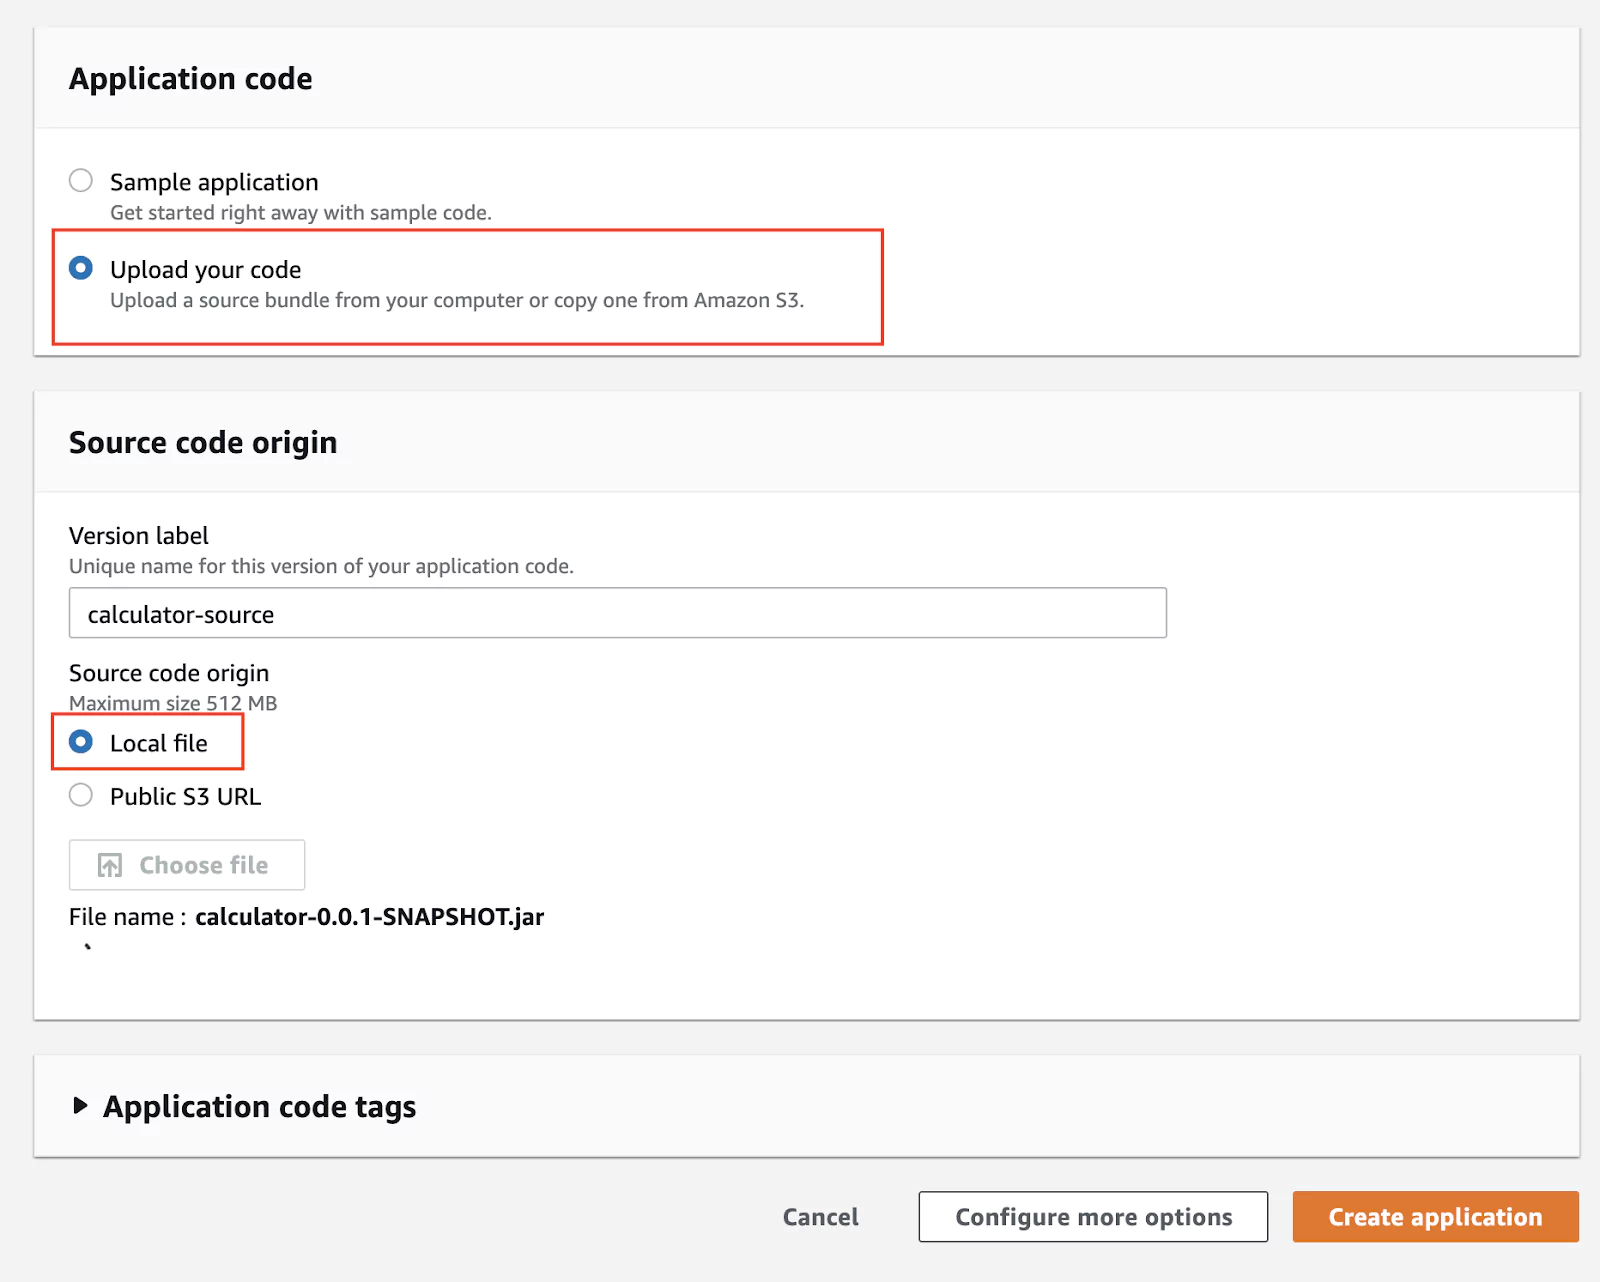
You can start the application with a sample code application, just to see that it is running. Since we already have a packaged Java application in the form of a jar file, we can directly use that.

(04-eb-upload-code.png)

Wait for the file upload to complete. Finally, click on Create application. This may take a few minutes to start. 

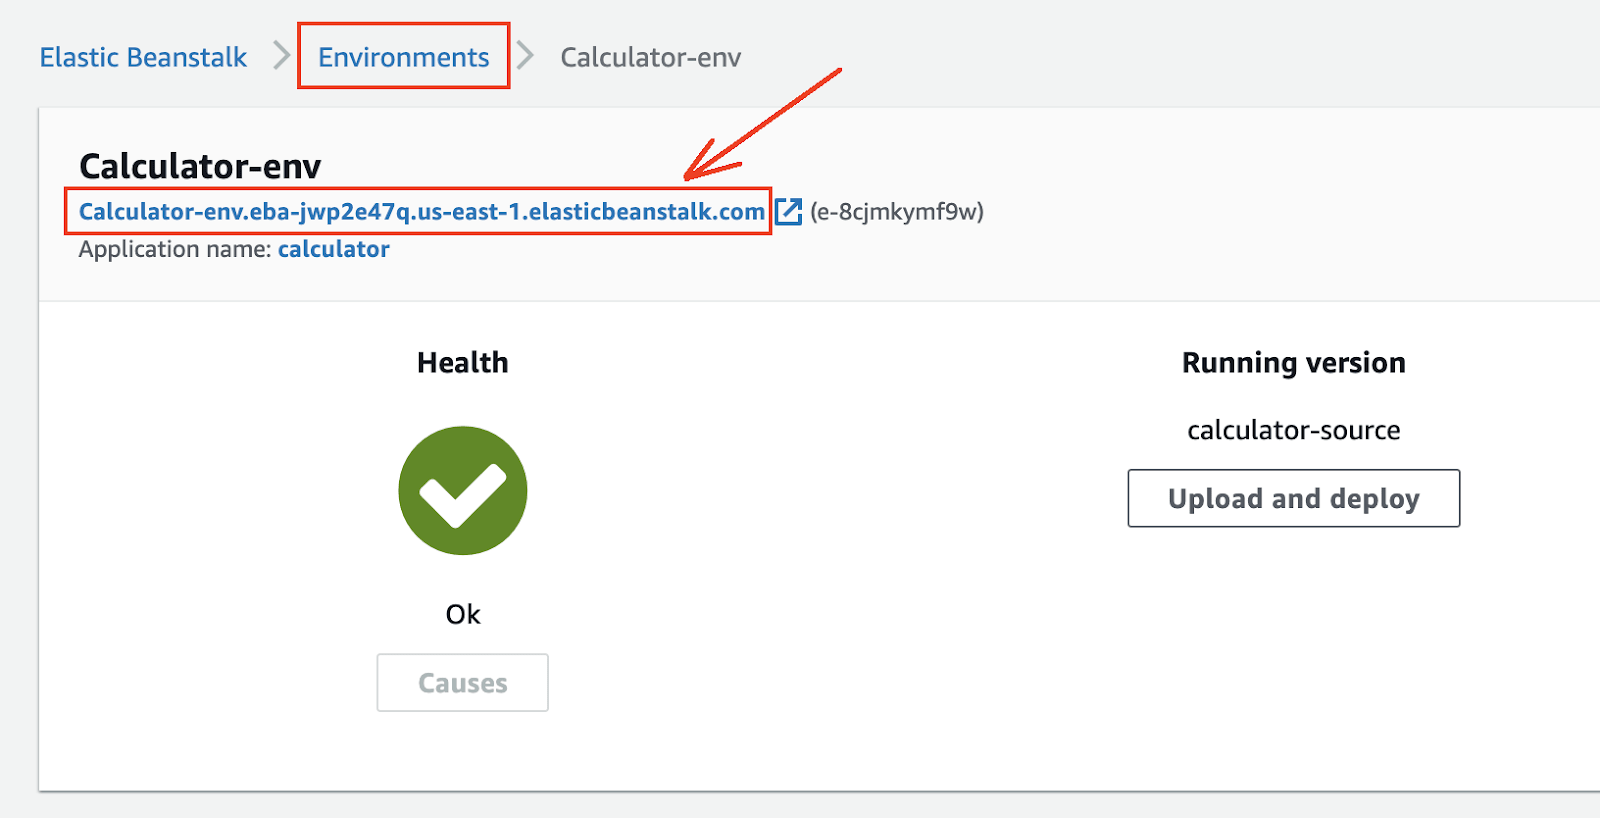
Now click on Environments, select the only environment being displayed, and right on top, you should see the public URL under which the application is available. 

(05-eb-environments.png)

If you click on the link displayed, you will get a 404 Not found status code, and that is expected. If you get a different status code, please check the Troubleshooting section within this article. Add /add?a=1&b=2 to the address, and you should see the response.

(06-eb-app.png)

Congratulations! You have just deployed a Java application to AWS with only a few clicks. 

How to deploy to AWS from Jenkins

So far, the process has been manual, but it has ensured that our application works on the AWS infrastructure. Since we want to automate this process, we need to use the terminal to do the steps that we did manually. 

Fortunately, AWS provides the tools needed to automate this process. The main tool that will allow us to interact with AWS is the AWS CLI, a software tool that has no graphical interface. 

The deploy the Java application to AWS from Jenkins, there are a series of steps we need to follow: 

  1. Upload the jar archive to AWS S3 (S3 is like Dropbox for the cloud and the main entry point to the AWS infrastructure when dealing with files).
  2. Create a new version of the application within EB by providing the jar achieve, which is now inside S3.
  3. Update the EB environment with the latest application version.

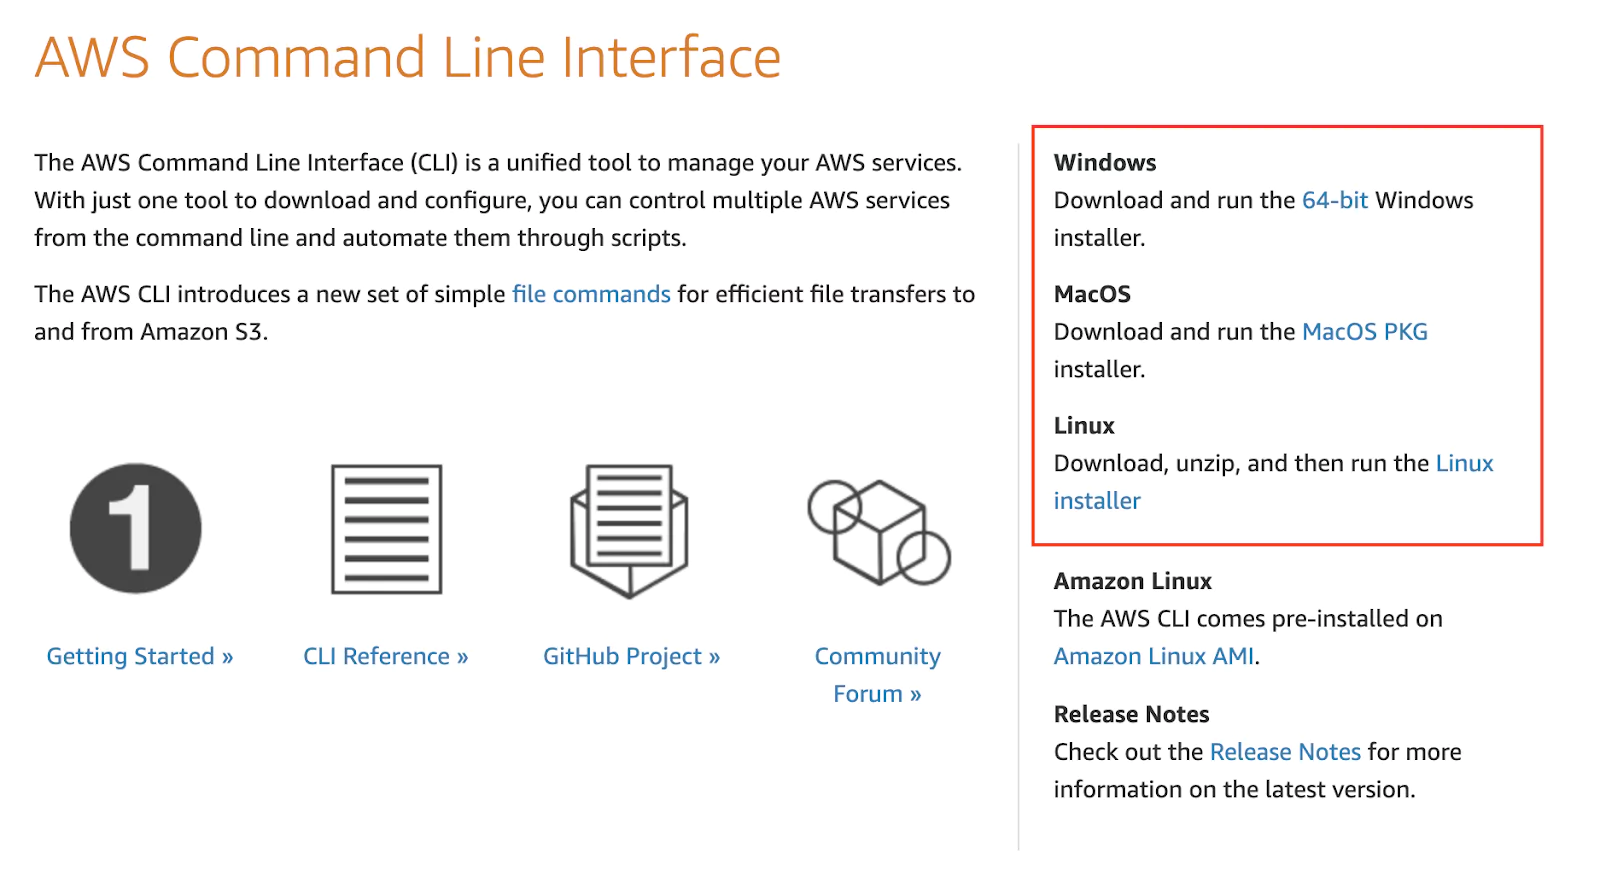
You can easily download and install AWS from https://aws.amazon.com/cli/ . You will find installers for Windows, macOS, and Linux.

(07-aws-cli.png)

After the installation has completed successfully, open any terminal window and run the command aws –version. This will confirm that the installation has been successful and will display the AWS CLI version.

(08-aws-cli-locally.png)

If you have Jenkins installed on macOS, to get AWS CLI to work in Jenkins, you may need to create or adapt the PATH variable with the value: /usr/local/bin:$PATH

How to upload a file to AWS S3 from Jenkins

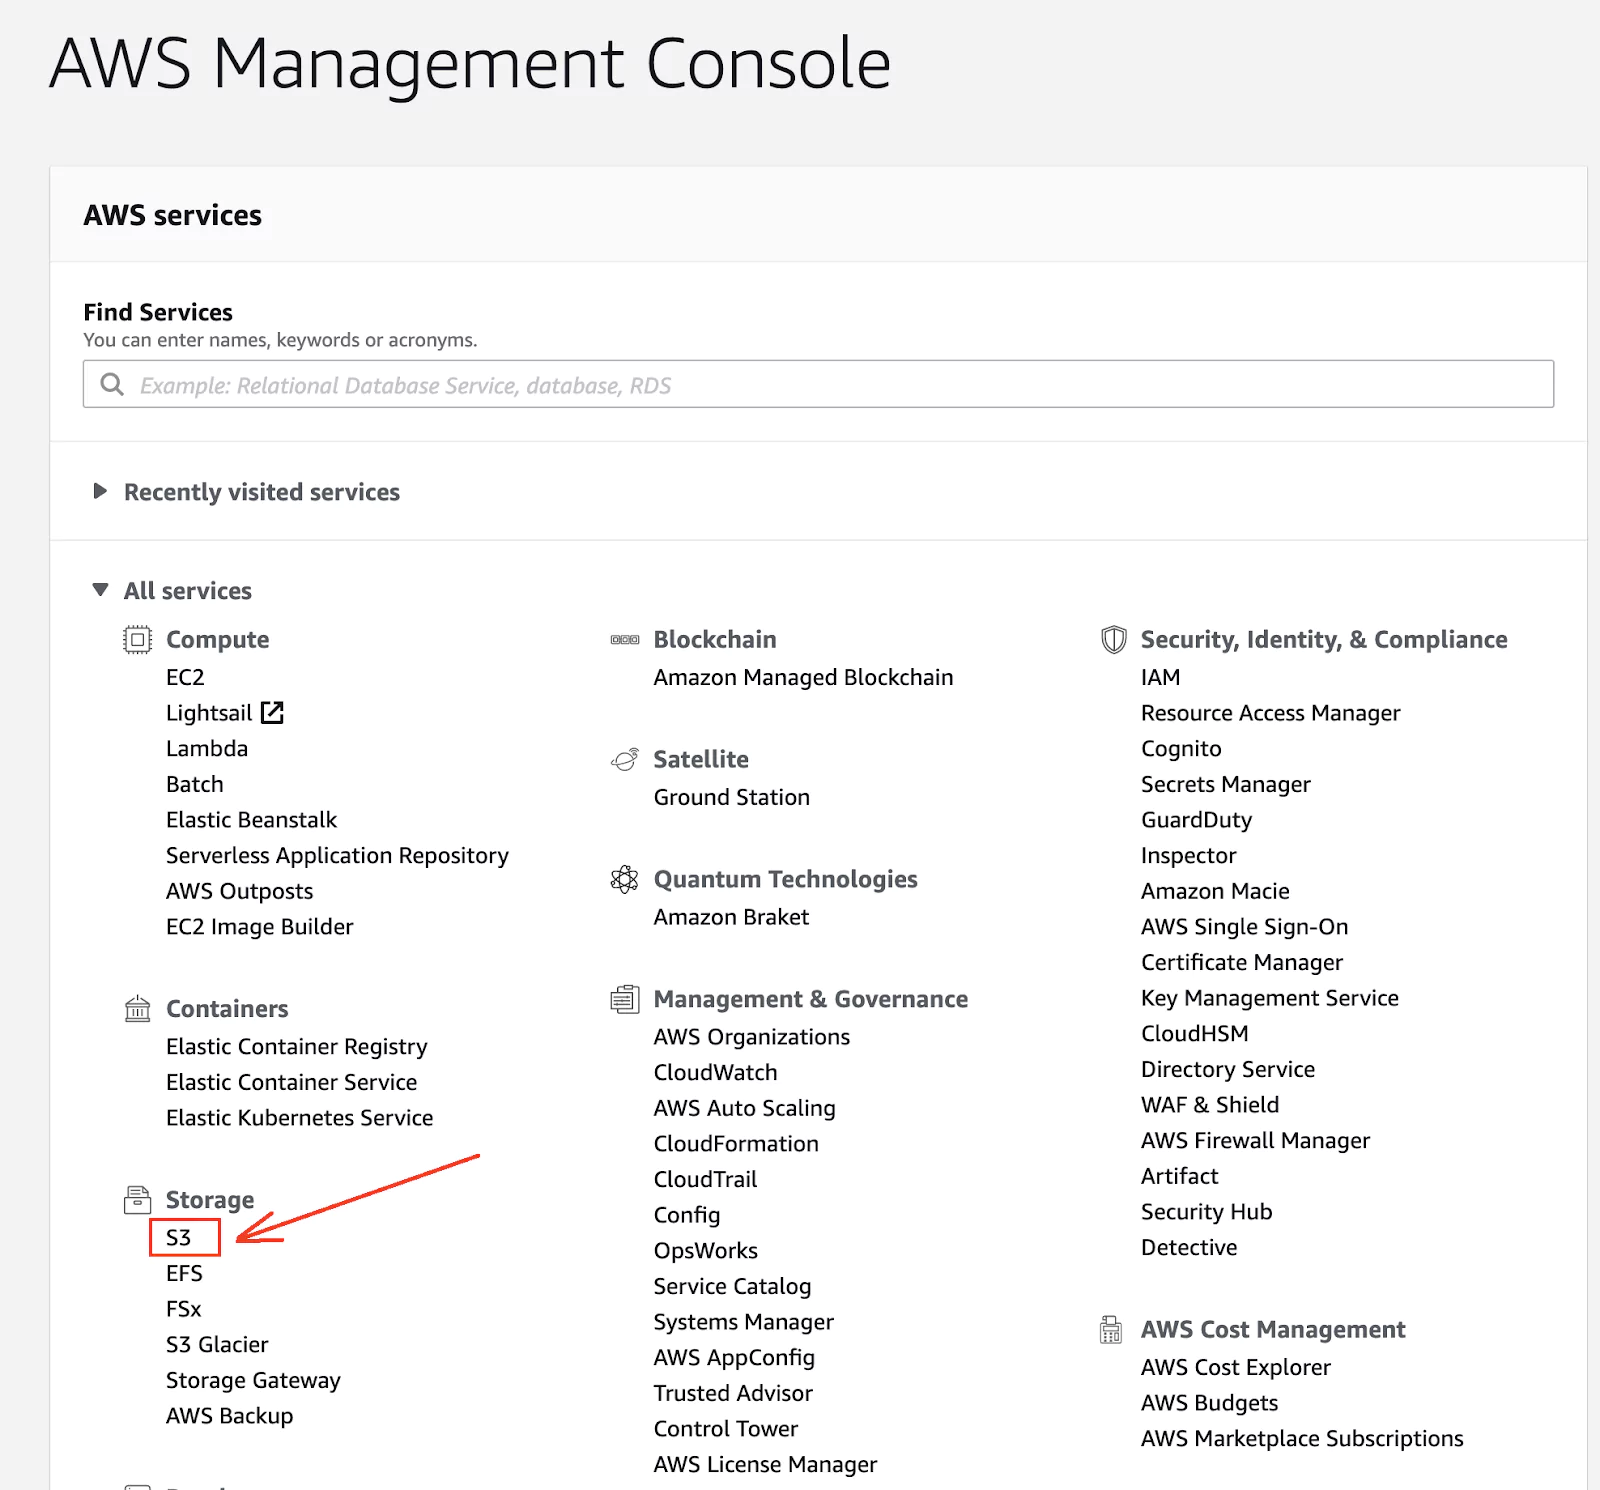
S3 stands for Simple Storage Service and is the gateway to the AWS infrastructure when working with files. You can see it like Dropbox but for the AWS infrastructure. Let’s go back to the AWS Management Console and select the S3 service.

(09-aws-s3.png)

In S3, files are organized in buckets, which are containers for storing data. Inside buckets, you can store files and folders, just as you would do on your computer. 

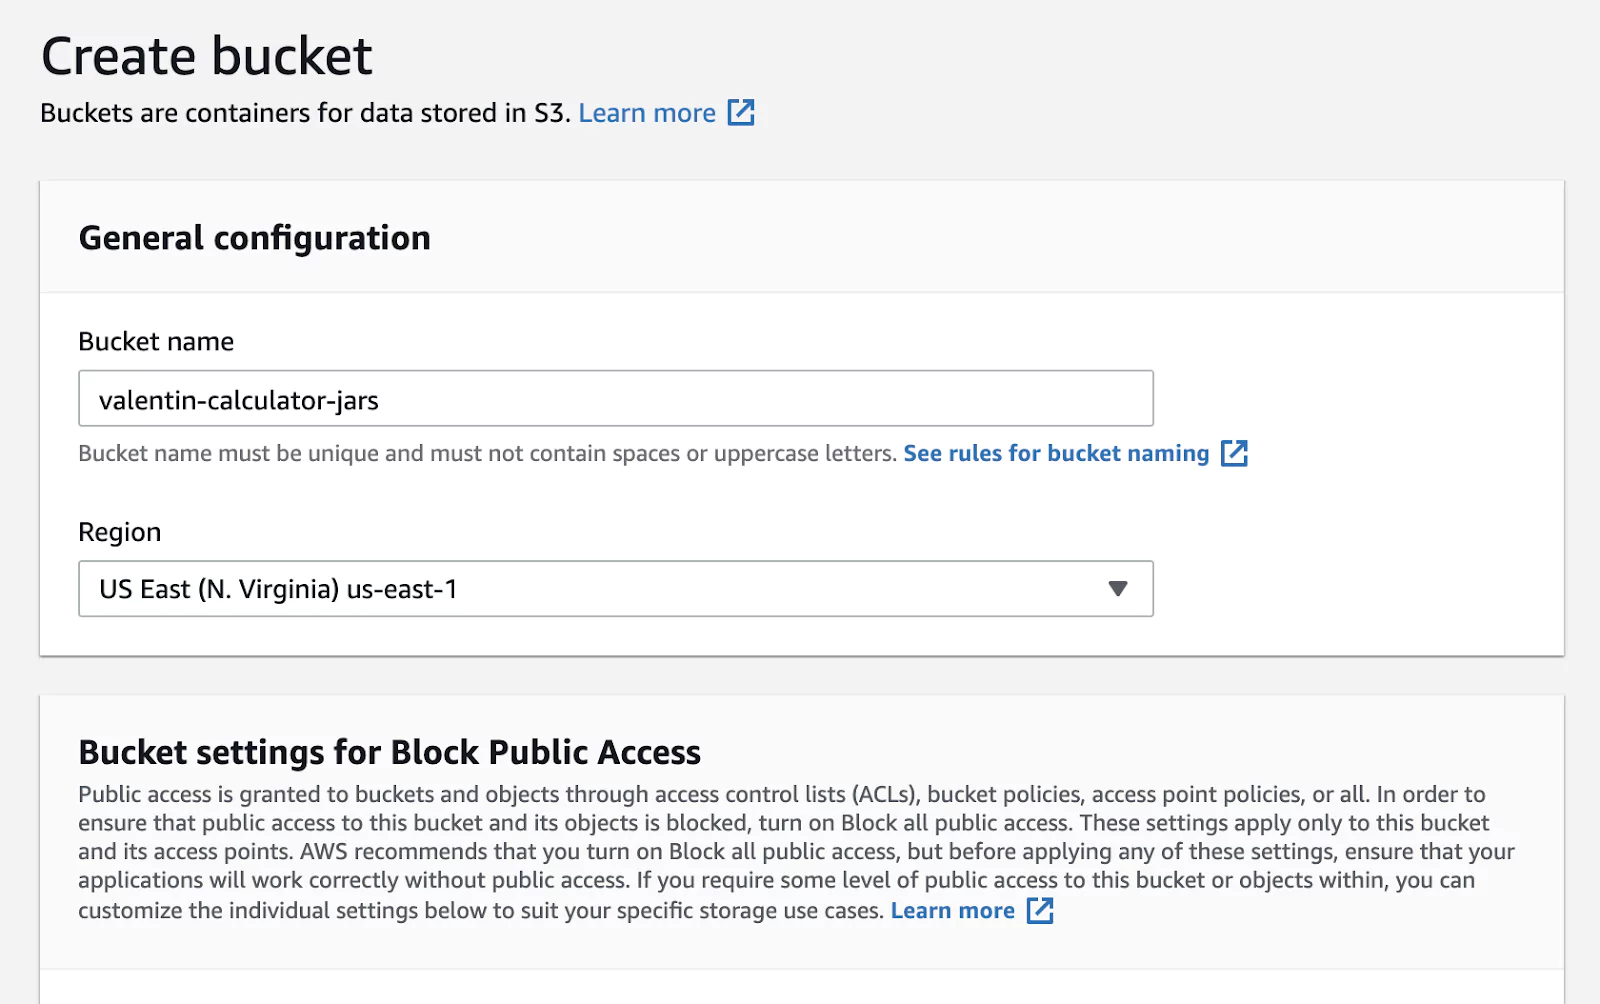
Let’s continue by creating a bucket for storing our jar archives. Your bucket name needs to be unique, and you may face conflicts if you decide to use common names. I choose to prefix the bucket with my name to avoid naming conflicts.

(10-create-s3-bucket.png)

At this point, all you need to do is remember the name of the bucket and the region in which the bucket has been created (in the screenshot above, the region is us-east-1).

To interact with any AWS service from the CLI, we cannot use our AWS account’s username and password. Not only would this be highly risky, but in many cases also impractical. We will create a special user that will only have access to the services required to perform the tasks needed.

For this reason, from the AWS Management console, identify the block Security, Identity, & Compliance and select the IAM service (Identity and Access Management). 

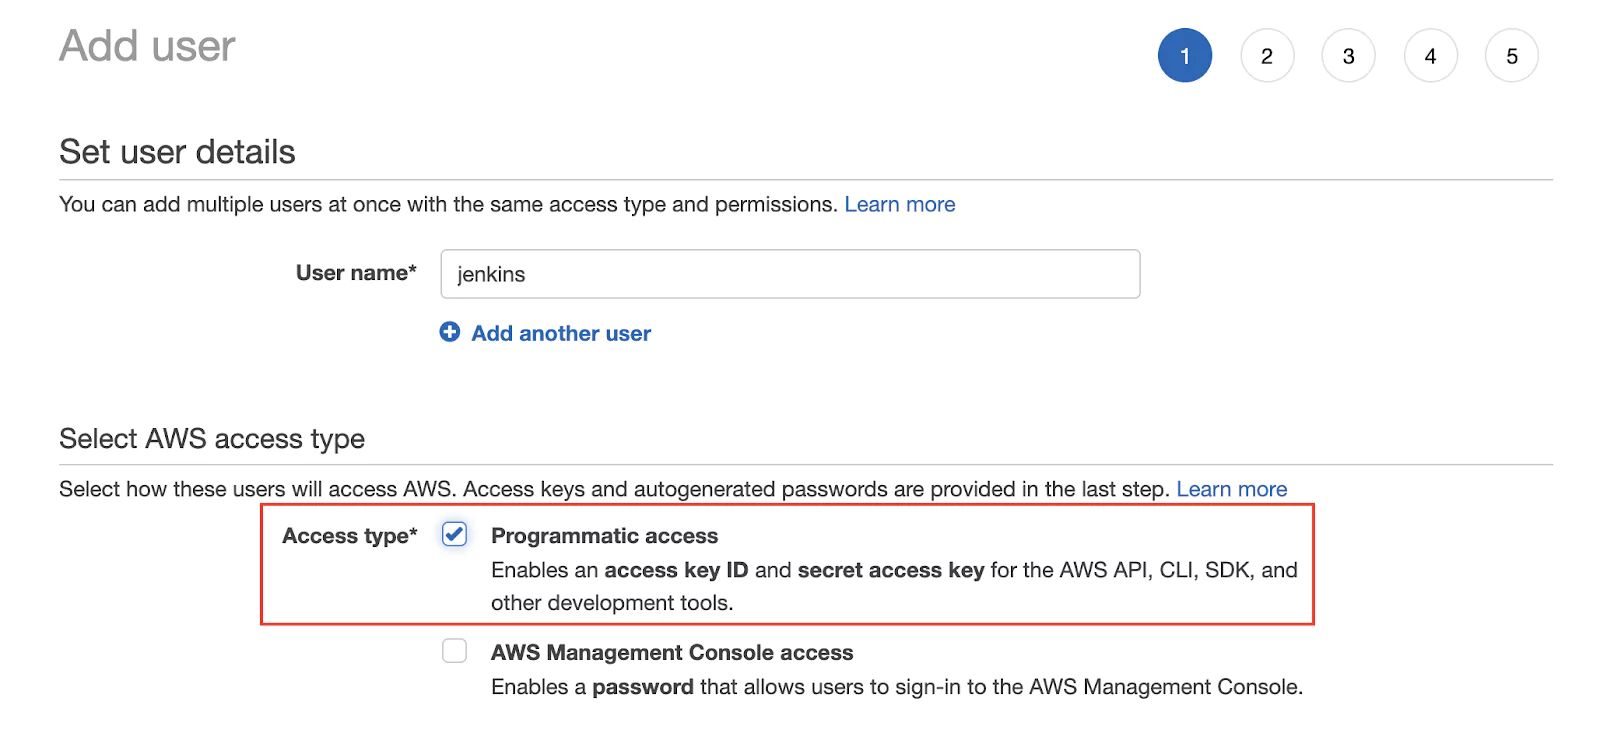
Click on Users > Add user. I will call this user jenkins, so that I can quickly identify it. Make sure to enable the Programmatic access to use this user from the AWS CLI. 

(11-iam-user.png)

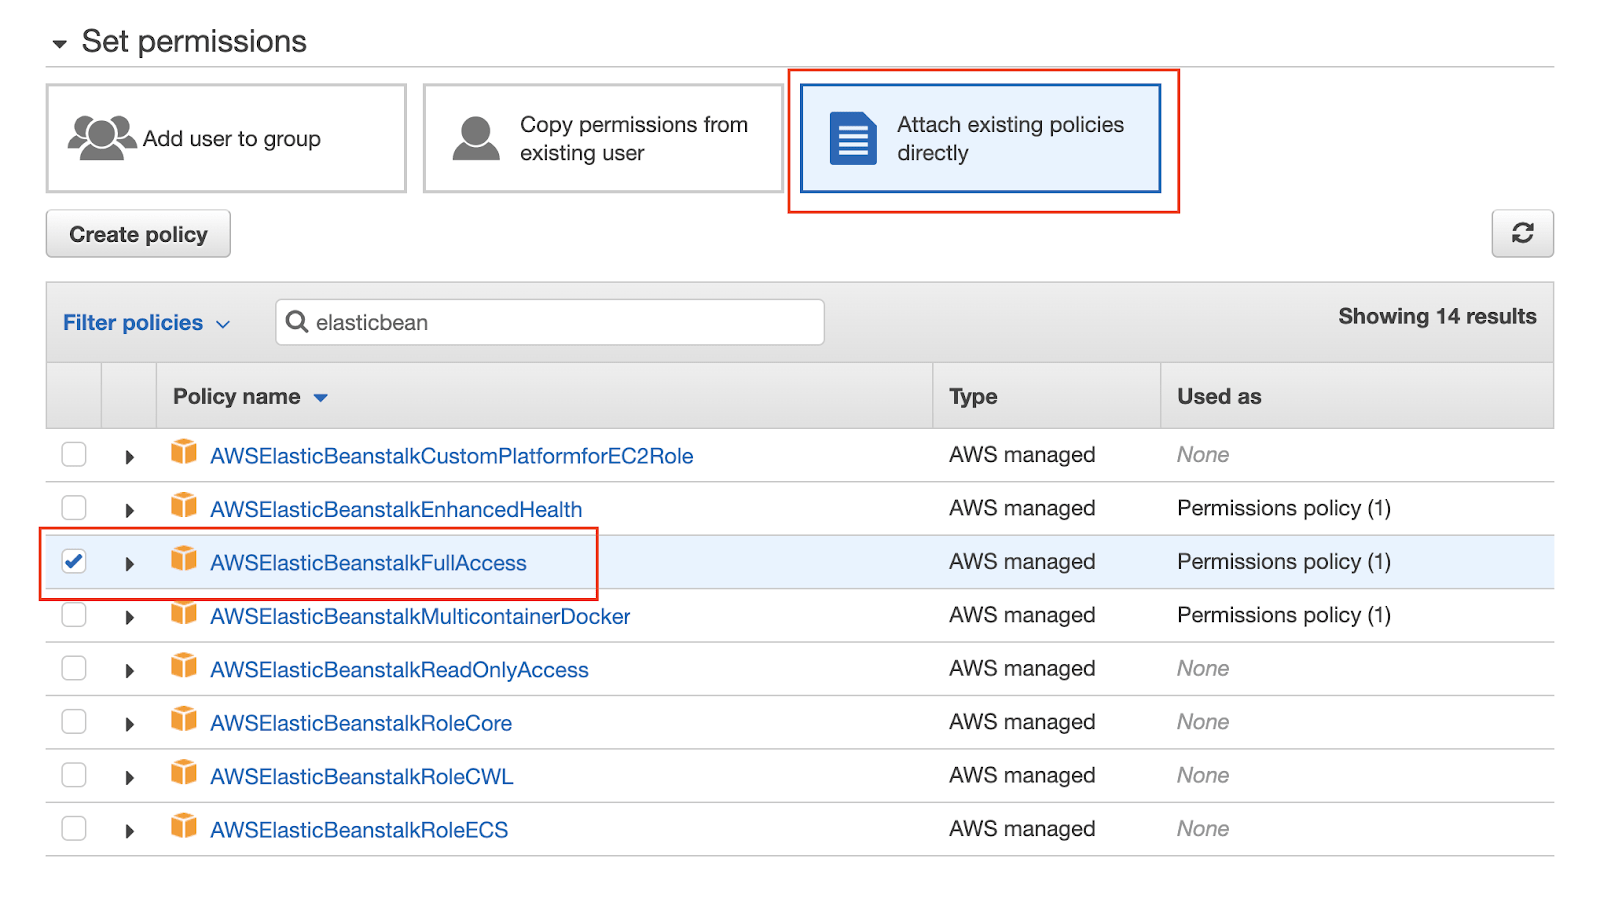
The next step will handle the Permissions that the user will have. We will use some predefined rules to get started. Select Attach existing policies directly. Using the search field, you can search for permissions, which often include the service name. Make sure that the user has the following permissions: AWSElasticBeanstalkFullAccess, AmazonS3FullAccess.

(12-iam-policies.png)

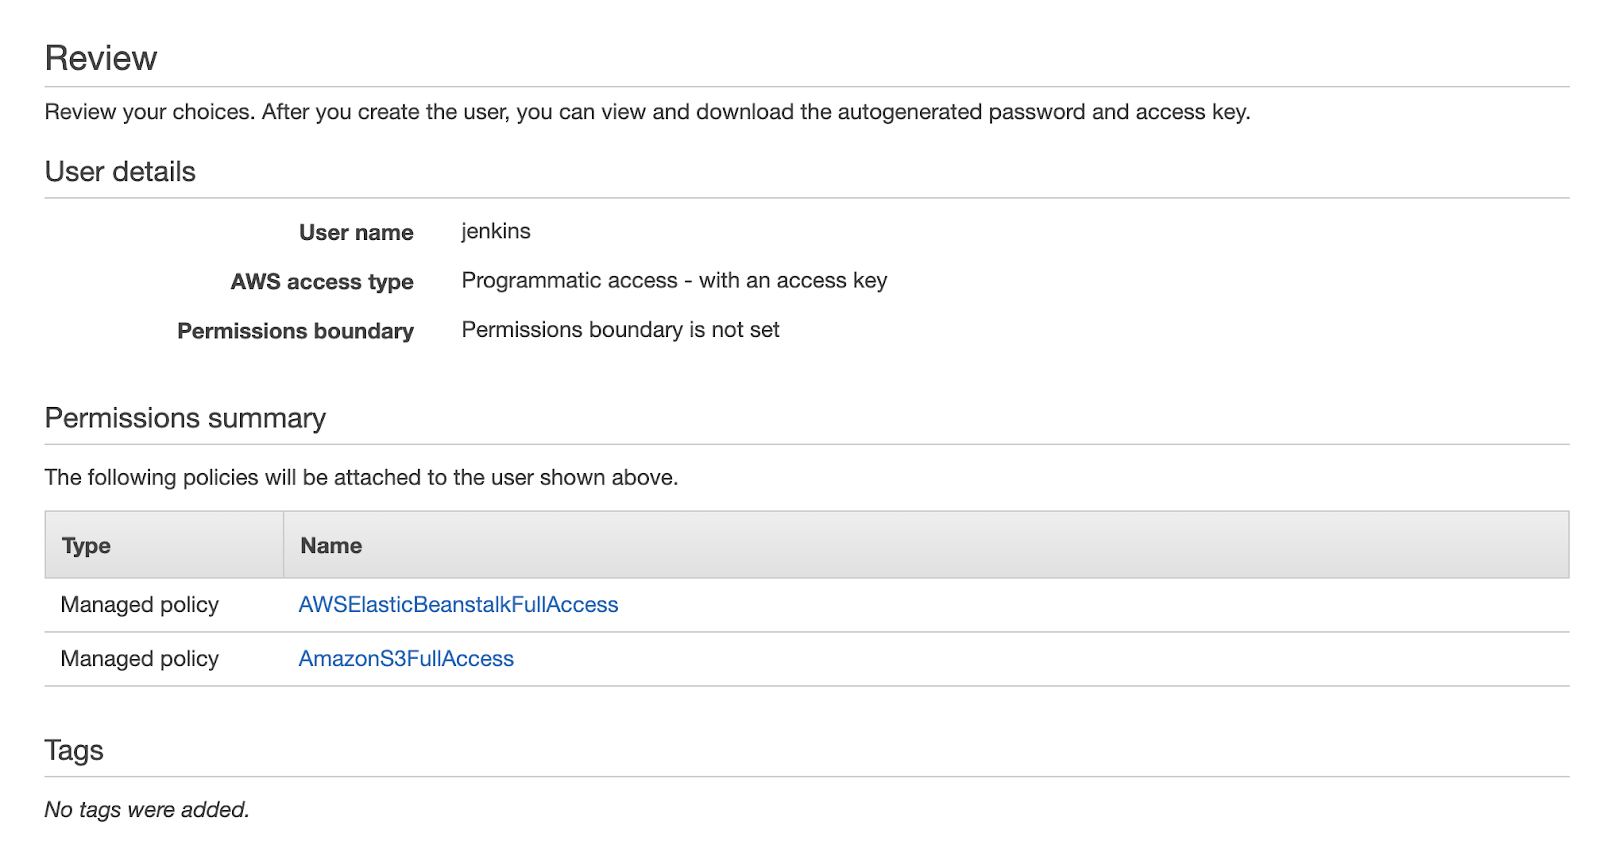
You can skip the Tags page, and on the Review page, your configuration should look very similar to the screenshot below. 

(13-iam-review.png)

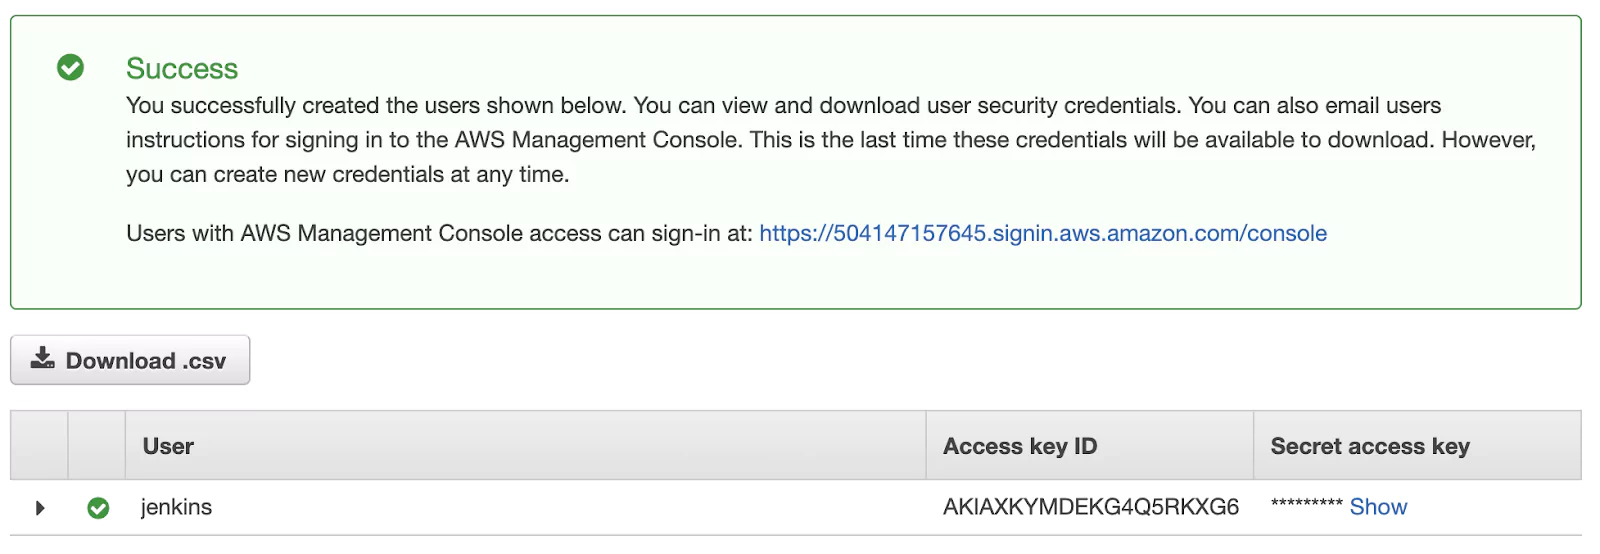
If everything looks right, go ahead and create the user. The final page will display the credentials that have been generated.

(14-iam-user-credentials.png)

Make sure that you store these credentials somewhere safe or keep this page open for a while. They won’t be displayed again. In case you lose them, delete the user and repeat the same process.

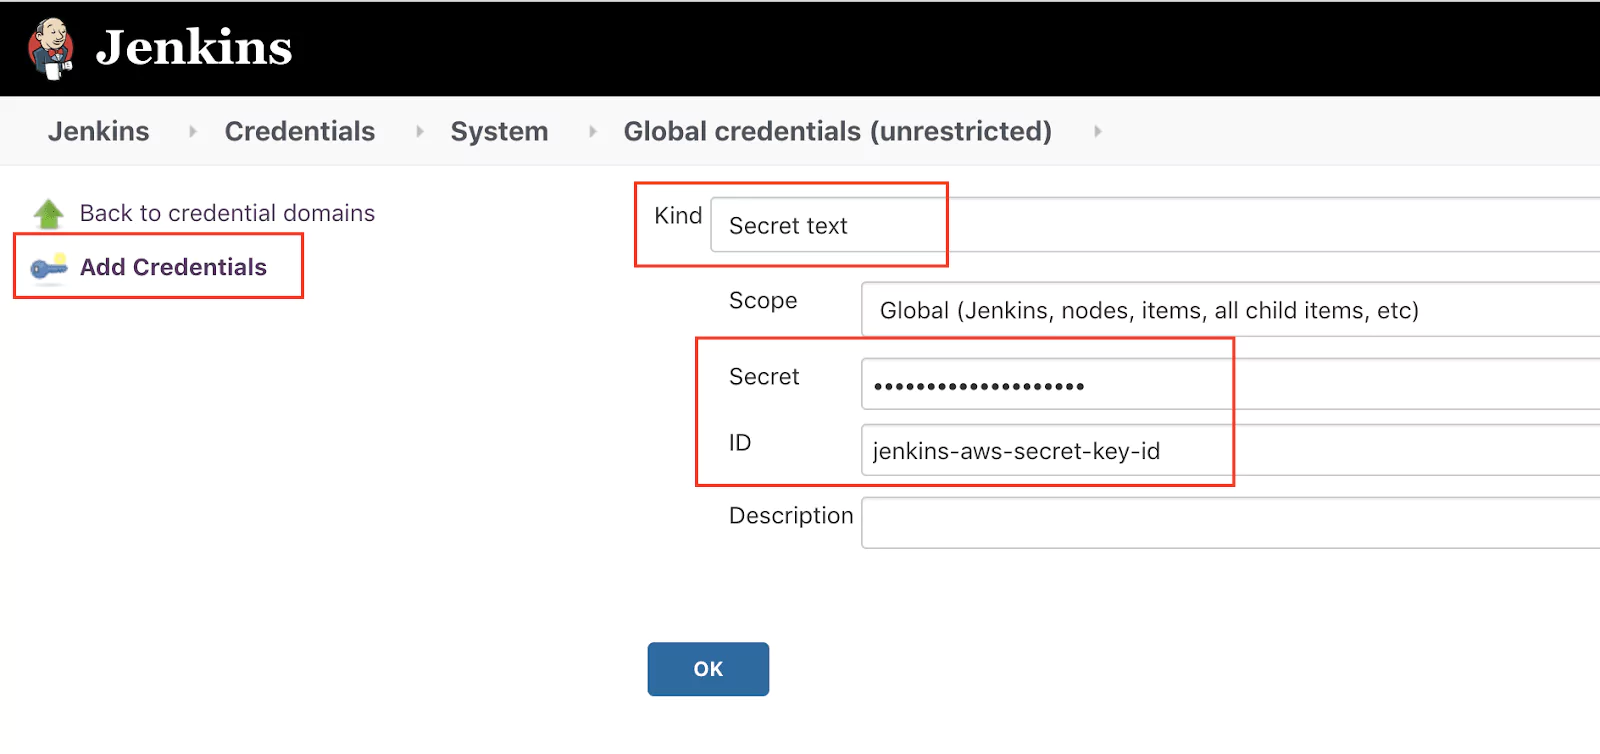
Now it is time to jump into Jenkins and store these credentials so that we can later use them in our pipeline. Go to Manage Jenkins > Credentials and click on the Jenkins store > Global credentials. If you see a menu item called Add Credentials on the right-hand side, you have reached the right place. 

Add for both the access key id and the secret access key (two entries in total). I have used the IDs jenkins-aws-secret-key-id and jenkins-aws-secret-access-key.

(15-jenkins-credentials-add.png)

After adding both credentials, the credentials overview page should look similar to the screenshot below.

(16-jenkins-credentials-overview.png)

By using this approach of storing the credentials within Jenkins, we ensure that this sensitive data does not land into our Git repository, and the use of the values will not be displayed in any logs. 

The AWS CLI will automatically pick-up the credentials stored in Jenkins, if we expose them as environment variables using a predefined name. The advantage of using environment variables is that many tools will automatically look for predefined names and use them. This makes the commands shorter and easier to read.

Inside the Jenkinsfile inside the pipeline block, add the following lines:

    environment {
        AWS_ACCESS_KEY_ID     = credentials('jenkins-aws-secret-key-id')
        AWS_SECRET_ACCESS_KEY = credentials('jenkins-aws-secret-access-key')
    }

This will instruct Jenkins to create two environment variables (AWS_ACCESS_KEY_ID, AWS_SECRET_ACCESS_KEY) and initialize them with the values stored in the Jenkins credential store.

Now we have everything in place to use the AWS CLI for uploading the jar archive to AWS S3.

There are two commands that we will execute.

The first command will let AWS know in which region you are operating. In my case, I have used the us-east-1 region for both S3 and EB:

aws configure set region us-east-1

The second command will do the upload from Jenkins to S3:

aws s3 cp ./target/calculator-0.0.1-SNAPSHOT.jar s3://YOUR-BUCKET-NAME/calculator.jar

The copy (cp) command for the S3 service will take two parameters: the source and the destination. During this process, we will rename the jar file. 

We will add both of these commands inside the success block of the publishing stage. The simplified pipeline after this step will look as follows:

pipeline {
    agent any 

     environment {
        AWS_ACCESS_KEY_ID     = credentials('jenkins-aws-secret-key-id')
        AWS_SECRET_ACCESS_KEY = credentials('jenkins-aws-secret-access-key')
    }      

    stages {
        stage('Build') {
            // build stage
        }
        stage('Test') {
           // test stage
        }
        stage('Publish') {
            steps {
                sh './mvnw package'
                // bat '.mvnw package'
            }
            post {
                success {
                    archiveArtifacts 'target/*.jar'
                    sh 'aws configure set region us-east-1'
                    sh 'aws s3 cp ./target/calculator-0.0.1-SNAPSHOT.jar s3://YOUR-BUCKET-NAME/calculator.jar'
                    // bat 'aws configure set region us-east-1'
                    // bat 'aws s3 cp ./target/calculator-0.0.1-SNAPSHOT.jar s3://YOUR-BUCKET-NAME/calculator.jar'
                }
            }
        }
    }
}

Note: If Jenkins is running on Windows, use bat inside of sh.

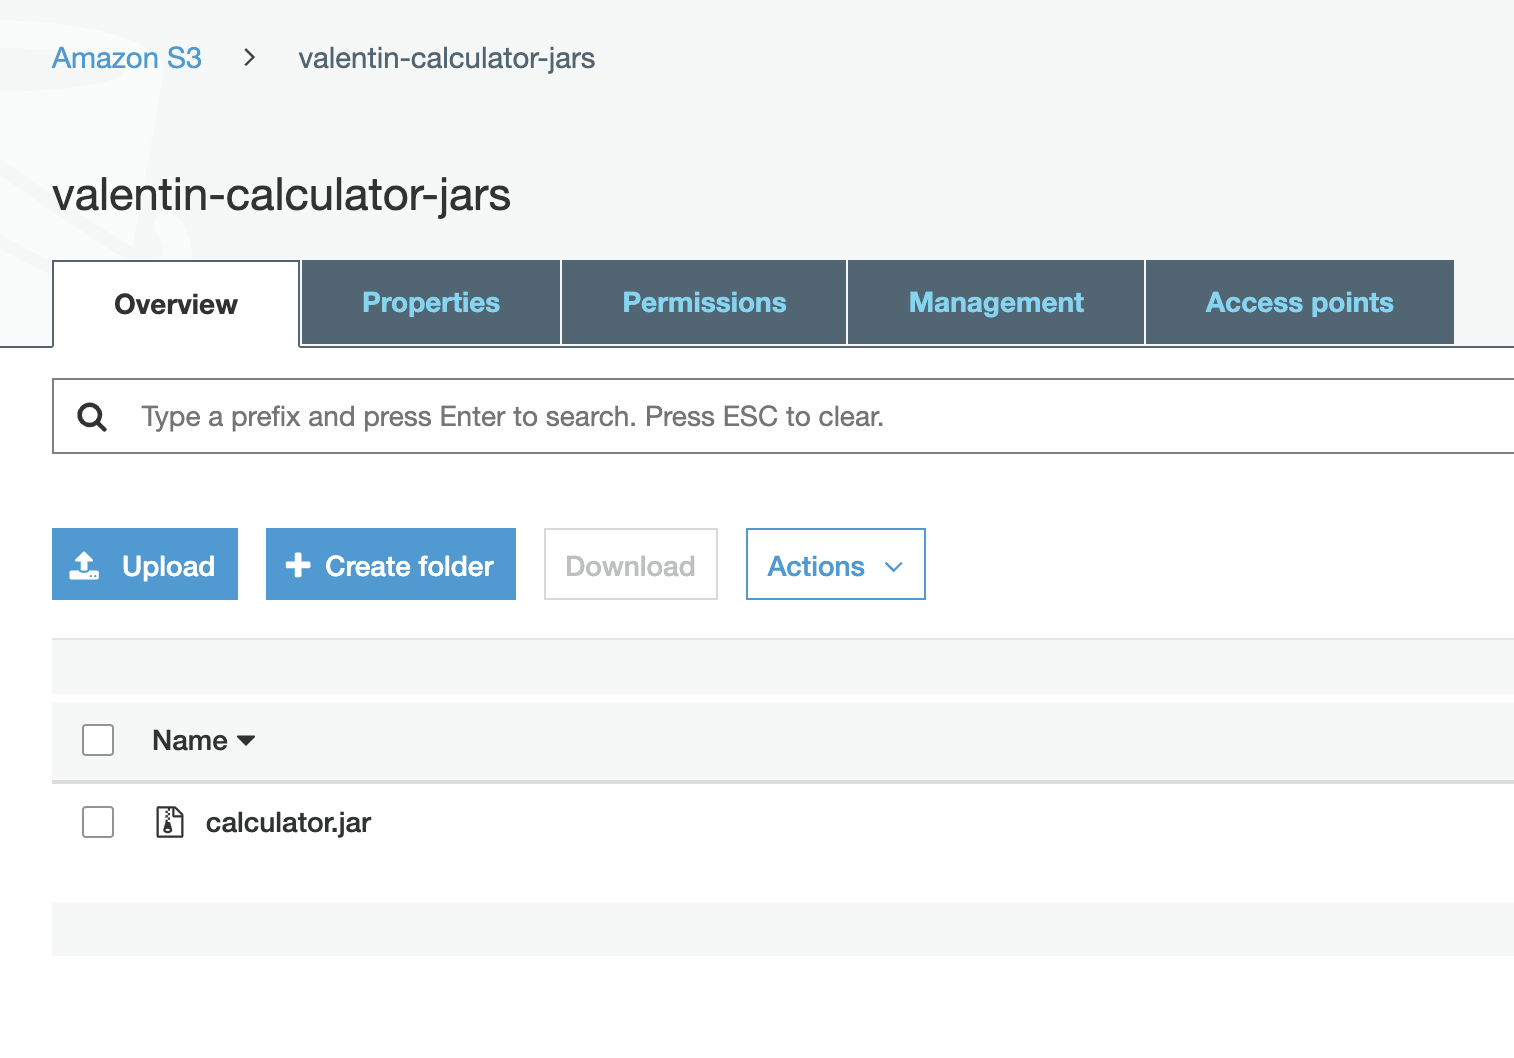
If the pipeline’s execution does not indicate any errors, you should soon see the jar archive inside the newly created S3 bucket in your AWS account. Please check the Troubleshooting section at the end of the article if you notice any errors in the console. 

(17-s3-upload-done.png)

How to deploy a new application version to AWS EB from Jenkins

Since we will start handling many parameters in the following commands, it is time to clean-up the pipeline code and organize all variables. We will begin to define new environment variables that will store the application-specific configuration. Make sure that the following values match the values you have configured in AWS.

    environment {
        AWS_ACCESS_KEY_ID     = credentials('jenkins-aws-secret-key-id')
        AWS_SECRET_ACCESS_KEY = credentials('jenkins-aws-secret-access-key')
        ARTIFACT_NAME = 'calculator.jar'
        AWS_S3_BUCKET = 'YOUR S3 BUCKET NAME'
        AWS_EB_APP_NAME = 'calculator'
        AWS_EB_ENVIRONMENT = 'Calculator-env'
        AWS_EB_APP_VERSION = "${BUILD_ID}"
    }

The first step in deploying a new version to EB is to create a new application version, by referencing a new jar artifact from S3 and specifying the application name and the artifact version.

On an Unix-like system you will access environment variables using the notation $VARIABLE_NAME while on a Windows system the notation will be %VARIABLE_NAME%.

aws elasticbeanstalk create-application-version --application-name $AWS_EB_APP_NAME --version-label $AWS_EB_APP_VERSION --source-bundle S3Bucket=$AWS_S3_BUCKET,S3Key=$ARTIFACT_NAME

You can view the full documentation and the available options at the official AWS CLI documentation for the create-application-version command ( https://awscli.amazonaws.com/v2/documentation/api/latest/reference/elasticbeanstalk/create-application-version.html)

Please note that this command will only create a new application version ready for usage in EB, but it will not affect the existing running version. 

To deploy a new application version, we need to use the update-environment command. This command will only work if we use a version that has already been created previously. The command options will be similar to the create-application-version command.

aws elasticbeanstalk update-environment --application-name $AWS_EB_APP_NAME --environment-name $AWS_EB_ENVIRONMENT --version-label $AWS_EB_APP_VERSION

You can view the full documentation and the available options at the official AWS CLI documentation for the update-environment  command. (https://awscli.amazonaws.com/v2/documentation/api/latest/reference/elasticbeanstalk/update-environment.html)

The complete publish stage will look as follows:

        stage('Publish') {
            steps {
                sh './mvnw package'
                // bat '.mvnw package'
            }
            post {
                success {
                    archiveArtifacts 'target/*.jar'
                    sh 'aws configure set region us-east-1'
                    sh 'aws s3 cp ./target/calculator-0.0.1-SNAPSHOT.jar s3://$AWS_S3_BUCKET/$ARTIFACT_NAME'
                    sh 'aws elasticbeanstalk create-application-version --application-name $AWS_EB_APP_NAME --version-label $AWS_EB_APP_VERSION --source-bundle S3Bucket=$AWS_S3_BUCKET,S3Key=$ARTIFACT_NAME'
                    sh 'aws elasticbeanstalk update-environment --application-name $AWS_EB_APP_NAME --environment-name $AWS_EB_ENVIRONMENT --version-label $AWS_EB_APP_VERSION'
                }
            }
        }

If you look inside the AWS console, you should be able to notice the latest version available.

(18-ec-new-version.png)

Troubleshooting tips

Deploying to AWS is a complex topic, and errors sometimes occur, often due to mistakes in the pipeline configuration. Below you will find some ideas on how to troubleshoot some of the most common errors.

How to find errors in the Jenkins console logs

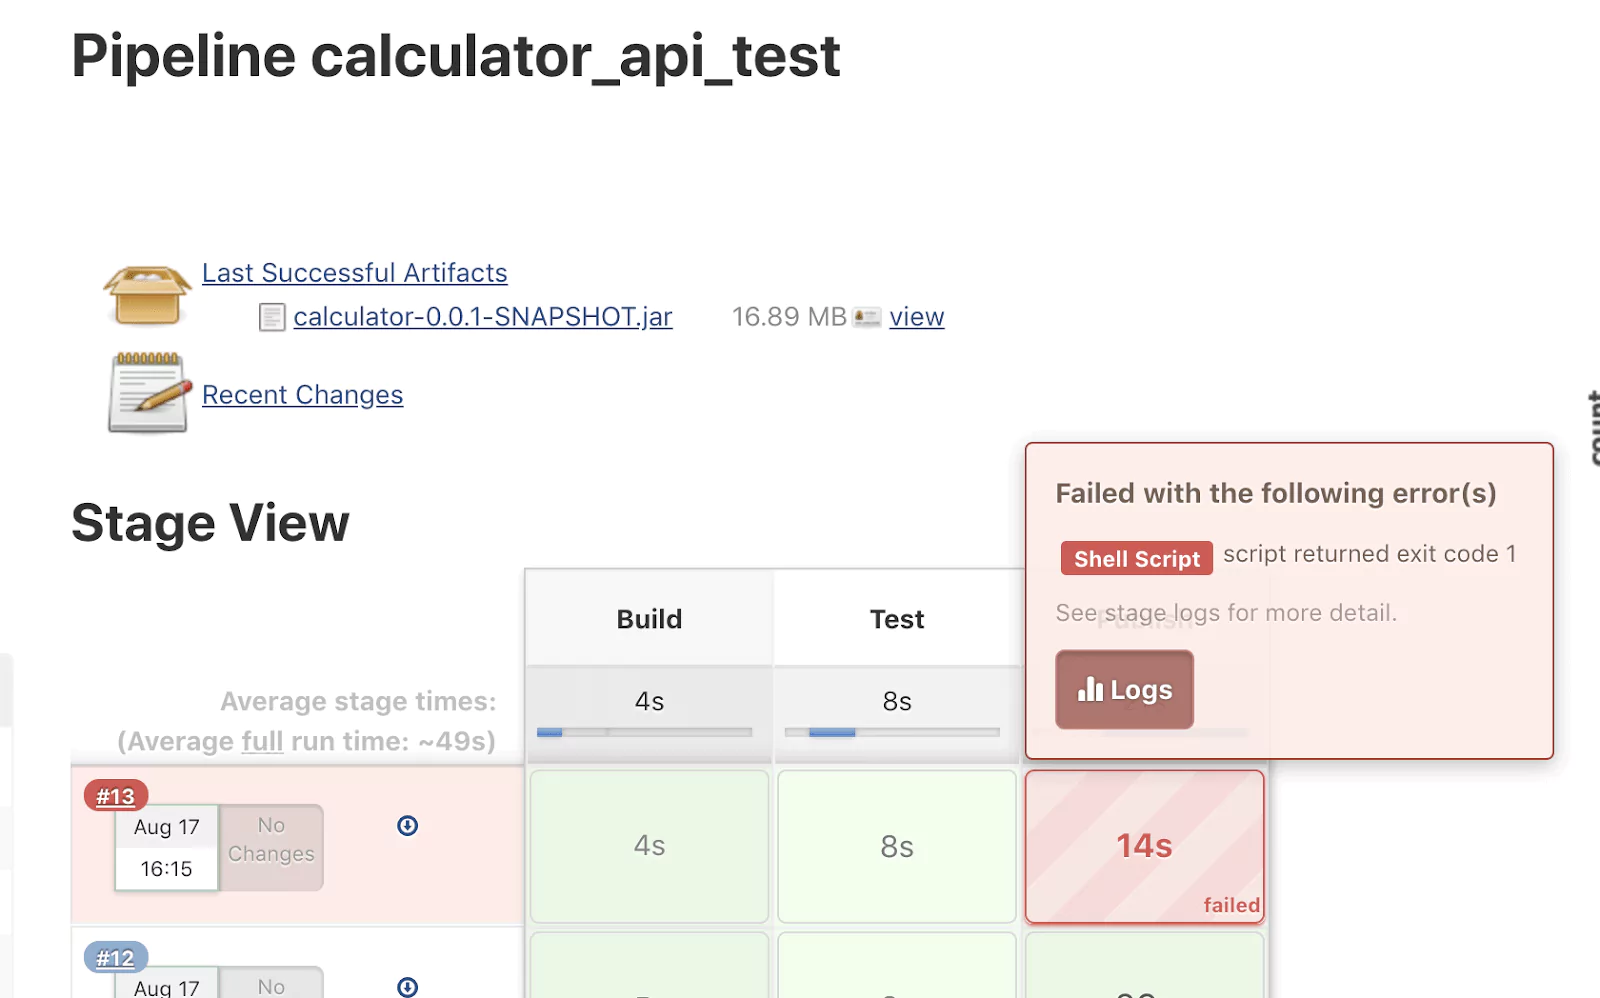
Should the pipeline fail at any stage, it is essential to read the logs for hints on what has failed. You can view the logs by clicking on the build number or clicking on the failed stage. 

(19-jenkins-error-logs.png)

Try to identify the error and the command that has generated the respective error. 

S3 upload failed – Unable to locate credentials

This error is an indication that the AWS CLI was unable to read the environment variables that contain the credentials needed: AWS_ACCESS_KEY_ID, AWS_SECRET_ACCESS_KEY. Make sure that both variables are defined and correctly spelled.

S3 upload failed – Invalid bucket name “”: Bucket name must match the regex

Take a look at the entire aws s3 cp command in the Jenkins logs. You may notice that the bucket name is empty. This is typically due to a missing or misspelled environment variable. 

An error occurred (InvalidParameterCombination) when calling the CreateApplicationVersion operation: Both S3 bucket and key must be specified.

Take a look at the entire aws elasticbeanstalk create-application-version command in the Jenkins logs. You may notice that the S3Bucket or S3Key is empty. 

The application endpoint responds with 502 Bad Gateway

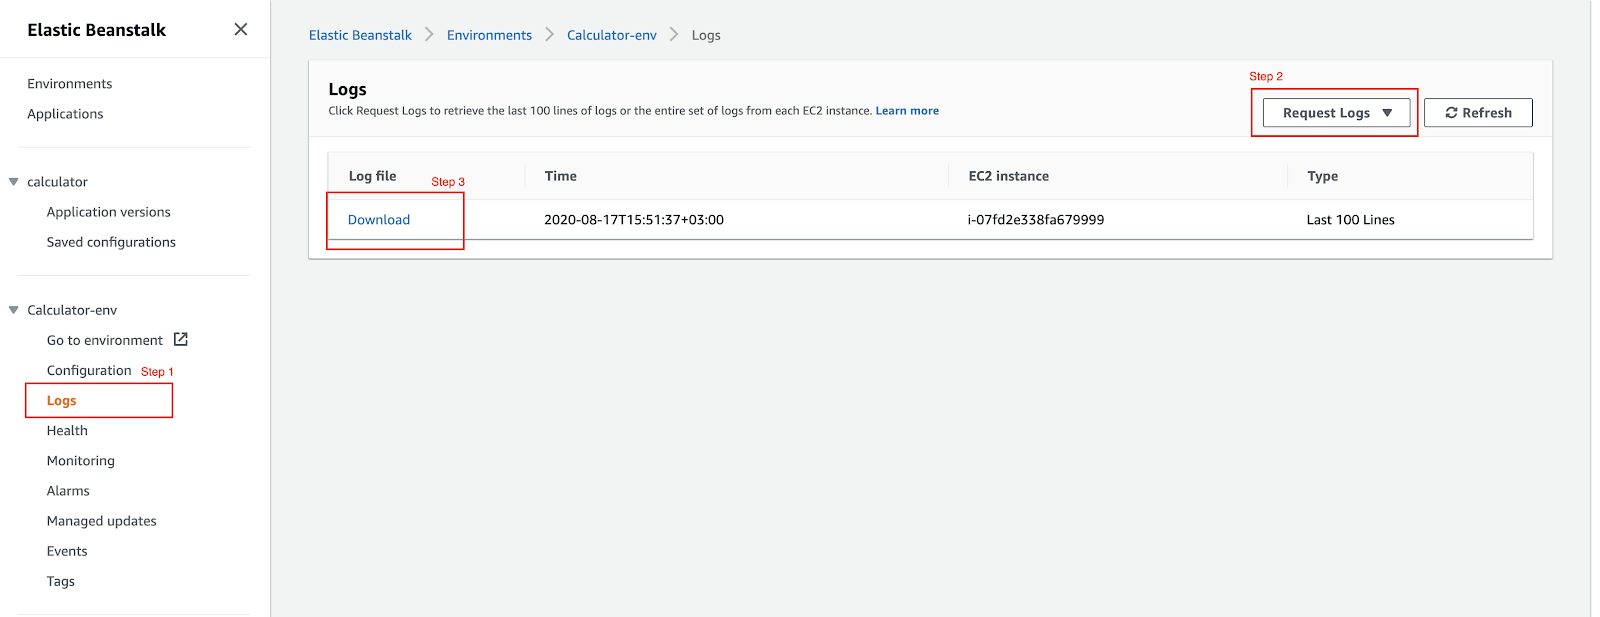
This is an indication that the application had some issues starting. It is hard to tell the root cause precisely, but the first place where you can look for hints is in the application logs. To get them, go to the respective environment and select the menu item called Logs.

(20-ec-app-logs.png)

From the list with Request Logs, get the last 100 entries. Once the logs are available, click on Download.

‘aws’ is not recognized as an internal or external command error in Jenkins

This is an error indicating that the aws command could not be found by Windows. The first step is to restart the computer and in many cases this will solve the problem. 

Conclusion and next steps

We now have the foundation for a simple but fully working CI/CD pipeline. While we are building, testing, and deploying a Java application to AWS, this solution is not production-ready. 

The CI pipeline may include additional code review, code quality, test or security stages to ensure the artifact fulfills all requirements before attempting a deployment.

For the CD pipeline, you may also want to include additional environments and tests to ensure that a deployment to the production environment will work without any issues.

Monitoring Jenkins: Essential Jenkins Logs to Watch Out For

Monitoring Jenkins is a serious challenge. Continuous auditing and logging are often overlooked, but it provides a wealth of information about the health of your Jenkins instance. The following are some approaches to generating informative logging to these issues, that can help to monitor and provide suitable explanations of where the problems lie; even identifying what the possible solutions are.

RAM usage on your Jenkins Instance

When Jenkins is running or has run out of RAM, it normally has a few root causes:

  • growth in data size requiring a bigger heap space
  • a memory leak
  • The operating system kernel running out of virtual memory
  • multiple threads need the same locks but obtain them in a different order

To identify the root cause of memory leaks, it normally requires access to one of three log sources. Those being the garbage collection logs, a heap dump, or a thread dump. These three sources are hugely important when monitoring Jenkins.

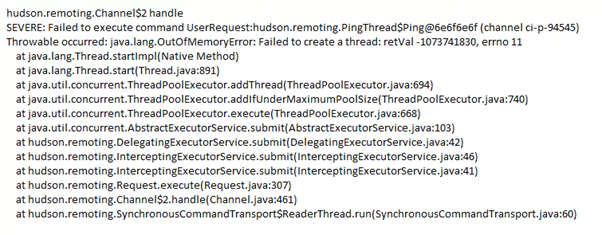
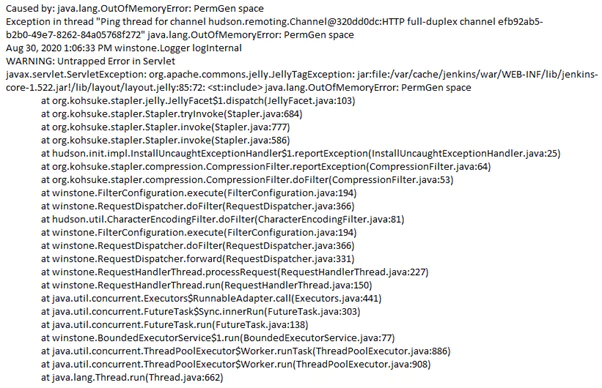
To demonstrate an OOM (OutofMemory) issue, a snippet from stdout log shows a Jenkins instance on a Master node, throwing such an error. Usually, when you see an OutOfMemory error and it references threads, this is commonly a native (system) out of memory because each additional thread that the JVM (Java Virtual Machine) spawns uses native memory (as opposed to Java Heap memory). The advice, in this case, would be to lower the Java heap size – since a large Java heap is crowding out the address space that needs to be used for keeping track of new threads

Monitoring Jenkins: Java Stack

When Jenkins does perform a rebuild though, it will keep the jobs and build data on the filesystem and load the new format to the memory. This can also lead to high memory consumption and result in slow UI responsiveness and OOM errors. To avoid such cases as the one demonstrated, it is best to open the old data management page (located at your-jenkins-url/administrativeMonitor/OldData/manage), verify that the data is not needed, and clear it.

A key tip to managing the RAM or heap usage is to define the right heap size or ensure it is throttled. When defining the heap size, there is a very important JVM feature you should consider implementing on the JVM for Jenkins. This feature is called UseCompressedOops, and it works on 64 bit platforms, which are now most often used. What it does, is to shrink the object’s pointer from 64bit to 32bit, thus saving a lot of memory. Enabling the configuration of Memory usage thresholds (throttle usage), can enable job builds to fail or be unstable, but notify users if memory usage goes beyond the maximum available.

You need to constantly check and analyze Jenkins performance by implementing configurations for:

  • Monitoring memory usage. This checking and monitoring RAM memory usage continuously for Jenkins master / slave node
  • Checking java memory leak
  • Adding correct java option arguments/parameters which are suggested by Jenkins official documents
  • Monitoring with the correct plugin. The monitoring plugin will help you to monitor running setup with live scaled data. This will involve, install the monitoring plugin and monitor Jenkins memory usage
  • With the plugin, add monitoring alerts for deadlock, threads, memory, and active sessions. You can add monitoring alerts to capture threshold baseline details and present it in tooling such as the ELK ‘stack’ – ElasticSearch, LogStash, Kibana, to perform a search, analysis, and visualization operations in real-time

CPU consumption

Jenkins doesn’t normally need a lot of processing power to work, but memory and storage performance issues can make the CPU load spike exponentially. When Jenkins is performing tasks, CPU usage will rise and/or spike temporarily. Once the CPU intensive process completes, the CPU usage should drop down to a lower level. When you’re monitoring Jenkins, the CPU usage is of paramount importance.

However, if you are receiving high CPU alerts or are experiencing application performance degradation, this may be due to a Jenkins process being stuck in an infinite loop (normally deadlock threads), repeated full Garbage collections, or that the application has encountered an unexpected error. If the JVM for Jenkins is using close to 100% of the CPU consumption, it will constantly have to free up processing power for different processes, which will slow it down and may render the application unreachable. When you’re monitoring Jenkins, you need to be able to catch these issues quickly.

To demonstrate high CPU usage, a snippet from stdout log, indicates high usage with a deadlock when queueing up jobs from a Jenkins Master instance. Causing the issue is the OutOfMemoryError: PermGen space error. PermGen is one of the primary Java memory regions and has a limited amount of memory without customization. Application of the JVM parameters -Xmx and -XX:MaxPermSize will help rectify this problem. If you do not explicitly set the sizes, platform-specific defaults will be used, this potential issue can occur.

Monitoring Jenkins: jenkins stack error

In order to reduce the CPU usage, you do need to determine what processes are taxing your CPU. The best way of diagnosing this is by executing the jenkinshangWithJstack.sh script while the CPU usage is high, as it will deliver the outputs of top and top -H while the issue is occurring, so you can see which threads are consuming the most CPU.

The following heap stack example shows that the Jenkins UI has become unresponsive, after running the jenkinshangWithJstack.sh script to gather data. In the output it shows the JVM is consuming a high amount of CPU:

Excessive CPU usage can be reduced or tempered by the following actions:

  • Minimizing the number of builds on the master node. This meaning you want to make the Jenkins master as “free” from work as you can, leaving the CPU and memory to be used for scheduling and triggering builds on slaves only
  • Looking at the garbage collection logs to see if there’s a memory leak
  • From repeated build processes, not keeping too much of the build history. Trying to limit it
  • Making sure your Jenkins & installed plugins version, are installed with the most up to date stable releases
  • Constantly monitor CPU performance, by checking and monitoring the CPU usage for Jenkins slaves the master node. Resulting outputs can be analyzed in the ELK stack

Managing the Garbage Collector (GC)

The garbage collector is an automatic memory management process.

Its main goal is to identify unused objects in the heap and release the memory that they hold. Some of the GC actions can cause the Jenkins program to pause. This will mostly happen when it has a large heap (normally 4GB). In those cases, GC tuning is required to shorten the pause time. If Jenkins is processing a large heap but requires low pause times, then you should consider as a starting point, the use of the G1GC collector. It will help manage its memory usage more efficiently.

A typical case example is when the java.lang.OutOfMemoryError: GC overhead limit exceeded error happens within a Jenkins instance. This is the JVM’s way of signaling that Jenkins is spending too much time doing garbage collection with too little result. By default the JVM is configured to throw this error if it spends more than 98% of the total time doing GC and when after the GC only less than 2% of the heap is recovered. The Garbage collector is always running behind the scenes, and when you’re monitoring Jenkins, you need to make sure it is running efficiently.

So when trying to build jobs in Jenkins from the Master node, and the build log (or stdout file) presents this repeated output…

Exception in thread "main" Java.lang.OutOfMemoryError: GC overhead limit exceeded.

…it is suggesting to clear any old builds which have been deployed way back in time (weeks or possibly months) and to consider increasing the build counter in Jenkins.

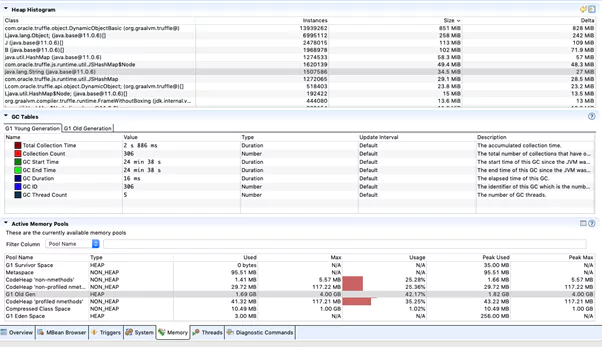
Through the use of a heap histogram as demonstrated, this can identify where the GC shows a large heap area (of 4GB) and its current usage from the Jenkins instance.

To manage the Garbage Collector more effectively and allow it to compact the heap on-the-go, it is suggested to apply the following configurations.

  • Enable GC logging
  • Enable G1GC – this is the most modern GC implementation (depending on JDK version)
  • Monitor GC behavior with plugins, services or toolings
  • Tune GC with additional flags as needed
  • Utilise the ELK stack to analyze the logging source
  • Keep monitoring and attach any key metric alerting to the logging process

This will involve tuning the garbage collection and setting arguments on the JVM for Jenkins.

Resulting in a more detailed, explanatory and transparent approach to log management and the monitoring of the garbage collector. Key is to parse effective logging, through primarily CUI/GUI GC monitoring tools, so as to provide better visualization of the issue and to identify and isolate, where any slow unresponsive behaviour Jenkins is showing.

Pipeline Build Failures

It is pretty common when starting with Jenkins to have a single server which runs the master and all builds, however Jenkins architecture is fundamentally ‘Master and Agent (slave)’. The master is designed to do coordination and provide the GUI and API endpoints, and the agents are designed to perform the work. The reason being that workloads are often best ‘farmed out’ to distributed servers.

When Jenkins is used in cloud environments, it has many integrations with agents, plugins and extensions, to support those various environmental elements. This may involve Virtual Machines, Docker Containers, Kubernetes, AWS (EC2), Azure, Google Cloud, VMWare and other external components. Where problems can arise in those build jobs, is if you use Jenkins as just a master instance, and finding that you start to run out of resources such as memory, CPU, etc. At that point you need to consider either upgrading your master or setting up agents to pick up the load. You might also need to factor having several different environments to test your builds.

When Jenkins Jenkins spins up an agent, you are likely dealing with a plugin that manages that agent. The fact that you need plugins in Jenkins to do just about anything can be problematic — and not only because it means software delivery teams have to spend time installing and configuring them before they can start working. A bigger issue will come into play here, in that most of Jenkins’ plugins are written by third parties, vary in quality, and may lose support without notice.

If the plugin version is out of sync, such as one to create Jenkins agents in Azure Virtual Machines, then the following error can occur is displayed in a stdout or build log:

This provisioning agent error shown, was specific to a bug not identified before release and applied outside of a repository used for approved build dependencies.

To ensure you follow some best practice for you build pipeline:

  • Avoid where possible, running jobs on the Master. User a master/slave (node) configuration. Ideally each jobs should run on slave and make sure you are executing jobs on slave to have minimum load on master node
  • Add correct cleanup configuration to delete old jobs from the master node
  • Add the correct memory configurations and limits for the Jenkins deployment
  • Use a central, shared and supported repository for build dependencies, so ensuring a cleaner, more reliable and safer build job workspace
  • Install only supported plugins and avoid those that have memory leak issues. Make sure you are installing correct plugins that you can test on a staging (testing) server first, before consideration of installing them in production
  • Avoid installing unwanted plugins, and checking before installing them, that they are security compliant and do not having security vulnerabilities
  • Export build logs to the ELK stack. In case of a large amount of running jobs, it can become difficult to keep track of all the activity. So collecting all this data and shipping it into the ELK Stack, can help to give you more visibility and identify any issues

Permission / Security related Issues

Jenkins is a tool that needs to interface with a myriad of systems and applications throughout DevOps environments. It needs unabridged access to code and artifacts, and to accomplish its role as the ‘steward,’ Jenkins must have access to a considerable breadth of credentials – or secrets – from usernames and passwords to source control and artifact deployment. When monitoring Jenkins, it’s tempting to only think about operational issues, but security issues come up regularly.

All too often, users who use Jenkins do have a propensity to treat security as secondary. The business risk of not securing your Jenkins servers is high. You need to ensure that user authentication is established and enforce access control policies to your Jenkins servers. Due to the centrality of its role, a breach of your Jenkins servers can end up exposing access credentials to your most valuable resources. Key to securing Jenkins, is ensuring there is an elimination of weaknesses related to misconfigured environments and poorly constructed security controls. This mainly related to authentication and authorization policies.

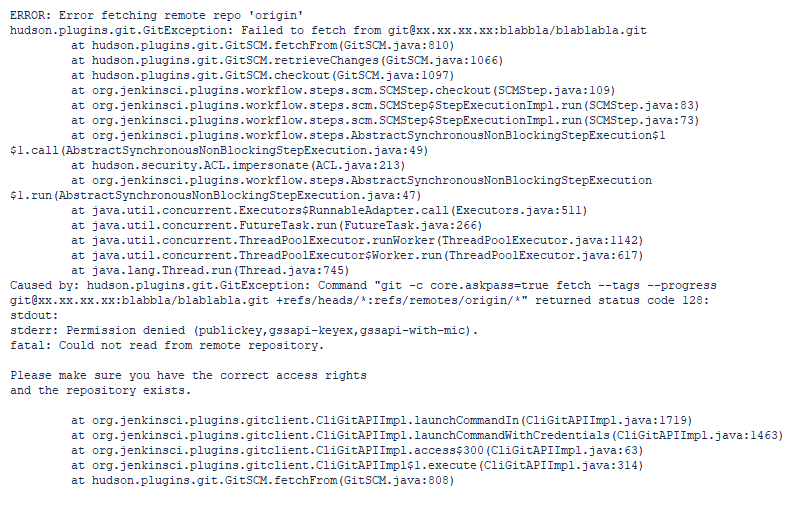
Understanding how to apply security controls can be seen in this log output, when encountering a problem trying to launch a pipeline Job with access to a Git repository.

The permission denied error meant there was something wrong with the credential(s) in the job definition, provided by Jenkins to access the Git server. It was corrected with an ‘id_rsa’ credential (permission).

To ensure you follow some best practice for securing your Jenkins instance and jobs:

  • Enable Jenkins’ security. Jenkins global security is the first line of defense in protecting the asset it controls. Core Jenkins supports four security realms: delegate to servlet container, Jenkins’s own user database, LDAP, and Unix user/group database
  • Consider the use of the Jenkins credentials plugin, that can provide a default internal credentials store. This can be used to store high value or privileged credentials, such as GitHub tokens
  • Configuring access control in Jenkins using a Security Realm and Authorization configuration. A Security Realm, informs the Jenkins environment, how and where to pull user (or identity) information from. Authorization configuration which informs the Jenkins environment as to which users and/or groups can access which aspects of Jenkins

Jenkins can provide various ways of keeping track of an instance, with two main categories of logs represented: system logs and build logs. Jenkins will provide some pretty useful in-console capabilities, for keeping track of your builds using these logs. As Jenkins takes constant effort to monitor, getting the context right in the form of the most informative logging, is critical to managing the most common and valid issues.
Easily Build Jenkins Pipelines – Tutorial

Are you building and deploying software manually and would like to change that? Are you interested in learning about building a Jenkins pipeline and better understand CI/CD solutions and DevOps at the same time? In this first post, we will go over the fundamentals of how to design pipelines and how to implement them in Jenkins. Automation is the key to eliminating manual tasks and to reducing the number of errors while building, testing and deploying software. Let’s learn how Jenkins can help us achieve that with hands-on examples with the Jenkins parameters. By the end of this tutorial, you’ll have a broad understanding of how Jenkins works along with its Syntax and Pipeline examples. 
What is a pipeline anyway?

Let’s start with a short analogy to a car manufacturing assembly line. I will oversimplify this to only three stages of a car’s production:

  • Bring the chassis
  • Mount the engine on the chassis
  • Place the body on the car

Even from this simple example, notice a few aspects:

    • These are a series of pipeline steps that need to be done in a particular order 
    • The steps are connected: the output from the previous step is the input for the next step

In software development, a pipeline is a chain of processing components organized so that the output of one component is the input of the next component.

At the most basic level, a component is a command that does a particular task. The goal is to automate the entire process and to eliminate any human interaction. Repetitive tasks cost valuable time and often a machine can do repetitive tasks faster and more accurately than a human can do.

What is Jenkins?

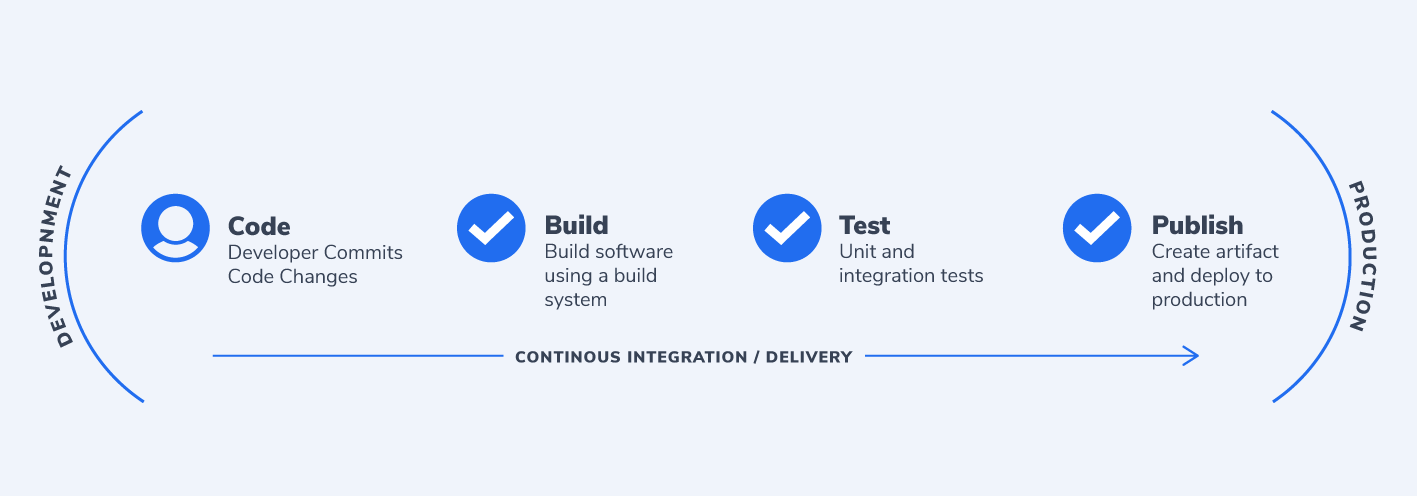
Jenkins is an automation tool that automatically builds, tests, and deploys software from our version control repository all the way to our end users. A Jenkins pipeline is a sequence of automated stages and steps to enable us to accelerate the development process – ultimately achieving Continuous Delivery (CD). Jenkins helps to automatically build, test, and deploy software without any human interaction  – but we will get into that a bit later. 
If you don’t already have Jenkins installed, make sure that you check this installation guide to get you started. 

Create a Jenkins Pipeline Job

Let’s go ahead and create a new job in Jenkins. A job is a task or a set of tasks that run in a particular order. We want Jenkins to automatically execute the task or tasks and to record the result. It is something we assign Jenkins to do on our behalf.

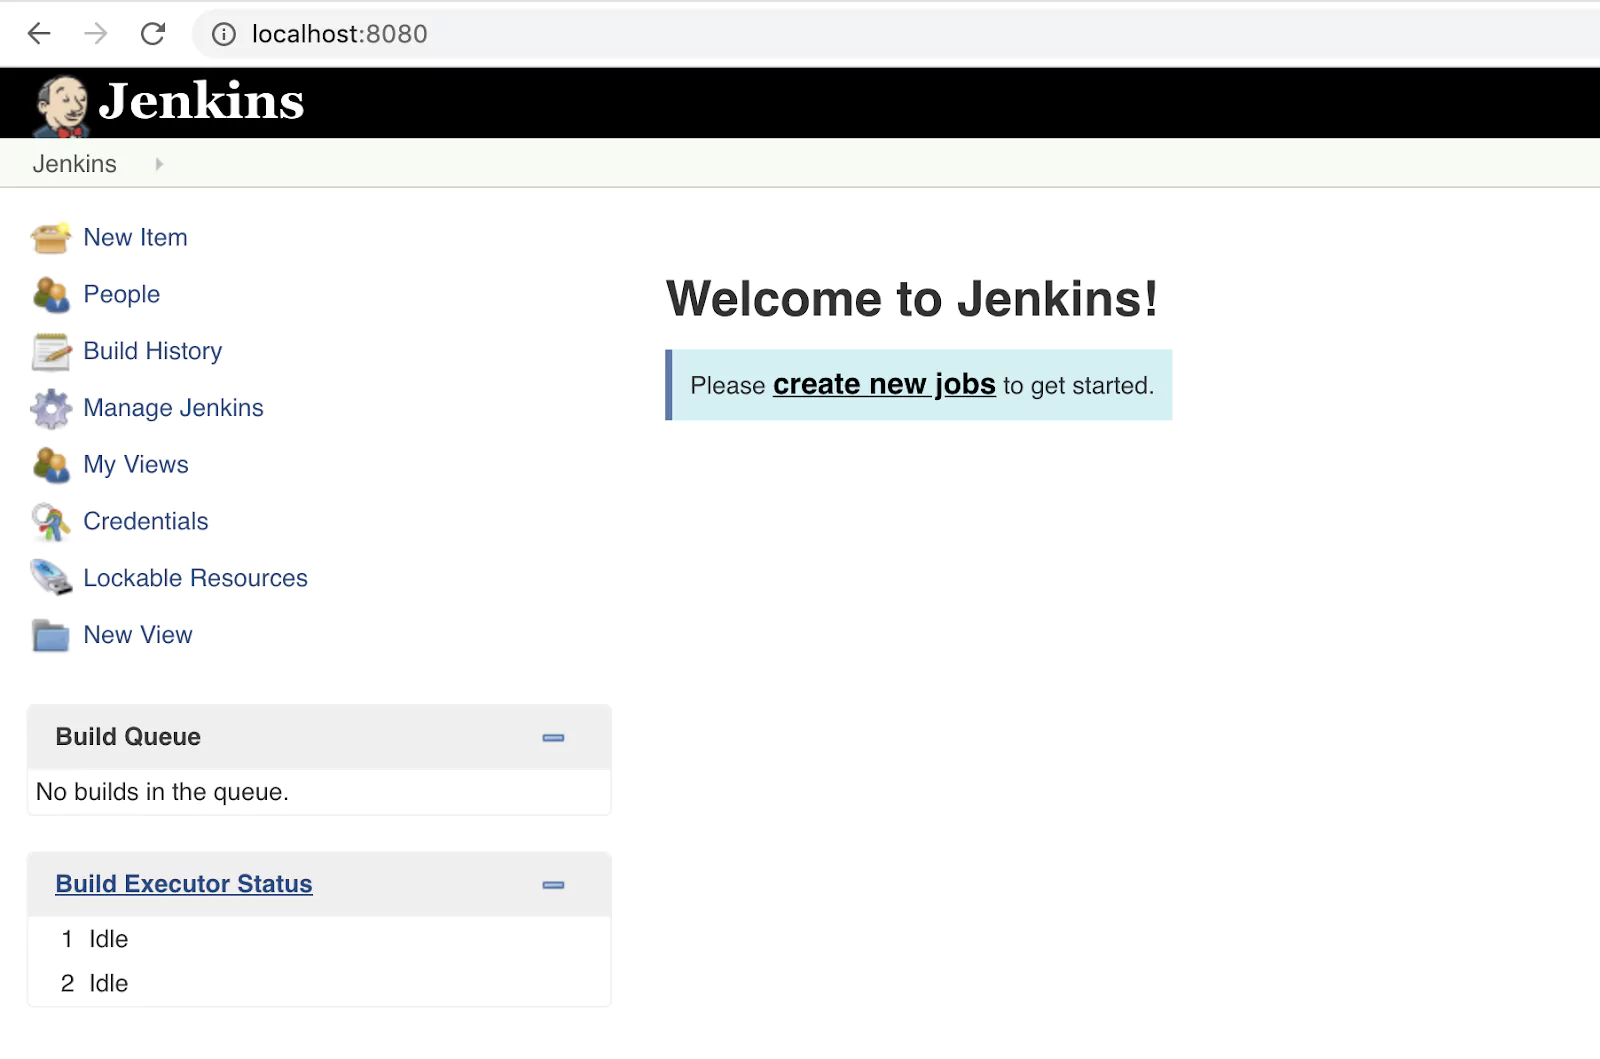
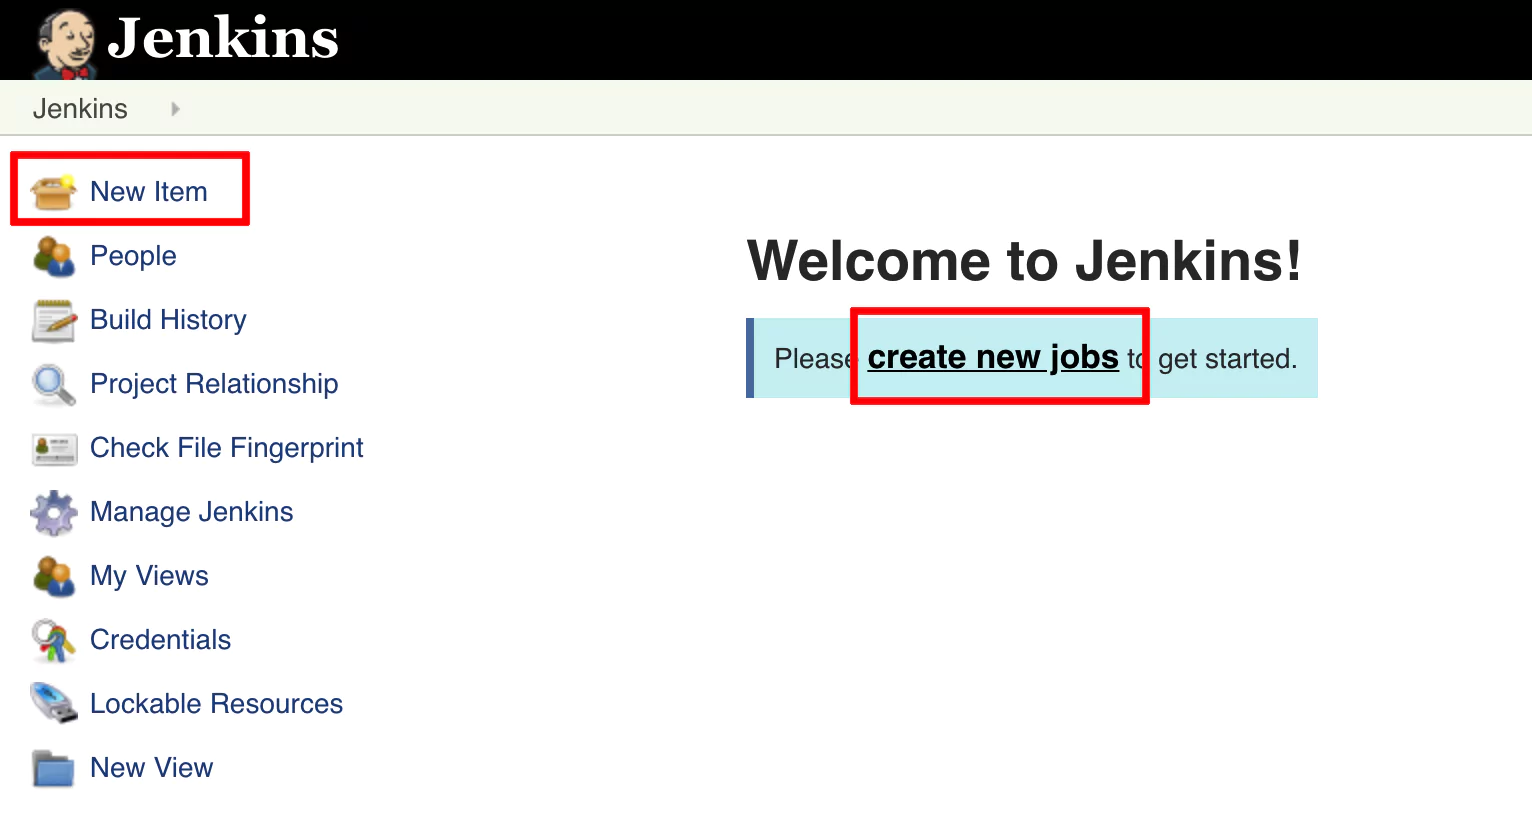
Click on Create new jobs if you see the text link, or from the left panel, click on New Item (an Item is a job). 

jenkins create pipeline start

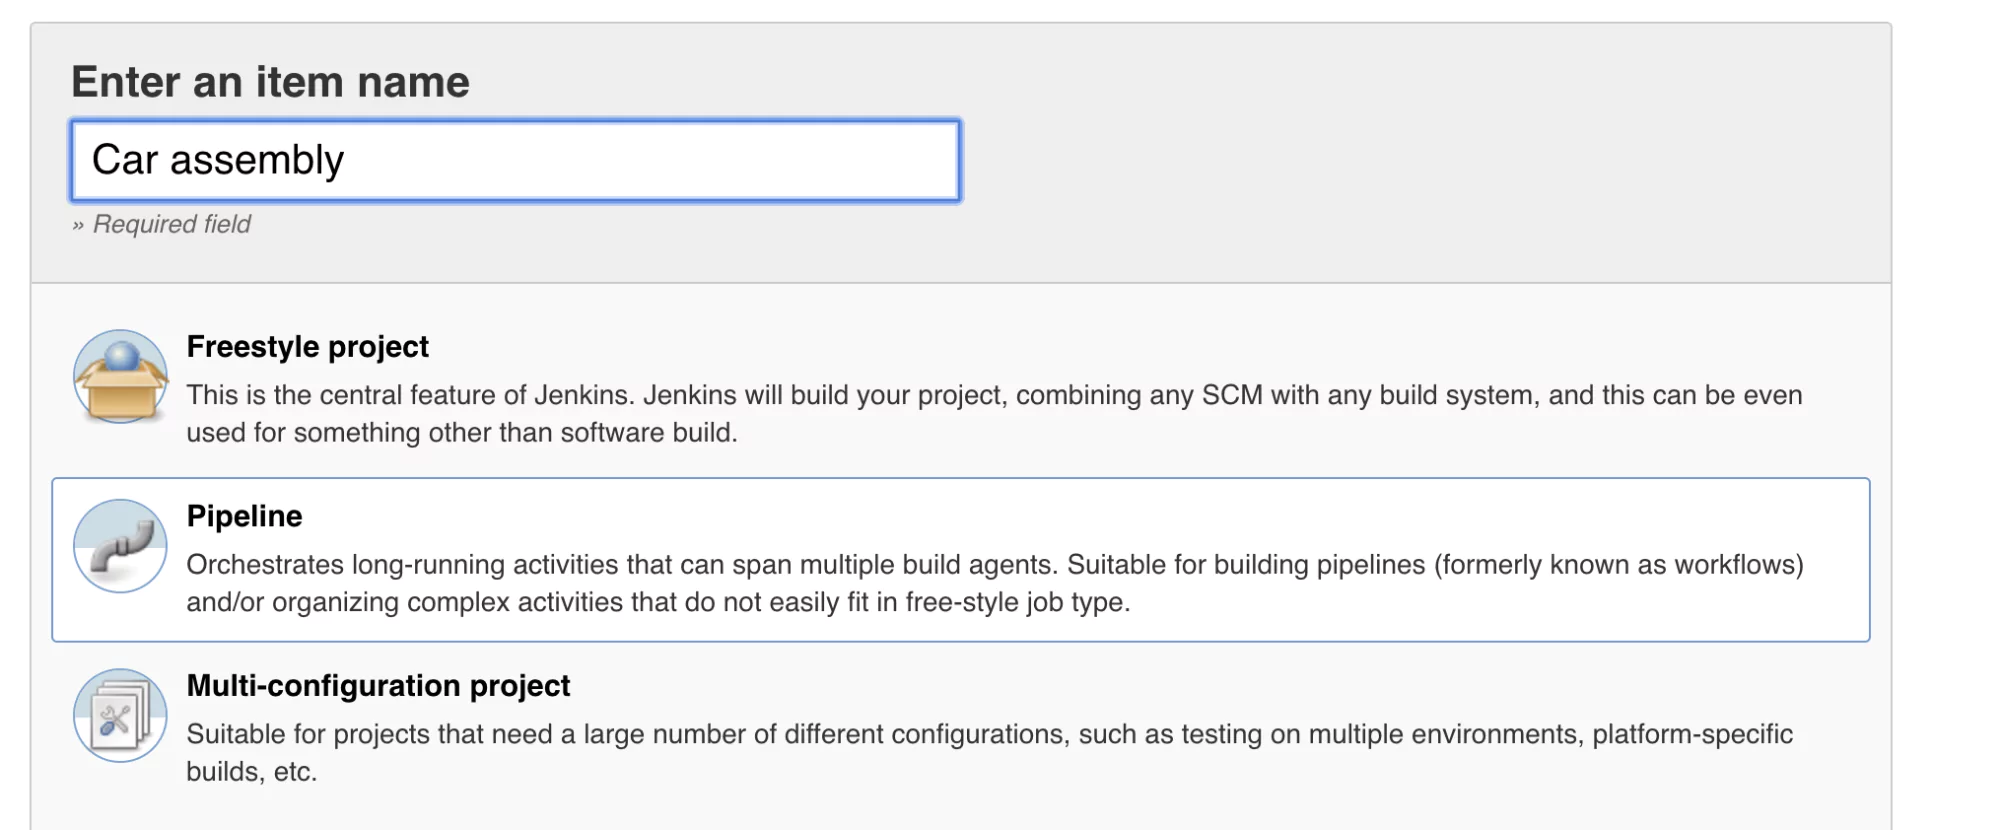
Name your job Car assembly and select the Pipeline type. Click ok.

jenkins-create-new-job

Configure Pipeline Job

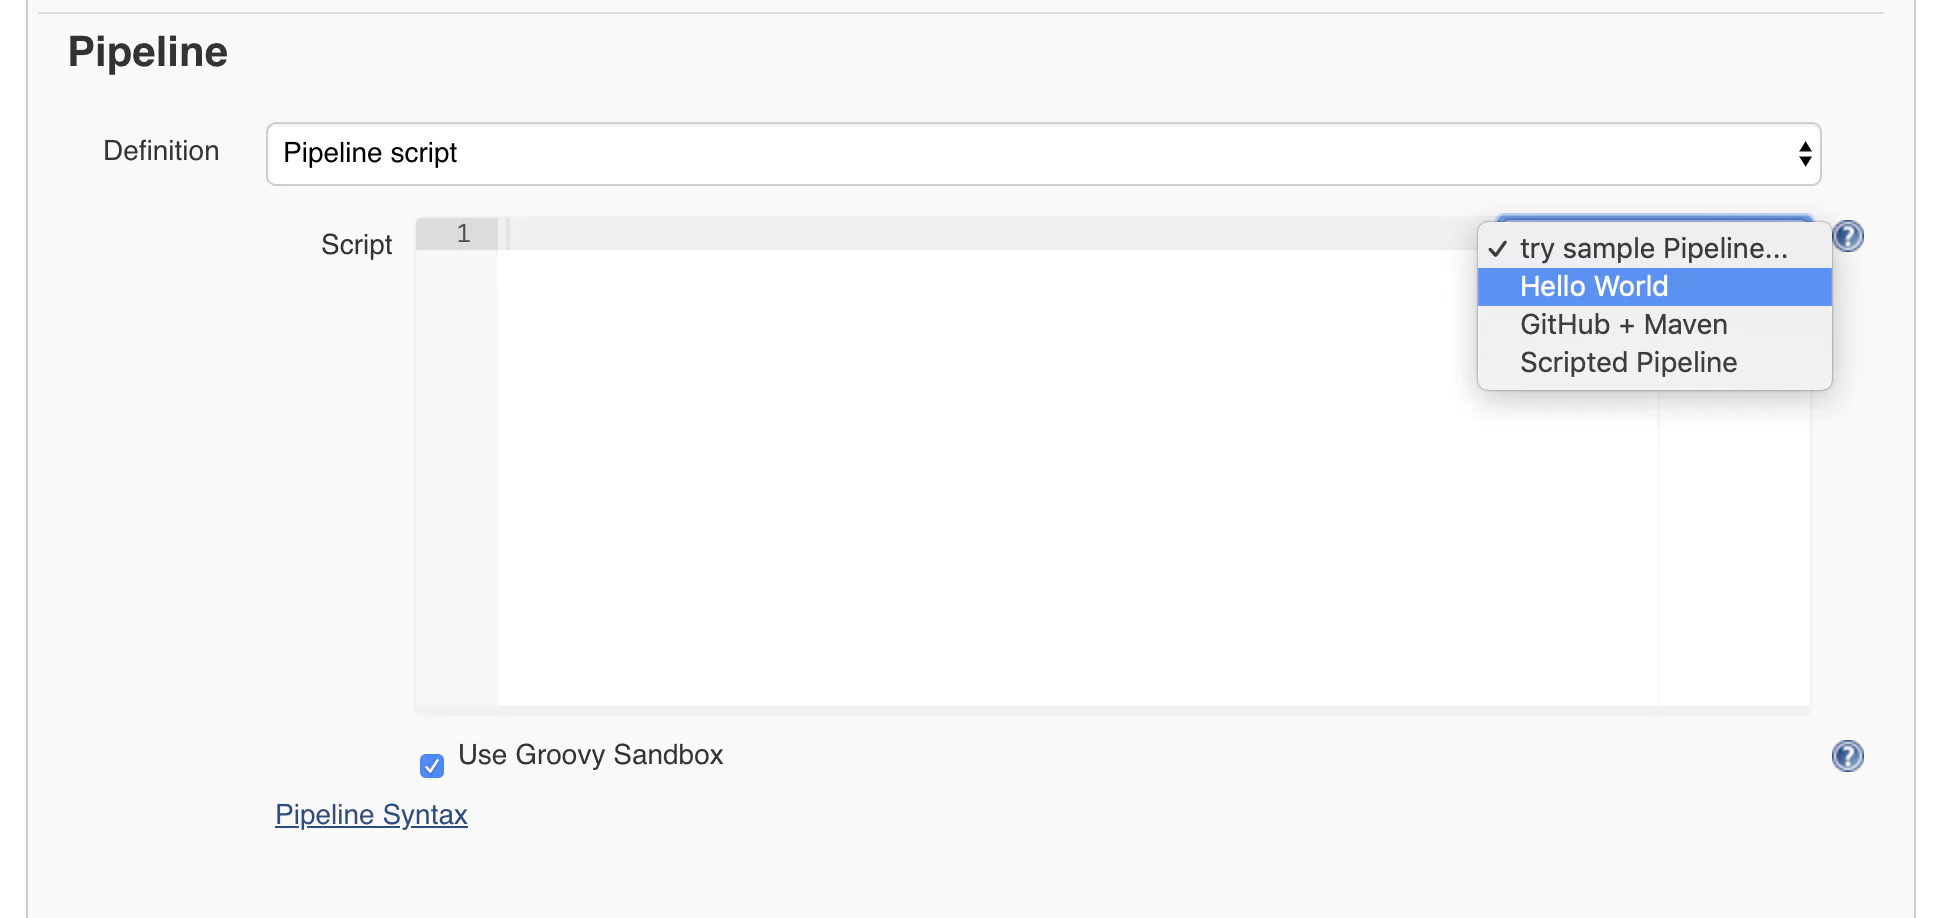
Now you will get to the job configuration page where we’ll configure a pipeline using the Jenkins syntax. At first, this may look scary and long, but don’t worry. I will take you through the process of building Jenkins pipeline step by step with every parameter provided and explained. Scroll to the lower part of the page until you reach a part called PipelineThis is where we can start defining our Jenkins pipeline. We will start with a quick example. On the right side of the editor, you will find a select box. From there, choose Hello World. 

jenkins-hello-world

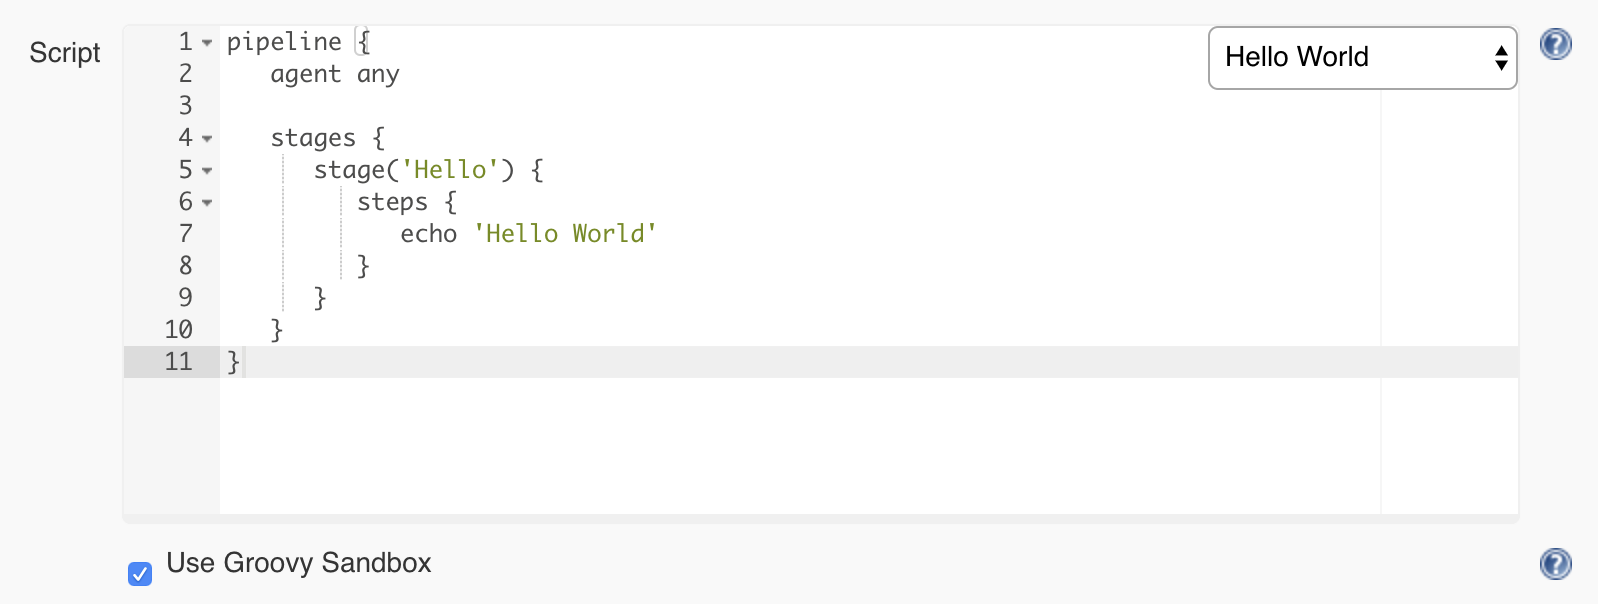
You will notice that some code was generated for you. This is a straightforward pipeline that only has one step and displays a message using the command echo ‘Hello World’

jenkins-first-pipeline

Click on Save and return to the main job page.

Build The Jenkins Pipeline

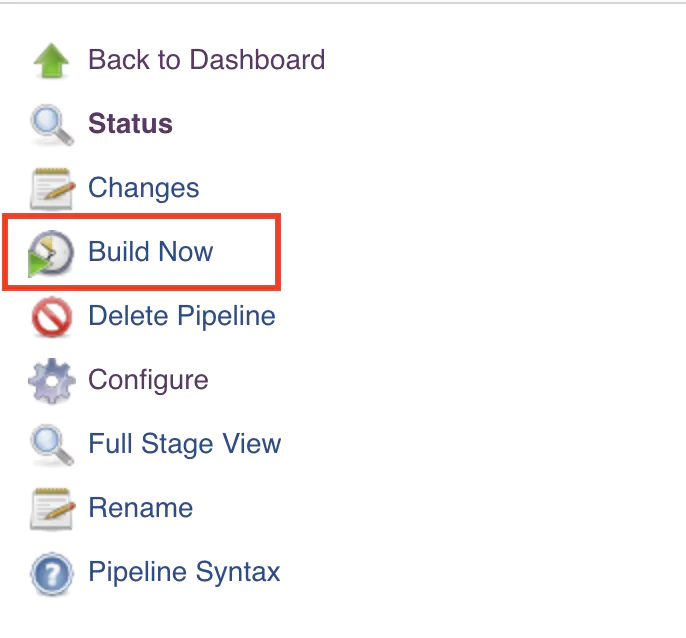
From the left-side menu, click on Build Now.

jenkins-build-now

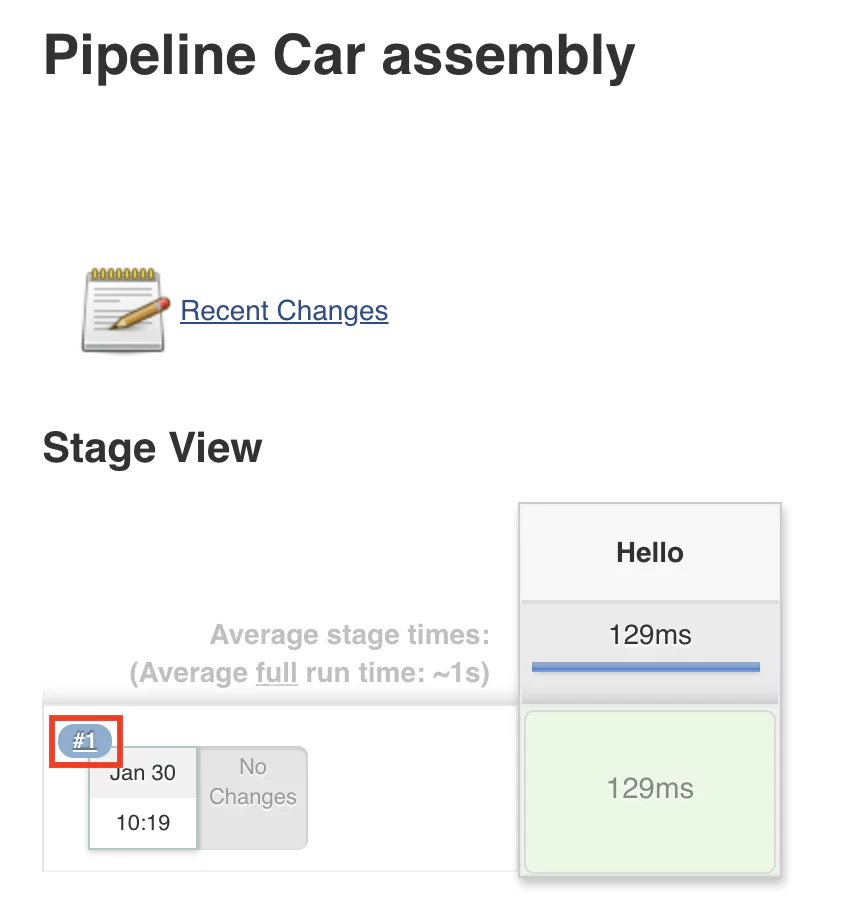
This will start running the job, which will read the configuration and begin executing the steps configured in the pipeline. Once the execution is done, you should see something similar to this layout:

jenkins-pipeline-overview

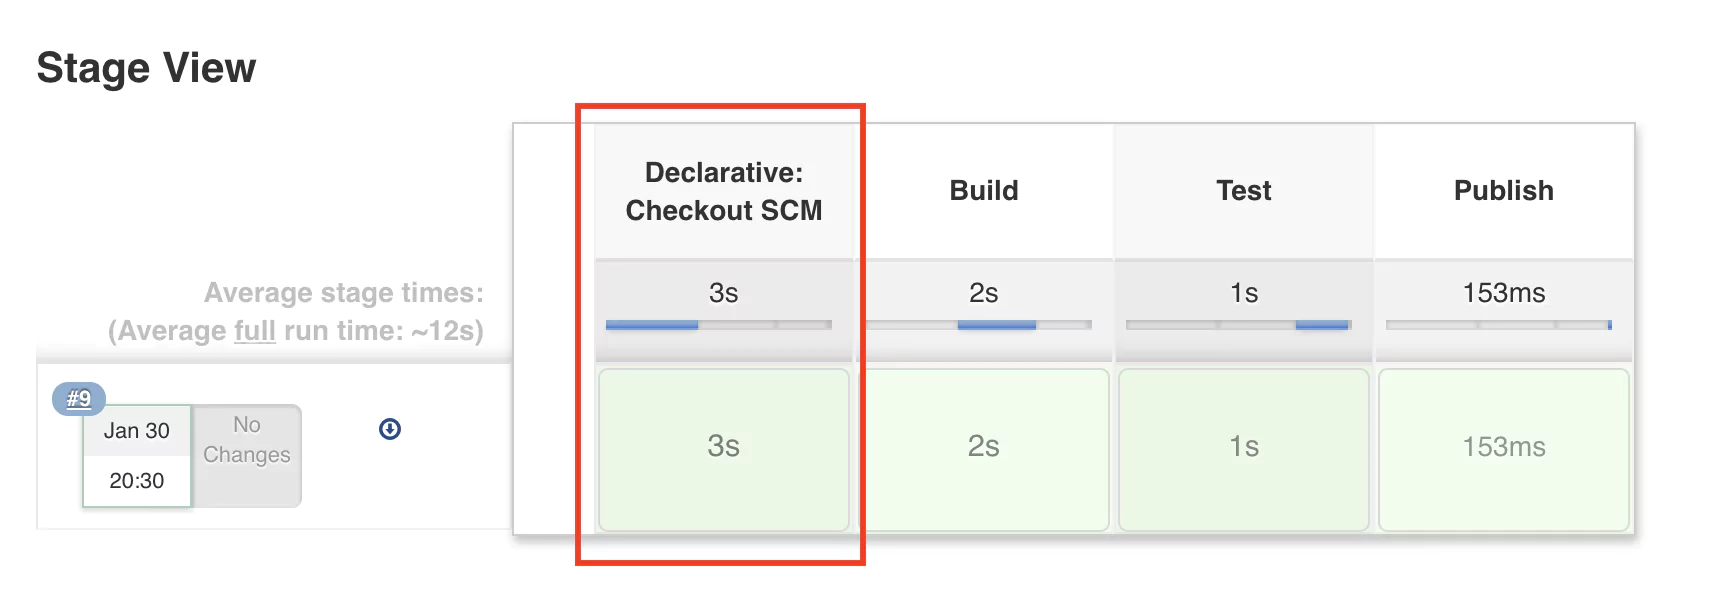
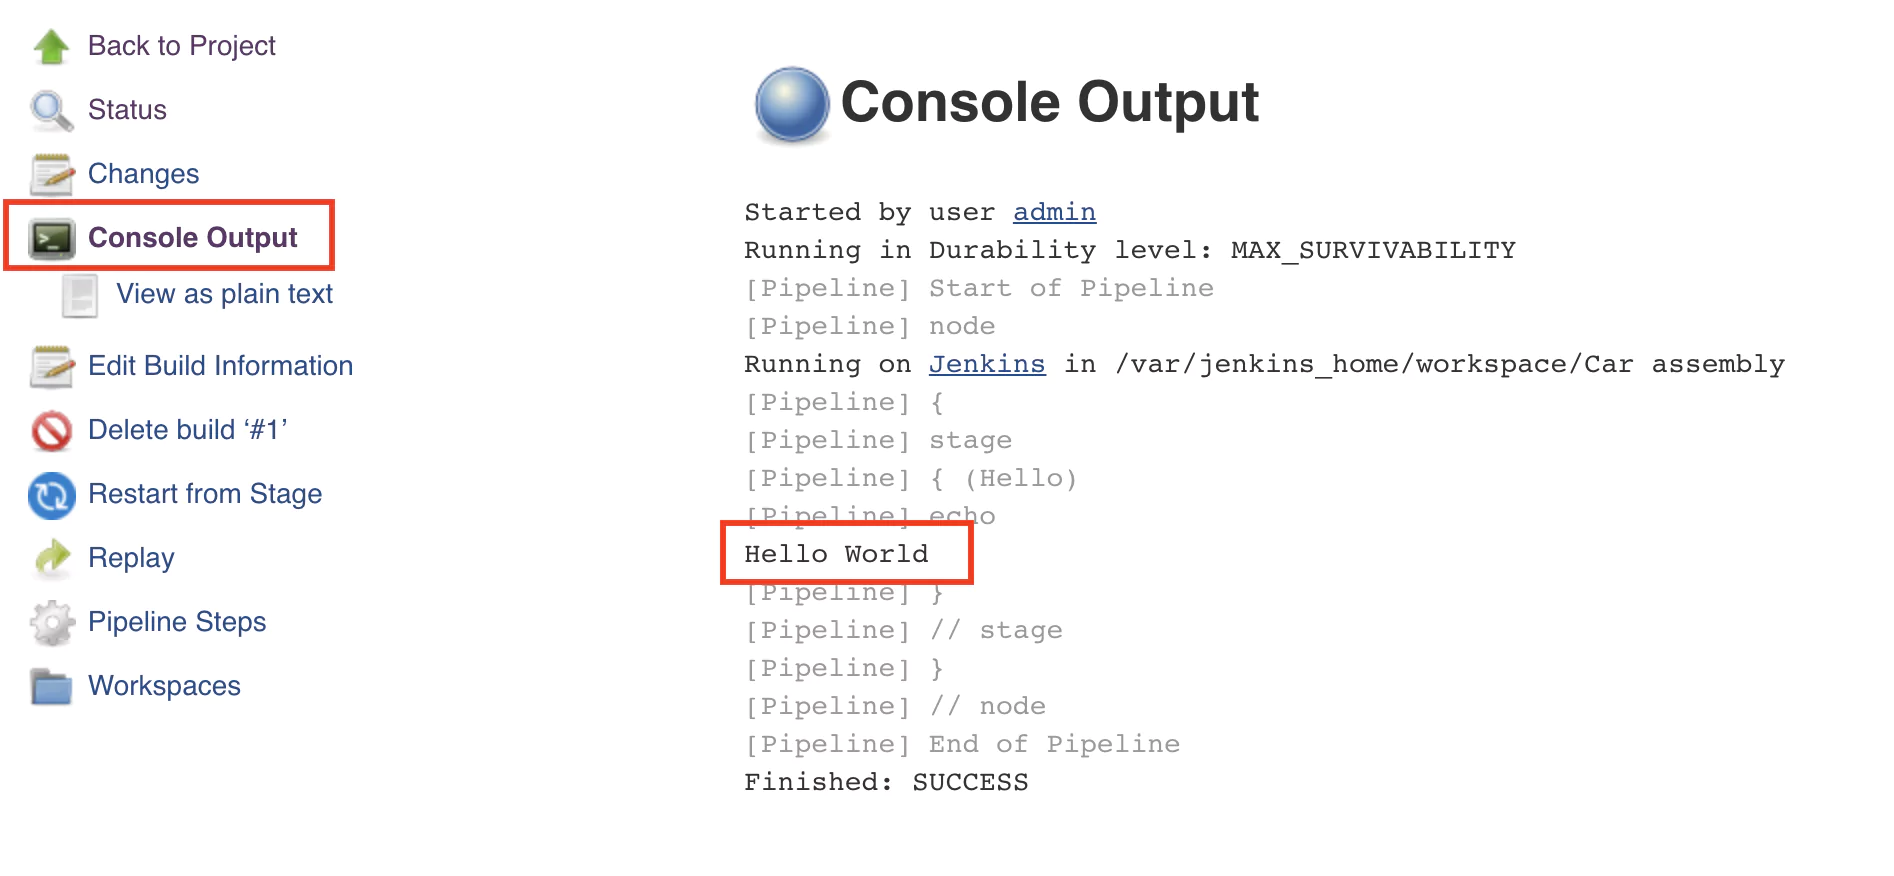
A green-colored stage will indicate that the execution was successful and no errors where encountered. To view the console output, click on the number of the build (in this case #1). After this, click on the Console output button, and the output will be displayed.

jenkins-console-output

Notice the text Hello world that was displayed after executing the command echo ‘Hello World’.

Congratulations! You have just configured and executed your first pipeline in Jenkins.

A Basic Pipeline Build Process

When building software, we usually go through several stages. Most commonly, they are:

  • Build – this is the main step and does the automation work required
  • Test – ensures that the build step was successful and that the output is as expected
  • Publish – if the test stage is successful, this saves the output of the build job for later use

We will create a simple car assembly pipeline but only using folders, files, and text. So we want to do the following in each stage:

Example of a basic Jenkins Pipeline

Build

  • create a build folder
  • create a car.txt file inside the build folder
  • add the words “chassis”, “engine” and “body” to the car.txt file

Test

  • check that the car.txt file exists in the build folder
  • words “chassis”, “engine” and “body” are present in the car.txt file

Publish

  • save the content of the build folder as a zip file

The Jenkins Build Stage

Note: the following steps require that Jenkins is running on a Unix-like system. Alternatively, the Windows system running Jenkins should have some Unix utilities installed.

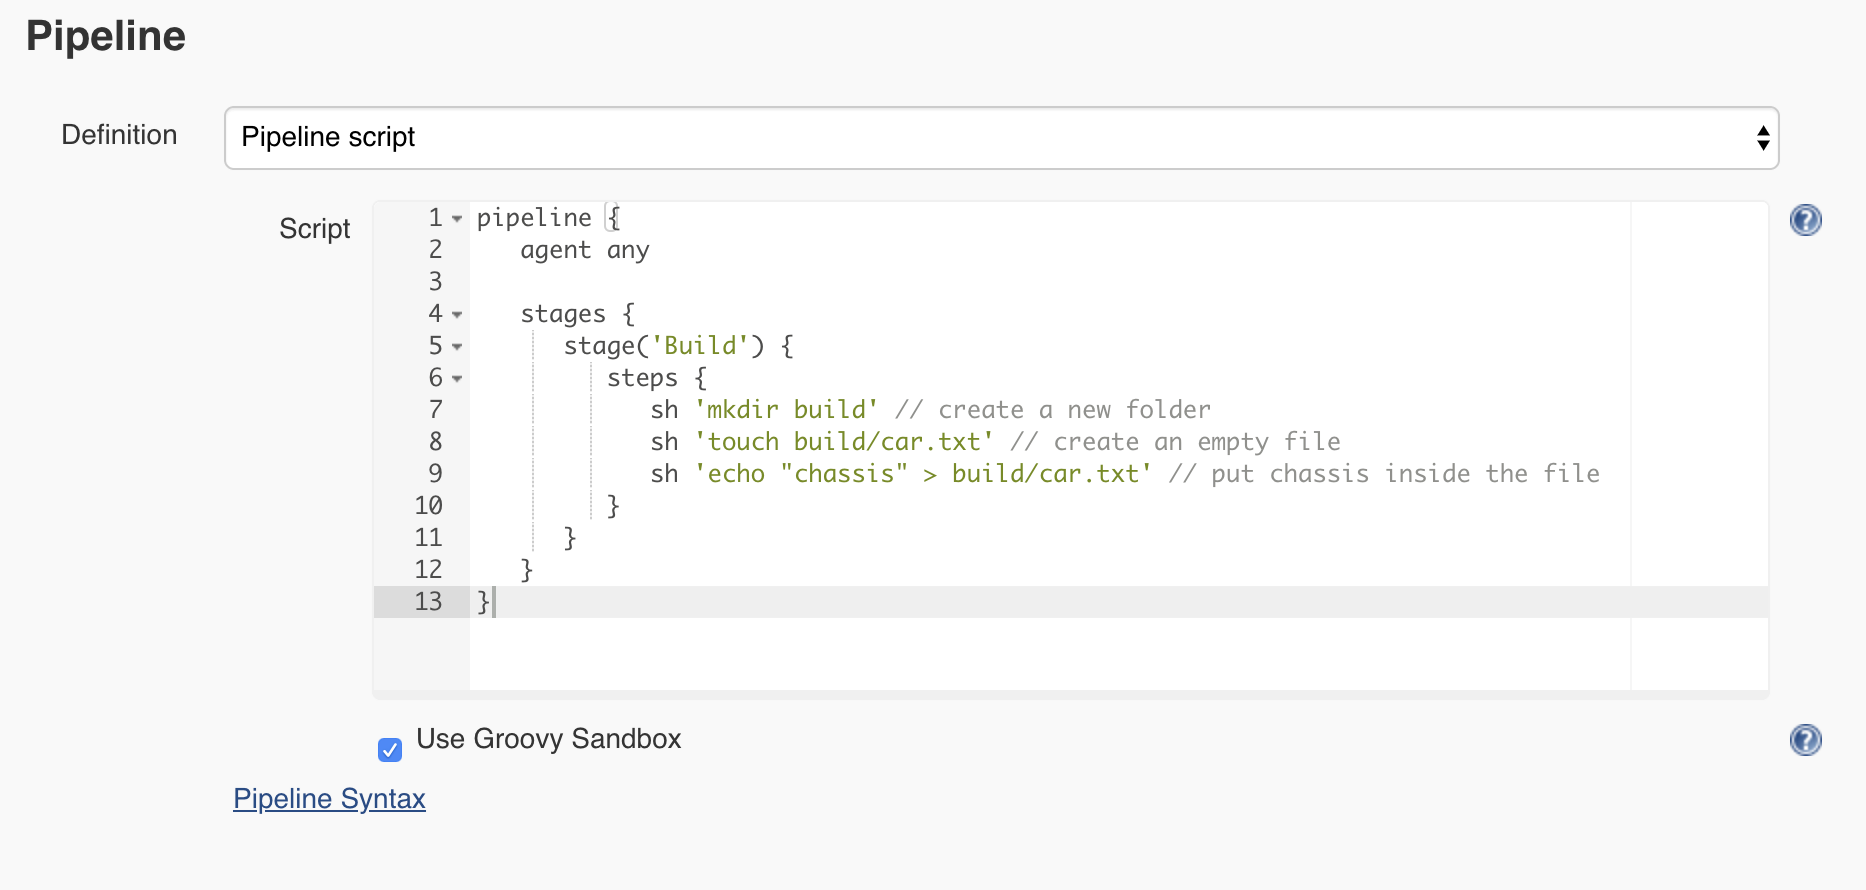
Let’s go back to the Car assembly job configuration page and rename the step that we have from Hello to Build. Next, using the pipeline step sh, we can execute a given shell command. So the Jenkins pipeline will look like this:

jenkins-build-step

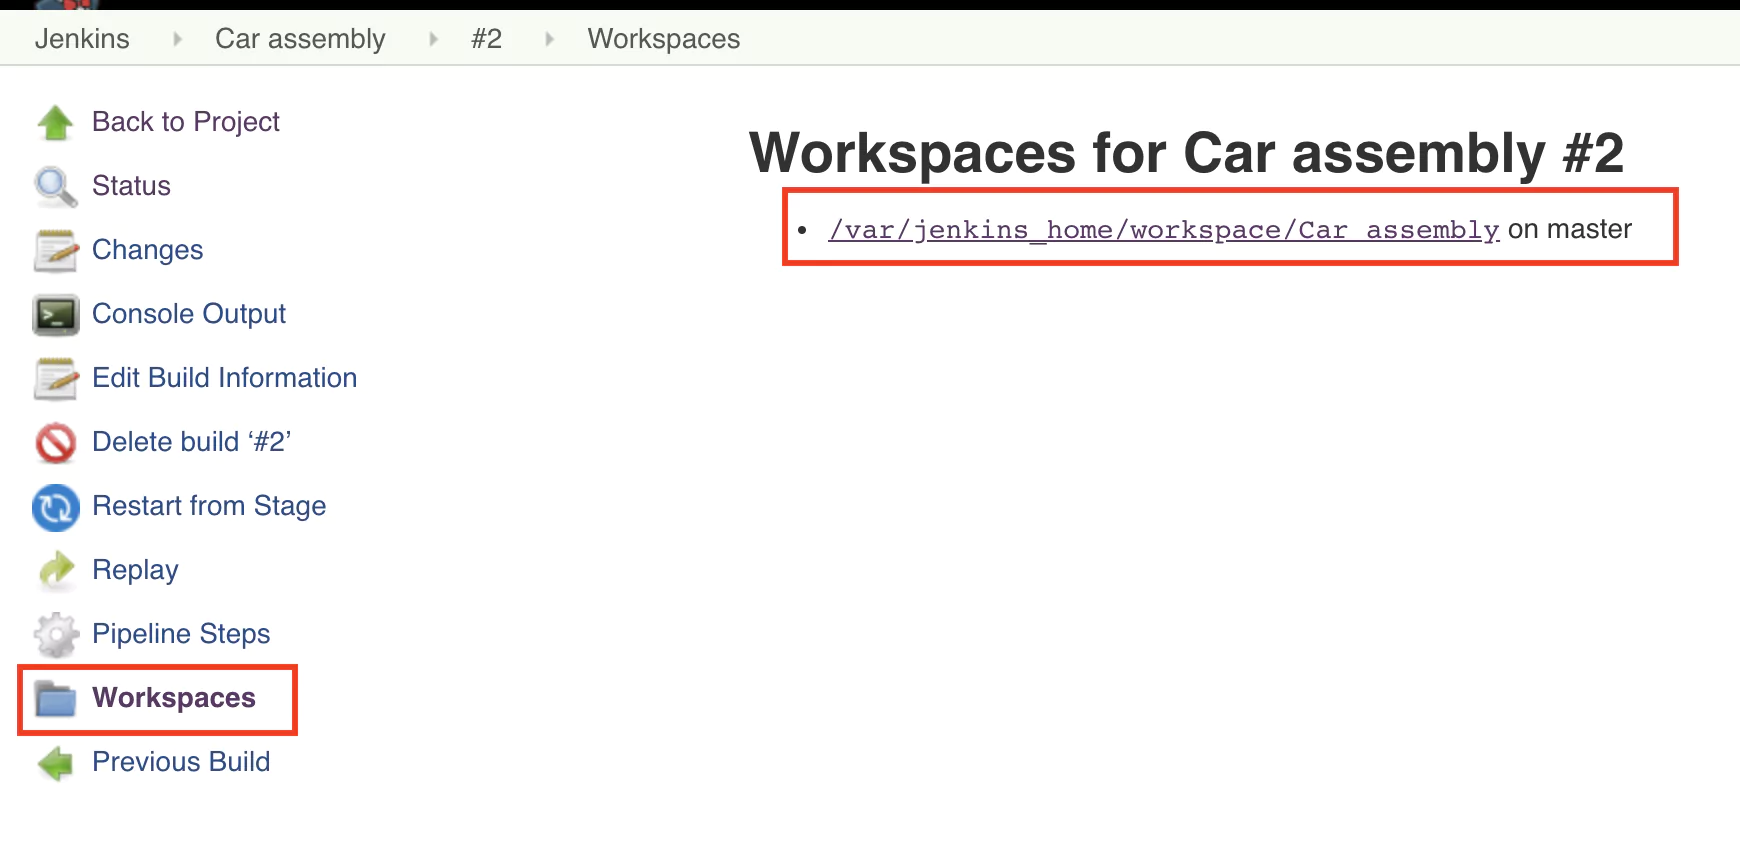
Let’s save and execute the pipeline.  Hopefully, the pipeline is successful again, but how do we know if the car.txt file was created? Do inspect the output, click on the job number and on the next page from the left menu select Workspaces.

jenkins-workspace

Click on the folder path displayed and you should soon see the build folder and its contents.

The Jenkins Test Stage

In the previous step, we manually checked that the folder and the file were created. As we want to automate the process, it makes sense to write a test that will check if the file was created and has the expected contents.

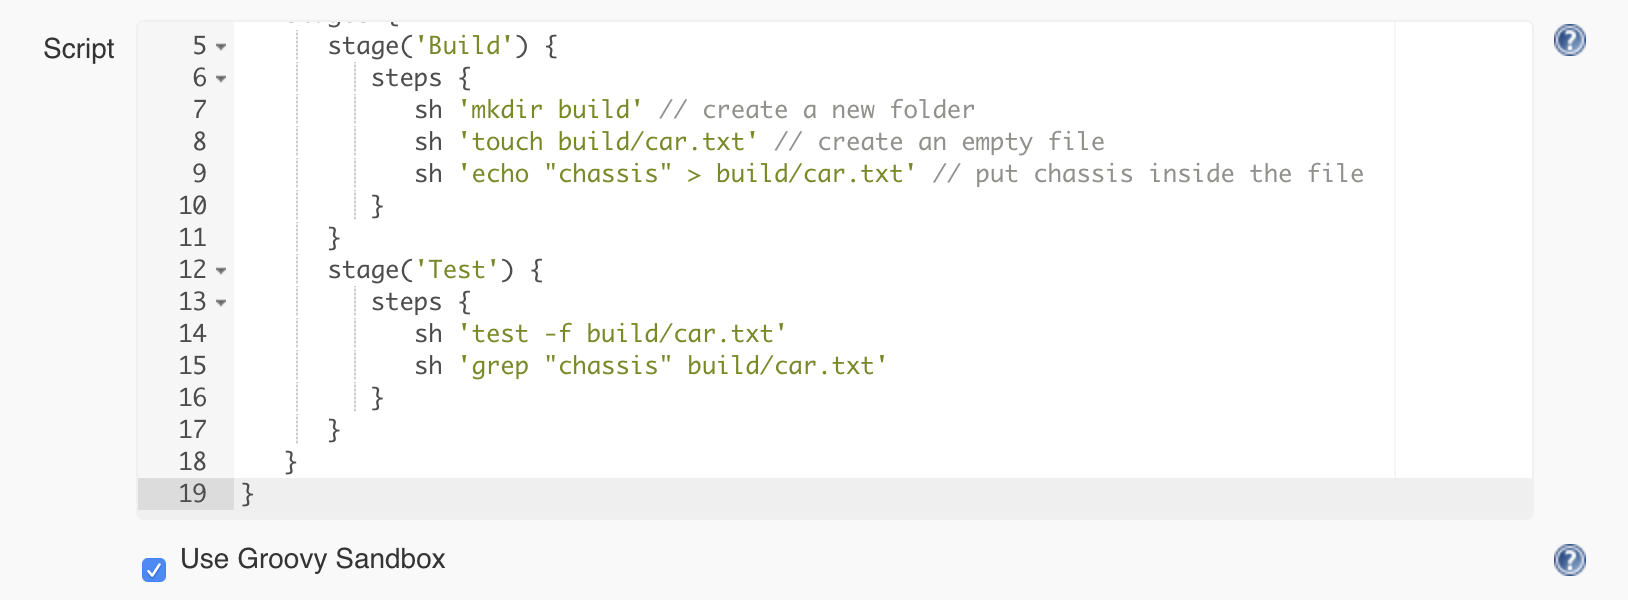
Let’s create a test stage and use the following commands to write the test:

  • the test command combined with the -f flag allows us to test if a file exists
  • the grep command will enable us to search the content of a file for a specific string

So the pipeline will look like this:

jenkins-test-step

Why did the Jenkins pipeline fail?

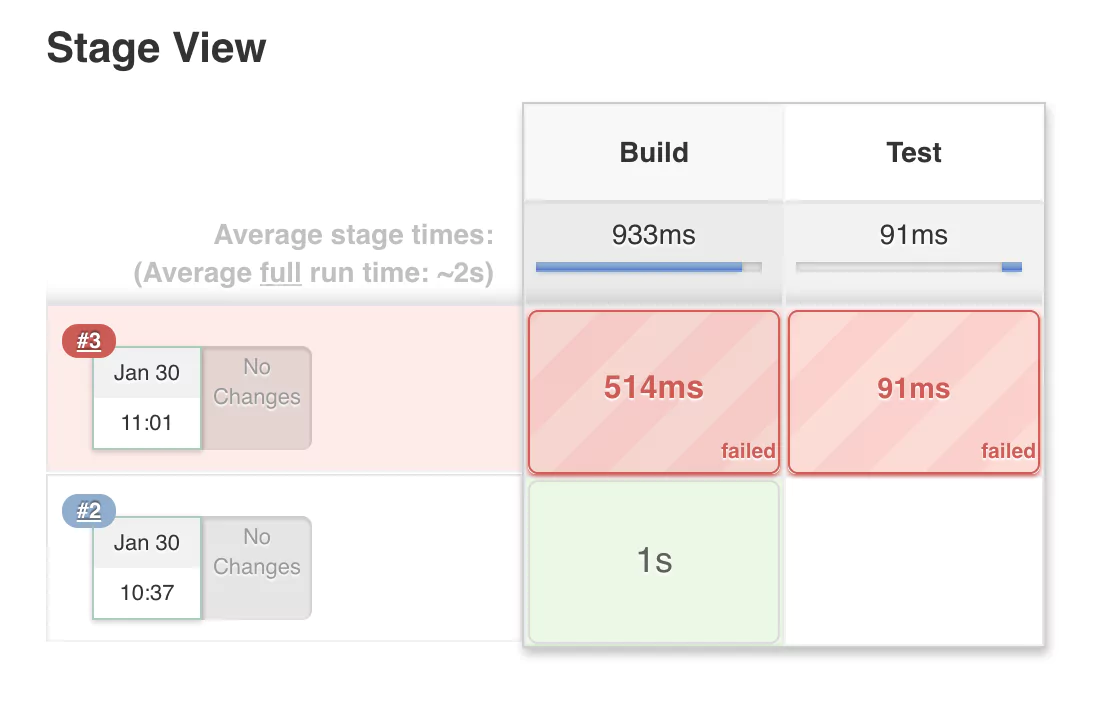
If you save the previous configuration and run the pipeline again, you will notice that it will fail, indicated by a red color.

jenkins-failed-pipeline

The most common reasons for a pipeline to fail is because:

  1. The pipeline configuration is incorrect. This first problem is most likely due to a syntax issue or because we’ve used a term that was not understood by Jenkins. 
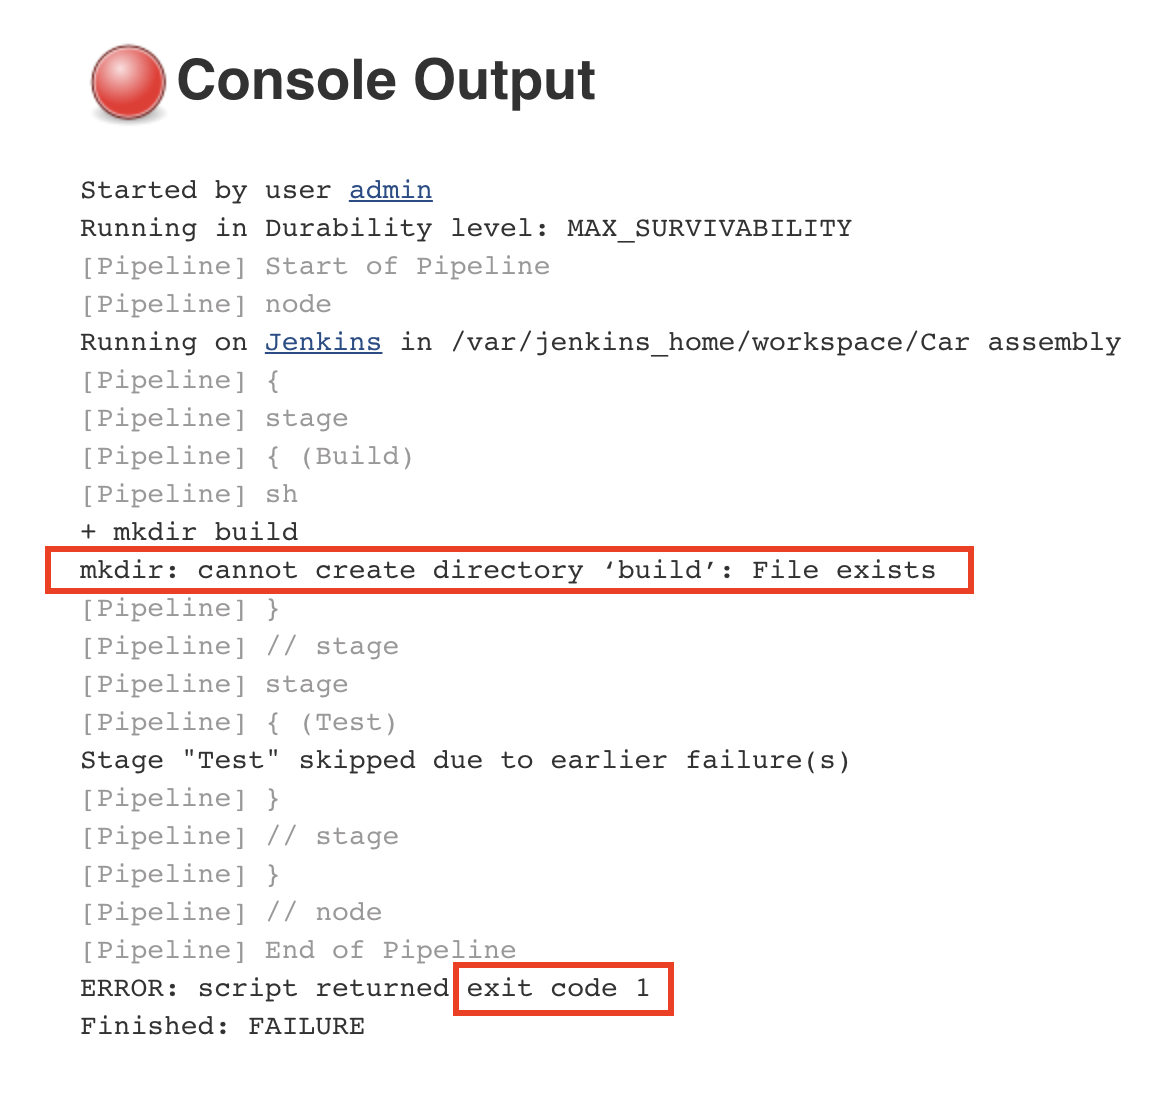
  2. One of the build step commands returns a non-zero exit code. This second problem is more common. Each command after executing is expected to return an exit code. This tells Jenkins if the command was successful or not. If the exit code is 0, it means the command was successful. If the exit code is not 0, the command encountered an error.

We want to stop the execution of the pipeline as soon as an error has been detected. This is to prevent future steps from running and propagating the error to the next stages. If we inspect the console output for the pipeline that has failed, we will identify the following error:

jenkins-failed-console-output

The error tells us that the command could not create a new build folder as one already exists. This happens because the previous execution of the pipeline already created a folder named ‘build’. Every Jenkins job has a workspace folder allocated on the disk for any files that are needed or generated for and during the job execution. One simple solution is to remove any existing build folder before creating a new one. We will use the rm command for this.

jenkins-remove-build

This will make the pipeline work again and also go through the test step.

The Jenkins Publishing Stage

If the tests are successful, we consider this a build that we want to keep for later use. As you remember, we remove the build folder when starting rerunning the pipeline, so it does not make sense to keep anything in the workspace of the job. The job workspace is only for temporary purposes during the execution of the pipeline. Jenkins provides a way to save the build result using a build step called archiveArtifacts

So what is an artifact? In archaeology, an artifact is something made or given shape by humans. Or in other words, it’s an object. Within our context, the artifact is the build folder containing the car.txt file.

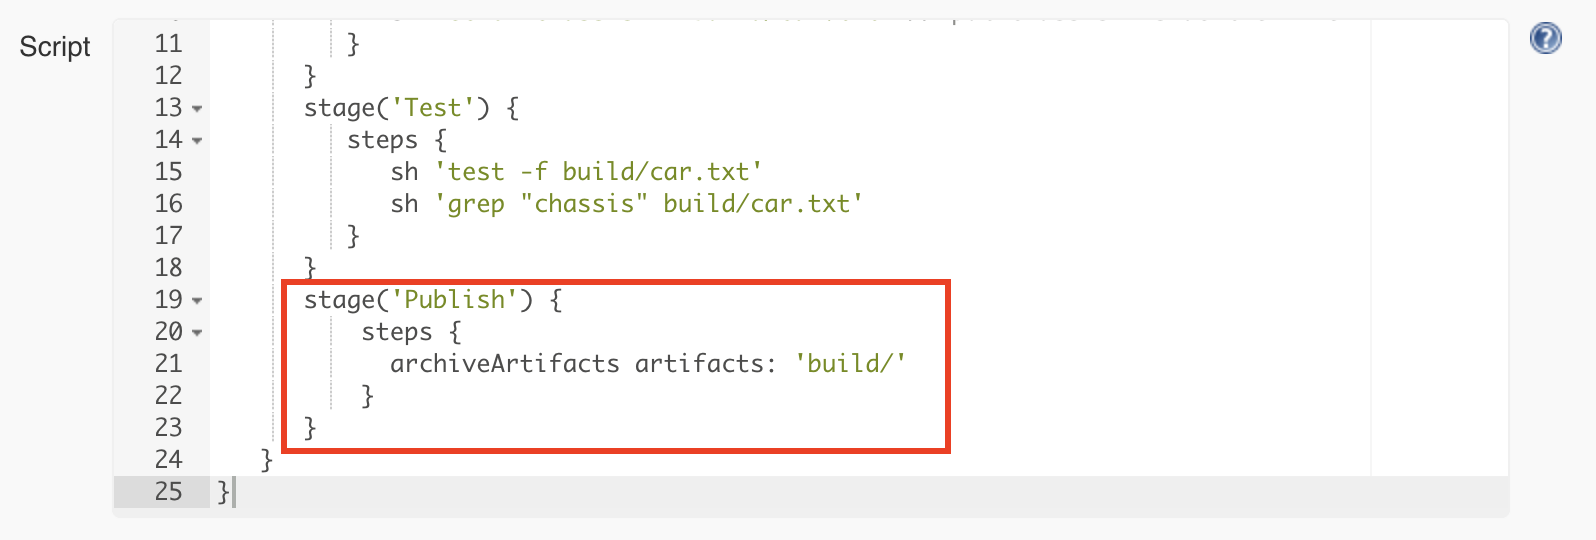
We will add the final stage responsible for publishing and configuring the archiveArtifacts step to publish only the contents of the build folder:

jenkins-artifac

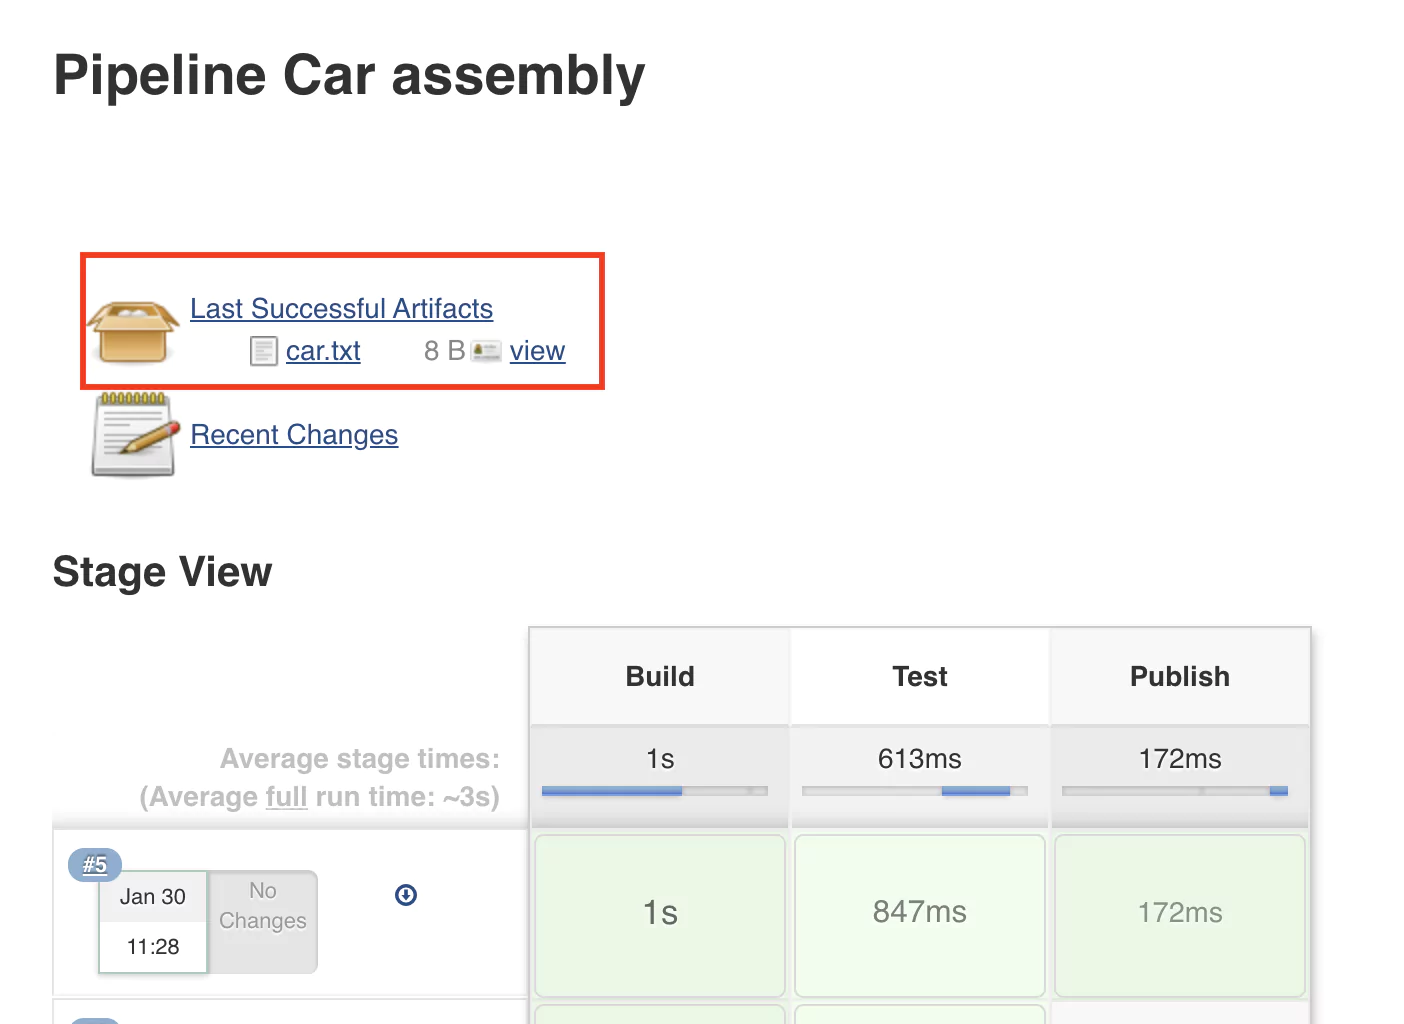
After rerunning the pipeline, the job page will display the latest successful artifact. Refresh the page once or twice if it does not show up. 

last-artifact.

(17-last-artifact.png)

Complete & Test the Pipeline

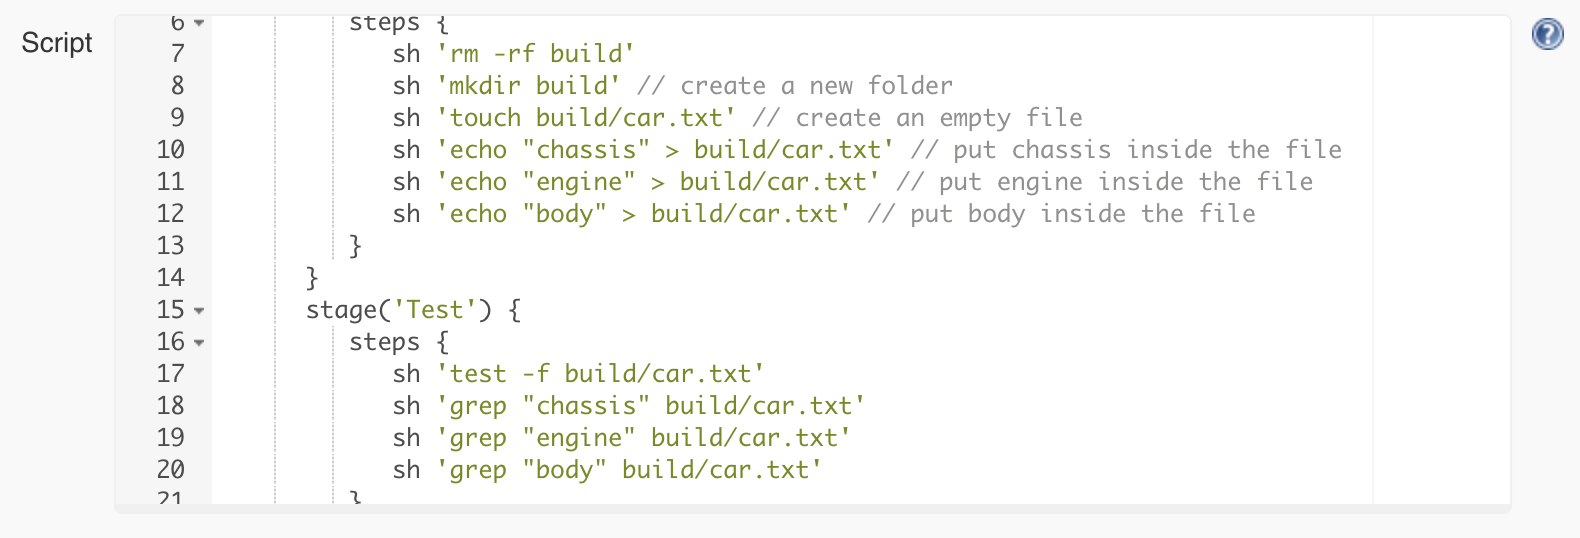
Let’s continue adding the other parts of the car: the engine and the body.  For this, we will adapt both the build and the test stage as follows:

jenkins-pipeline-car-parts

pipeline {
   agent any

   stages {
      stage('Build') {
         steps {
            sh 'rm -rf build' 
            sh 'mkdir build' // create a new folder
            sh 'touch build/car.txt' // create an empty file
            sh 'echo "chassis" > build/car.txt' // add chassis
            sh 'echo "engine" > build/car.txt' // add engine
            sh 'echo "body" > build/car.txt' // body
         }
      }
      stage('Test') {
          steps {
              sh 'test -f build/car.txt'
              sh 'grep "chassis" build/car.txt'
              sh 'grep "engine" build/car.txt'
              sh 'grep "body" build/car.txt'
          }
      }
   }
}

Saving and rerunning the pipeline with this configuration will lead to an error in the test phase. 

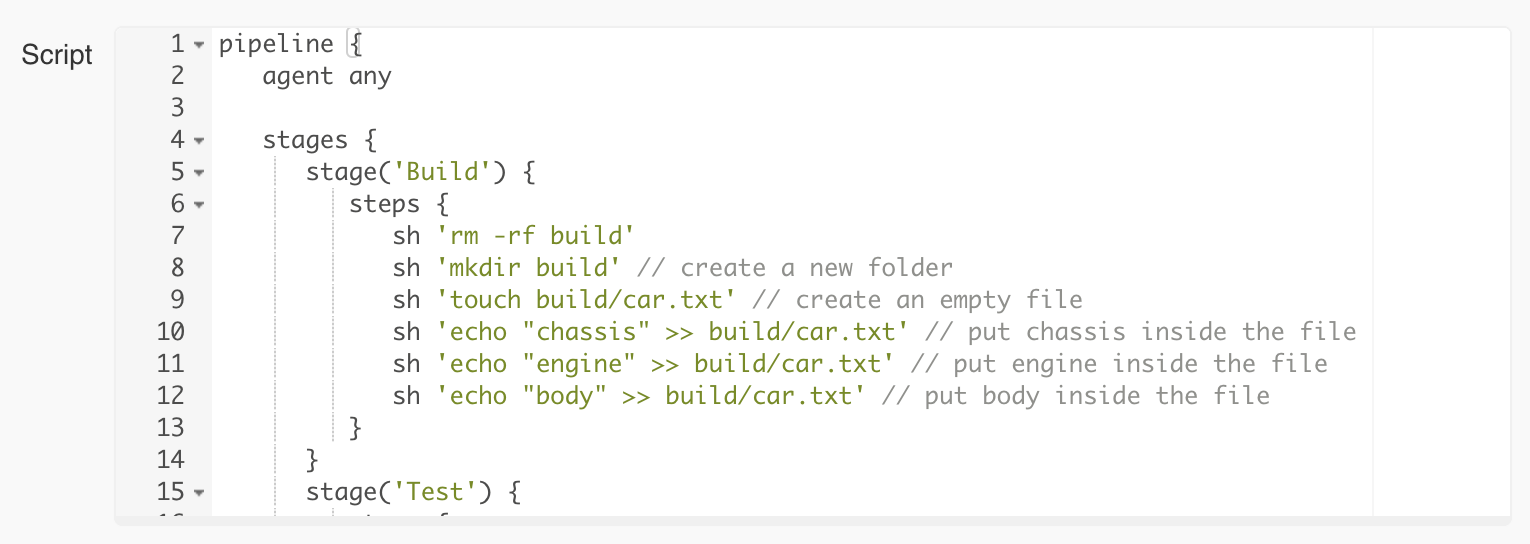
The reason for the error is that the car.txt file now only contains the word “body”. Good that we tested it! The > (greater than) operator will replace the entire content of the file, and we don’t want that. So we’ll use the >> operator just to append text to the file.

 
pipeline {
   agent any

   stages {
      stage('Build') {
         steps {
            sh 'rm -rf build' 
            sh 'mkdir build'
            sh 'touch build/car.txt'
            sh 'echo "chassis" >> build/car.txt'
            sh 'echo "engine" >> build/car.txt'
            sh 'echo "body" >> build/car.txt'
         }
      }
      stage('Test') {
          steps {
              sh 'test -f build/car.txt'
              sh 'grep "chassis" build/car.txt'
              sh 'grep "engine" build/car.txt'
              sh 'grep "body" build/car.txt'
          }
      }
   }
}

Now the pipeline is successful again, and we’re confident that our artifact (i.e. file) has the right content.

Pipeline as Code

If you remember, at the beginning of the tutorial, you were asked to select the type of job you want to create. Historically, many jobs in Jenkins were and still are configured manually, with different checkboxes, text fields, and so on. Here we did something different. We called this approach Pipeline as Code. While it was not apparent, we’ve used a Domain Specific Language (DSL), which has its foundation in the Groovy scripting language. So this is the code that defines the pipeline. 

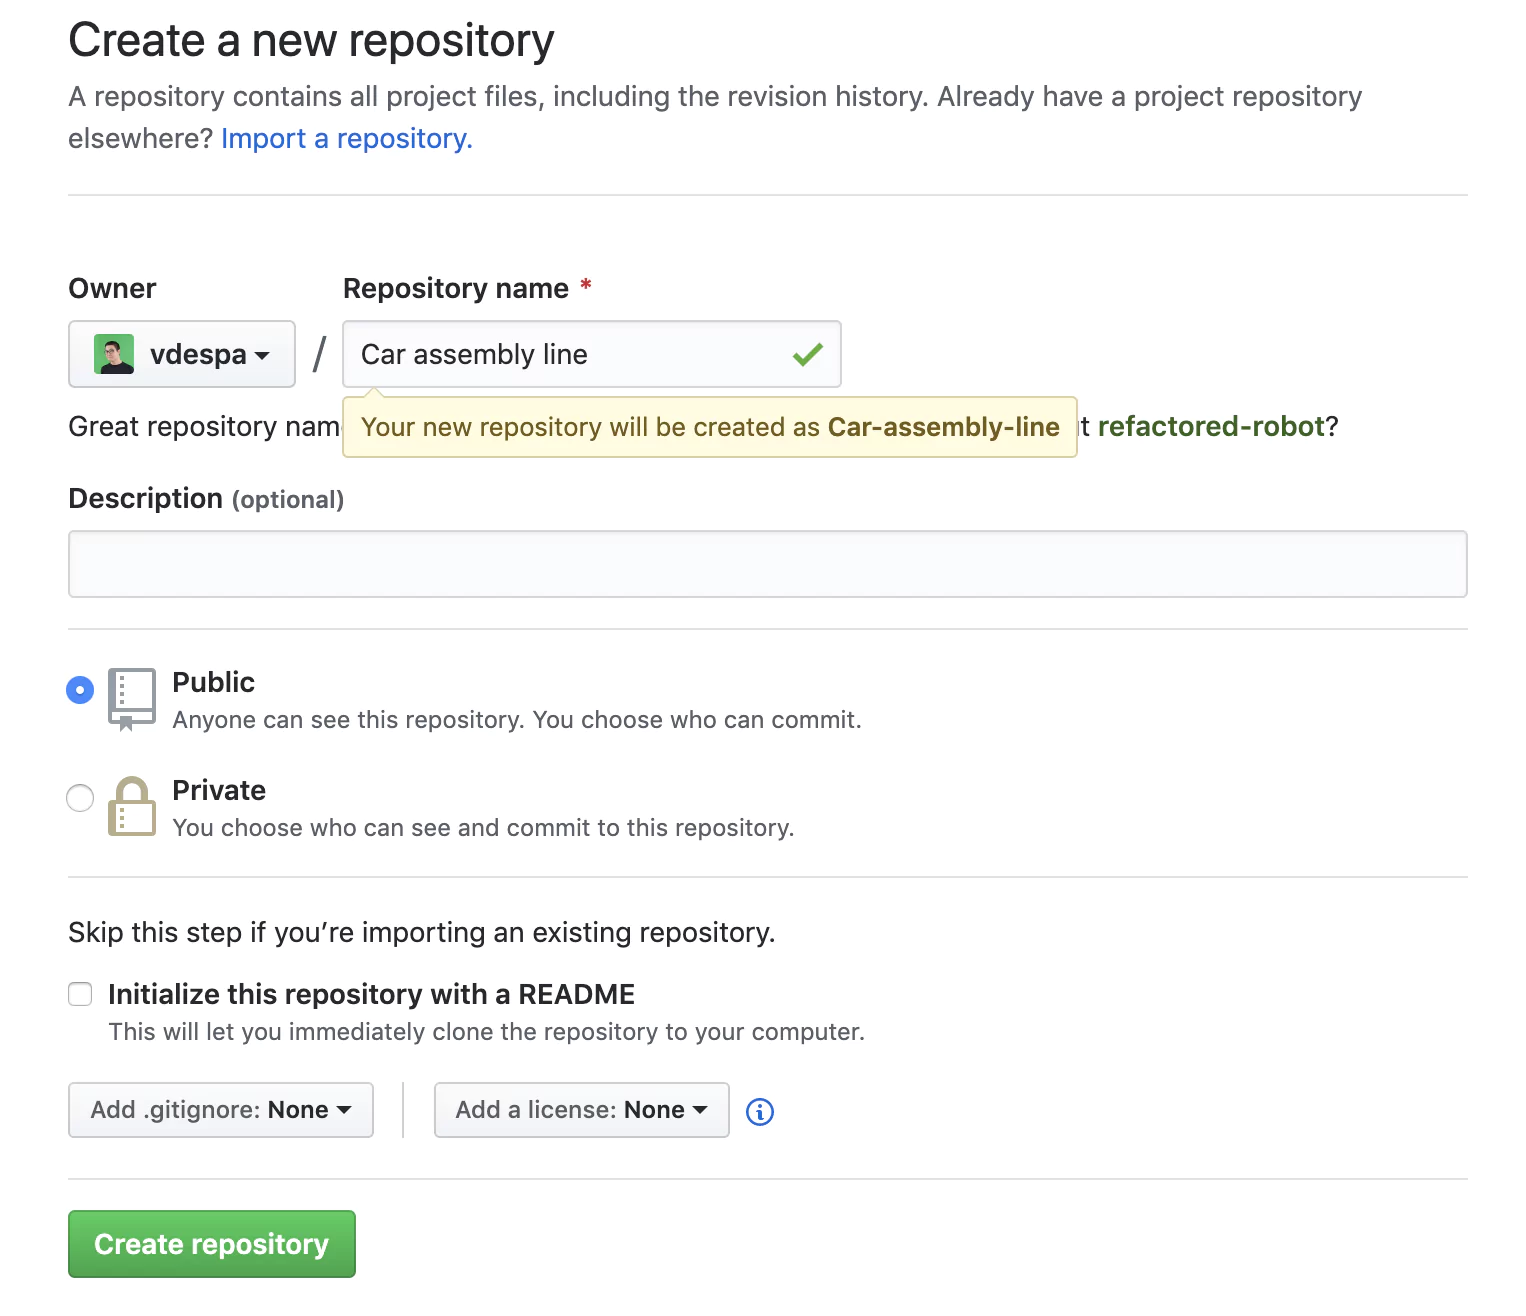
As you can observe, even for a relatively simple scenario, the pipeline is starting to grow in size and become harder to manage. Also, configuring the pipeline directly in Jenkins is cumbersome without a proper text editor. Moreover, any work colleagues with a Jenkins account can modify the pipeline, and we wouldn’t know what changed and why. There must be a better way! And there is. To fix this, we will create a new Git repository on Github.

To make things simpler, you can use this public repository under my profile called Jenkins-Car-Assembly.

github-new-repo

Jenkinsfile from a Version Control System

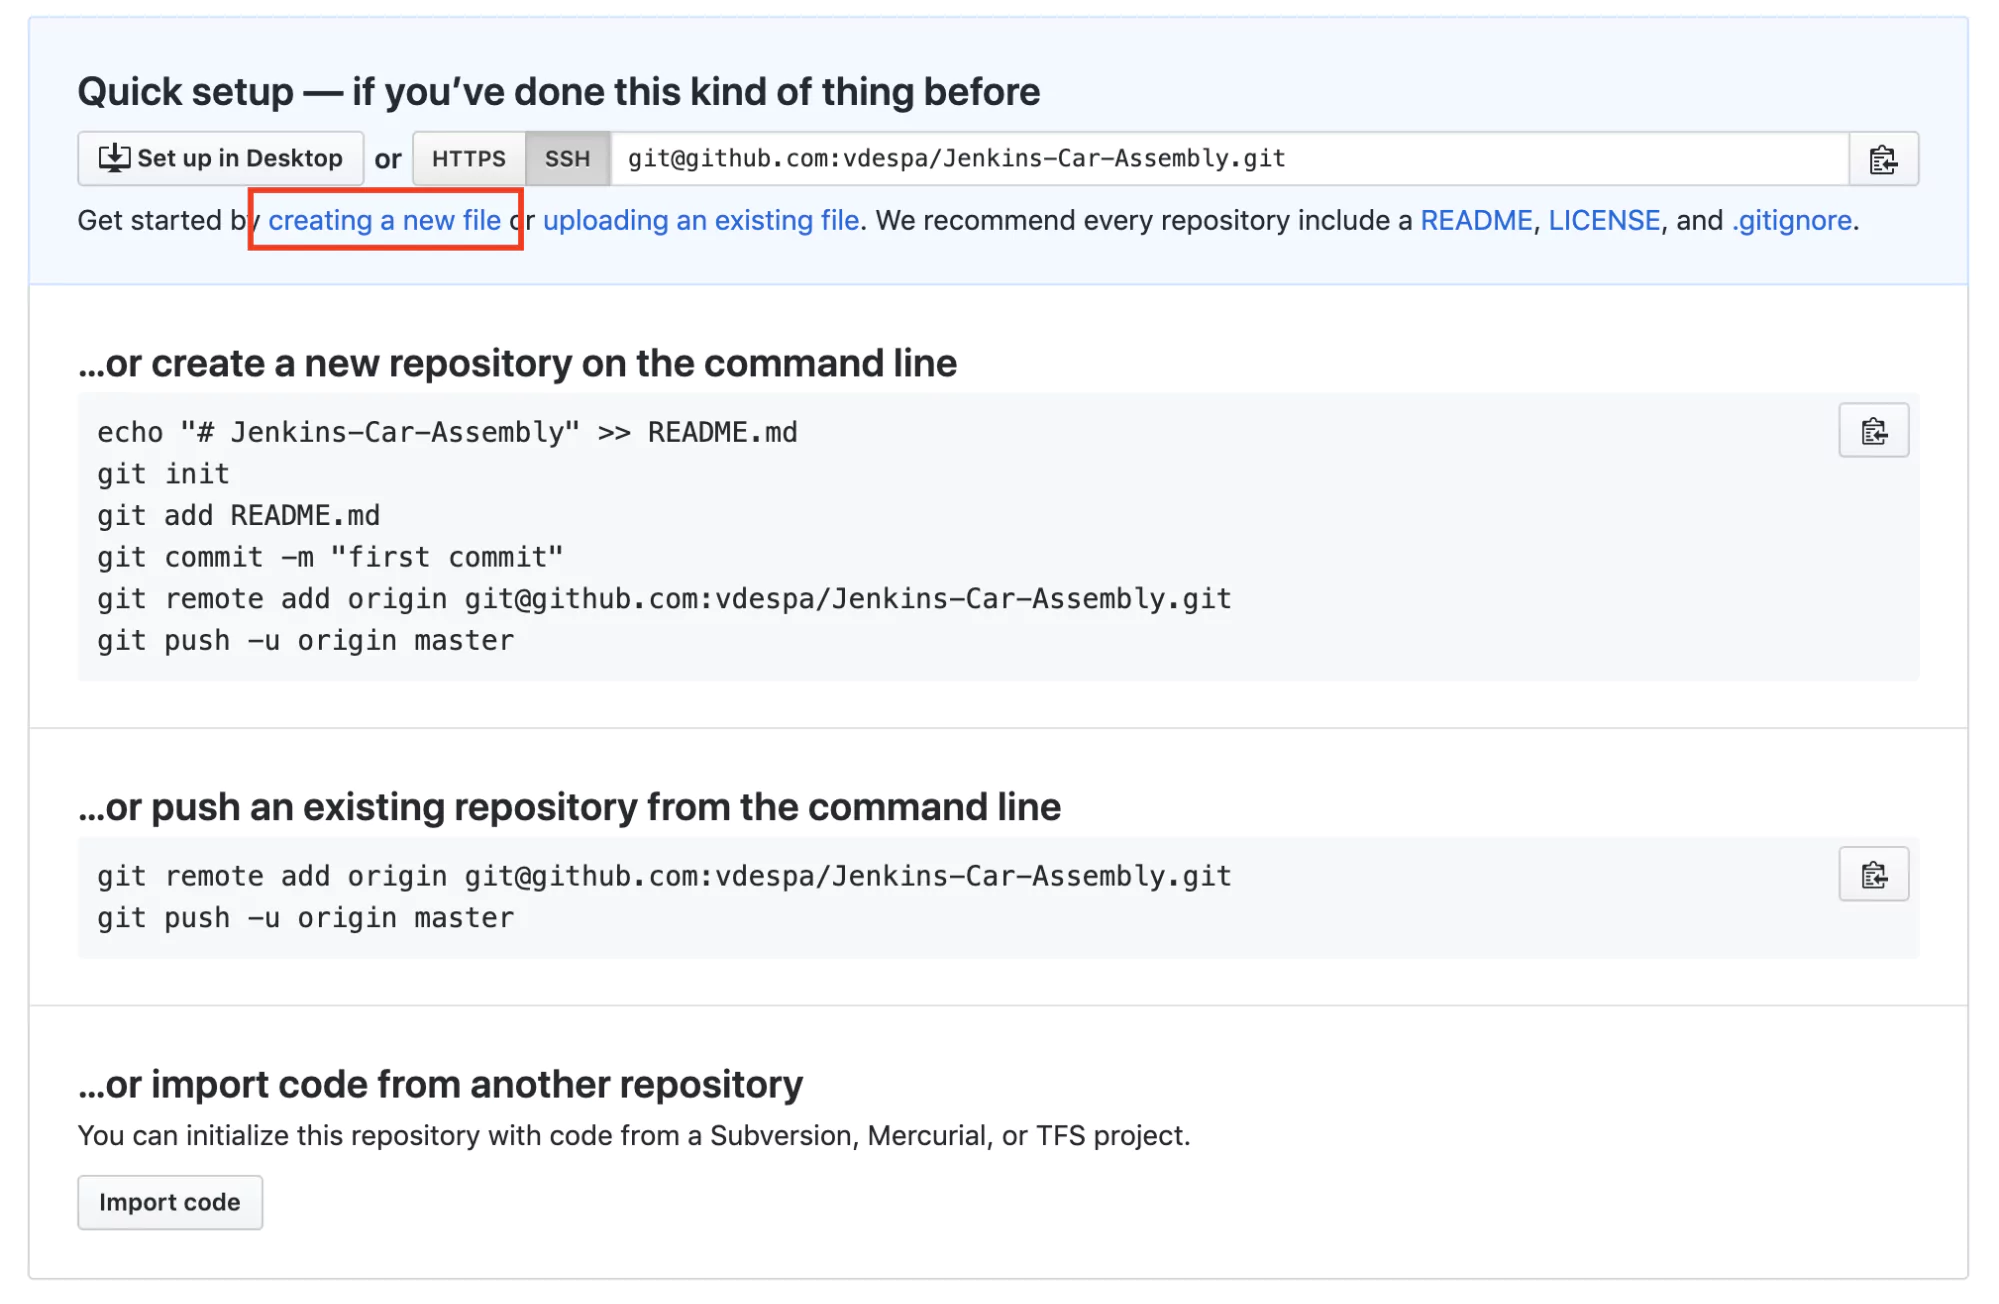
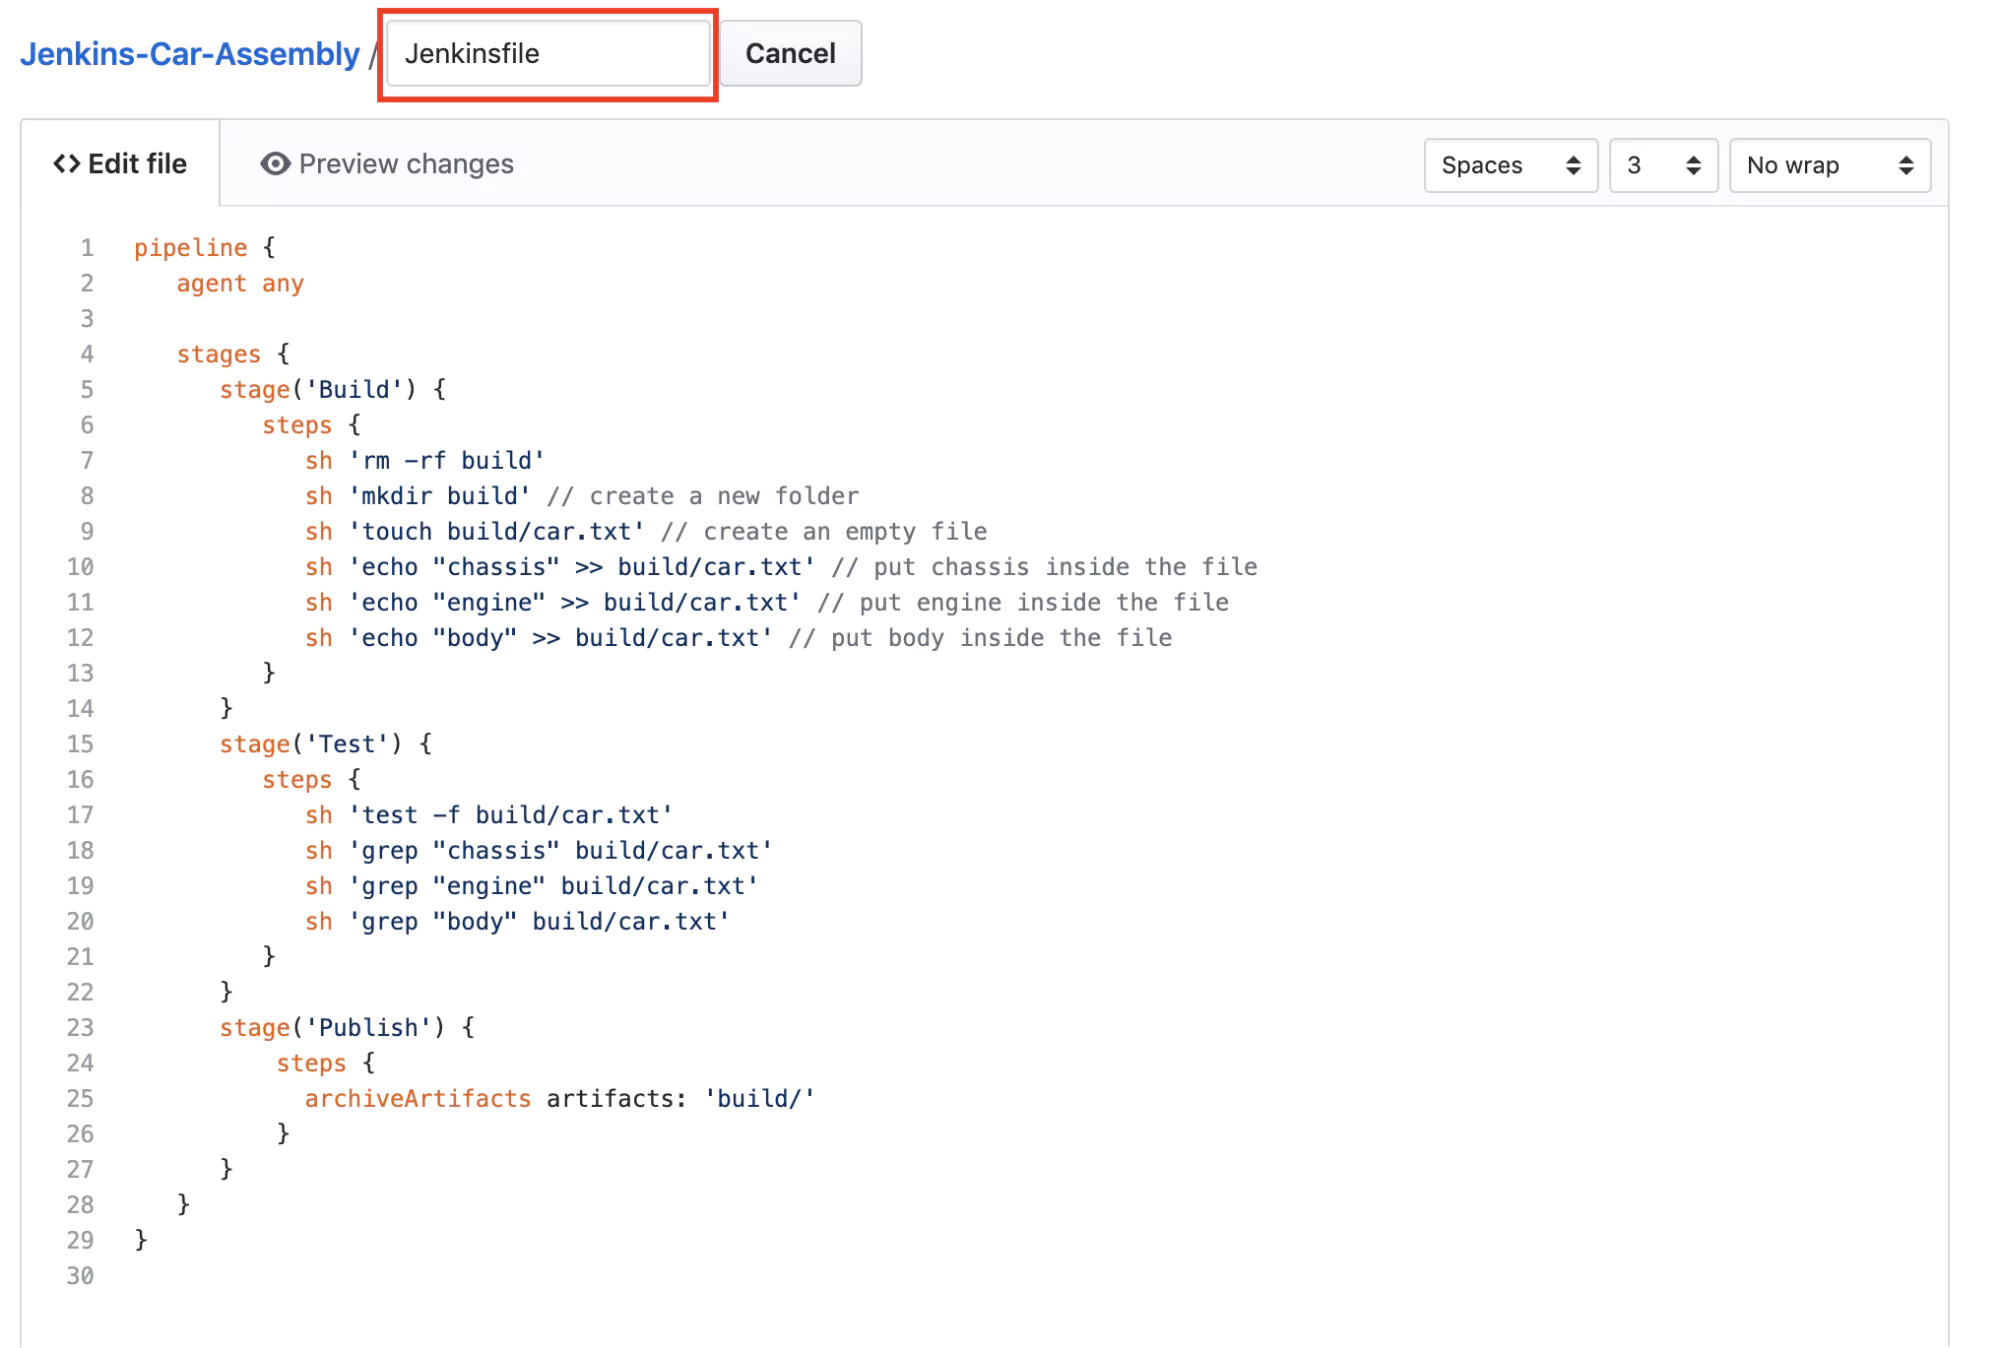
The next step is to create a new file called Jenkinsfile in your Github repository with the contents of the pipeline from Jenkins.

github-new-file

jenkinsfile

Read Pipeline from Git

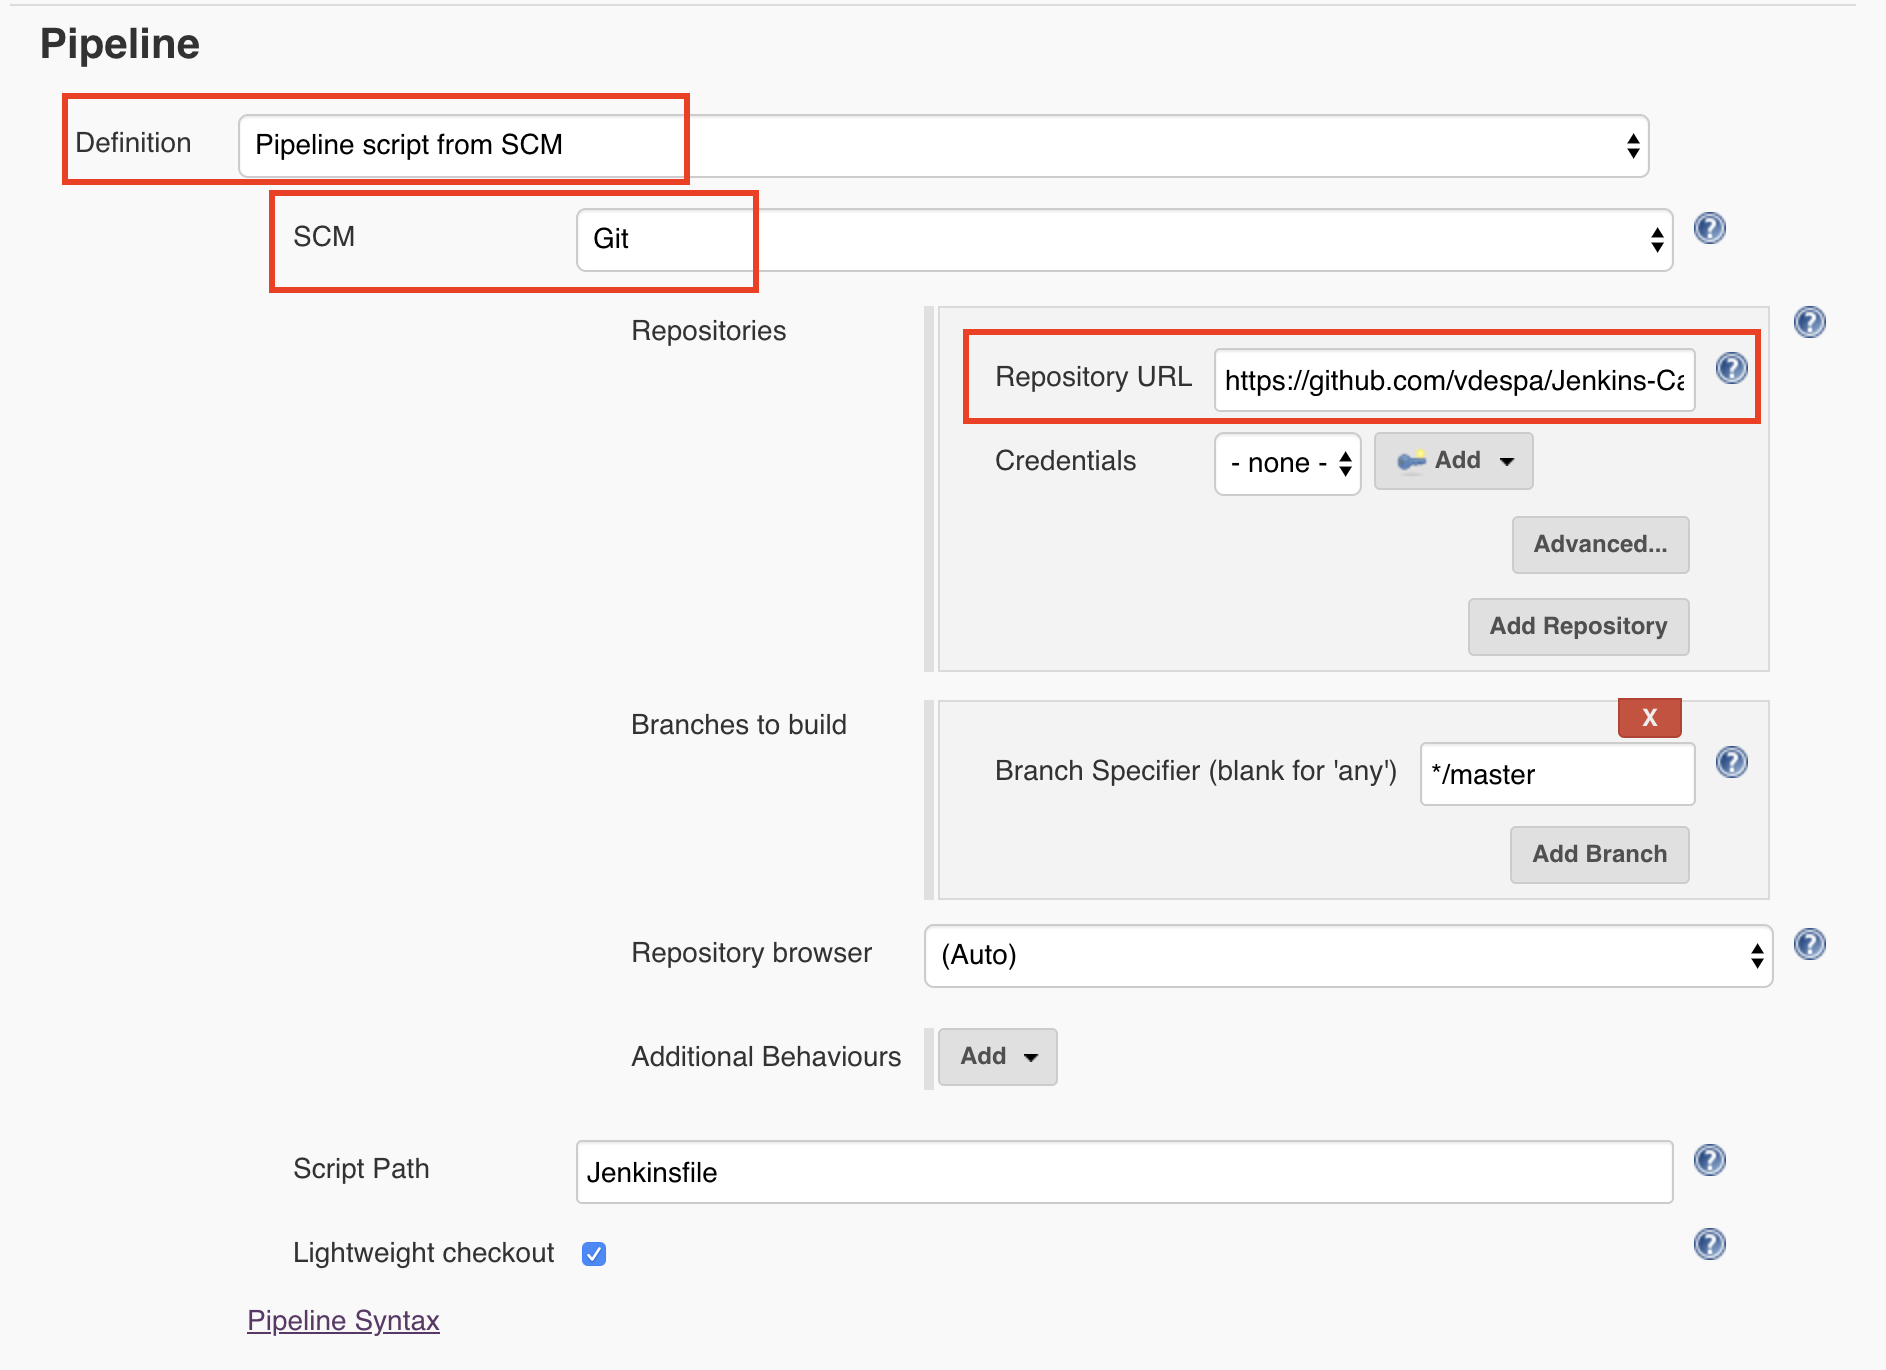
Finally, we need to tell Jenkins to read the pipeline configuration from Git. I have selected the Definition as Pipeline Script from SCM which in our case, refers to Github. By the way, SCM stands for Source code management. 

jenkins-jenkinsfile

Saving and rerunning the pipeline leads to a very similar result. 

run-with-jenkinsfile

So what happened? Now we use Git to store the pipeline configuration in a file called Jenkinsfile. This allows us to use any text editing software to change the pipeline but now we can also keep track of any changes that happen to the configuration. In case something doesn’t work after making a Jenkins configuration change, we can quickly revert to the previous version.

Typically, the Jenkinsfile will be stored in the same Git repository as the project we are trying to build, test, and release. As a best practice, we always store code in an SCM system. Our pipeline belongs there as well, and only then can we really say that we have a ‘pipeline as code’.

Conclusion

I hope that this quick introduction to Jenkins and pipelines has helped you understand what a pipeline is, what are the most typical stages, and how Jenkins can help automate the build and test process and ultimately deliver more value to your users faster.

For your reference, you can find the Github repository referenced in this tutorial here: 

https://github.com/coralogix-resources/jenkins-pipeline-course/tree/master/Jenkins-Car-Assembly-master

Next: Learn about how Coralogix integrates with Jenkins to provide monitoring and analysis of your CI/CD processes.

How to Install Jenkins on a Mac: Step-By-Step Guide

Are you looking for information on how to install Jenkins for Mac OS? Before we get started, there are (at least) two ways to install Jenkins on your macOS system that we’ll review in this article: using the Homebrew package manager or using Docker.

Option 1: Install Jenkins with Homebrew

Step 1: Install Homebrew

If you don’t already have the Homebrew package manager installed, you will first need to follow the installation steps from https://brew.sh/.

You can check if Homebrew is already installed by opening a terminal window and typing:

brew --version

You should get back the Homebrew version if already installed.

homebrew-macos

Step 2: Install Jenkins

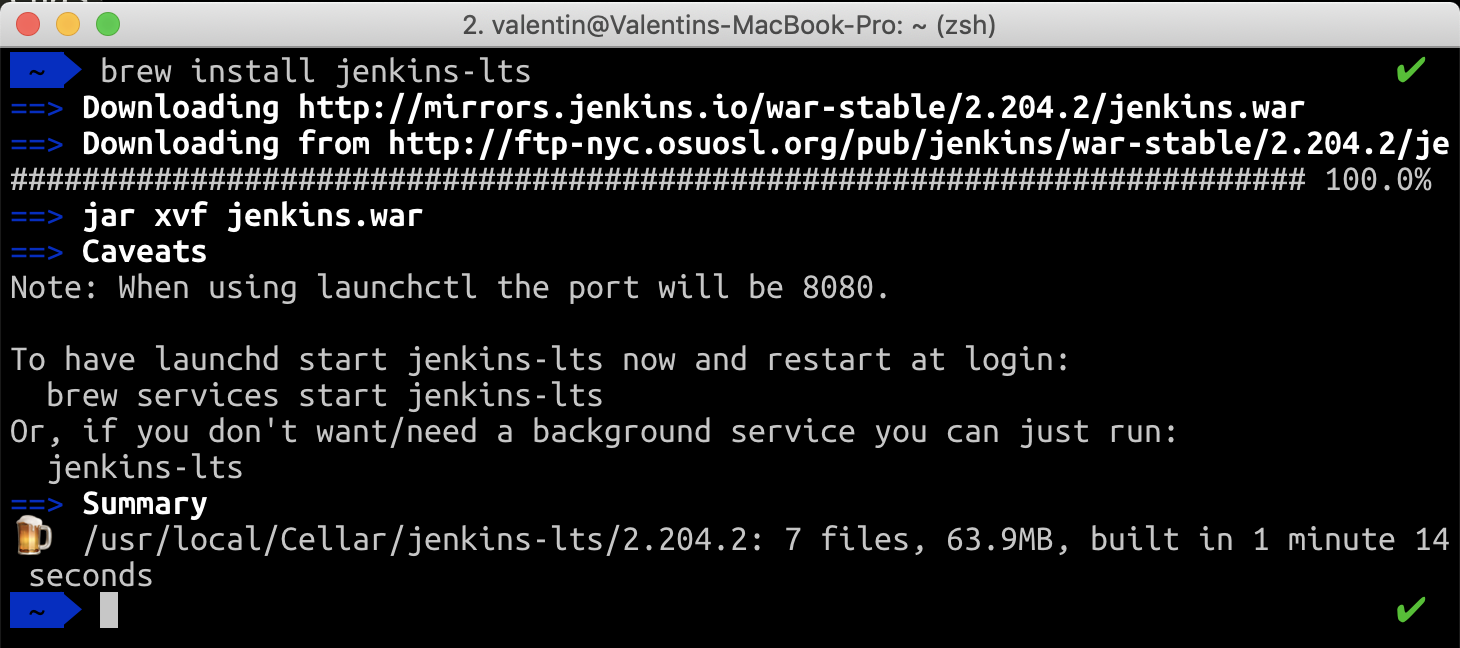
Once Homebrew is installed, you can run the following command which will download and install the current Long-term support (LTS) version of Jenkins.

brew install jenkins-lts
homebrew-jenkins

Step 3: Start the Jenkins server

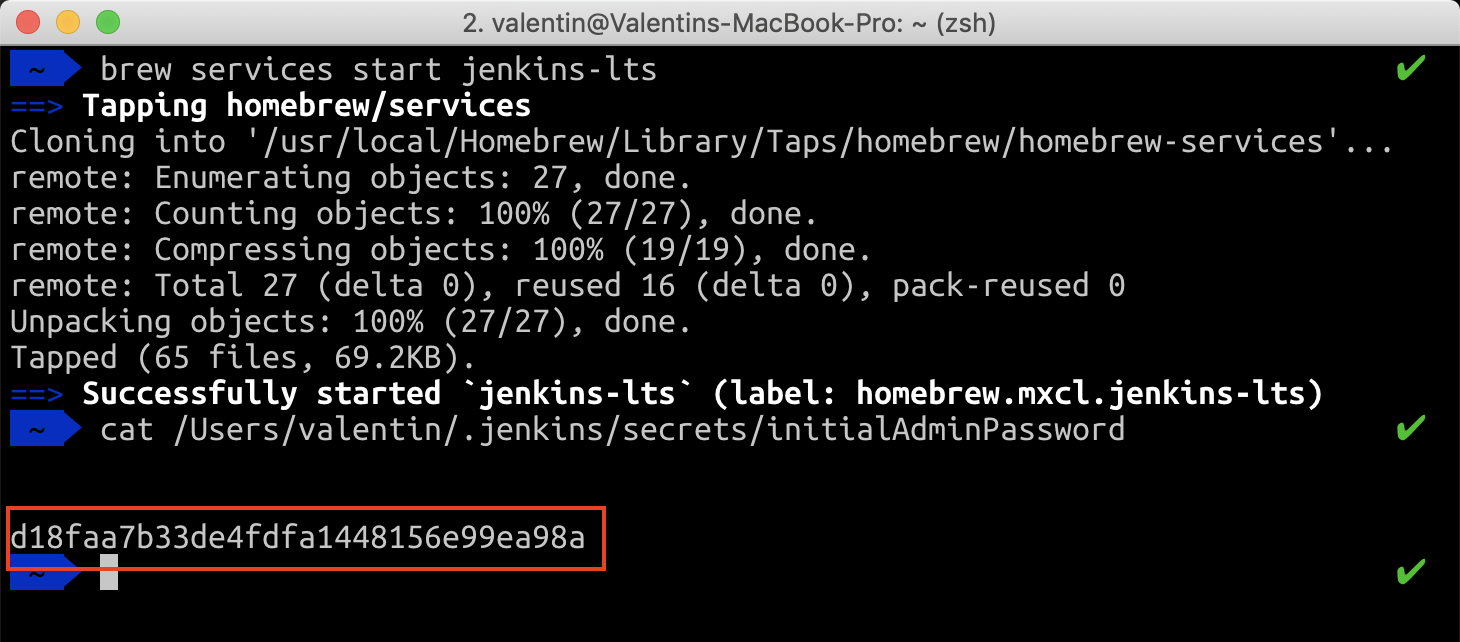
The next step is to actually start the Jenkins server. You can do that with this command:

brew services start jenkins-lts

This will start the Jenkins server in a few seconds. You can check if it is properly working by visiting https://localhost:8080/

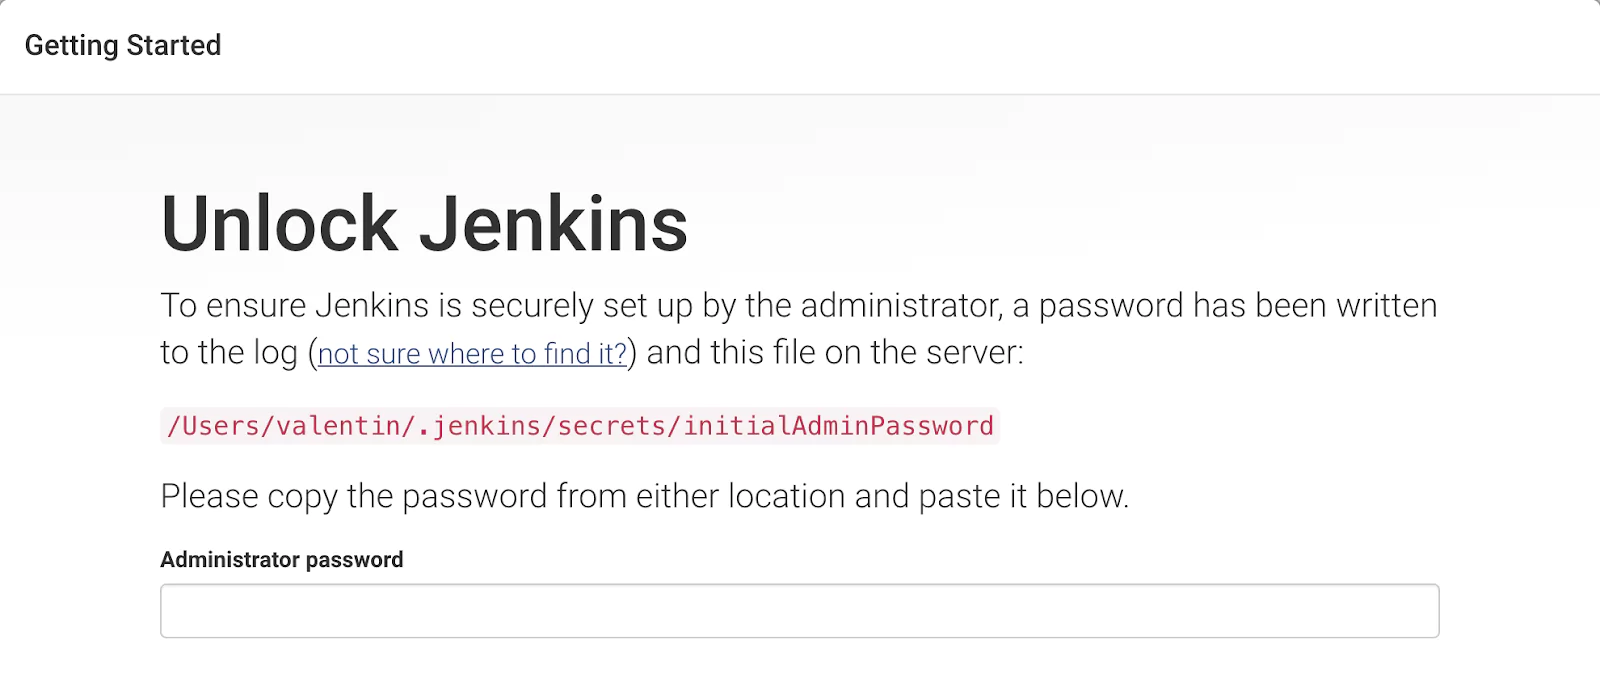
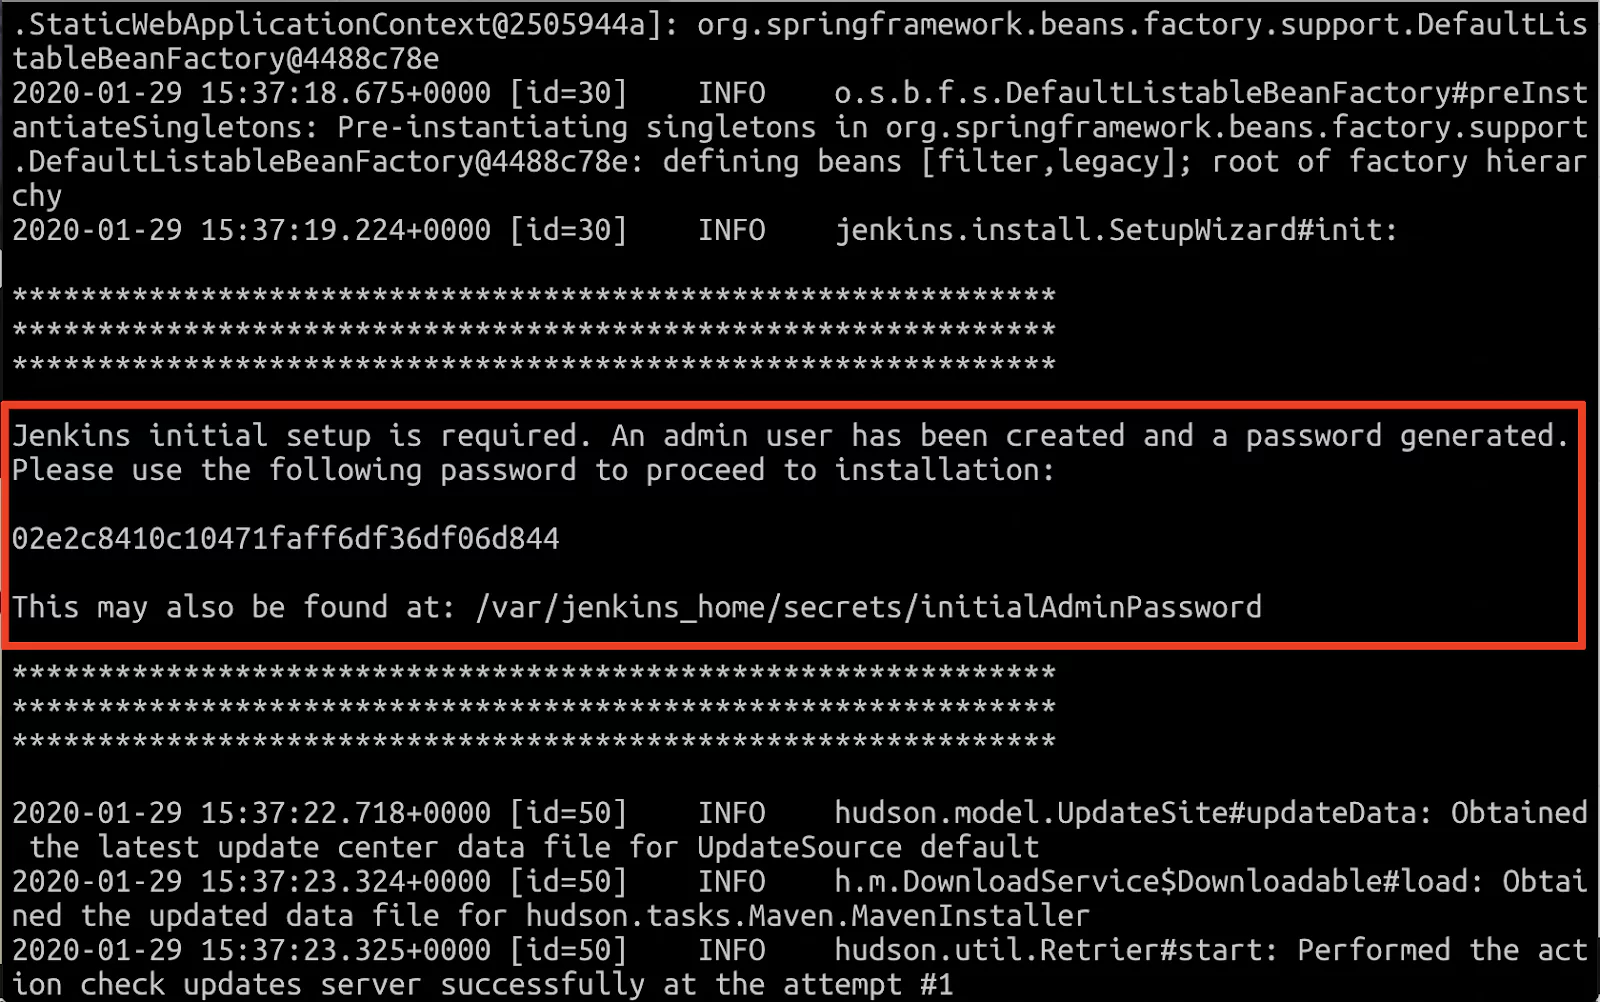
Step 4: Get the installation password

To get the password needed to run the installation process, just check the content of the file mentioned on the screen.

jenkins install screen

Now, let’s use the cat command directly in the terminal, for example (replace with your own file path):

cat /Users/valentin/.jenkins/secrets/initialAdminPassword
jenkins pwd

Check the last section of this article on how to complete the setup process.

Starting and stopping Jenkins

To stop the Jenkins server, open any terminal window and enter the command:

brew services stop jenkins-lts

To start the Jenkins server again, use the command:

brew services start jenkins-lts

Option 2: Install Jenkins with Docker

Step 1: Install Docker

This step requires that you have Docker installed on your system. If this is not the case, make sure you download and install Docker Desktop

Step 2: Run the Jenkins Docker image

Once Docker is up-and-running, you can open a new terminal window and paste the following command:

docker run -p 8080:8080 -p 50000:50000 -v ~/jenkins_home:/var/jenkins_home jenkins/jenkins:lts

This command will download the current Long-term support (LTS) version of Jenkins and will spin-up a new Docker container. You can learn more about the different options available at the official Jenkins Docker documentation page.

Step 3: Wait for the installation to complete

Initially, it should take a few minutes to download and install, but you should soon see in the terminal no longer displaying anything new.

This indicates that the container is now working and waiting for you to complete the Jenkins installation.

Step 4: Get the installation password

Open a new browser window and go to https://localhost:8080/.

You will be asked to input the installation password that should still be visible in the terminal.

macos cli jenkins pwd

Starting and stopping Jenkins

To stop Jenkins, you can go to the terminal window where you started the Docker container and hit Command + C. This will stop the process running the Docker container thus stopping Jenkins.

If you need to start Jenkins again, run the exact same command as when you have installed Jenkins.

How to Configure Jenkins

Once you have installed Jenkins in any of the ways presented, it is time to do the final setup.

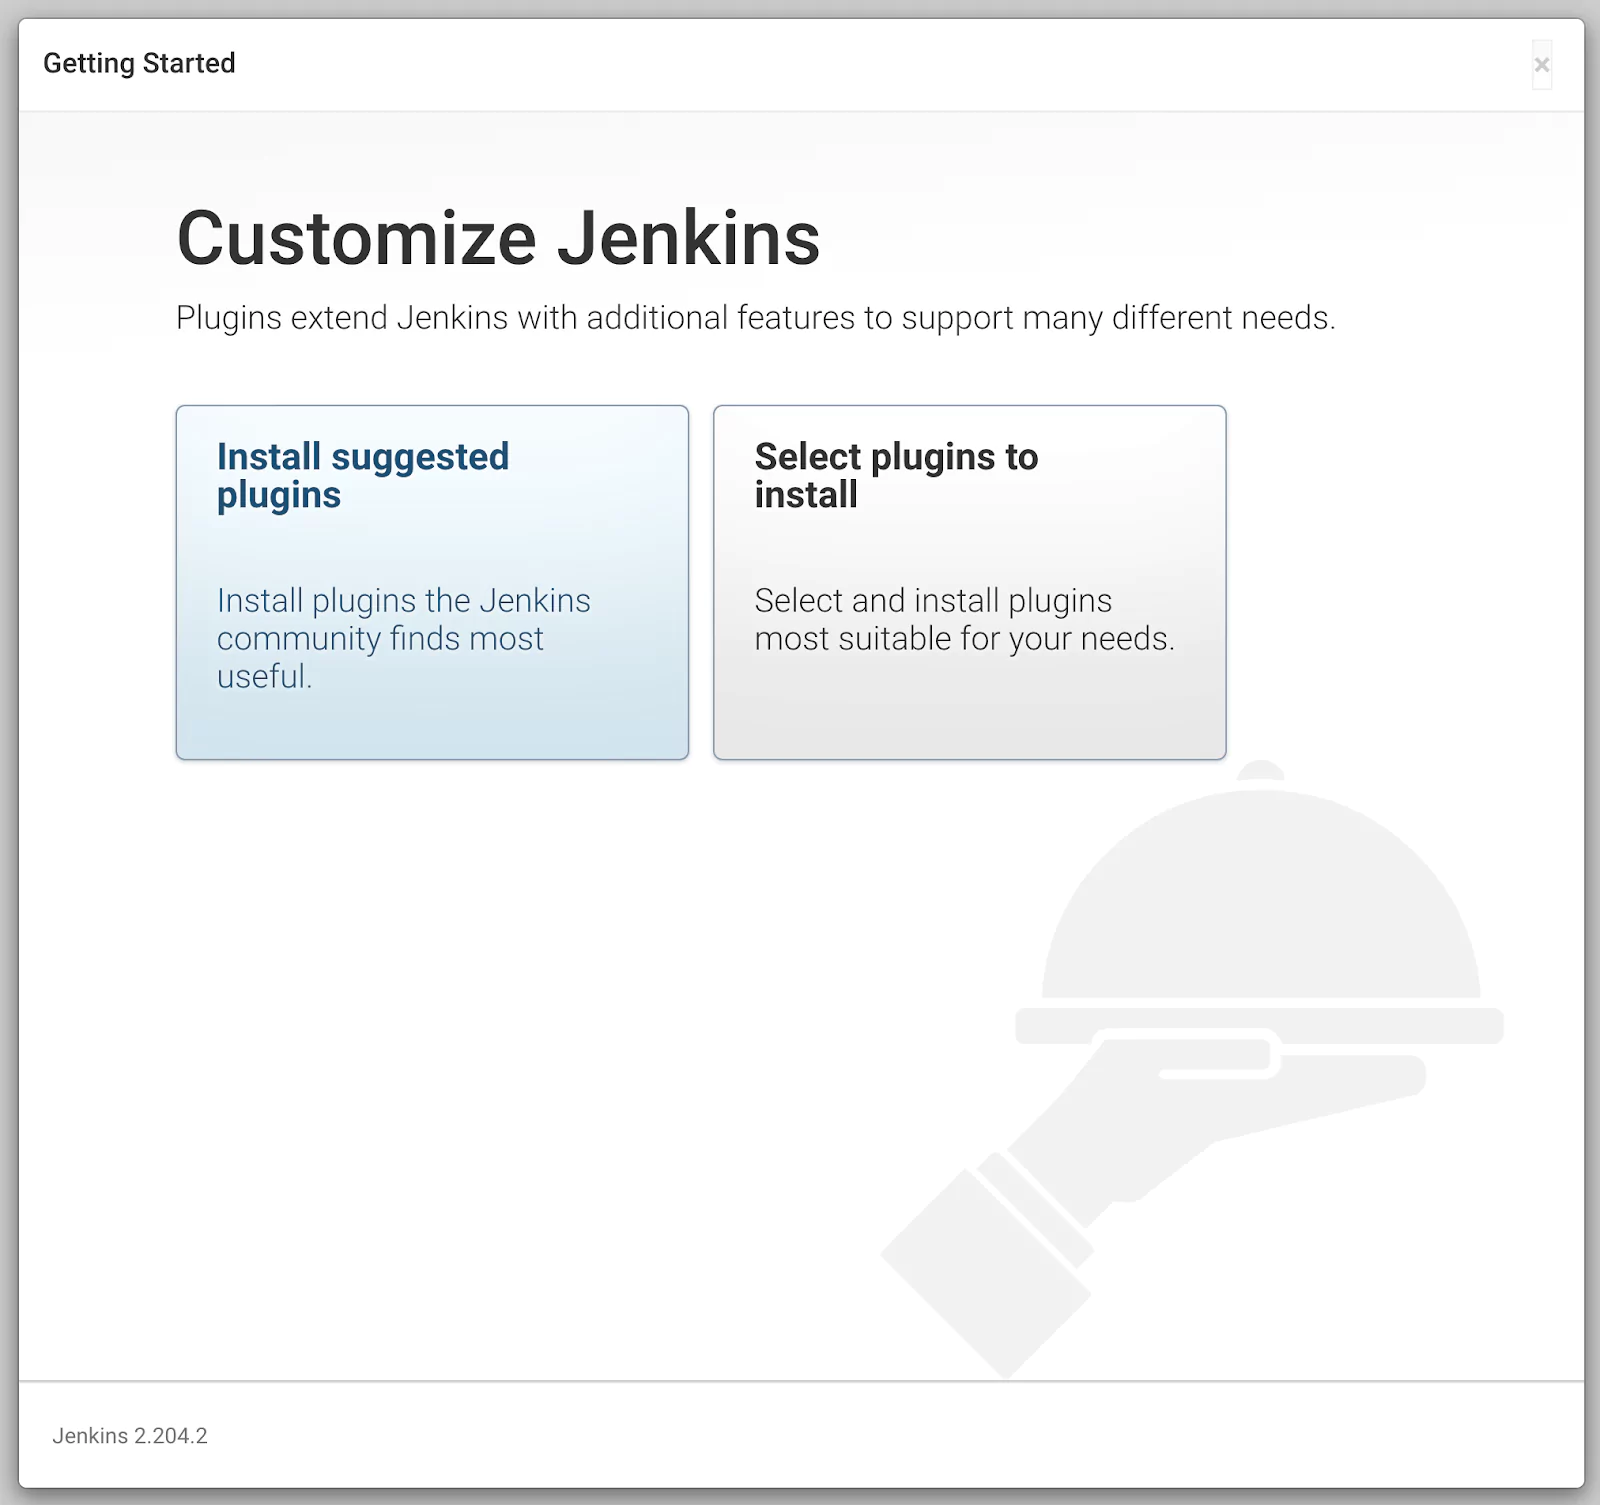
Step 1: Install plugins

Jenkins is composed of multiple components called plugins. The next step asks you which plugins you would like to install. Just install the suggested plugins. Don’t worry about this – you can easily add or remove plugins later. Just install the suggested plugins.

jenkins plugins

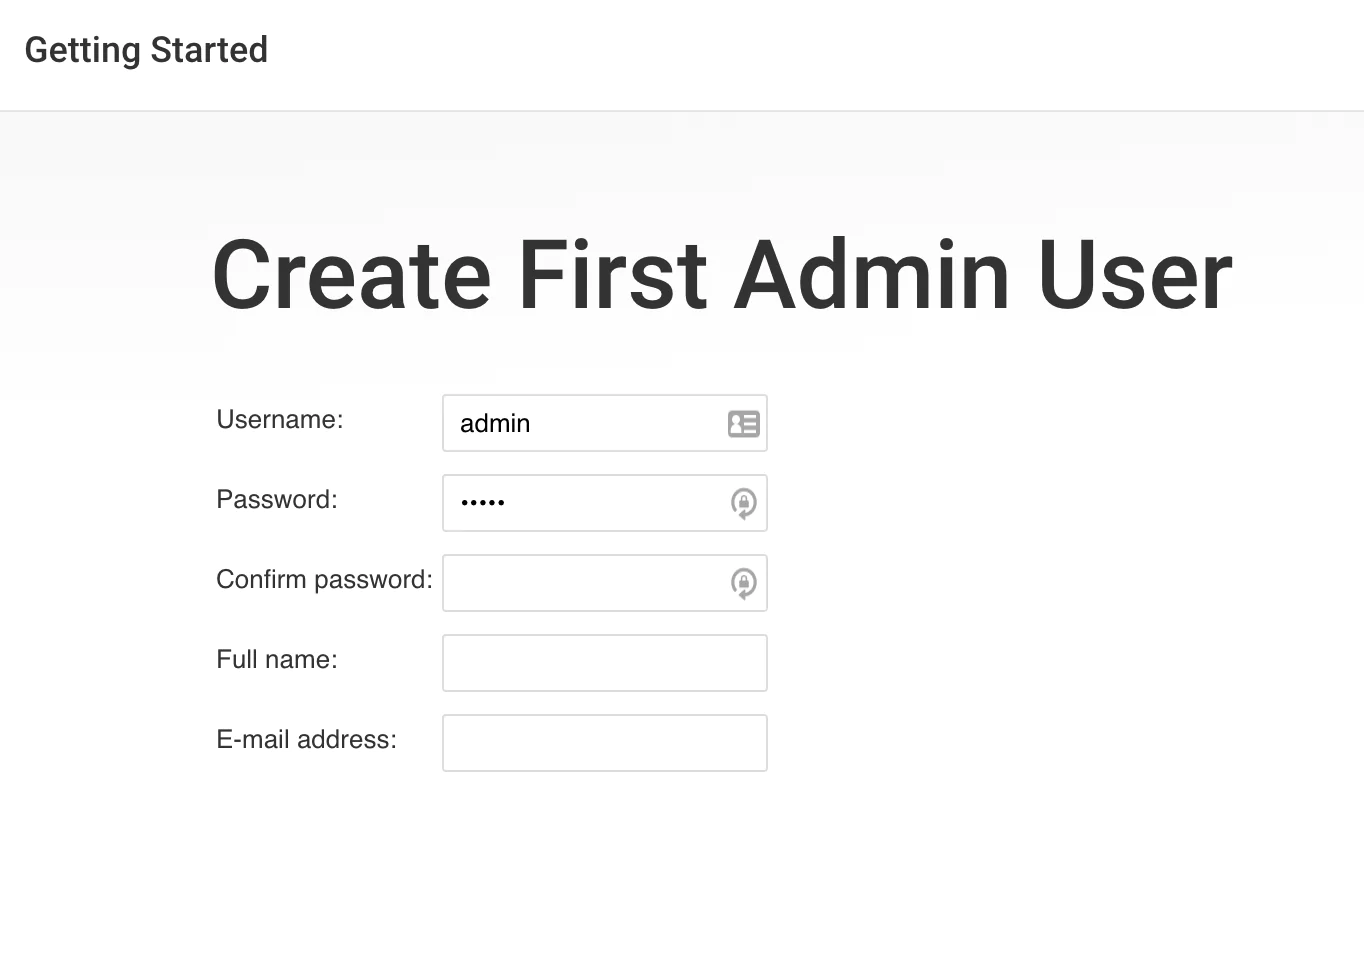
Step 2: Create a Jenkins User

The next step is to create a Jenkins admin user. Make sure you write down the username and password as you will need them later.

jenkins user

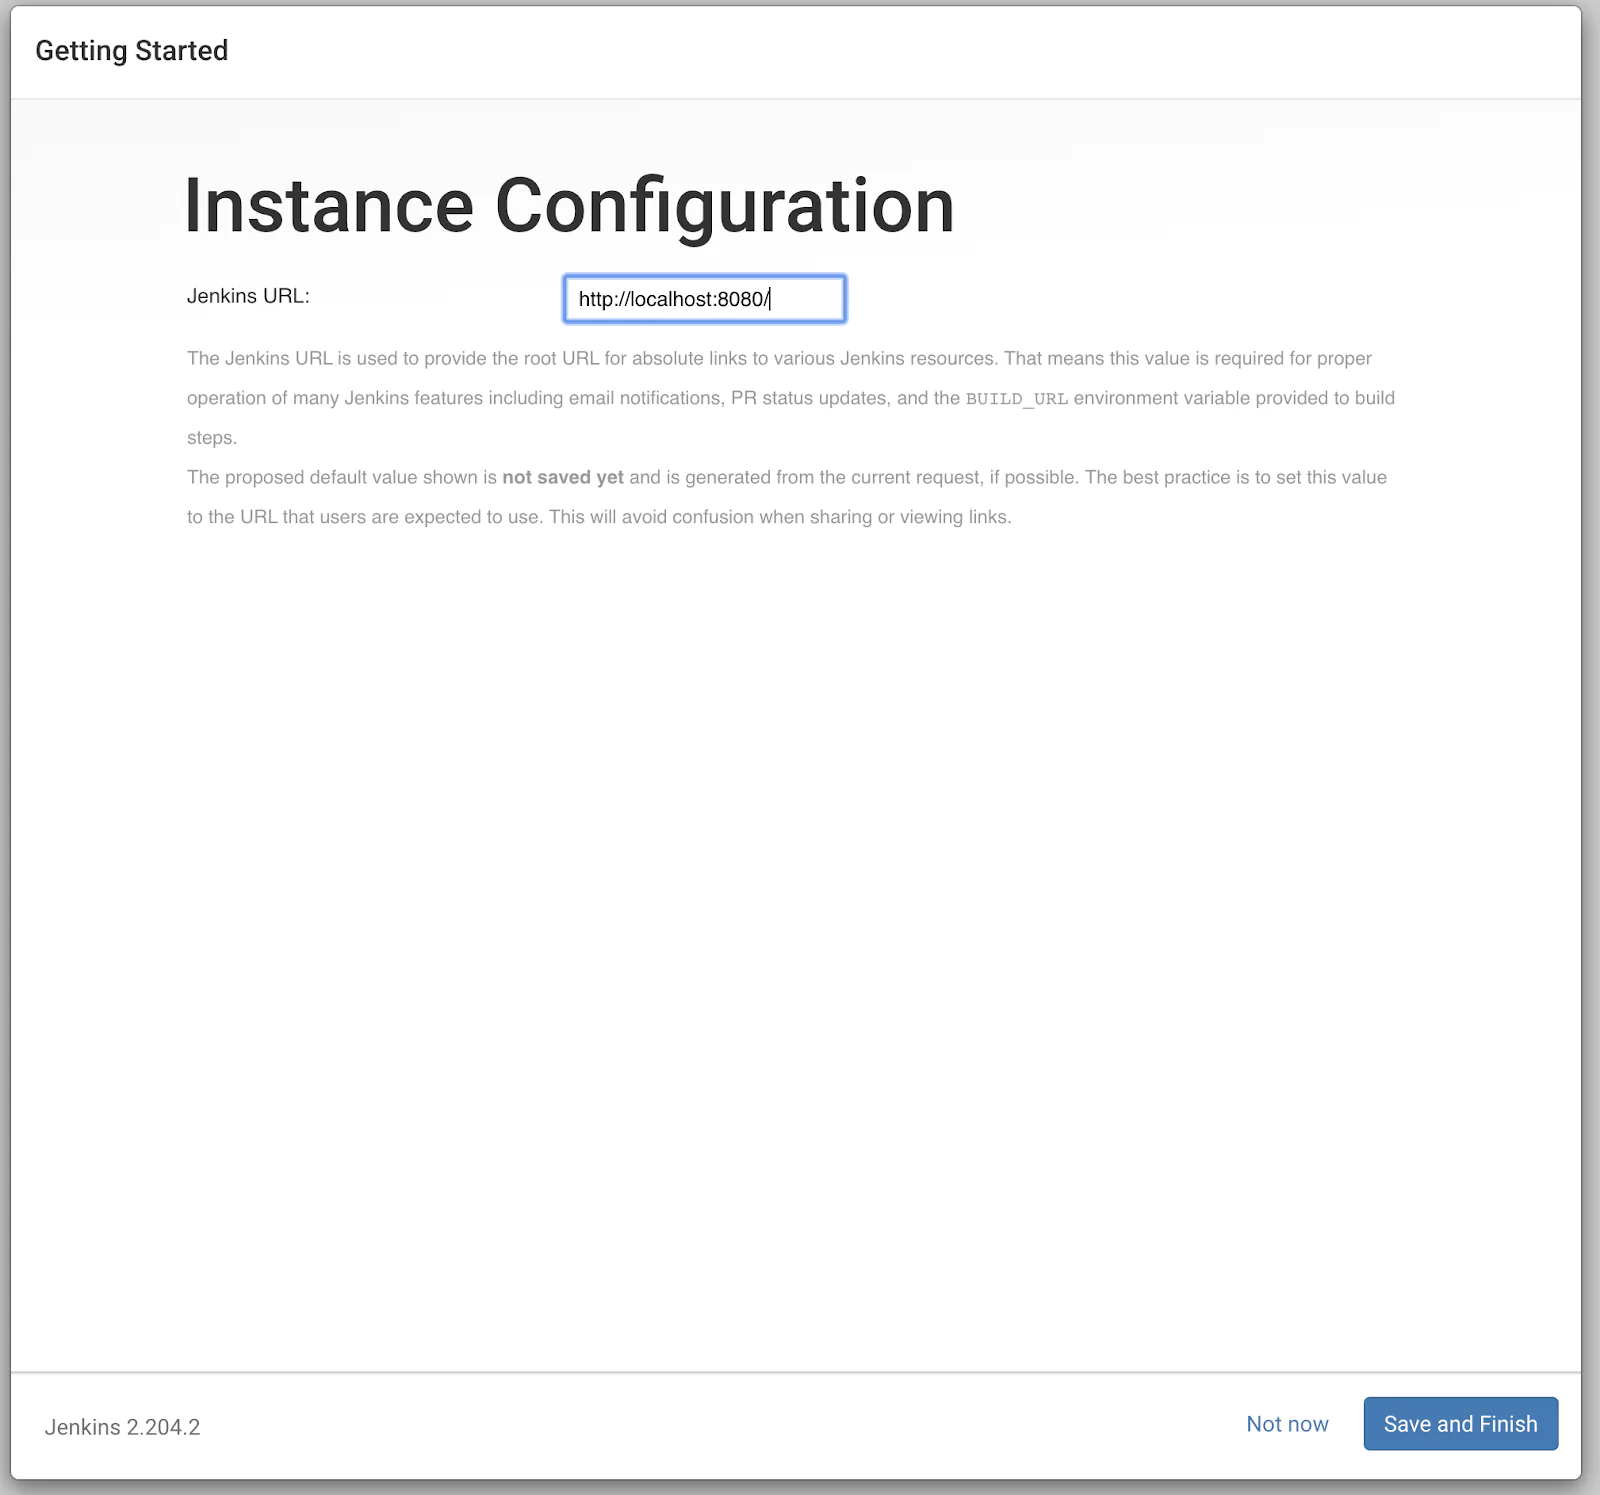
Step 3: Configure the Jenkins URL

The final step is to configure the URL for the Jenkins server. This would be prefilled for you. So all you need to do is to click “Save and continue“.

jenkins-url

Soon the server will be configured and ready for action.

jenkins-ready


How to Install and Configure Jenkins on Windows 10

If you’re looking for information on how to install Jenkins on Windows 10 this is the tutorial for you. We’ll also discuss how to configure it to get your going quickly.

Part 1: Installing Jenkins using the Jenkins installer for Windows

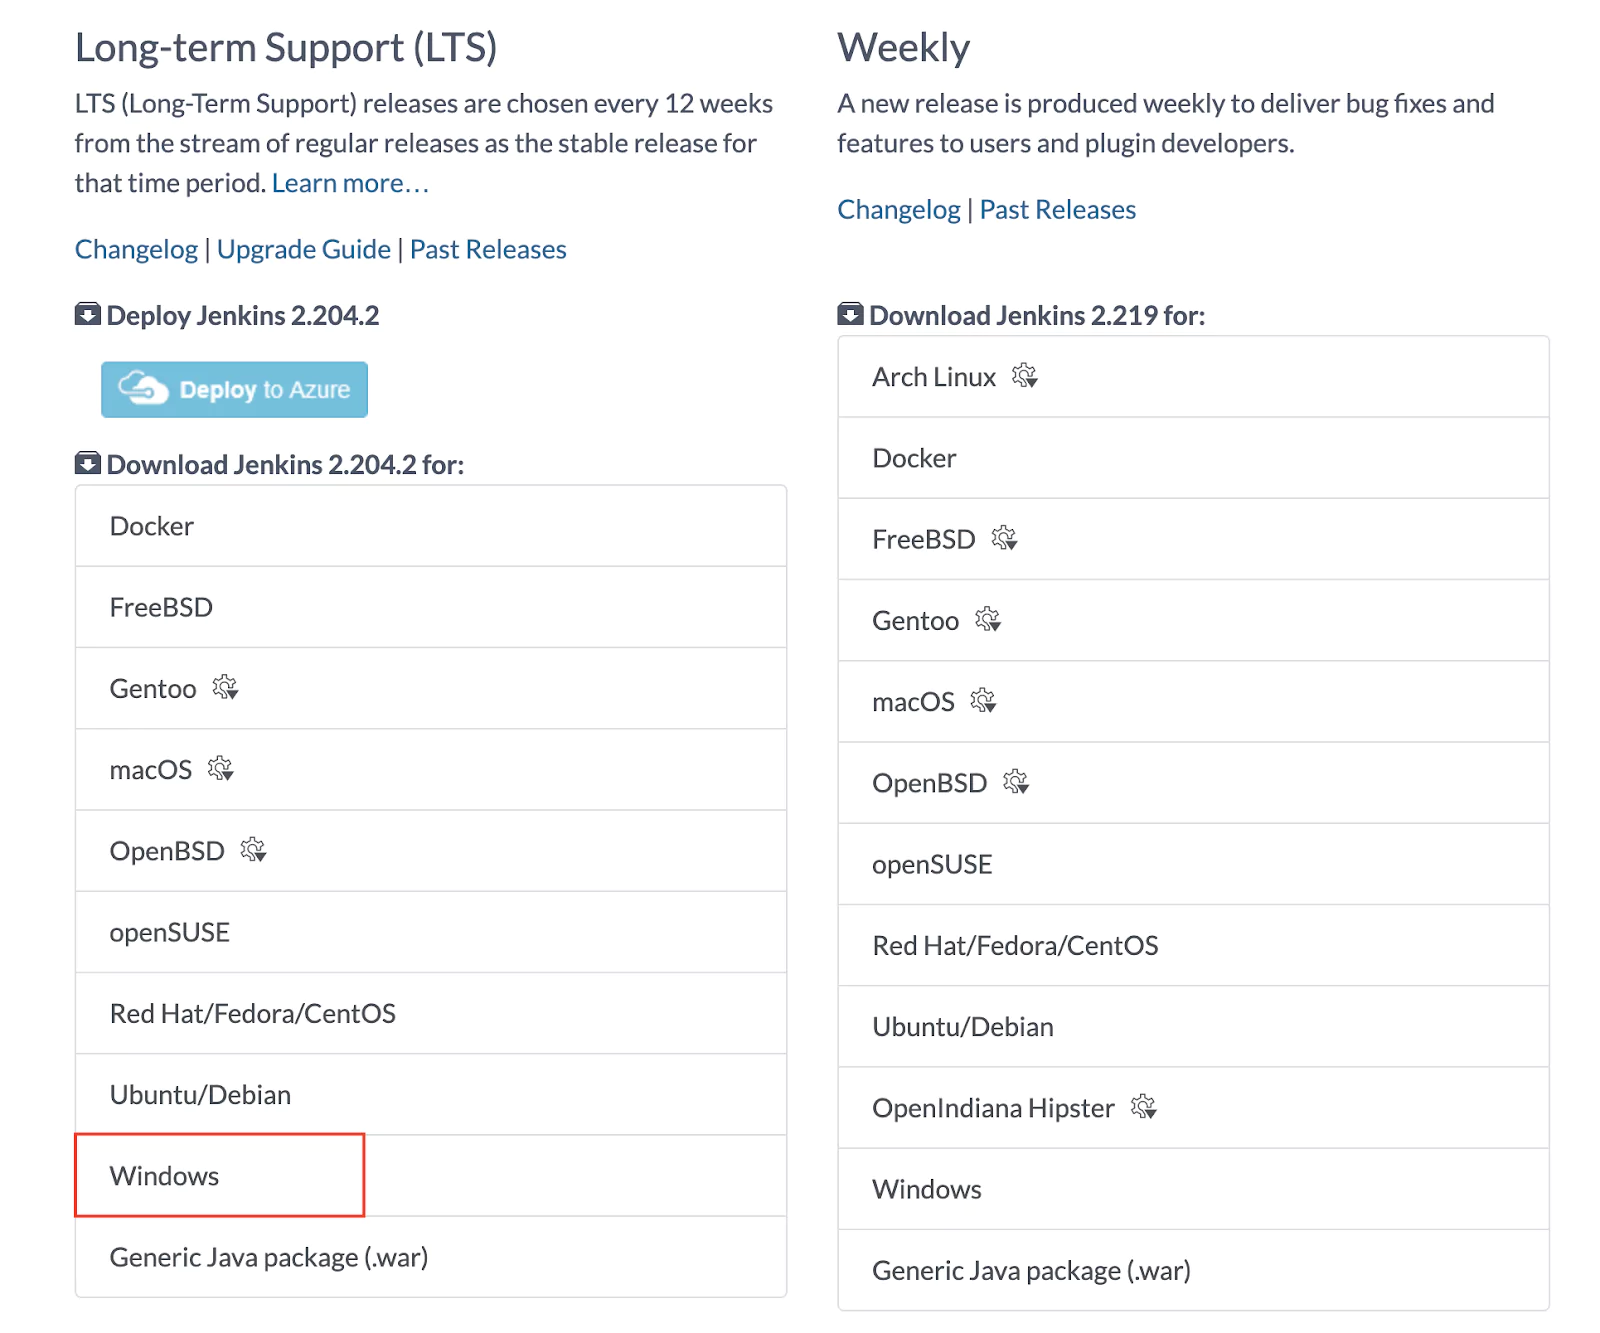
Step 1: Download Jenkins

The first step is to go to the Jenkins download page and to download the Windows version.

jenkins-download

Step 2: Extract the ZIP archive

The Jenkins installer comes packed in a ZIP file. You need to extract the ZIP file before you can run the installer.

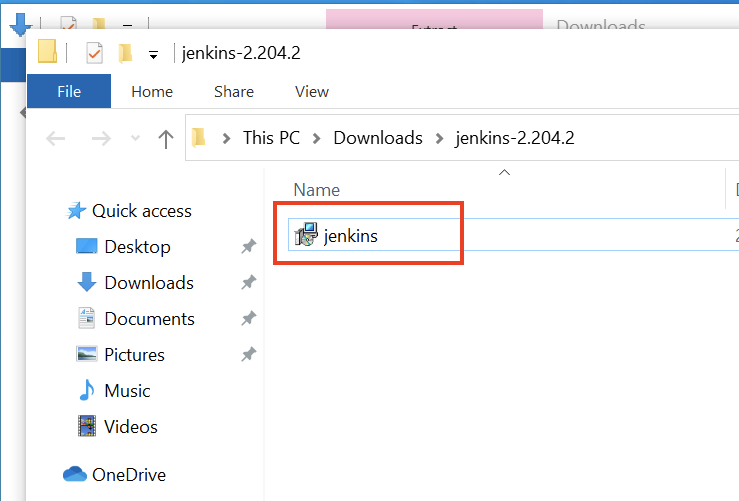
Step 3: Run the installer

Double-click the installer to start the installation wizard.

jenkins-installer

The installation process is straightforward, and you can just use the default settings.

Step 4: Get the installation password

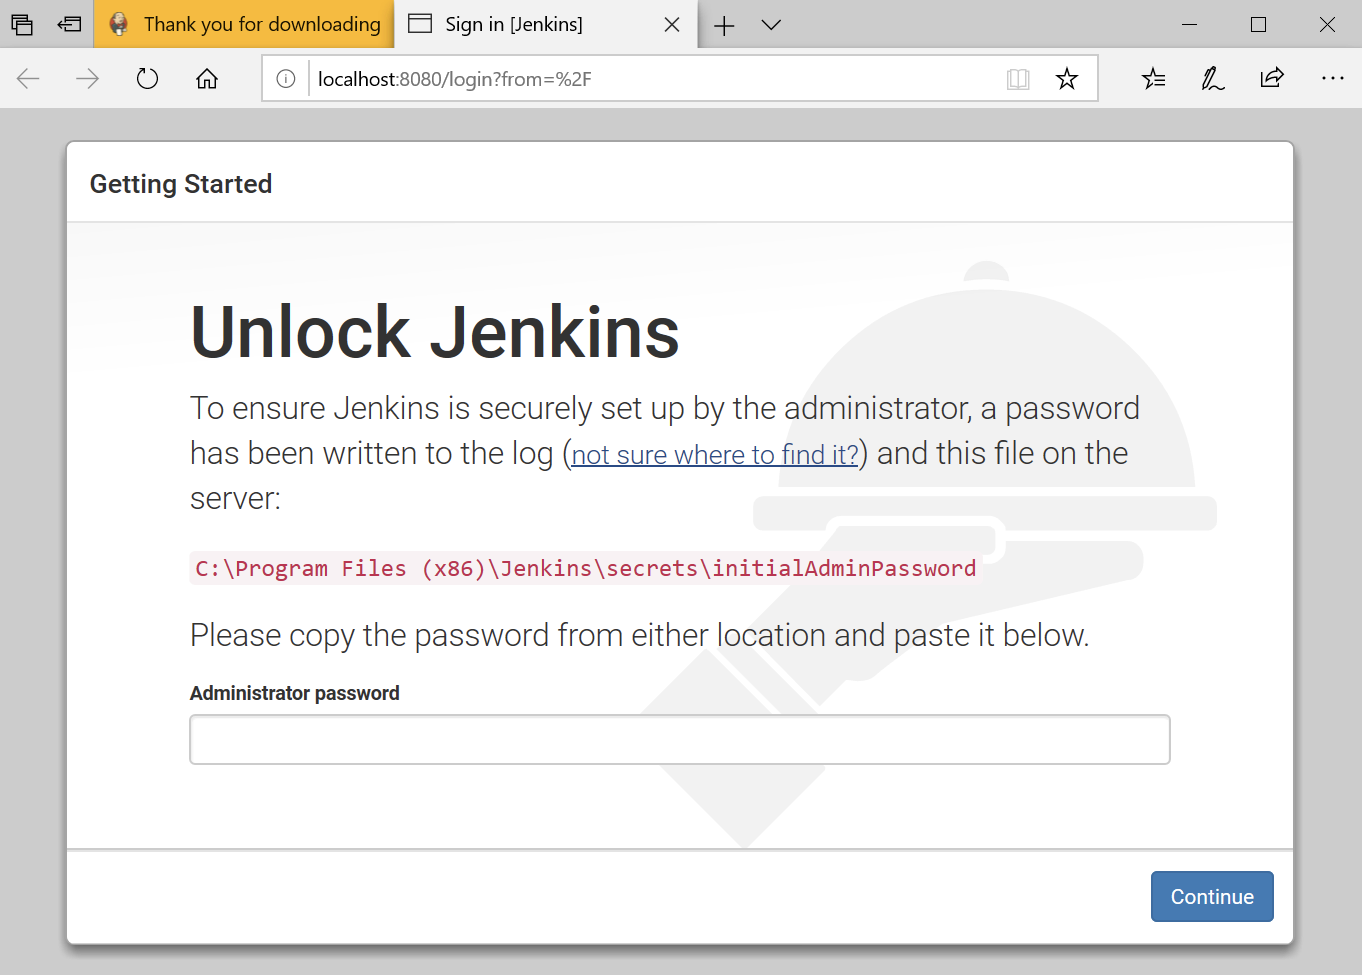
As soon as the installation wizard is complete, it will open a new browser page pointing you to this URL: https://localhost:8080/

jenkins-unlock

Next, you need to open the file mentioned (initialAdminPassword) with Notepad or any other text editor and copy the password.

Starting and stopping Jenkins

Jenkins was installed as a service and will start automatically when Windows starts. To start/stop Jenkins manually, use the service manager from the Control Panel.

Part 2: How to Configure Jenkins

Once you have installed Jenkins in any of the ways presented, it is time to do the final setup.

Step 1: Install plugins

Jenkins is composed of multiple components called plugins. The next step asks you which plugins you would like to install. Just install the suggested plugins. Don’t worry about this – you can easily add or remove plugins later. Just install the suggested plugins.

jenkins plugins

Step 2: Create a Jenkins User

The next step is to create a Jenkins admin user. Make sure you write down the username and password as you will need them later.

jenkins user

Step 3: Configure the Jenkins URL

The final step is to configure the URL for the Jenkins server. This would be prefilled for you. So all you need to do is to click “Save and continue“.

jenkins-url

Soon the server will be configured and ready for action.

jenkins-ready

Part 3: Installing Git

Git is a version control system that is the defacto standard today. If you don’t already have Git installed, you will most likely need it as Jenkins will need to work with Git repositories.

If Git is not already installed on your system and configured in Jenkins, please check the following installation guide.

Step 1: Download Git

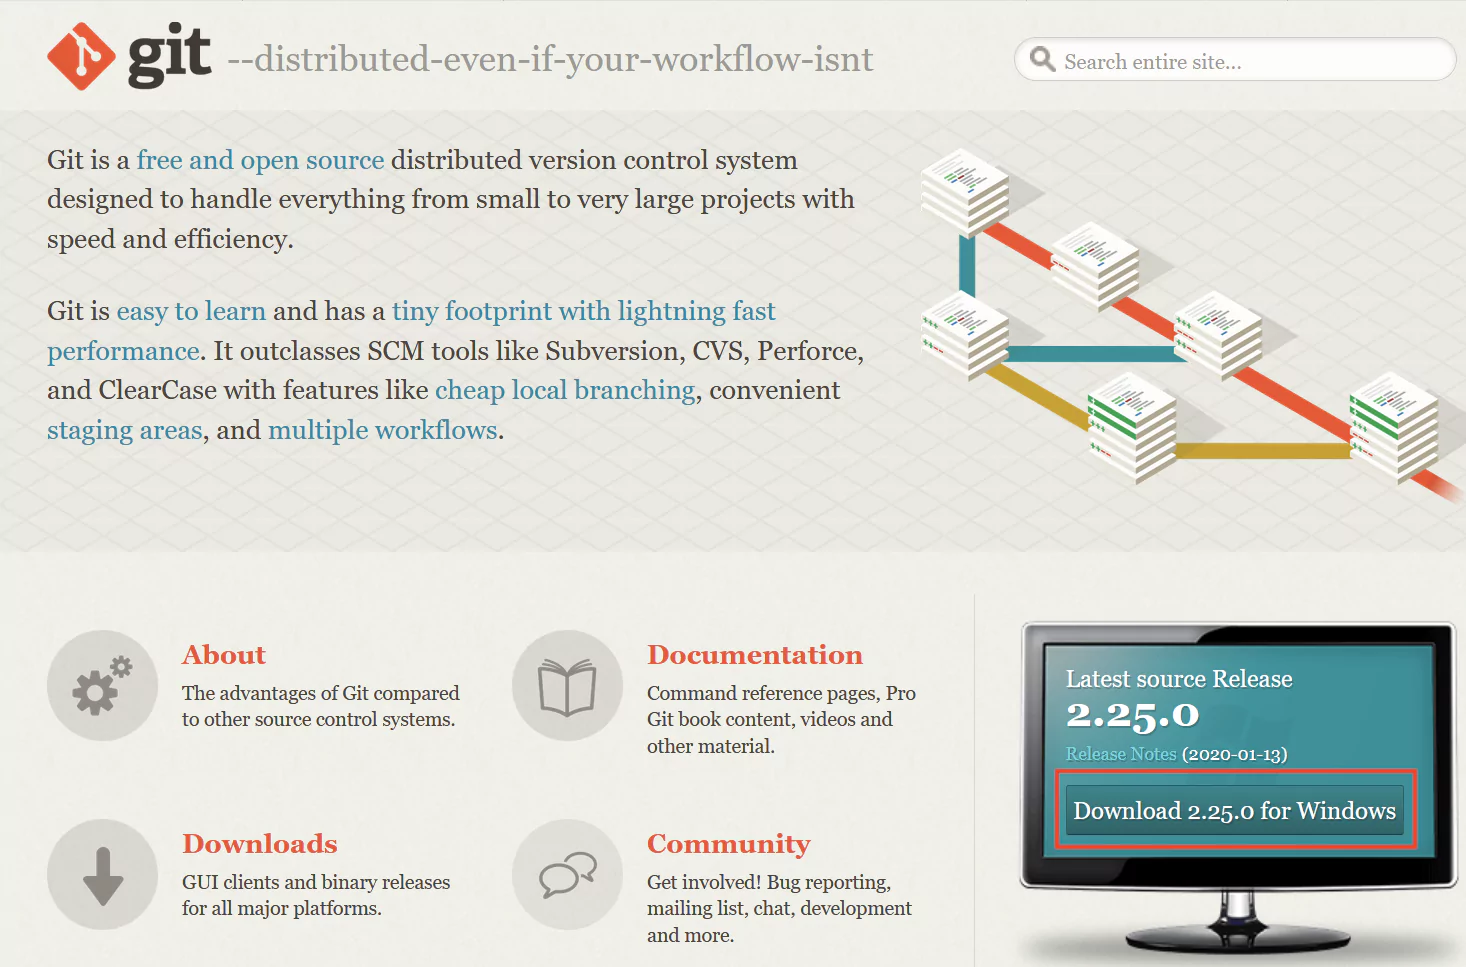
Download the latest Git version for Windows.

pasted image 0 14

Step 2: Run the Installer

Start the installation process for Git and keep the defaults.

Step 3: Configure Jenkins

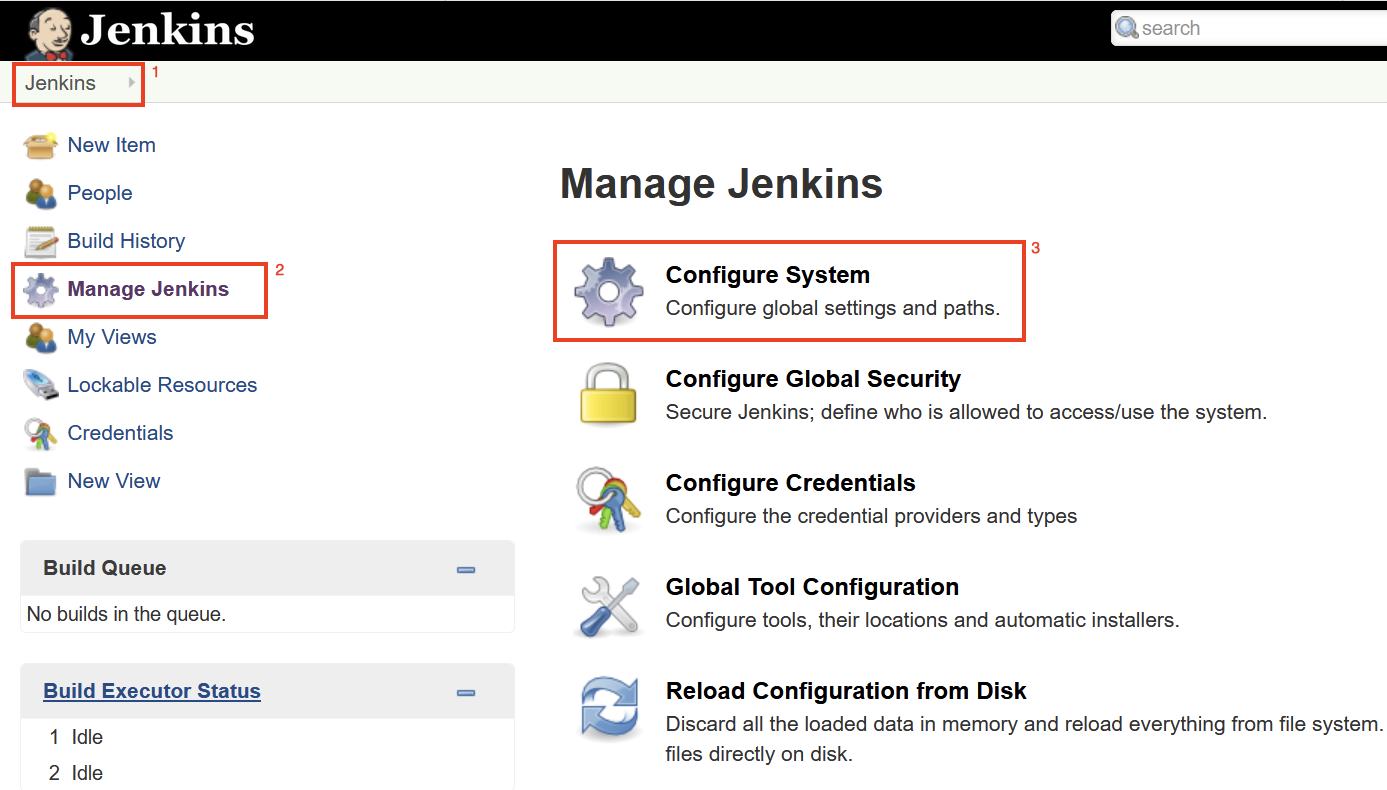
Jenkins needs to know where Git is installed in order to use it. Open Jenkins and go to Manage Jenkins from the left menu and then to Configure System.

configure-jenkins.

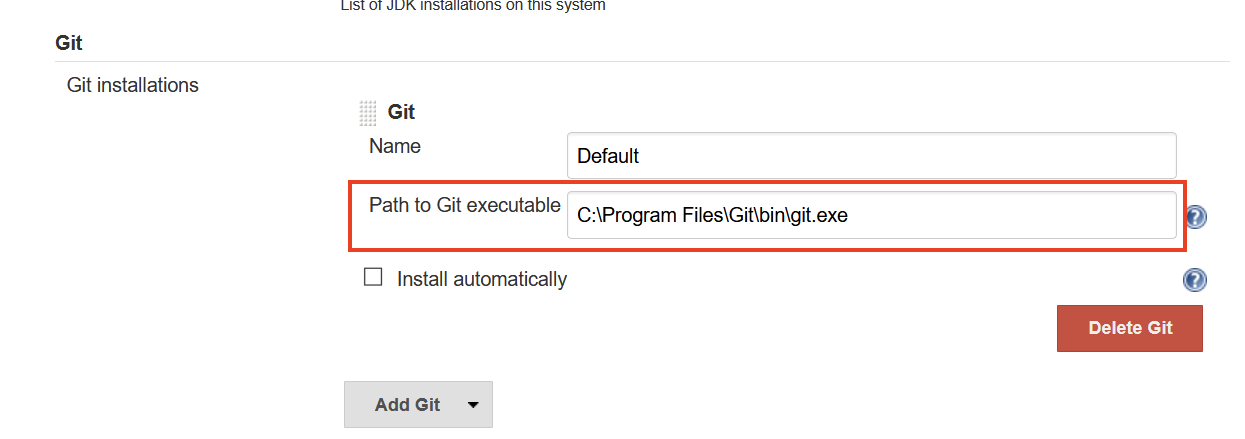
Scroll down and locate the Git section. Set the path to where Git was installed (most likely C:Program FilesGitbingit.exe). Make sure you save this new path by clicking the Save button.

git-path

Jenkins is now ready to work with Git repositories.

Part 3: Cygwin

Cygwin is a collection of Linux utilities ported for Windows. Cygwin provides functionality similar to a Linux distribution, and this may be useful when building pipelines.

While it is not necessary to install Cygwin to use Jenkins, it makes it easier to create scripts and pipelines that are supposed to work on Linux systems.

Step 1: Download Cygwin

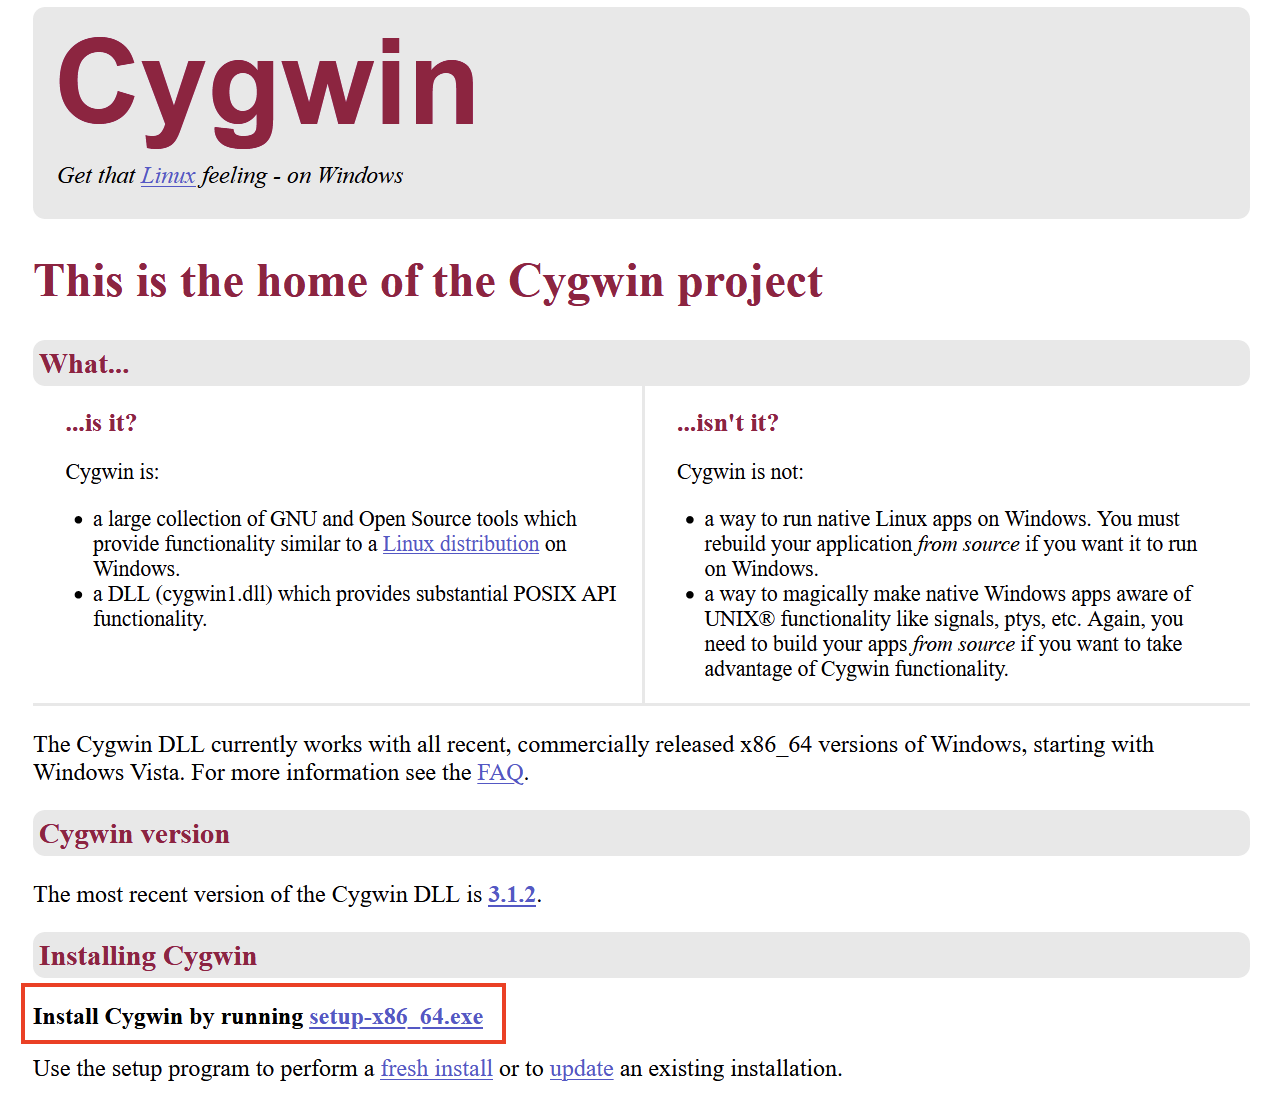
To download Cygwin you need to download the  setup-x86_64.exe installer.

cygwin

Step 2: Run the installer

The installation process is relatively easy and you can keep all the default settings.

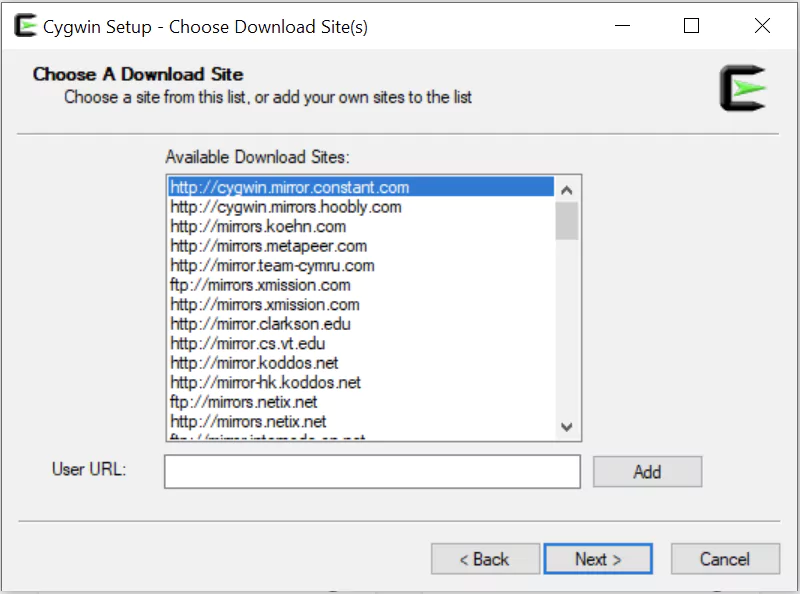
When asked about the download site, make sure you select one from the list and click on Next.

cygwin-install

Step 3: Add Cygwin to the Path Environment Variable

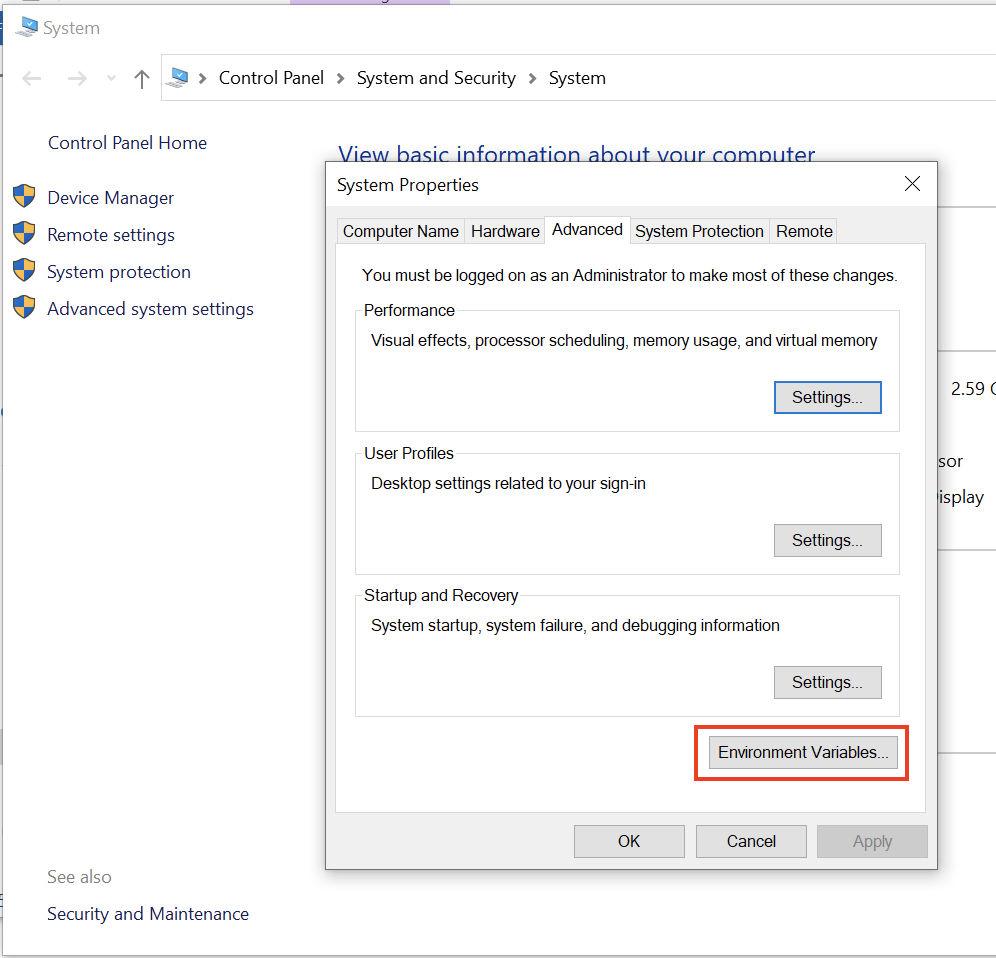
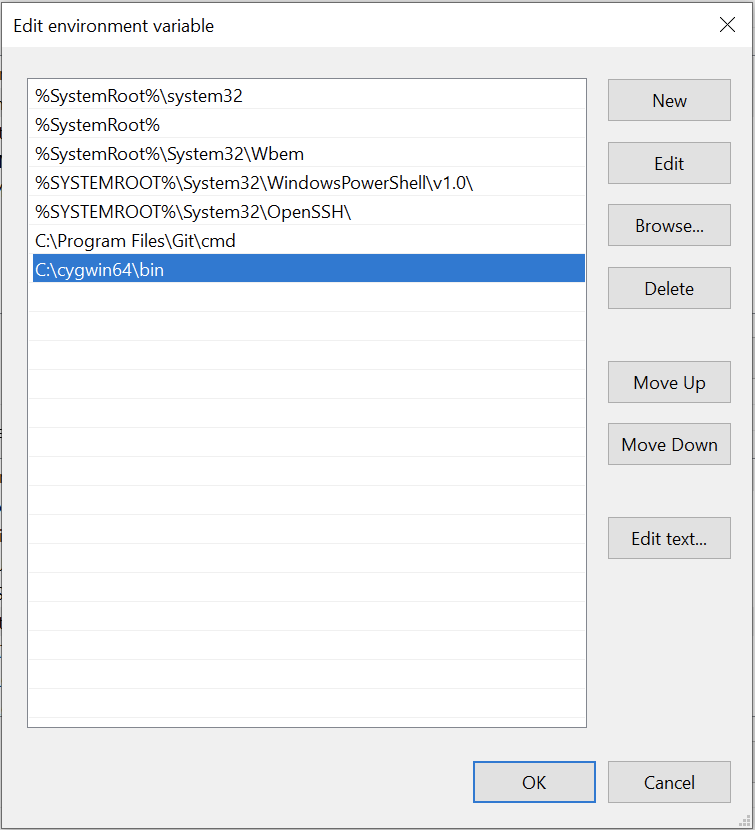
To let Windows know about all the Linux utilities that Cygwin has installed, we need to add the path to the Cygwin bin folder to the Path environment variable.

win-sys-prop

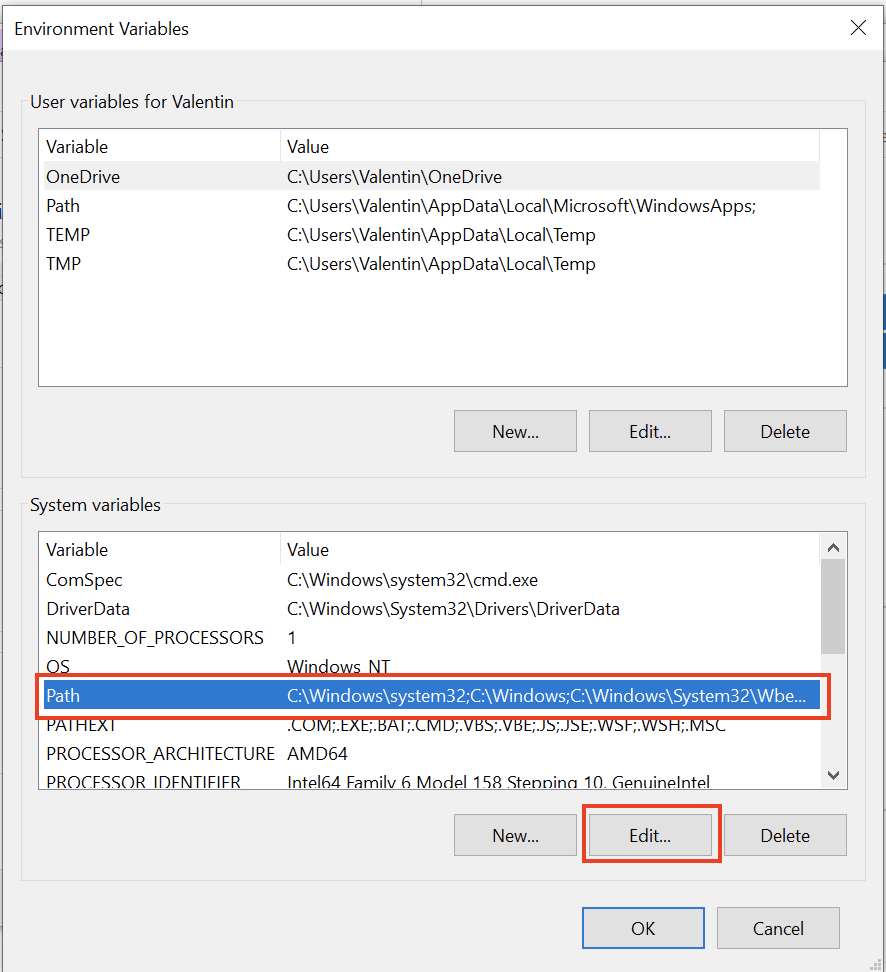
Select the Path variable and click on Edit.

win-path

Add a new entry with the path to the Cygwin bin folder (typically C:cygwin64bin)

win-path-cygwin

Step 4: Restart Windows

The final step involves restarting Windows. This ensures that the new value for the Path variable is begin used by Windows.