Ship OpenTelemetry Data to Coralogix via Reverse Proxy (Caddy 2)

It is commonplace for organizations to restrict their IT systems from having direct or unsolicited access to external networks or the Internet, with network proxies serving as gatekeepers between an organization’s internal infrastructure and any external network. Network proxies can provide security and infrastructure admins the ability to specify specific points of data egress from their internal networks, often referred to as an egress controller.
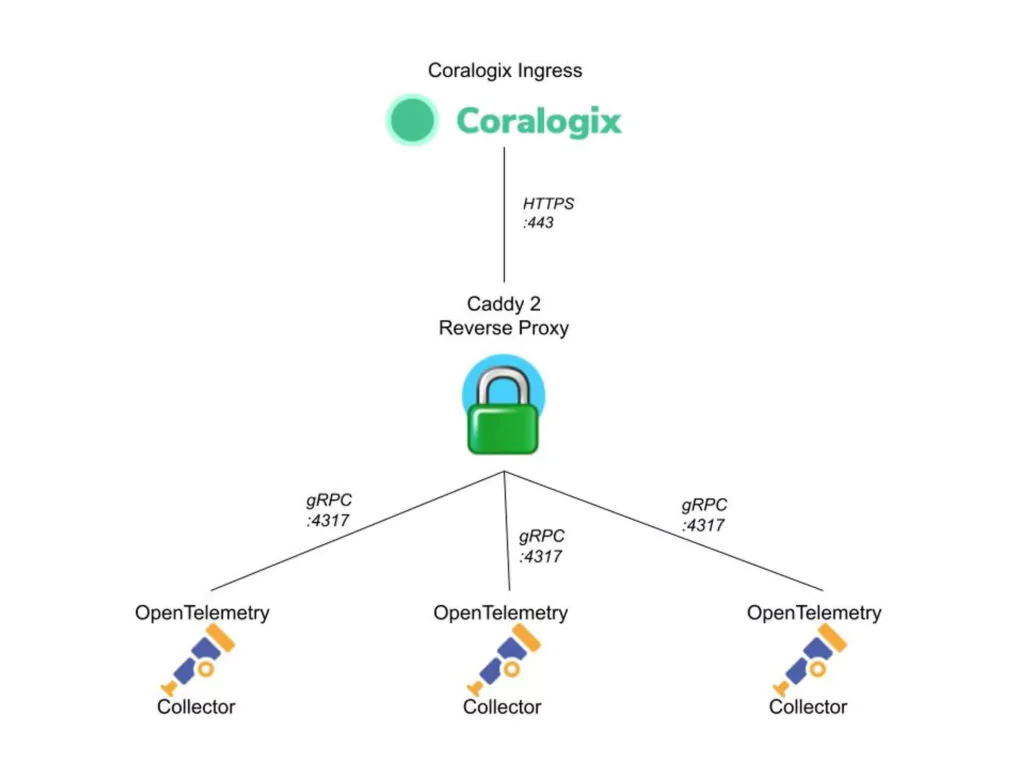
This tutorial demonstrates how to leverage open-source telemetry shippers in conjunction with an open-source network proxy to create a hub-and-spoke architecture that sends your data to Coralogix with a single specified point of data egress.
Before You Begin
What exactly will you find here?
At the outset, this guide assumes that you have already deployed the OpenTelemetry Collector as a DaemonSet within the Kubernetes cluster to export your data to Coralogix.
We’ll show you how to easily:
- Install and configure the Caddy 2 Reverse Proxy server on a dedicated Debian host outside of the Kubernetes cluster
- Deploy OpenTelemetry and a single instrumented application in a K3s Kubernetes cluster

Caddy 2 Setup
Installation
Install the latest stable release of Caddy 2 on a Debian server.
sudo apt install -y debian-keyring debian-archive-keyring apt-transport-https
curl -1sLf '<https://dl.cloudsmith.io/public/caddy/stable/gpg.key>' | sudo gpg --dearmor -o /usr/share/keyrings/caddy-stable-archive-keyring.gpg
curl -1sLf '<https://dl.cloudsmith.io/public/caddy/stable/debian.deb.txt>' | sudo tee /etc/apt/sources.list.d/caddy-stable.list
sudo apt update
sudo apt install caddy
Configuration
STEP 1. Create a file called Caddyfile in your working directory.
touch Caddyfile
STEP 2. Copy the following configuration into Caddyfile:
{
        servers {
                protocols h1 h2 h2c
        }
}

<caddy_server_address>:4317 {
        log {
                output stdout
                level DEBUG
        }
        reverse_proxy ingress.coralogixstg.wpengine.com:443 {
                transport http {
                        tls_server_name ingress.coralogixstg.wpengine.com
                }
        }
}

:2019 {
        metrics /metrics
}
STEP 3. Define any global options that apply to the entire Caddy server, including which HTTP protocols to support. The h2c scheme allows us to translate gRPC requests into HTTPS onward requests to Coralogix.
{
        servers {
                protocols h1 h2 h2c
        }
}
STEP 4. Define the parameters of the reverse proxy, including the address and port for the inbound traffic coming from our OpenTelemetry Collectors. This allows us to successfully forward inbound gRPC traffic from our OpenTelemetry Collectors to Coralogix ingress via HTTPS.
<caddy_server_address>:4317 {
        log {
                output stdout
                level DEBUG
        }
        reverse_proxy ingress.coralogixstg.wpengine.com:443 {
                transport http {
                        tls_server_name ingress.coralogixstg.wpengine.com
                }
        }
}
Notes:
- The
logfunction is used to write all associated logs to stdout with a level of DEBUG or higher. - The destination of our reverse proxy connections is specified as ingress.coralogixstg.wpengine.com:443 with the transport type specified to HTTP.
- The
tls_server_nameparameter is set to ingress.coralogixstg.wpengine.com.
STEP 5. Instruct Caddy 2 to publish Prometheus-format metrics of the Caddy 2 server itself. This step allows us to use our OpenTelemetry Collectors to scrape these metrics and actively monitor our egress controller without deploying any additional components into our telemetry stack.
:2019 {
        metrics /metrics
}
STEP 6. To apply the configuration for the first time and start the Caddy server, use the following command:
caddy run
STEP 7. To make any changes to the Caddyfile, reapply the configuration with the following command:
caddy reload
STEP 8. To view the logs generated by Caddy 2 in stdout, use the following command:
sudo journalctl -u caddy -f
OpenTelemetry
Now that have implemented our Caddy 2 server, update the configuration of our OpenTelemetry Daemonset to send the gRPC traffic to the reverse proxy listening address.
Use this example values.yaml file with Helm to apply the new configuration to our OpenTelemetry Collectors.
global:
  traces:
    endpoint: "<caddy_proxy_address>:4317"
  metrics:
    endpoint: "<caddy_proxy_address>:4317"
  logs:
    endpoint: "<caddy_proxy_address>:4317"

opentelemetry-collector:
  mode: "daemonset"
  presets:
    logsCollection:
      enabled: false
    kubernetesAttributes:
      enabled: true
    hostMetrics:
      enabled: true
    kubeletMetrics:
      enabled: true

  config:
    exporters:
      coralogix:
        timeout: "30s"
        private_key: "${CORALOGIX_PRIVATE_KEY}"
        traces:
          endpoint: "{{ .Values.global.traces.endpoint }}"
          tls:
            insecure_skip_verify: true
        metrics:
          endpoint: "{{ .Values.global.metrics.endpoint }}"
          tls:
            insecure_skip_verify: true
        logs:
          endpoint: "{{ .Values.global.logs.endpoint }}"
          tls:
            insecure_skip_verify: true
  receivers:
      prometheus:
        config:
          scrape_configs:
            - job_name: 'caddy'
              scrape_interval: 10s
              static_configs:
                - targets: ['<caddy_proxy_address>:2019']
This demands a bit of an explanation:
endpoint
The first part of this file specifies the endpoint configuration to match the value we used for our reverse proxy listening address in our Caddyfile.
global:
  traces:
    endpoint: "<caddy_proxy_address>:4317"
  metrics:
    endpoint: "<caddy_proxy_address>:4317"
  logs:
    endpoint: "<caddy_proxy_address>:4317"
tls
As this is a tutorial environment, we have added tls: insecure_skip_verify: true configurations to each of the endpoints (traces, metrics, logs) for the Coralogix Exporter.
The setting insecure_skip_verify: true allows us to send the data using unencrypted gRPC (without TLS verification) to our Caddy 2 egress controller. Caddy 2 then handles the TLS handshake with Coralogix ingress over HTTPS.
Important note folks! This is for a non-production environment. If you have a valid SSL/TLS architecture available, we recommend you secure the traffic between the OpenTelemetry Collectors and Caddy 2 using TLS.
  config:
    exporters:
      coralogix:
        timeout: "30s"
        private_key: "${CORALOGIX_PRIVATE_KEY}"
        traces:
          endpoint: "{{ .Values.global.traces.endpoint }}"
          tls:
            insecure_skip_verify: true
        metrics:
          endpoint: "{{ .Values.global.metrics.endpoint }}"
          tls:
            insecure_skip_verify: true
        logs:
          endpoint: "{{ .Values.global.logs.endpoint }}"
          tls:
            insecure_skip_verify: true
prometheus
Here we add a configuration in our OpenTelemetry Collector configuration that leverages the Prometheus receiver to scrape the metrics published by Caddy 2. All we need to do here is change <caddy_proxy_address> to the address of our Caddy 2 server.
receivers:
      prometheus:
        config:
          scrape_configs:
            - job_name: 'caddy'
              scrape_interval: 10s
              static_configs:
                - targets: ['<caddy_proxy_address>:2019']
All Set!
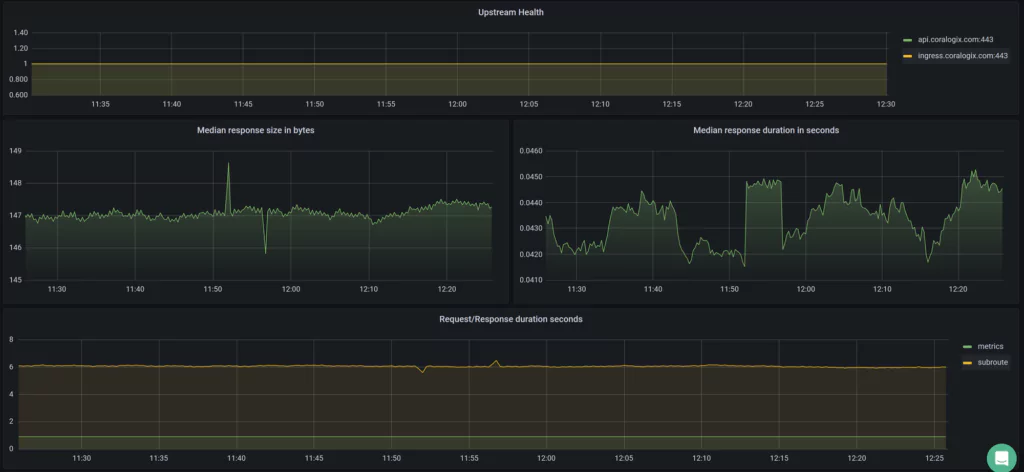
You can now monitor Caddy 2 in your Coralogix dashboard. Go on to configure metric alerts to notify us should any issues occur with our egress controller.


