Full-Stack Observability Guide

Like cloud-native and DevOps, full-stack observability is one of those software development terms that can sound like an empty buzzword. Look past the jargon, and you’ll find considerable value to be unlocked from building data observability into each layer of your software stack.

Before we get into the details of monitoring observability, let’s take a moment to discuss the context. Over the last two decades, software development and architecture trends have departed from single-stack, monolithic designs toward distributed, containerized deployments that can leverage the benefits of cloud-hosted, serverless infrastructure. 

This provides a range of benefits, but it also creates a more complex landscape to maintain and manage: software breaks down into smaller, independent services that deploy to a mix of virtual machines and containers hosted both on-site and in the cloud, with additional layers of software required to manage automatic scaling and updates to each service, as well as connectivity between services.

At the same time, the industry has seen a shift from the traditional linear build-test-deploy model to a more iterative methodology that blurs the boundaries between software development and operations. This DevOps approach has two main elements. 

First, developers have more visibility and responsibility for their code’s performance once released. Second, operations teams are getting involved in the earlier stages of development — defining infrastructure with code, building in shorter feedback loops, and working with developers to instrument code so that it can output signals about how it’s behaving once released. 

With richer insights into a system’s performance, developers can investigate issues more efficiently, make better coding decisions, and deploy changes faster.

Observability closely ties into the DevOps philosophy: it plays a central role in providing the insights that inform developers’ decisions. It depends on addressing matters traditionally owned by ops teams earlier in the development process.

What is full-stack observability?

Unlike monitoring, observability is not what you do. Instead, it’s a quality or property of a software system. A system is observable if you can ask questions about the data it emits to gain insight into how it behaves. Whereas monitoring focuses on a pre-determined set of questions — such as how many orders are completed or how many login attempts failed — with an observable system, you don’t need to define the question.

Instead, observability means that enough data is collected upfront allowing you to investigate failures and gain insights into how your software behaves in production, rather than adding extra instrumentation to your code and reproducing the issue. 

Once you have built an observable system, you can use the data emitted to monitor the current state and investigate unusual behaviors when they occur. Because the data was already collected, it’s possible to look into what was happening in the lead-up to the issue.

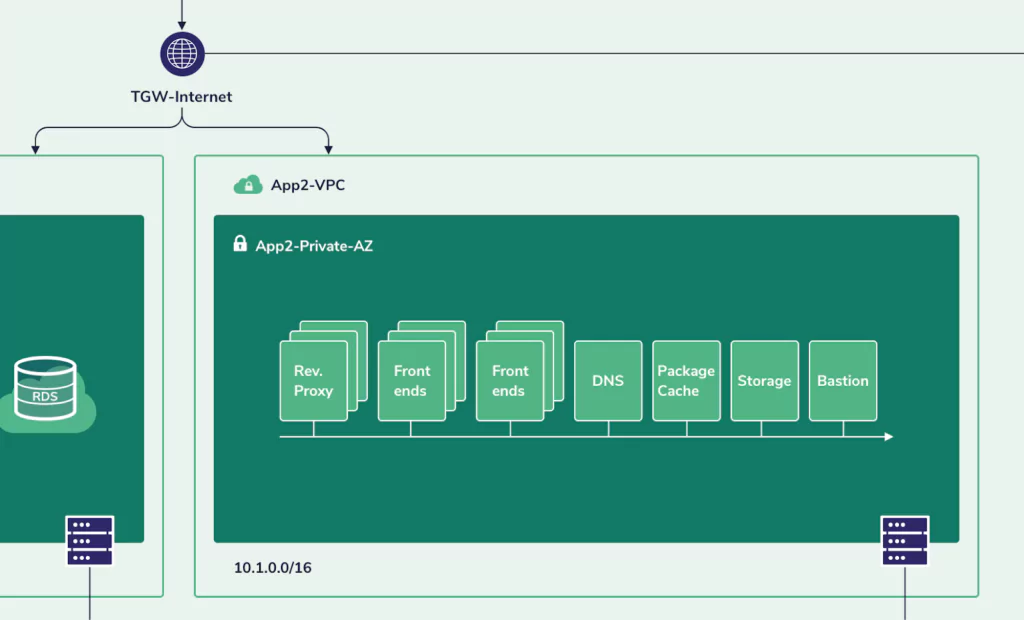
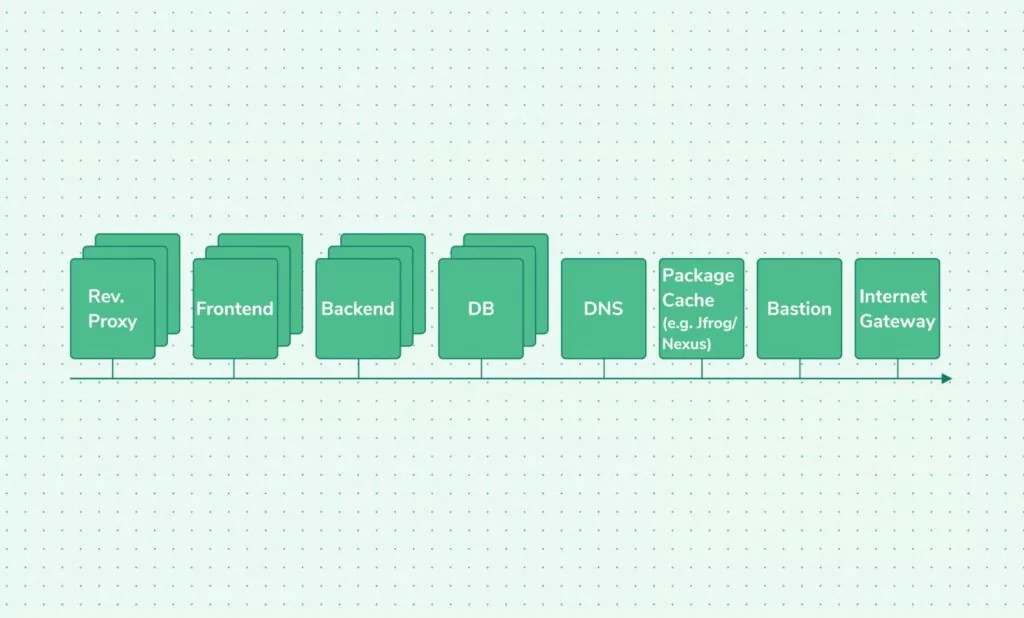
Full-stack observability refers to observability implemented at every layer of the technology stack. – From the containerized infrastructure on which your code is running and the communications between the individual services that make up the system, to the backend database, application logic, and web server that exposes the system to your users.

With full-stack observability, IT teams gain insight into the entire functioning of these complex, distributed systems. Because they can search, analyze, and correlate data from across the entire software stack, they can better understand the relationships and dependencies between the various components. This allows them to maintain systems more effectively, identify and investigate issues quickly, and provide valuable feedback on how the software is used.

So how do you build an observable system? The answer is by instrumenting your code to emit signals and collect telemetry centrally so that you can ask questions about how it’s behaving and why it’s running in production. The types of telemetry can be broken down into what is known as the “four pillars of observability”: metrics, logs, traces, and security data. 

Each pillar provides part of the picture, as we’ll discuss in more detail below. Ensuring these types of data are emitted and collating that information into a single observability platform makes it possible to observe how your software behaves and gain insights into its internal workings.

Deriving value from metrics

The first of our four pillars is metrics. These are time series of numbers derived from the system’s behavior. Examples of metrics include the average, minimum, and maximum time taken to respond to requests in the last hour or day, the available memory, or the number of active sessions at a given point in time.

The value of metrics is in indicating your system’s health. You can observe trends and identify any significant changes by plotting metric values over time. For this reason, metrics play a central role in monitoring tools, including those measuring system health (such as disk space, memory, and CPU availability) and those which track application performance (using values such as completed transactions and active users).

While metrics must be derived from raw data, the metrics you want to observe don’t necessarily have to be determined in advance. Part of the art of building an observable system is ensuring that a broad range of data is captured so that you can derive insights from it later; this can include calculating new metrics from the available data.

Gaining specific insights with logs

The next source of telemetry is logs. Logs are time-stamped messages produced by software that record what happened at a given point. Log entries might record a request made to a service, the response served, an error or warning triggered, or an unexpected failure. Logs can be produced from every level of the software stack, including operating systems, container runtimes, service meshes, databases, and application code.

Most software (including IaaS, PaaS, CaaS, SaaS, firewalls, load balancers, reverse proxies, data stores, and streaming platforms) can be configured to emit logs, and any software developed in-house will typically have logging added during development. What causes a log entry to be emitted and the details it includes depend on how the software has been instrumented. This means that the exact format of the log messages and the information they contain will vary across your software stack.

In most cases, log messages are classified using logging levels, which control the amount of information that is output to logs. Enabling a more detailed logging level such as “debug” or “verbose” will generate far more log entries, whereas limiting logging to “warning” or “error” means you’ll only get logs when something goes wrong. If log messages are in a structured format, they can more easily be searched and queried, whereas unstructured logs must be parsed before you can manipulate them programmatically.

Logs’ low-level contextual information makes them helpful in investigating specific issues and failures. For example, you can use logs to determine which requests were produced before a database query ran out of memory or which user accounts accessed a particular file in the last week. 

Taken in aggregate, logs can also be analyzed to extrapolate trends and detect past and real-time anomalies (assuming they are processed quickly enough). However, checking the logs from each service in a distributed system is rarely practical. To leverage the benefits of logs, you need to collate them from various sources to a central location so they can be parsed and analyzed in bulk.

Using traces to add context

While metrics provide a high-level indication of your system’s health and logs provide specific details about what was happening at a given time, traces supply the context. Distributed tracing records the chain of events involved in servicing a particular request. This is especially relevant in microservices, where a request triggered by a user or external API call can result in dozens of child requests to different services to formulate the response.

A trace identifies all the child calls related to the initiating request, the order in which they occurred, and the time spent on each one. This makes it much easier to understand how different types of requests flow through a system, so that you can work out where you need to focus your attention and drill down into more detail. For example, suppose you’re trying to locate the source of performance degradation. In that case, traces will help you identify where the most time is being spent on a request so that you can investigate the relevant service in more detail.

Implementing distributed tracing requires code to be instrumented so that trace identifiers are propagated to each child request (known as spans), and the details of each span are forwarded to a database for retrieval and analysis.

Adding security data to the picture

The final element of the observability puzzle is security data. Whereas the first three pillars represent specific types of telemetry, security data refers to a range of data, including network traffic, firewall logs, audit logs and security-related metrics, and information about potential threats and attacks from security monitoring platforms. As a result, security data is both broader and narrower than the first three pillars.

Security data merits inclusion as a pillar in its own right because of the crucial importance of defending against cybersecurity attacks for today’s enterprises. In the same way that the importance of building security into software has been highlighted by the term DevSecOps, including security as a pillar in its own right serves to highlight the role that observability plays in improving software security and the value to be had from bringing all available data into a single platform.

As with metrics, logs, and traces, security data comes from multiple sources. One of the side effects of the trend towards more distributed systems is an increase in the potential attack surface. With application logic and data spread across multiple platforms, the network connections between individual containers and servers and across public and private clouds have become another target for cybercriminals. Collating traffic data from various sources makes it possible to analyze that data more effectively to detect potential threats and investigate issues efficiently.

Using an observability platform

While these four types of telemetry provide valuable data, using each in isolation will not deliver the full benefits of observability. To answer questions about how your system is performing efficiently, you need to bring the data together into a single platform that allows you to make connections between data points and understand the complete picture. This is how an observability platform adds value.

Full-stack observability platforms provide a single source of truth for the state of your system. Rather than logging in to each component of a distributed system to retrieve logs and traces, view metrics, or examine network packets, all the information you need is available from a single location. This saves time and provides you with better context when investigating an issue so that you can get to the source of the problem more quickly.

Armed with a comprehensive picture of how your system behaves at all layers of the software stack, operations teams, software developers, and security specialists can benefit from these insights. Full-stack observability makes it easier for these teams to detect and troubleshoot production issues and monitor changes’ impact as they deploy.

Better visibility of the system’s behavior also reduces the risk associated with trialing and adopting new technologies and platforms, enabling enterprises to move fast without compromising performance, reliability, or security. Finally, having a shared perspective helps to break down siloes and encourages the cross-team collaboration that’s essential to a DevSecOps approach. 

An Introduction to Kubernetes Observability

If your organization is embracing cloud-native practices, then breaking systems into smaller components or services and moving those services to containers is an essential step in that journey. 

Containers allow you to take advantage of cloud-hosted distributed infrastructure, move and replicate services as required to ensure your application can meet demand, and take instances offline when they’re no longer needed to save costs.

Once you’re dealing with more than a handful of containers in production, a container orchestration platform becomes practically essential. Kubernetes, or K8s for short, has become the de-facto standard for container orchestration, with all major cloud providers offering K8s support and their own Kubernetes managed service.

With Kubernetes observability, you can automate your containers’ deployment, management, and scaling, making it possible to work with hundreds or thousands of containers and ensure reliable and resilient service. 

Fundamental to the design of Kubernetes is its declarative model: you define what you want the state of your system to be, and Kubernetes works to ensure that the cluster meets those requirements, automatically adding, removing, or replacing pods (the wrapper around individual containers) as required.  

The self-healing design can give the impression that observability and monitoring are all taken care of when you deploy with Kubernetes. Unfortunately, that’s not the case. While some things are handled automatically – like replacing failed cluster nodes or scaling services – Kubernetes observability still needs to be built in and used to ensure the health and performance of a K8s deployment.

Log data plays a central role in creating an observable system. By monitoring logs in real-time, you gain a better understanding of how your system is operating and can be proactive in addressing issues as they emerge, before they cause any real damage. This article will look at how Kubernetes observability can be built into your Kubernetes-managed cluster, starting at the bottom of the stack.

Observability for K8s infrastructure

As a container orchestration platform, Kubernetes handles the containers running your application workloads but doesn’t manage the underlying infrastructure that hosts those containers. 

A Kubernetes cluster consists of multiple physical and/or virtual machines (the cluster nodes) connected over a network. While Kubernetes will take care of deploying containers to the nodes (according to the declared configuration) and packing them efficiently, it cannot manage the nodes’ health.

Your cloud provider is responsible for keeping servers online and providing computing resources on demand in a public cloud context. However, to avoid the risk of a huge bill, you’ll want to keep an eye on your usage – and potentially set quotas – to prevent auto-scaling and elastic resources from running wild. If you’ve set quotas, you’ll need to monitor your usage and be ready to provision additional capacity as demand grows.

If you’re running Kubernetes on a private cloud or on-premise infrastructure, monitoring the health of your servers – including disk space, memory, and CPU – and keeping them patched and up-to-date is essential. 

Although Kubernetes will take care of moving pods to healthy nodes if a machine fails, with a fixed set of resources, that approach can only stretch so far before running out of server nodes. To use Kubernetes’ self-healing and auto-scaling features to the best effect, you must ensure sufficient cluster nodes are online and available at all times.

Using Kubernetes’ metrics and logs

Once you’ve considered the observability of the servers hosting your Kubernetes cluster, the next layer to consider is the Kubernetes deployment itself. 

Although Kubernetes is self-healing, it is still dependent on the configuration you specify; by getting visibility into how your cluster is being used, you can identify misconfigurations, such as faulty replica sets, and spot opportunities to streamline your setup, like underused nodes.

As you might expect, the various components of Kubernetes each emit log messages so that the inner workings of the system can be observed. This includes:

  • kube-apiserver – This serves the REST API that allows you, as an end-user, to communicate with the cluster components via kubectl or a GUI application, and enables communication between control plane components over gRPC. The API server logs include details of error messages and requests. Monitoring these logs can alert you to early signs of the server needing to be scaled out to accommodate increased load or issues down the pipeline that are slowing down the processing of incoming requests.
  • kube-scheduler – The scheduler assigns pods to cluster nodes according to configuration rules and node availability. Unexpected changes in the number of pods assigned could signify a misconfiguration or issues with the infrastructure hosting the pods.
  • kube-controller-manager – This runs the controller processes. Controllers are responsible for monitoring the status of the different elements in a cluster, such as nodes or endpoints, and moving them to the desired state when needed. By monitoring the controller manager over time, you can determine a baseline for normal operations and use that information to spot increases in latency or retries. This may indicate something is not working as expected.

The Kubernetes logging library, klog, generates log messages for these system components and others, such as kubelet. Configuring the log verbosity allows you to control whether logs are only generated for critical or error states or lower severity levels too. 

While you can view log messages from the Kubernetes CLI, kubectl, forwarding logs to a central platform allows you to gain deeper insights. By building up a picture of the log data over time, you can identify trends and compare these to the latest data in real-time, using it to identify changes in cluster behavior.

Monitoring a Kubernetes-hosted application

In addition to the cluster-level logging, you need to generate logs at the application level for full observability of your system. Kubernetes observability ensures your services are available, but it lacks visibility or understanding of your application logic. 

Instrumenting your code to generate logs at appropriate severity levels makes it possible to understand how your application is behaving at runtime and can provide essential clues when debugging failures or investigating security issues.

Once you’ve enabled logging into your application, the next step is to ensure those logs are stored and available for analysis. By their very nature, containers are ephemeral – spun up and taken offline as demand requires. 

Kubernetes stores the logs for the current pods and the previous pods on a given node, but if a pod is created and removed multiple times, the earlier log data is lost. 

As log data is essential for determining what normal behavior looks like, investigating past incidents and for audit purposes, it’s a good idea to consider shipping logs to a centralized platform for storage and analysis.

The two main patterns for shipping logs from Kubernetes are to use either a node logging agent or a sidecar logging agent:

  • With a node logging agent, the agent is installed on the cluster node (the physical or virtual server) and forwards the logs for all pods on that node.
  • With a sidecar logging agent, each pod holds the application container together with a sidecar container hosting the logging agent. The agent forwards all logs from the container.

Once you’ve forwarded your application logs to a log observability platform, you can start analyzing the log data in real-time. Tracking business metrics, such as completed transactions or order quantities, can help to spot unusual patterns as they begin to emerge. 

Monitoring these alongside lower-level application, cluster, and infrastructure health data makes it easier to correlate data and drill down into the root cause of issues.

Summary

While Kubernetes offers many benefits when running distributed, complex systems, it doesn’t prevent the need to build observability into your application and monitor outputs from all levels of the stack to understand how your system is behaving. 

With Coralogix, you can perform real-time analysis of log data from each part of the system to build a holistic view of your services. You can forward your logs using Fluentd, Fluent-Bit, or Filebeat, and use the Coralogix Kubernetes operator to apply log parsing and alerting features to your Kubernetes deployment natively using Kubernetes custom resources.

An Introduction to Windows Event Logs

The value of log files goes far beyond their traditional remit of diagnosing and troubleshooting issues reported in production. 

They provide a wealth of information about your systems’ health and behavior, helping you spot issues as they emerge. By aggregating and monitoring log file data in real-time, you can proactively monitor your network, servers, user workstations, and applications for signs of trouble.

In this article, we’re looking specifically at Windows event logs – also known as system logs – from how they are generated to the insights they can offer, particularly in the all-important security realm.

Logging in Windows

If you’re reading this, your organization will likely run Windows on at least some of your machines. Windows event logs come from the length and breadth of your IT estate, whether that’s employee workstations, web servers running IIS, cluster managers enabling highly available services, Active Directory or Exchange servers, or databases running on SQL Server.

Windows has a built-in tool for viewing log files from the operating system and the applications and services running on it. 

Windows Event Viewer is available from the Control Panel’s Administrative Tools section or by running “eventvwr” from the command prompt. From Event Viewer, you can view the log files generated on the current machine and any log files forwarded from other machines on the network.

When you open Event Viewer, choose the log file you want to view (such as application, security, or system). A list of the log entries is displayed together with the log level (critical, error, warning, information, verbose). 

As you might expect, you can sort and filter the list by parameters such as date, source, and severity level. Selecting a particular log entry displays the details of that entry.

When using audit policies, you can control the types of logged events. Suppose you aim to identify and stop cyber-attacks at the earliest opportunity. In that case, it’s essential to apply your chosen policy settings to all machines in your organization, including individual workstations, as hackers often target these. 

Furthermore, if you’re responsible for archiving event logs for audit or regulatory purposes, ensure you check the properties for each log file and configure the log file location, retention period, and overwrite settings.

Working with windows event logs

Although Event Viewer gives you access to your log data, you can only view entries for individual machines, and you need to be logged into the machine in question to do so. 

However, for all but the most minor operations, logging into or connecting to individual machines to view log files regularly is impractical. 

At best, you can use this method to investigate past security incidents or diagnose known issues, but you miss out on the opportunity to use log data to spot early signs of trouble.

If you want to leverage log data for proactive monitoring of your systems and to perform early threat detection, you first need to forward your event logs to a central location and then analyze them in real-time. 

There are various ways to do this, including using Windows Event Forwarding to set up a subscription or installing an agent on devices to ship logs to your chosen destination.

Forwarding your logs to a central server also simplifies the retention and backup of log files. This is particularly helpful if regulatory schemes, like HIPAA, require storing log entries for several years after they were generated.

Monitoring events

When using log data proactively, it pays to cast a wide net. The types of events that can signal something unexpected or indicate a situation that deserves close monitoring include:

  • Any change in the Windows Firewall configuration. As all planned changes to your setup should be documented, anything unexpected should trigger alarm bells.
  • Any change to user groups or accounts, including creating new accounts. Once an attacker has compromised an account, they may try to increase their privileges.
  • Successful or failed login attempts and remote desktop connections, mainly if these are outside business hours or from unexpected IP addresses or locations.
  • Password lockouts. These may indicate a brute force attempt, so it’s always worth identifying the machine in question and further investigating whether it was just an honest mistake.
  • The application allows listing. Keep an eye out for scripts and processes that don’t usually run on your systems, as these may be added to facilitate an attack.
  • Changes to file system permissions. Look for changes to root directories or system files that should not routinely be modified.
  • Changes to the registry. While you can expect some registry keys, such as recently used files, to change regularly, others, such as those controlling the programs that run on startup, could indicate something more sinister. Similarly, any changes to permissions to the password hash store should be investigated.
  • Changes to audit policies. Hackers can ensure future activity stays under the radar by changing what events are logged.
  • Clearing event logs. It’s not uncommon for attackers to cover their tracks. If logs are being deleted locally, it’s worth finding out why (while breathing a sigh of relief, you had the entries forwarded to a central location automatically and haven’t lost any data).

While the above is an exhaustive list, it demonstrates that you should set your Windows audit policies to log more than just failures.

Wrapping up

Windows event log analysis can capture a wide range of activities and provide valuable insights into the health of your system. 

We’ve discussed some events to look out for and which you may want to be alerted to automatically. Still, cybersecurity is a constantly moving target, with new attack vectors emerging. You must continuously be on the lookout for anything unusual to protect your organization.

By collating your Windows event logs in a central location and applying machine learning, you can offload much effort to detect anomalies. Coralogix uses machine learning to detect unusual behavior while filtering out false positives. Learn more about log analytics with Coralogix, or start shipping your Windows Event logs now.

Coralogix’s Streama Technology: The Ultimate Party Bouncer

Coralogix is not just another monitoring or observability platform. We’re using our unique Streama technology to analyze data without needing to index it so teams can get deeper insights and long-term trend analysis without relying on expensive storage. 

So you’re thinking to yourself, “that’s great, but what does that mean, and how does it help me?” To better understand how Streama improves monitoring and troubleshooting capabilities, let’s have some fun and explore it through an analogy that includes a party, the police, and a murder!

Grab your notebook and pen, and get ready to take notes. 

Not just another party 

Imagine that your event and metric data are people, and the system you use to store that data is a party. To ensure that everyone is happy and stays safe, you need a system to monitor who’s going in, help you investigate, and remediate any dangerous situations that may come up. 

For your event data, that would be some kind of log monitoring platform. For the party, that would be our bouncer.

Now, most bouncers (and observability tools) are concerned primarily with volume. They’re doing simple ticket checks at the door, counting people as they come in, and blocking anyone under age from entering. 

As the party gets more lively, people continue coming in and out, and everyone’s having a great time. But imagine what happens if, all of a sudden, the police show up and announce there’s been a murder. Well, shit, there goes your night! Don’t worry, stay calm – the bouncer is here to help investigate. 

They’ve seen every person who has entered the room and can help the police, right?

Why can’t typical bouncers keep up?

Nothing ever goes as it should, this much we know. Crimes are committed, and applications have bugs. The key, then, is how we respond when something goes wrong and what information we have at our disposal to investigate.

Suppose a typical bouncer is monitoring our party, and they’re just counting people as they come in and doing a simple ID check to make sure they’re old enough to enter. In that case, the investigation process starts only once the police show up. At this point, readily-available information is sparse. You have all of these people inside, but you don’t have a good idea of who they are.

This is the biggest downfall of traditional monitoring tools. All data is collected in the same way, as though it carries the same potential value, and then investigating anything within the data set is expensive. 

The police may know that the suspect is wearing a black hat, but they still need to go in and start manually searching for anyone matching that description. It takes a lot of time and can only be done using the people (i.e., data) still in the party (i.e., data store). 

Without a good way to analyze the characteristics of people as they’re going in and out, our everyday bouncer will have to go inside and count everyone wearing a black hat one by one. As we can all guess, this will take an immense amount of time and resources to get the job done. Plus, if the suspect has already left, it’s almost like they were never there.

What if the police come back to the bouncer with more information about the suspect? It turns out that in addition to the black hat, they’re also wearing green shoes. With this new information, this bouncer has to go back into the party and count all the people with black hats AND green shoes. It will take him just as long, if not longer, to count all of those people again.

What makes Streama the ultimate bouncer?

Luckily, Streama is the ultimate bouncer and uses some cool tech to solve this problem.

Basically, Streama technology differentiates Coralogix from the rest of the bunch because it’s a bouncer that can comprehensively analyze the people as they go into the party. For the sake of our analogy, let’s say this bouncer has Streama “glasses,” which allow him to analyze and store details about each person as they come in.

Then, when the police approach the bouncer and ask for help, he can already provide some information about the people at the party without needing to physically go inside and start looking around.

If the police tell the bouncer they know the murderer had on a black hat, he can already tell them that X number of people wearing a black hat went into the party. Even better, he can tell them that without those people needing to be inside still! If the police come again with more information, the bouncer can again give them the information they need quite easily.  

In some cases, the bouncer won’t have the exact information needed by the police. That’s fine, they can still go inside to investigate further if required. By monitoring the people as they go in, though, the bouncer and the police can save a significant amount of time, money, and resources in most situations.

Additional benefits of Streama

Since you are getting the information about the data as it’s ingested, it doesn’t have to be kept in expensive hot storage just in case it’s needed someday. With Coralogix, you can choose to only send critical data to hot storage (and with a shorter retention period) since you get the insights you need in real-time and can always query data directly from your archive.

There are many more benefits to monitoring data in-stream aside from the incredible cost savings. However, that is a big one.

Data enrichment, dynamic alerting, metric generation from log data, data clustering, and anomaly detection occur without depending on hot storage. This gives better insights at a fraction of the cost and enables better performance and scaling capabilities. 

Whether you’re monitoring an application or throwing a huge party, you definitely want to make sure Coralogix is on your list!

3 Metrics to Monitor When Using Elastic Load Balancing

One of the benefits of deploying software on the cloud is allocating a variable amount of resources to your platform as needed. To do this, your platform must be built in a scalable way. The platform must be able to detect when more resources are required and assign them. One method of doing this is the Elastic Load Balancer provided by AWS. 

Elastic load balancing will distribute traffic in your platform to multiple, healthy targets. It can automatically scale according to changes in your traffic. To ensure scaling has appropriate settings and is being delivered cost-effectively, developers need to track metrics associated with the load balancers. 

Available Elastic Load Balancers

AWS elastic load balancers work with several AWS services. AWS EC2, ECS, Global Accelerator, and Route 53 can all benefit from using elastic load balancers to route traffic. Monitoring can be provided by AWS CloudWatch or third-party analytics services such as Coralogix’s log analytics platform. Each load balancer available is used to route data at a different level of the Open Systems Interconnection (OSI) model. Where the routing needs to occur strongly determines which elastic load balancer is best-suited for your system.

Application Load Balancers

Application load balancers, route events at the application layer, the seventh and highest layer of the OSI model. The load balancer component becomes the only point of contact for clients so it can appropriately route traffic. Routing can occur across multiple targets and multiple availability zones. The listener checks for requests sent to the load balancer, and routes traffic to a target group based on user-defined rules. Each rule includes a priority, action, and one or more conditions. Target groups route requests to one or more targets. Targets can include computing tasks like EC2 instances or Fargate Tasks deployed using ECS.

Developers can configure checks for target health. If this is in place, the load balancer will only be able to send requests to healthy targets, further stabilizing your system when a sufficient number of registered targets are provided.

Classic Load Balancers

Classic load balancers distribute traffic for only EC2 instances working on the transport and application OSI layers. The load balancer component is the only point of contact for clients, just as it is in application load balancers. EC2 instances can be added and removed as needed without disrupting request flows. The listener checks for requests sent to the load balancer and sends them to registered instances using a user-configured protocol and port values.

Classic load balancers can also be configured to detect unhealthy EC2 instances. They can route traffic only to healthy instances, stabilizing your platform.

Network Load Balancers

Network load balancers route events at the transport layer, the fourth layer of the OSI model. It has a very high capacity to scale requests and allows millions of requests per second. The load balancer component receives connection requests and selects targets from the user-defined ruleset. It then will open connections to selected targets on the port specified. Network load balancers handle TCP and UDP traffic using flow hash algorithms to determine individual connections.

The load balancers may be enabled to work within a certain availability zone where targets can only be registered in the same zone as the load balancer. Load balancers may also be registered as cross-zone where traffic can be sent to targets in any enabled availability zone. Using the cross-zone feature adds more redundancy and fault tolerance to your system. If targets in a single zone are not healthy, traffic is automatically directed to a different, healthy zone. Health checks should be configured to monitor and ensure requests are sent to only healthy targets.

Gateway Load Balancers

Gateway load balancers, route events at the network layer, the third layer of the OSI model. These load balancers are used to deploy, manage and scale virtual services like deep packet inspection systems and firewalls. They can distribute traffic while scaling virtual appliances with load demands.

Gateway load balancers must send traffic across VPC boundaries.They use specific endpoints set up only for gateway load balancer to accomplish this securely. These endpoints are VPC endpoints that provide a private connection between the virtual appliances in the provider VPC and the application servers in the consumer VPCs. AWS provides a list of supported partners that offer security appliances, though users are free to configure using other partners. 

Metrics Available

Metrics are measured on AWS every 60 seconds when requests flow through the load balancer. No metrics will be seen if the load balancer is not receiving traffic. CloudWatch intercepts and logs the metrics. You can create manual alarms in AWS or send the data to third-party services like Coralogix, where machine learning algorithms can provide insights into the health of your endpoints. 

Metrics are provided for different components of the elastic load balancers. The load balancer, target, and authorization components have their own metrics. This list is not exhaustive but contains some of the metrics considered especially useful in observing the health of your load balancer network.

Load Balancer Metrics

These metrics are all for statistics originating from the load balancers directly and do not include responses generated from targets which are provided separately. 

Statistical Metrics

Load balancer metrics show how the load balancer endpoint component is functioning. 

  • ActiveConnectionCount: The number of active TCP connections at any given time. These include connections between the client and load balancer as well as between load balancer and target. This metric should be watched to make sure your load balancer is scaling to meet your needs at any given time.
  • ConsumedLCUs: The number of load balancer capacity units used at any given time. This determines the cost of the load balancer and should be watched closely to track associated costs.
  • ProcessedBytes: The number of bytes the load balancer has processed over a period of time. This includes traffic over both IPv4 and IPv6 and includes traffic between the load balancer and clients, identity providers, and AWS Lambda functions.

HTTP Metrics

AWS provides several HTTP-specific metrics for each load balancer. Developers configure rules that determine how the load balancer will respond to incoming actions. Some of these rules will generate unique metrics so teams can count the number of events that trigger each rule type. The numbered HTTP metrics are also available from targets.

  • HTTP_Fixed_Response_Count: Fixed response actions return custom HTTP response codes and can include a message optionally. This metric is the number of successful fixed-response actions over a given period of time. 
  • HTTP_Redirect_Count: Redirect actions will redirect client requests from the input URL to another. These can be temporary or permanent, depending on the setup. This metric is the number of successful redirect actions over a period of time.
  • HTTP_Redirect_Url_Limit_Exceeded_Count: The redirect response location is returned in the response’s header data and has a maximum size of 8K Bytes. This error metric will log the number of redirect events that failed because the URL exceeded this size limit. 
  • HTTPCode_ELB_3XX_Count: The number of redirect codes originating from the load balancer. 
  • HTTPCode_ELB_4XX_Count: The number of 4xx HTTP errors originating from the load balancer. These are malformed or incomplete requests that the load balancer could not forward to the target. 
  • HTTPCode_ELB_5XX_Count: The number of 5xx HTTP errors originating from the load balancer. Internal errors in the load balancer cause these. Metrics are also available for some specific 5XX errors (500, 502, 503, and 504). 

Error Metrics

  • ClientTLSNegotiationErrorCount: The number of connection requests initiated by the client did not connect to the load balancer due to a TLS protocol error. Issues like an invalid server certificate could cause this.
  • DesyncMitigationMode_NonCompliant_Request_Count: The number of requests that fail to comply with HTTP protocols

Target Metrics

Target metrics are logged for each target sent traffic from the load balancer. Targets provide all the listed HTTP code metrics provided for load balancers and those listed below.

  • HealthHostCount: The number of healthy targets linked to a load balancer.
  • RequestCountPerTarget: The average number of requests sent to a specific target in a target group. This metric applies to any target type connected to the load balancer except AWS Lambda.
  • TargetResponseTime: The number of seconds between when the request leaves the load balancer to when the target receives the request.

Authorization Metrics

Authorization metrics are essential for detecting potential attacks on your system. Many error metrics especially can show that nefarious calls are made against your endpoints. These metrics are critical to observe and set alarms when using Elastic load balancers.

Statistical Metrics

Some Authorization metrics are used to track the usage of the elastic load balancer. These include the following metrics

  • ELBAuthLatency: The time taken to query the identity provider for user information and the ID token. This latency will either be the time to return the token when successful or the time to fail.
  • ELBAuthRefreshTokenStatus: The number of times a refresh token is successfully used to provide a new ID token.

Error Metrics

There are three error metrics associated with authorization on elastic load balancers. Exact errors can be read in AWS Cloudwatch logs in the error_reason parameter.

  • ELBAuthError: This metric is used for errors such as malformed authentication actions when a connection cannot be established with the identity provider, or another internal authentication error occurred.
  • ELBAuthFailure: Authentication failures occur when identity provider access is denied to the user, or an authorization code is used multiple times.
  • ELBAuthUserClaimsSizeExceeded: This metric shows how many times the identity provider returned user claims larger than 11K Bytes. Most browsers limit cookie sizes to 4K Bytes. When a cookie is more significant than 4K, AWS ELB logs will use separate shards to handle the size. Anything up to 11K is allowed, but larger cannot be handled and will throw a 500 error.

Summary

AWS elastic load balancers scale traffic from endpoints into your platform. It allows companies to truly scale their backend and ensure the needs of their customers are always met by providing the resources needed to support those customers are available. Elastic load balancers are available for scaling at different levels of the OSI networking model. 

Developers can use all or some of the available metrics to analyze the traffic flowing through and the health of their elastic load balancer setup and its targets. Separate metrics are available for the load balancer, its targets, and authorization setup. Metrics can be manually checked using AWS CloudWatch. They can also be sent to external analytics tools to alert development teams when there may be problems with the system.

IoT Security: How Important are Logs for System?

IoT has rapidly moved from a fringe technology to a mainstream collection of techniques, protocols, and applications that better enable you to support and monitor a highly distributed, complex system. One of the most critical challenges to overcome is processing an ever-growing stream of analytics data, from IoT security data to business insights, coming from each device. Many protocols have been implemented for this, but could logs provide a powerful option for IoT data and IoT monitoring?

Data as the unit of currency

The incredible power of a network of IoT devices comes from the sheer volume and sophistication of the data you can gather. All of this data can be combined and analyzed to create actionable insights for your business and operations teams. This data is typically time-series data, meaning that snapshots of values are taken at time intervals. For example, temperature sensors will regularly broadcast updated temperatures with an associated timestamp. Another example might be the number of requests to non-standard ports when you’re concerned with IoT security. The challenge is, of course, how to transmit this much data to a central server, where it can be processed. IoT data collection typically produces a large volume of information for a centralized system to process.

The thing is, this is already a very well-understood problem in the world of log analytics. We typically have hundreds, if not thousands, of sources (virtual machines, microservices, operating system logs, databases, load balancers, and more) that are constantly broadcasting information. IoT software doesn’t pose any new challenges here! Conveniently, logs are almost always broadcast with an associated timestamp too. Rather than reinventing the wheel, you can simply use logs as your vehicle for transmitting your IoT data to a central location.

Using the past to predict the future

When your data is centralized, you can also begin to make predictions. For example, in the world of IoT security, you may wish to trigger alarms when certain access logs are detected on your IoT device because they may be the footprint of a malicious attack. In a business context, you may wish to conclude certain trends in your measurements, for example, if the temperature has begun to increase on a thermostat sharply, and its current trajectory means it’s going to exceed operational thresholds soon. It’s far better to tell the user before it happens than after it has already happened.

This is regularly done with log analytics and metrics. Rather than introducing highly complex and sophisticated time-series databases into your infrastructure, why not leverage the infrastructure you already have?

You’ll need your observability infrastructure anyway!

When you’re building out your complex IoT system, you’re inevitably going to need to build out your observability stack. With such a complex, distributed infrastructure, IoT monitoring and the insights it brings will be essential in keeping your system working. 

This system will need to handle a high volume of traffic and will only increase when your logging system is faced with the unique challenges of IoT software. For example, logs indicate the success of a firmware rollout across thousands of devices worldwide. This is akin to having thousands of tiny servers that must be updated. Couple that with the regular operating logs that a single server can produce, which should put your IoT monitoring challenge into perspective. 

Log analytics provide a tremendous amount of information and context that will help you get to the bottom of a problem and understand the overall health of your system. This is even more important when you consider that your system could span across multiple continents, with varying degrees of connectivity, and these devices may be moving around, being dropped, or worse! Without a robust IoT monitoring stack that can process the immense volumes associated with IoT data collection, you’re going to be left confused as to why a handful of your devices have just disappeared.

Improving IoT Security

With this increased observability comes the power to detect and mitigate security threats immediately. Take the recent Log4Shell vulnerability. These types of vulnerabilities that exist in many places are challenging to track and mitigate. With a robust observability system optimized for the distributed world of IoT security, you will already have many of the tools you need to avoid these kinds of serious threats.

Your logs are also in place for as long as you like, with many long-term archiving options if you need them. This means that you can respond instantly, and you can reflect on your performance in the long term, giving you vital information to inspect and adapt your ways of working. 

Conclusion

IoT security, observability, and operational success are a delicate balance to achieve, but what we’ve explored here is the potential for log analytics to take a much more central role than simply an aspect of your monitoring stack. A river of information, from your devices, can be analyzed by a wealth of open source and SaaS tools and provide you with actionable insights that can be the difference between success and failure.

Optimized Traffic Mirroring Examples – Part 2

In a previous post, we looked at an example of a fictional bookstore company and recommended mirroring strategies for that specific scenario. In this post, we’ll be looking at a fictional bank and recommended mirroring strategies for their network traffic.

For a list of the most commonly used strategies, check out our traffic mirroring tutorial.

GoldenBank

In this scenario, the client is running two different services, in two different private VPCs. The two VPCs cannot communicate with each other. The reverse proxies handle the majority of the traffic and perform basic request validations such as URIs and web methods and possibly also parameters type validation and then forward the request to the frontend servers.

Unlike the previous scenario, the connection between the reverse proxy and the frontend servers is also encrypted in TLS. The frontend servers perform business context validation of the requests and then process them by sending requests to the backend servers.

Close-up App1

Close-up App2

The backend servers in app1 rely on a storage server, while the backend servers of app2 rely on an AWS RDS service.

Following are the details of the security groups of all instances in both applications’ VPCs:

VPC App1

Rev Proxy

(No public IP)

FromToServiceStatus
anyanyHTTP/tcpAllow
anyanyHTTPS/tcpAllow
10.0.0.0/16FrontendHTTPS/tcpAllow
10.0.0.0/16anyNTP/udpAllow
BastionanySSH/tcpAllow
10.0.0.0/16DNSDNS/udpAllow
10.0.0.0/16Packages CacheHTTP/tcp, HTTPS/tcpAllow

Frontend

(No public IP)

FromToServiceStatus
Rev. Proxy10.0.0.0/16HTTPS/tcpAllow
10.0.0.0/16BackendCustom ports setAllow
10.0.0.0/16anyNTP/udpAllow
BastionanySSH/tcpAllow
10.0.0.0/16DNSDNS/udpAllow
10.0.0.0/16Packages CacheHTTP/tcp, HTTPS/tcpAllow

Backend

(No Public IP)

FromToServiceStatus
Frontend10.0.0.0/16Custom ports setAllow
10.0.0.0/16StorageNFS/udpAllow
10.0.0.0/16StorageNFS/tcpAllow
10.0.0.0/16anyNTP/udpAllow
BastionanySSH/tcpAllow
10.0.0.0/16DNSDNS/udpAllow
10.0.0.0/16Packages CacheHTTP/tcp, HTTPS/tcpAllow

Storage

(No Public IP)

FromToServiceStatus
Backend10.0.0.0/16NFS/udpAllow
Backend10.0.0.0/16NFS/tcpAllow
10.0.0.0/16anyNTP/udpAllow
BastionanySSH/tcpAllow
10.0.0.0/16DNSDNS/udpAllow
10.0.0.0/16Packages CacheHTTP/tcp, HTTPS/tcpAllow

DNS

(No Public IP)

FromToServiceStatus
10.0.0.0/16anyDNS/udpAllow
10.0.0.0/16anyNTP/udpAllow
BastionanySSH/tcpAllow
10.0.0.0/16Packages CacheHTTP/tcp, HTTPS/tcpAllow

Package Cache

(No Public IP)

10.0.0.0/16anyHTTP/tcp, HTTPS/tcpAllow
10.0.0.0/16anyNTP/udpAllow
BastionanySSH/tcpAllow
10.0.0.0/16DNSDNS/udpAllow

Here are our visibility recommendations for similar networks:

Reverse Proxies and Front-end servers

Outbound

Rule numberDescriptionRule actionProtocolSource port rangeDestination port rangeSource CIDR blockDestination CIDR block
100Monitor everything *acceptAll protocols0.0.0.0/00.0.0.0/0

* Even though most of the traffic is encrypted since it would include responses to client requests, the outbound traffic is still extremely valuable. It can indicate the size of the data being sent to the client and assist in detecting large data leaks, it can detect connections originating from the reverse proxy itself and help detect command and control connections, it can also detect connections or connection attempts to other servers other than the frontend servers which can detect lateral movement.

Inbound

Rule numberDescriptionRule actionProtocolSource port rangeDestination port rangeSource CIDR blockDestination CIDR block
100Drop HTTPS*rejectTCP4430.0.0.0/010.0.0.0/16
200Monitor everything elseacceptAll protocols0.0.0.0/00.0.0.0/0

* Since the incoming traffic on HTTPS is encrypted, the only thing it can indicate is its volume over time which can indicate certain types of DoS or DDoS and also the validity of the certificates used. So if the traffic volume is expected to be high, we would recommend excluding this traffic.

Backend servers

Since the frontend servers are contacting these servers with requests that are supposed to be valid after the checks done by the proxy and frontend servers, the traffic volume is expected to be significantly lower than traffic volume to the proxy and frontend servers.

Also, since this is the last chance to detect malicious traffic before it reaches the database, we believe that all traffic from these servers should be mirrored. However, if this is still too expensive for your organization, we would recommend that you use the following mirroring configuration to at least be able to tell if a backend server is behaving abnormally which may indicate that it has already been breached:

Outbound

Rule numberDescriptionRule actionProtocolSource port rangeDestination port rangeSource CIDR blockDestination CIDR block
100Exclude file service activity **rejectTCPNFS10.0.0.0/1610.0.0.0/16
200Exclude file service activity **rejectUDPNFS10.0.0.0/1610.0.0.0/16
300Monitor everything *acceptAll protocols0.0.0.0/00.0.0.0/0

* – Although this rule will also mirror the server’s responses to frontend requests we do recommend that you mirror it since it might also contain HTTPS connections initiated by malware running on the proxy servers to command and control servers. Also, this might include unintended responses that will indicate that an attack (such as XSS or SQL Injection) took place.

** – Since the filesystem activity is usually heavy, we would recommend you avoid mirroring this type of traffic unless it is highly valuable in your application or network architecture.

Inbound

Rule numberDescriptionRule actionProtocolSource port rangeDestination port rangeSource CIDR blockDestination CIDR block
100Monitor everything elseacceptAll protocols0.0.0.0/00.0.0.0/0

Storage Servers

Outbound

Rule numberDescriptionRule actionProtocolSource port rangeDestination port rangeSource CIDR blockDestination CIDR block
100Exclude file service activity *rejectTCPNFS10.0.0.0/1610.0.0.0/16
200Exclude file service activity *rejectUDPNFS10.0.0.0/1610.0.0.0/16
300Monitor everythingacceptAll protocols0.0.0.0/00.0.0.0/0

DNS server

Since this server generates a very minimal amount of traffic that is so extremely valuable for detecting so many types of attacks we recommend that you would mirror all traffic in and out of this server.

Package cache server

Since this server is responsible for packages installations on all other servers, the data from and to this server can answer questions like who installed what and when, which can be crucial in a forensic investigation and for detecting installation of malicious tools on the server.

Also, the traffic volume from and to this server is expected to be quite low. Therefore, we recommend that you would mirror all traffic in and out of this server.

Bastion server

Since this server is serving as the only way to manage all other servers, provided that it is being used to update the code on the various servers, install required packages, etc., the traffic volume should be relatively low and the value of the data it can provide is extremely high and therefore we recommend that you would mirror all traffic in and out of this server.

VPC App2

Rev Proxy

(No Public IP)

anyanyHTTP/tcpAllow
anyanyHTTPS/tcpAllow
10.1.0.0/16FrontendHTTPS/tcpAllow
10.1.0.0/16anyNTP/udpAllow
BastionanySSH/tcpAllow
10.1.0.0/16DNSDNS/udpAllow
10.1.0.0/16Packages CacheHTTP/tcp, HTTPS/tcpAllow

Frontend

(No Public IP)

Rev. Proxy10.1.0.0/16HTTPS/tcpAllow
10.1.0.0/16BackendCustom ports setAllow
10.1.0.0/16anyNTP/udpAllow
BastionanySSH/tcpAllow
10.1.0.0/16DNSDNS/udpAllow
10.1.0.0/16Packages CacheHTTP/tcp, HTTPS/tcpAllow

Backend

(No Public IP)

Frontend10.0.0.0/16Custom ports setAllow
10.1.0.0/16RDSDB portsAllow
10.1.0.0/16anyNTP/udpAllow
BastionanySSH/tcpAllow
10.1.0.0/16DNSDNS/udpAllow
10.1.0.0/16Packages CacheHTTP/tcp, HTTPS/tcpAllow

RDS

(No Public IP)

Backend10.1.0.0/16DB portsAllow
10.1.0.0/16anyNTP/udpAllow
BastionanySSH/tcpAllow
10.1.0.0/16DNSDNS/udpAllow
10.1.0.0/16Packages CacheHTTP/tcp, HTTPS/tcpAllow

DNS

(No Public IP)

10.1.0.0/16anyDNS/udpAllow
10.1.0.0/16anyNTP/udpAllow
BastionanySSH/tcpAllow
10.1.0.0/16Packages CacheHTTP/tcp, HTTPS/tcpAllow

Package Cache

(No Public IP)

10.1.0.0/16anyHTTP/tcp, HTTPS/tcpAllow
10.1.0.0/16anyNTP/udpAllow
BastionanySSH/tcpAllow
10.1.0.0/16DNSDNS/udpAllow

This network architecture is quite complex and would require an approach that would combine multiple data sources to provide proper security for it. In addition, it involves traffic that is completely encrypted, storage servers that are contacted via encrypted connections, and also AWS services that cannot be mirrored to the STA.

Here are our visibility recommendations for similar networks:

Reverse Proxies and Front-end servers

Outbound

Rule numberDescriptionRule actionProtocolSource port rangeDestination port rangeSource CIDR blockDestination CIDR block
100Monitor everything *acceptAll protocols0.0.0.0/00.0.0.0/0

* Even though most of the traffic is encrypted since it would include responses to clients requests, the outbound traffic is still extremely valuable. It can indicate the size of the data being sent to the client and assist in detecting large data leaks, it can detect connections originating from the reverse proxy itself and help detect command and control connections, it can also detect connections or connection attempts to other servers other than the frontend servers which can detect lateral movement.

Inbound

Rule numberDescriptionRule actionProtocolSource port rangeDestination port rangeSource CIDR blockDestination CIDR block
100Drop HTTPS*rejectTCP4430.0.0.0/010.1.0.0/16
200Monitor everything elseacceptAll protocols0.0.0.0/00.0.0.0/0

* Since the incoming traffic on HTTPS is encrypted, the only thing it can indicate is its volume over time which can indicate certain types of DoS or DDoS and also the validity of the certificates used. So if the traffic volume is expected to be high, we would recommend excluding this traffic.

Backend servers

Outbound

Rule numberDescriptionRule actionProtocolSource port rangeDestination port rangeSource CIDR blockDestination CIDR block
100Monitor everything *acceptAll protocols0.0.0.0/00.0.0.0/0

* – Since this server is expected to communicate with the RDS service, we would recommend mirroring all the traffic from this instance as this will allow the detection of database-related attacks. In addition, the RDS security group should be configured to allow connections only from the backend server (this can be more strict by configuring the RDS itself to allow connections only if they were identified by a certificate that exists only on the backend server) and an alert should be defined in Coralogix based on CloudTrail logs that would fire if the security group is modified.

Also, by forwarding the database logs from the RDS instance, an alert should be defined in Coralogix so it would be triggered if the database detects connections from other IPs.

Inbound

Since the traffic volume here should be quite low due to the validations done by the proxies and front-end servers, and due to the fact that this is the last point we can tap into the data before it is saved into the DB we recommend that you mirror all incoming traffic from this server

Rule numberDescriptionRule actionProtocolSource port rangeDestination port rangeSource CIDR blockDestination CIDR block
100Monitor everything *acceptAll protocols0.0.0.0/00.0.0.0/0

DNS server

Since this server generates a very minimal amount of traffic that is so extremely valuable for detecting so many types of attacks we recommend that you mirror all traffic in and out of this server.

Package cache server

Since this server is responsible for packages installations on all other servers, the data from and to this server can answer questions like who installed what when, which can be crucial in a forensic investigation and for detecting installation of malicious tools on the server. Also, the traffic volume from and to this server is expected to be quite low. Therefore, we recommend that you mirror all traffic in and out of this server.

Bastion server

Since this server is serving as the only way to manage all other servers, provided that it is being used to update the code on the various servers, install required packages, etc., the traffic volume should be relatively low and the value of the data it can provide is extremely high and therefore we recommend that you mirror all traffic in and out of this server.

Summary

Just like in any other field of security, there is no real right or wrong here, it’s more a matter of whether or not it is worth the trade-off in particular cases. There are several strategies that can be taken to minimize the overall cost of the AWS traffic monitoring solution and still get acceptable results.

For a list of the most commonly used strategies, check out our traffic mirroring tutorial.

5 Ways Scrum Teams Can Be More Efficient

With progressive delivery, DevOps, scrum, and agile methodologies, the software delivery process has become faster and more collaborative than ever before. Scrum has emerged as a ubiquitous framework for agile collaboration, instilling some basic meetings and roles into a team and enabling them to begin iterating on product increments quickly. However, as scrum teams grow and systems become more complex, it can be difficult to maintain productivity levels in your organization. 

Let’s dive into five ways you can tweak your company’s scrum framework to drive ownership, optimize cloud costs, and overall increased productivity for your team.

1. Product Backlog Optimization

Scrum is an iterative process. Thus, based on feedback from the stakeholders, the product backlog or the list of implementable features gets continually adjusted. Prioritizing and refining tasks on this backlog will ensure that your team delivers the right features to your customers, thus boosting efficiency and morale. 

However, it’s not as easy as it sounds. Each project has multiple stakeholders, and getting them on the same page about feature priority can sometimes prove tricky. That’s why selecting the right product owner and conducting pre-sprint and mid-sprint meetings are essential. 

These meetings help create a shared understanding of the project scope and the final deliverable early. Using prioritization frameworks to categorize features based on value and complexity can also help eliminate the guesswork or biases while deciding priority. 

At the end of each product backlog meeting, document the discussions and send them to the entire team, including stakeholders. That way, as the project progresses, there is less scope for misunderstandings, rework, or missing features. With a refined backlog, you’ll be able to rapidly deliver new changes to your software; however, this gives rise to a new problem.

2. Observability

As software systems become more distributed, there is rarely a single point of failure for applications. Identifying and fixing the broken link in the chain can add hours to the sprint, reducing the team’s overall productivity. Having a solid observability system with log, traces, and metrics monitoring, thus, becomes crucial to improve product quality. 

However, with constant pressure to meet scrum deadlines, it can be challenging to maintain logs and monitor them constantly. That’s precisely where monitoring platforms like Coralogix can help. You can effectively analyze even the most complex of your applications as your security, and log data can be visualized in a single, centralized dashboard. 

Machine learning algorithms in observability platforms continually search for anomalies through this data with an automatic alerting system. Thus, bottlenecks and security issues in a scrum sprint can be identified before they become critical and prioritized accordingly. Collaboration across teams also becomes streamlined as they can access the application analytics data securely without the headache of maintaining an observability stack.

This new information becomes the fuel for continuous improvement within the team. This is brilliant, but just the data alone isn’t enough to drive that change. You need to tap into the most influential meetings in the scrum framework—the retrospective.

3. Efficient Retrospectives

Even though product delivery is usually at the forefront of every scrum meeting, retrospectives are arguably more important as they directly impact both productivity and the quality of the end product.

Retrospectives at the end of the sprint are powerful opportunities to improve workflows and processes. If done right, these can reduce time waste, speed up future projects, and help your team collaborate more efficiently.

During a retrospective, especially if it’s your team’s first one, it is important to set ground rules to allow constructive criticism. Retrospectives are not about taking the blame but rather about solving issues collectively.

To make the retrospective actionable, you can choose a structure for the meetings. For instance, some companies opt for a “Start, Stop, Continue” format where employees can jot down what they think they should start doing, what has been working well and what has not. Another popular format is the “5 Whys,” which encourages team members to introspect and think critically about improving the project workflow.

As sprint retrospectives are relatively regular, sticking to a particular format can get slightly repetitive. Instead, switch things up by changing the time duration of the meeting, retrospective styles, and the mandatory members. No matter which format or style you choose, the key is to engage the entire team.

At the end of a retrospective, document what was discussed and plan to address the positive and negative feedback. This list would help you pick and prioritize the changes that would impact and implement them from the next sprint. Throughout your work, you may find that some of these actions can only be picked up by a specific group of people. This is called a “single point of failure,” and the following tip can solve it.

4.  Cross-Training

Cross-training helps employees upskill themselves, understand the moving parts of a business, and how their work fits in the larger scheme of things. The idea is to train employees on the most critical or base tasks across the organization segment, thus enabling better resource allocation. 

Cross-training has been successful because pairs programming helps boost collaboration and cross-train teams. If there’s an urgent product delivery or one of the team members is not available, others can step in to complete the task. Cross-functional teams can also iterate more quickly than their siloed counterparts as they have the skills to prototype and test minimum viable products within the team rapidly.

However, the key to cross-training is not to overdo it. Having a developer handle the server-side of things or support defects for some time is reasonable, but if it becomes a core part of their day, it wouldn’t fit with their career goals. Cross-functional doesn’t mean that everyone should do everything, but rather help balance work and allocate tasks more efficiently.

When engineers are moving between tech stacks and supporting one another, it does come with a cost. That team will need to think hard about how they work to build the necessary collaborative machinery, such as CI/CD pipelines. These tools, together, form the developer workflow, and with cross-functional teams, an optimal workflow is essential to team success.

5. Workflow Optimization

Manual work and miscommunication cause the most significant drain on a scrum team’s productivity. Choosing the right tools can help cut down this friction and boost process efficiency and sprint velocity. Different tools that can help with workflow optimization include project management tools like Jira, collaboration tools like Slack and Zoom, productivity tools like StayFocused, and data management tools like Google Sheets.

Many project management tools have built-in features specific to agile teams, such as customizable scrum boards, progress reports, and backlog management on simple drag-and-drop interfaces. For example, tools like Trello or Asana help manage and track user stories, improve visibility, and identify blockers effectively through transparent deadlines. 

You can also use automation tools like Zapier and Butler to automate repetitive tasks within platforms like Trello. For example, you can set up rules on Zapier to trigger whenever a particular action is performed. For instance, every time you add a new card on Trello, you can configure it to make a new Drive folder or schedule a meeting. This would cut down unnecessary switching between multiple applications and save man-hours. Thus, with routine tasks automated, the team can focus on more critical areas of product delivery.

It’s also important to keep track of software costs while implementing tools. Keep track of the workflow tools you implement and trim those that don’t lead to a performance increase or are redundant.

Final Thoughts

While scrum itself allows for speed, flexibility, and energy from teams, incorporating these five tips can help your team become even more efficient. However, you should always remember that the Scrum framework is not a one-size-fits-all. Scrum practices that would work in one scenario might be a complete failure in the next one. 

Thus, your scrum implementations should always allow flexibility and experimentation to find the best fit for the team and project. After all, that’s the whole idea behind being agile, isn’t it?

Optimized Security Traffic Mirroring Examples – Part 1

You have to capture everything to investigate security issues thoroughly, right? More often than not, data that at one time was labeled irrelevant and thrown away is found to be the missing piece of the puzzle when investigating a malicious attacker or the source of an information leak.

So, you need to capture every network packet. As ideal as this might be, capturing every packet from every workstation and every server in every branch office is usually impractical and too expensive, especially for larger organizations. 

In this post, we’ll look at an example of a fictional bookstore company and the recommended mirroring strategies for that specific scenario. 

For a list of the most commonly used strategies, check out our traffic mirroring tutorial.

MyBookStore Company

This example represents a simple books store. The frontend servers hold the code for handling customers’ requests for searching and purchasing books, all the system’s data is stored in the database servers. Currently, the throughput to the website is not extremely high but is expected to grow significantly in the upcoming months due to the new year’s sales.

The network diagram above describes a typical network of a SaaS service. It’s a collection of reverse proxies that handle HTTPS encryption and client connections after basic validation, such as URIs paths and sometimes even parameters and HTTP methods. They  then send the HTTP requests as HTTP to the frontend servers, making requests to their backend servers that process the data and update or query the DB servers and return the requested result.

Security groups and public IP configuration

The following table represents the network security measures indicated by the allowed connections in and out of each server shown on the diagram.

Rev Proxy

(With public IP)

FromToServiceStatus
anyanyHTTP/tcpAllow
anyanyHTTPS/tcpAllow
192.168.1.0/24FrontendHTTP/tcpAllow
192.168.1.0/24anyNTP/udpAllow
BastionanySSH/tcpAllow
192.168.1.0/24DNSDNS/udpAllow
192.168.1.0/24Packages CacheHTTP/tcp, HTTPS/tcpAllow

Frontend

(No public IP)

FromToServiceStatus
Rev. Proxy192.168.1.0/24HTTP/tcpAllow
192.168.1.0/24BackendSet of custom portsAllow
192.168.1.0/24anyNTP/udpAllow
Bastion192.168.1.0/24SSH/tcpAllow
192.168.1.0/24DNSDNS/udpAllow
192.168.1.0/24Packages CacheHTTP/tcp, HTTPS/tcpAllow

Backend

(No public IP)

FromToServiceStatus
Frontend192.168.1.0/24Set of custom portsAllow
192.168.1.0/24DBDB PortsAllow
192.168.1.0/24anyNTP/udpAllow
Bastion192.168.1.0/24SSH/tcpAllow
192.168.1.0/24DNSDNS/udpAllow
192.168.1.0/24Packages CacheHTTP/tcp, HTTPS/tcpAllow

DB

(No public IP)

FromToServiceStatus
Backend192.168.1.0/24DB ports/tcpAllow
192.168.1.0/24anyNTP/udpAllow
Bastion192.168.1.0/24SSH/tcpAllow
192.168.1.0/24DNSDNS/udpAllow
192.168.1.0/24Packages CacheHTTP/tcp, HTTPS/tcpAllow

DNS

(No public IP)

FromToServiceStatus
192.168.1.0/24DNSDNS/udpAllow
192.168.1.0/24anyNTP/udpAllow
192.168.1.0/24anyDNS/udpAllow
Bastion192.168.1.0/24SSH/tcpAllow
192.168.1.0/24Packages CacheHTTP/tcp, HTTPS/tcpAllow

Packages Cache

(No public IP)

FromToServiceStatus
192.168.1.0/24anyHTTP/tcp, HTTPS/tcpAllow
192.168.1.0/24anyNTP/udpAllow
192.168.1.0/24anyDNS/udpAllow
Bastion192.168.1.0/24SSH/tcpAllow

Bastion

(With public IP)

FromToServiceStatus
Well defined set of IP addresses192.168.1.0/24SSH/tcpAllow
192.168.1.0/24anyNTP/udpAllow
192.168.1.0/24DNSDNS/udpAllow
192.168.1.0/24Packages CacheHTTP/tcp, HTTPS/tcpAllow

In this setup, the only servers that are exposed to the Internet and expected to be reachable by other servers on the Internet are the proxy servers and the bastion server. All other servers do not have a public IP address assigned to them. 

All DNS queries are expected to be sent to the local DNS server, resolving them against other DNS servers on the Internet.

Package installations and updates for all the servers on this network are expected to be handled against the local packages caching server. So all other servers will not need to access the Internet at all except for time synchronization against public NTP servers.

SSH connections to the servers are expected to happen only via the bastion server and not directly from the Internet.

In this scenario, we would recommend using the following mirroring configuration by server type.

Reverse Proxies

Since these servers are contacted by users from the Internet over a TLS encrypted connection, most of the traffic to it should be on port 443 (HTTPS) and its value to traffic rate ratio is expected to be quite low, we would recommend the following mirror filter configuration:

Outbound

Rule numberDescriptionRule actionProtocolSource port rangeDestination port rangeSource CIDR blockDestination CIDR block
100Monitor everything *acceptAll protocols0.0.0.0/00.0.0.0/0

* Note – Although this rule will also mirror the server’s encrypted responses to the HTTPS requests we do recommend that you mirror it since it might also contain HTTPS connections initiated by malware running on the proxy servers to command and control servers and especially since the traffic volume of the server’s responses is not expected to be extremely high.

Inbound

Rule numberDescriptionRule actionProtocolSource port rangeDestination port rangeSource CIDR blockDestination CIDR block
100Exclude incoming HTTPSrejectTCP4430.0.0.0<your servers subnet>
200Monitor everything elseacceptAll protocols0.0.0.0/00.0.0.0/0

Frontend servers

Since the frontend servers receive the unencrypted traffic they are essentially the first place on the network in which we can detect attacks against the system and therefore their traffic data is very valuable from an information security perspective. 

This is why we believe that you would mirror any traffic from and to these servers. This will, of course, include the valid traffic by the customers. Although this can be extremely valuable for creating a good baseline that can later be used to detect anomalies, it can also be rather expensive for the organization. 

For such cases we would recommend the following mirroring configuration for detecting abnormal behavior of the frontend servers that can indicate a cyberattack that is currently in progress:

Outbound

Rule numberDescriptionRule actionProtocolSource port rangeDestination port rangeSource CIDR blockDestination CIDR block
100Monitor everything *acceptAll protocols0.0.0.0/00.0.0.0/0

* Note – Although this rule will also mirror the server’s responses to the HTTPS requests, we do recommend that you mirror it since it might also contain HTTPS connections initiated by malware running on the proxy servers to command and control servers. Also, this might include unintended responses that will indicate that an attack (such as XSS or SQL Injection) took place.

Inbound

Rule numberDescriptionRule actionProtocolSource port rangeDestination port rangeSource CIDR blockDestination CIDR block
100Exclude incoming HTTPSrejectTCP800.0.0.0/0<your servers subnet>
200Monitor everything elseacceptAll protocols0.0.0.0/00.0.0.0/0

Backend servers

Since the frontend servers are contacting these servers with requests that are supposed to be valid after the checks done by the proxy and frontend servers, the traffic volume is expected to be significantly lower than traffic volume to the proxy and frontend servers.

Also, since this is the last chance to detect malicious traffic before it reaches the database, we believe that all traffic from these servers should be mirrored. However, if this is still too expensive for your organization, we would recommend that you use the following mirroring configuration to at least be able to tell if a backend server is behaving abnormally, which may indicate that it has already been breached:

Outbound

Rule numberDescriptionRule actionProtocolSource port rangeDestination port rangeSource CIDR blockDestination CIDR block
100Monitor everything *acceptAll protocols0.0.0.0/00.0.0.0/0

* Note – Although this rule will also mirror the server’s responses to frontend requests we do recommend that you mirror it since it might also contain HTTPS connections initiated by malware running on the proxy servers to command and control servers. Also, this might include unintended responses that will indicate that an attack (such as XSS or SQL Injection) took place.

Inbound

Rule numberDescriptionRule actionProtocolSource port rangeDestination port rangeSource CIDR blockDestination CIDR block
100Exclude incoming HTTPSrejectTCPSet of custom ports<your servers subnet><your servers subnet>
200Monitor everything elseacceptAll protocols0.0.0.0/00.0.0.0/0

Databases

Since this server is at the heart of the customer’s system, we recommend that you would mirror all traffic in and out of this server.

DNS server

Since this server generates a very minimal amount of traffic that is so extremely valuable for detecting so many types of attacks we recommend that you would mirror all traffic in and out of this server.

Package cache server

Since this server is responsible for packages installations on all other servers, the data from and to this server can answer questions like who installed what and when which can be crucial in a forensic investigation and for detecting installation of malicious tools on the server. Also, the traffic volume from and to this server is expected to be quite low. Therefore, we recommend that you would mirror all traffic in and out of this server.

Bastion server

Since this server is serving as the only way to manage all other servers, provided that it is being used to update the code on the various servers, install required packages, etc., the traffic volume should be relatively low and the value of the data it can provide is extremely high and therefore we recommend that you would mirror all traffic in and out of this server.

Summary

Just like in any other field of security, there is no real right or wrong here, it’s more a matter of whether or not it is worth the trade-off in particular cases. There are several strategies that can be taken to minimize the overall cost of the AWS traffic monitoring solution and still get acceptable results.

For a list of the most commonly used strategies, check out our traffic mirroring tutorial.

JSON Logging: What, Why, How, & Tips

When you’re working with large data sets, having that data structured in a way that means you can use software to process and understand it will enable you to derive insights far more quickly than any manual approach. Logfile data is no exception.

As increasing numbers of organizations embrace the idea that log files can offer far more than an aid to troubleshooting or a regulatory requirement, the importance of log file monitoring and structuring the data in those log files so that it can be extracted, manipulated, and analyzed efficiently is quickly moving up the priority list. In this article, we’re going to explore one of the most popular formats for structuring log files: JSON.

What is JSON?

JSON, or JavaScript Object Notation to give it its full form, is a machine-readable syntax for encoding and exchanging data. Despite the name, you’ll find JSON in use far outside its original realm of web servers and browsers. With all major computing languages supporting it, JSON is one of the most widely used formats for exchanging data in machine-to-machine communications.

One of the advantages of JSON over other data exchange formats, such as XML, is that it’s easy for us humans to both read and write. Unlike XML, JSON doesn’t rely on a complex schema and completely avoids the forest of angle brackets that results from requiring everything to be enclosed within tags. This makes it much easier for first-time users to get started with JSON.

A JSON document is made up of a simple syntax of key-value pairs ordered and nested within arrays. For example, a key called “status” might have values “success,” “warning,” and “error.” Keys are defined within the document and are always quoted, meaning there are no reserved words to avoid, and arrays can be nested to create hierarchies. 

That means you can create whatever keys make sense for your context, and structure them however you need. The keys and how they are nested (the JSON specification) need to be agreed upon between the sender and the recipient, which can then read the file and extract the data as required.

The simplicity and flexibility of JSON make it an ideal candidate for generating structured log statements; log data can be extracted and analyzed programmatically, while the messages remain easy for individuals to understand. JSON logging is supported by all major programming languages, either natively or via libraries.

Benefits of JSON logging

Given that log messages are always generated by software, you might expect that they are always structured and be wondering what JSON can add. While it’s true that log messages will always follow a particular syntax (in accordance with how the software has been programmed to output logs), that syntax could be one long string of characters, multiple lines of obscure codes and statuses, or a series of values delimited by a character of the programmer’s choice.

In order to make sense of these logs, you first need to decipher their syntax and then write logic to parse the messages and extract the data you need. Unfortunately, that logic is often quite brittle, so if something changes in the log format – perhaps a new piece of data is included, or the order of items is changed – then the parser will break. 

If you’re only dealing with logs from a single system that you have control over, that might be manageable. But the reality in many enterprises is that you’re working with multiple systems and services, some developed in-house and others that are open-source or commercial, and all of them are generating log messages.

Those log messages are a potential mine of information that can be used to gain insights into how your systems – and therefore your business – are performing. However, before you can derive those insights, you first need to make sense of the information that is being provided. Writing and maintaining custom logic to parse logs for dozens of pieces of software is no small task. 

That’s where a structured format such as JSON can help. The key-value pairs make it easy to extract specific values and to filter and search across a data set. If new key-value pairs are added, the software parsing the log messages will just ignore those keys it doesn’t expect, rather than failing completely.

Writing logs in JSON format

So what does a log message written in JSON look like? The following is an example log line generated by an Nginx web server and formatted in JSON:

{
"time": "17/May/2015:08:05:24 +0000",
"remote_ip": "31.22.86.126",
"remote_user": "-",
"request": "GET /downloads/product_1 HTTP/1.1",
"response": 304,
"bytes": 0,
"referrer": "-",
"agent": "Debian APT-HTTP/1.3 (0.8.16~exp12ubuntu10.16)"
}

The same data in combined log format would look like this:

31.22.86.126 - - 17/May/2015:08:05:24 +0000 "GET /downloads/product_1 HTTP/1.1" 304 0 "-" "Debian APT-HTTP/1.3 (0.8.16~exp12ubuntu10.16)"

With the JSON format, it’s easy for someone unfamiliar with web server logs to understand what the message contains, as each field is labeled. With a common log format, you need to know what you’re looking at.

Of course, common log format is widely used by web servers, and most log analysis platforms can parse it natively, without further manual configuration. But what about log files generated by other software, such as a custom-built application or third-party software? Looking at this unstructured log file from an iOS application you’d be forgiven for wondering what it’s telling you:

08:51:08 [DataLogger:27]: G L 35.76 +/- 12m <+52.55497710,-0.38856690> +/- 15.27m 0.60

A JSON formatted version of the same log returns:

{
  "eventTime": "08:51:08",
  "source":
      {
      "file": "DataLogger",
      "line": 27
      },
  "eventType": "GPS update",
  "eventData":
{
      "altitude": 35.76,
    "verticalAccuracy": 12,
      "latitude": 52.55497710,
      "longitude": -0.38856690,
      "horizontalAccuracy": 15.27,
      "speed": 0.60
  }
}

With this format, it’s easy to understand the values and see how the fields are related.

JSON logging best practices

Now that we’ve covered the what, why, and how of JSON logging, let’s discuss some tips to help you get the most out of your JSON logs. Most of these apply whether you’re writing software in-house or are using third-party or open-source tools that allow you to configure the format of the logs they output.

Invest time in designing your logs

Just as you wouldn’t jump in and start writing code for the next ticket on the backlog without first thinking through the problem you’re trying to solve and how it fits into the wider solution, it’s important to take the time to design your log format. There is no standard format for JSON logs – just the JSON syntax – so you can decide on a structure to serve your needs.

When defining keys, think about what level of granularity makes sense. For example, do you need a dedicated “error” key, or is it more useful to have a key labeled “message” that is used for any type of message, and another labeled “status” that will record whether the message was an error, warning, or just information? With the latter approach, you can filter log data by status to view only error messages while reducing the number of columns and filter options.

Add log lines as you code

If you’re developing software in-house, make adding log lines as much a part of your code hygiene as writing unit tests. It’s much easier to decide what information would be useful to output, and at what level (for example, is this a critical error or just useful to know when debugging) when you’re writing that particular piece of functionality, than after you’ve finished the development work.

Capture as much detail as possible

When you’re thinking about what data to capture, it’s easy to focus on the parameters you want to be able to filter, sort, and query by, while losing sight of what you might want to learn from your logs when drilling down into more detail. 

Log files provide value on both a macro and micro level: by aggregating and analyzing log files, we can identify patterns of behavior and spot changes that might indicate a problem. Once we know where to look, we can zoom into the individual log files to find out more about what’s going on. This is where capturing as much detail as possible pays dividends.

For application logs, details such as the module name and line number will help you identify the cause of the problem quickly. In the case of server access logs, details such as the requester’s IP, their time zone, logged-in username, and authentication method can be invaluable when investigating a potential security breach.

Keep in mind that not all data needs to be broken down into separate fields; you can create a key to capture more verbose information that you wouldn’t want to filter by, but which is useful when reading individual log messages.

Consistency is king

Being consistent in the way you name keys and the way you record values will help you to analyze logs more efficiently. This applies both within a single piece of software and when designing logs across multiple systems and services. 

For example, using the same set of log levels across applications means you can easily filter by a particular type while being consistent in writing status codes, as either strings or numbers will ensure you can manipulate the data effectively.

Unstructured logs – parsing to JSON

Although structuring logs with JSON offers many advantages, in some cases it’s not possible to output logs in this format. For some third-party software, you may not have the ability to configure the format or content of log messages. 

If you’re dealing with a legacy system plagued with technical debt, the effort involved in updating the logging mechanism might not be justified – particularly if work on a replacement is underway.

When you’re stuck with an existing unstructured log format, the next best thing is to parse those logs into a JSON format after the fact. This involves identifying the individual values within each message (using a regular expression, for example) and mapping them to particular keys. 

Many log analysis platforms allow you to configure rules for parsing unstructured logs to JSON so that they can be processed automatically. You can then analyze the data programmatically alongside your structured log data. Transforming logs to JSON also renders the individual log files more readable to humans, ready for when you want to drill down in more detail.  

JSON log analytics with Coralogix

By structuring your logs in JSON format you can more effectively analyze log files from multiple sources and leverage machine learning techniques to identify trends and anomalies in your data. Because JSON is easy to read, you can still view and understand individual log entries when investigating and troubleshooting issues.

As a log analysis and observability platform, Coralogix automatically extracts fields from your JSON logs so that you can filter, sort, query, and visualize according to your JSON log file viewer. With custom views, you can configure reports based on the fields you’re interested in. For unstructured logs, you can set up log parsing rules to extract values and append the JSON to the log entry, or replace the entire entry with structured JSON, according to your needs. Using the Coralogix log analytics platform you can collate and aggregate logs from multiple sources and use sophisticated data analysis tools to improve your understanding of your systems and unlock valuable insights.

Have You Forgotten About Application-Level Security?

Security is one of the most changeable landscapes in technology at the moment. With innovations, come new threats, and it seems like every week brings news of a major organization succumbing to a cyber attack. We’re seeing innovations like AI-driven threat detection and zero-trust networking continuing to be a huge area of investment. However, security should never be treated as a single plane. 

Here at Coralogix, we’re firm believers that observability is the backbone of good security practice. That’s why, in this piece, we’re going to examine what’s in the arsenal when it comes to protecting your platforms at their core: the application level. 

The cyber-security picture today

Trends in cyber security seem to revolve around two key facets: detection and recovery. Detection, because stopping an attack before it happens is less costly than recovery. Recovery, because there is a certain inevitability associated with cyber-attacks and organizations want to be best prepared for such an eventuality. GDPR logging and monitoring and NIS require disclosure from an organization hit by a cyberattack within 72 hours, so it’s easy to see companies are today focussing on these pillars. 

In terms of attack style, three main types dominate a CISO’s headspace in 2021. These are (in no particular order), supply-chain attacks, insider threats, and ransomware. 

Code-layer security for your application 

It’s fair to say that applications need safe and secure code to run without the threat of compromising other interdependent systems. The SolarWinds cyber attack is a great example of when compromised code had a devastating knock-on effect. Below, we’ll explore how you can boost your security at a code level.

Maintain a repository

Many companies will employ a trusted code repository to ensure that they aren’t shipping any vulnerabilities. You can supercharge the use of a repository by implementing GitOps as a methodology. Not only does this give you ship and roll-back code quickly, but with the Coralogix Kubernetes Operator, you can keep track of these deployments with your observability platform. 

Write secure code

This seems like an obvious suggestion, but it shouldn’t be overlooked. Vulnerabilities in Java code occupy the top spots in the OWASP top 10, so ensure your engineers are well versed in shortcomings around SSL/TLS libraries. While there are tools available which scan your code for the best-known vulnerabilities, they’re no substitute for on-the-ground knowledge. 

Monitor your code

Lack of proper monitoring, alerting, and logging is cited as a key catalyst of application-level security problems. Fortunately, Coralogix has a wide range of integrations for the most popular programming languages so that you can monitor key security events at a code level.

Cloud service security for your application

Public cloud provides a range of benefits that organizations look to capitalize on. However, the public cloud arena brings its own additional set of application security considerations.

Serverless Monitoring

In a 2019 survey, 40% of respondents indicated that they had adopted a serverless architecture. Function as a Service (FaaS) applications have certainly brought huge benefits for organizations, but also bring a new set of challenges. On AWS, the FaaS offerings are Lambda and S3 (which is stateful backend storage for Lambda). The Internet is littered with examples of security incidents directly related to S3 security problems, most famously Capital One’s insider threat fiasco. This is where tools like Coralogix’s Cloudwatch integration can be useful, allowing you to monitor changes in roles and permissions in your Coralogix dashboard. Coralogix also offers direct integration with AWS via its Serverless Application Repository, for all your serverless security monitoring needs. 

Edge Computing

Edge computing is one of the newer benefits realized by cloud computing. It greatly reduces the amount of data in flight, which is good for security. However, it also relies on a network of endpoint devices for processing. There are numerous considerations for security logging and monitoring when it comes to IoT or edge computing. A big problem with monitoring these environments is the sheer amount of data generated and how to manage it. Using an AI-powered tool, like Loggregation, to help you keep on top of logging outputs is a great way of streamlining your security monitoring.

Container security for your application 

If you have a containerized environment, then you’re probably aware of the complexity of managing its security. While there are numerous general containerized environment security considerations, we’re going to examine the one most relevant to application-level security.

Runtime Security

Runtime security for containers refers to the security approach for when the container is deployed. Successful container runtime security is heavily reliant on an effective container monitoring and observability strategy. 

Runtime security is also about examining internal network traffic, instead of just relying on traditional firewalling. You also have to monitor the orchestration platforms (for example Kubernetes or Istio) to make sure you don’t have vulnerabilities there. Coralogix provides lots of different Kubernetes integrations, including Helm charts, to give you that vital level of granular observability.

What’s the big deal?

With many organizations being increasingly troubled by cyberattacks, it’s important to make sure that security focus isn’t just on the outer layer, for example, firewalls. In this article, we’ve highlighted steps you can take to effectively monitor your applications and their components to increase your system security, from the inside out. 

What’s the biggest takeaway from this, then? Well, you can monitor your code security, cloud services, and container runtime. But don’t ever do it in isolation. Coralogix gives you the ability to overlay and contextualize this data with other helpful metrics, like firewalls, to keep your vital applications secure and healthy. 

Comparing REST and GraphQL Monitoring Techniques

Maintaining an endpoint, especially a customer-facing one, requires constant log monitoring, whether using REST or GraphQL. As the industry has looked for solutions to build a more adaptive endpoint technology, it is also a must to monitor these endpoints. GraphQL and REST are two different technologies that allow user-facing clients to link to databases and platform logic. Both GraphQL and REST include monitoring techniques. Here, we will compare enterprise monitoring an endpoint using AWS API Gateway backed by a REST or GraphQL.

REST and GraphQL Monitoring Architecture

The architecture of a GraphQL versus a REST endpoint is fundamentally different. The architecture gives different locations available for monitoring your solution. Both RESTful and GraphQL systems are stateless, meaning the server and client do not need to know what state the other is in for interactions. Both RESTful and GraphQL systems also separate the client from the server. Either architecture can modify the server or client without affecting operations of the other as long as the format of the requests on the endpoint(s) remain consistent.  

GraphQL Monitoring and Server Architecture

GraphQL uses a single endpoint and allows users to select what portion of the available returned data is required, making it more flexible for developers to integrate and update. GraphQL endpoints include these components:

  1. A single HTTP endpoint
  2. A schema that defines data types
  3. An engine that uses the schema to route inputs to resolvers
  4. Resolvers process the inputs and interact with resources. 

Developers can place GraphQL Monitoring in any of several locations. Monitoring the HTTP endpoint itself will reveal all the traffic hitting the GraphQL server. Developers can monitor the GraphQL server where the server routes data from the endpoint to a specific resolver. Each resolver, query or mutation, can have monitoring implemented.  

REST Monitoring and Server Architecture

RESTful architecture is similar in components to GraphQL but requires a very different and more strict setup. REST is a paradigm for how to set up an endpoint following some relatively strict rules. Many endpoints exist claiming to be REST, but they do not precisely follow these rules. Endpoints that do not conform to the rules are better defined as HTTP APIs. REST is robust but inflexible in its capabilities since each endpoint requires its own design and building. It is up to the developers to design their endpoints as needed, but many believe only endpoints following these rules should be labeled as REST.

Designing a RESTful API includes defining the resources that will be made accessible using HTTP, identifying all resources with URLs (or resources), and mapping CRUD operations to standard HTTP methods. CRUD operations (create, retrieve, update, delete) are mapped to POST, GET, PUT, and DELETE methods, respectively.

Each RESTful URL expects to receive specific inputs and will return results based on those inputs. Inputs and outputs of each resource are set and known by both client and server to interact. 

Monitoring on RESTful APIs has some similarities to GraphQL. Developers can set up monitoring on the API endpoints directly. Monitoring may be averaged across all endpoints with the same base URL or broken up for each specific resource. When developers use compute functions between the database and the endpoint, developers can monitor these functions as well. If using AWS monitoring, it is common to use Lambda to power API endpoints. 

REST and GraphQL Error Monitoring

REST Error Format

RESTful APIs use well-defined HTTP status codes to signify errors. When a client makes a request, the server notifies the client if the request was successfully handled. A status code is returned with all request results, signifying what kind of error has occurred or what server response the client should expect. HTTP includes a few categories of status codes. These include 200 level (success), 400 level (client errors), and 500 level (server errors).

Errors can be caught in several places and monitored for RESTful endpoints. The API itself may be able to monitor the status codes and provide metrics for which codes are returned and how often. Logs from computing functions behind the endpoint can also be used to help troubleshoot error codes. Logs can be sent to third-party tools like Coralogix’s log analytics platform to help alert developers of systemic issues.

GraphQL Error Format

GraphQL monitoring looks at server responses to determine if an issue has arisen. Errors returned are categorized based on the error source. GraphQL’s model combines errors with data. So, when the server cannot retrieve some data, the server will return all available data and append an error when appropriate. The return format for GraphQL resolvers is shown below:

The Apollo server library allows developers to use internally generated syntax and validation errors that are applied automatically. Developers can also define custom error logic in resolvers so errors can be handled gracefully by the client.

A typical HTTP error can still be seen when there is an error in the API endpoint in front of a GraphQL server. For example, if the client was not authorized to interact with the GraphQL server, a 401 error is returned in the HTTP format. 

Monitoring errors in a GraphQL endpoint is more complex than Restful APIs. The status codes returned tend towards success (200) since any data that is found is returned. Error messages are secondary if only parts of the data needed are missing. Errors could instead be logged in the compute function behind the GraphQL server. If this is the case, CloudWatch log analytics would be helpful to track the errors. Custom metrics can be configured to differentiate errors. Developers can use third-party tools like Coralogix’s log analytics platform to analyze GraphQL logs and automatically find the causes of errors.

AWS API Gateway Monitoring

Developers could use many tools to host a cloud server. AWS, Azure, and many third-party companies accommodate API management tools that accommodate either RESTful or GraphQL architecture. Amazon’s API Gateway tool allows developers to build, manage, and maintain their endpoints.

API Gateway is backed by AWS’s monitoring tools, including but not limited to CloudWatch CloudTrail, and Kinesis. 

GraphQL Monitoring using CloudWatch API integration

The API Gateway Dashboard page includes some high-level graphs. These all allow developers to check how their APIs are currently functioning. Graphs include the number of API calls over time, both latency and integration latency over time, and different returned errors (both 4xx and 5xx errors over time). While these graphs are helpful to see the overall health of an endpoint, they do little else to help determine the actual issue and fix it. 

In CloudWatch, users can get a more clear picture of which APIs are failing using CloudWatch metrics. The same graphs in the API Dashboard shown above are available for each method (GET, POST, PUT, etc.) and each endpoint resource. Developers can use these metrics to understand which APIs are causing issues, so troubleshooting and optimization can be focussed on specific APIs. Metrics may be sent to other systems like Coralogix’s scalable metrics platform for alerting and analysis.

Since RESTful endpoints have different resources defined for each unique need, these separate graphs help find where problems are in the server. For example, if a single endpoint has high latency, it would bring up the average latency for the entire API. That endpoint can be isolated using the resource-specific graphs and fixed after checking other logs. With GraphQL endpoints, these resource-specific graphs are less valuable since GraphQL uses a single endpoint to access all endpoint data. So, while the graphs show an increased latency, users cannot know which resolvers are to blame for the problem.

Differences in Endpoint Traffic Monitoring

GraphQL and REST use fundamentally different techniques to get data for a client. Differences in how traffic is routed and handled highlight differences in how monitoring can be applied. 

Caching

Caching data allows for reducing the traffic requirements of your endpoint. The HTTP specification used by RESTful APIs has caching requirements. Different endpoints can set up caching based on which path semantics are used. Servers can cache GET requests according to HTTP. However, since GraphQL uses a single POST endpoint, these defined specifications do not apply to GraphQL. It is up to developers to implement caching for non-mutable (query) endpoints. It is also critical that developers implement their requirements to separate mutable (mutation) and non-mutable (query) functions on their GraphQL server. 

Resource Fetching 

REST APIs typically require data chaining to get a complete data set. Clients first retrieve data about a user, then can retrieve other vital data subsequently using different calls. By design, REST endpoints are generally split to get data separately and point to different, single resources or databases. GraphQL, on the other hand, was designed to have a single endpoint that can point at many resources. So, clients can retrieve more data with a single query. GraphQL endpoints tend to require less traffic. This fundamental difference emphasizes the importance of traffic monitoring on REST endpoints over that need in GraphQL servers.

Summary

GraphQL uses a single HTTP endpoint for all functions and allows different requests to route to the appropriate location in the GraphQL server. Monitoring these endpoints can be more difficult since only a single endpoint is used. Log analytics plays a vital role in troubleshooting GraphQL endpoints because GraphQL monitoring is a uniquely tricky challenge.

RESTful endpoints use HTTP endpoints for each available request. Each request will return an appropriate status code and message based on whether the request was successful or not. Status codes can be used to monitor the health of the system and logs used to troubleshoot when functionality is not as expected. 

Third-party metrics tools can be used to monitor and alert on RESTful endpoints using status codes. Log analytics tools will help developers isolate and repair issues in both GraphQL and RESTful endpoints.